Goal Kick Build-Up Play: Structured Possession from the Back
Master a systematic, three-phase goal kick build-up structure that transforms restarts into controlled possession sequences, bypasses the opposition press, and launches your team into dangerous attacking positions.
Equipment Needed
Overview
The goal kick is one of the most frequently occurring restarts in football — occurring on average 10–15 times per match — yet it remains one of the most underutilised opportunities for teams to establish possession and dictate tempo. A well-rehearsed goal kick build-up play allows your team to recycle possession under pressure, stretch the opposition's defensive block, and create numerical advantages in key areas of the pitch before the ball even reaches the middle third.
This set play is designed for teams operating in a 4-3-3 formation but the principles are transferable to any system that prioritises playing out from the back. It is most effective when the opposition is pressing high, when your team needs to reset after sustained pressure, or when you want to control the game's rhythm in the final 20 minutes of a tight match.
Tactical Principle: "Possession from a goal kick is not a gift — it is a decision. Every player must know their role before the ball is placed."
Setup
Equipment Required
| Item | Quantity | Purpose |
|---|---|---|
| Full-size footballs | 6–8 | Multiple balls for flow drills |
| Bibs (2 colours) | 11 + 6 | Differentiate teams and press units |
| Cones (flat discs) | 20 | Mark zones and player start positions |
| Portable goals or poles | 2 | Define target areas in progression drills |
| Coaching board / tablet | 1 | Demonstrate shape before live reps |
Pitch Setup
Use a full-size pitch (100–110m × 64–75m) for the main shape work. Divide the pitch into three horizontal zones using flat cones:
- Defensive Third (0–35m from goal): The "Build Zone" — where the initial structure is established.
- Middle Third (35–70m): The "Transition Zone" — where the ball must be progressed through or around the press.
- Attacking Third (70–110m): The "Press Zone" — where the opposition will attempt to win the ball back.
For the initial training phase, use a 40m × 50m grid to rehearse the short-pass structure before moving to the full pitch.
Starting Player Positions (4-3-3)
| # | Position | Starting Location |
|---|---|---|
| 1 | GK | Goal area line, centre |
| 2 | RB | Right flank, 20–25m from goal |
| 3 | LB | Left flank, 20–25m from goal |
| 5 | CB-L | Left of penalty area, 15m from goal |
| 6 | CB-R | Right of penalty area, 15m from goal |
| 4 | CDM | Central, 28–32m from goal (dropping option) |
| 8 | CM-L | Left of centre, 40–45m from goal |
| 10 | CM-R | Right of centre, 40–45m from goal |
| 7 | RW | Wide right, 50–55m from goal |
| 11 | LW | Wide left, 50–55m from goal |
| 9 | ST | Centre, 50–55m from goal (stretching the line) |
Step-by-Step Instructions
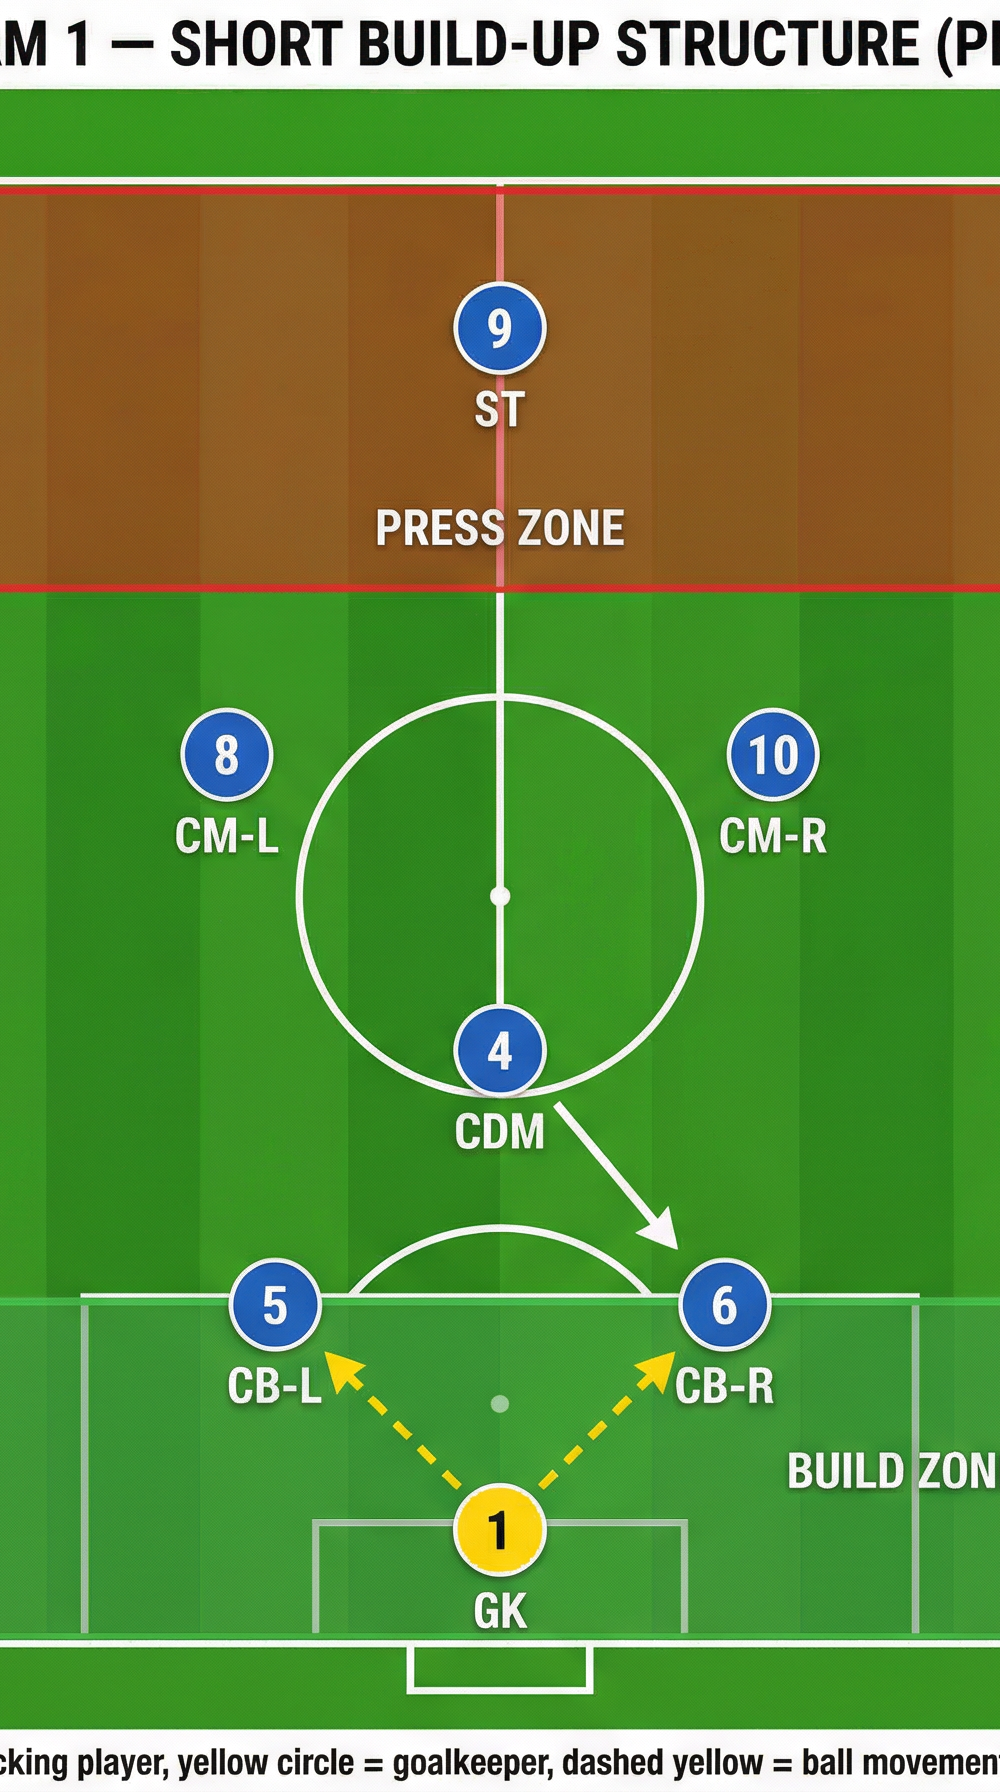
Phase 1 — Setting the Structure (Pre-Kick)
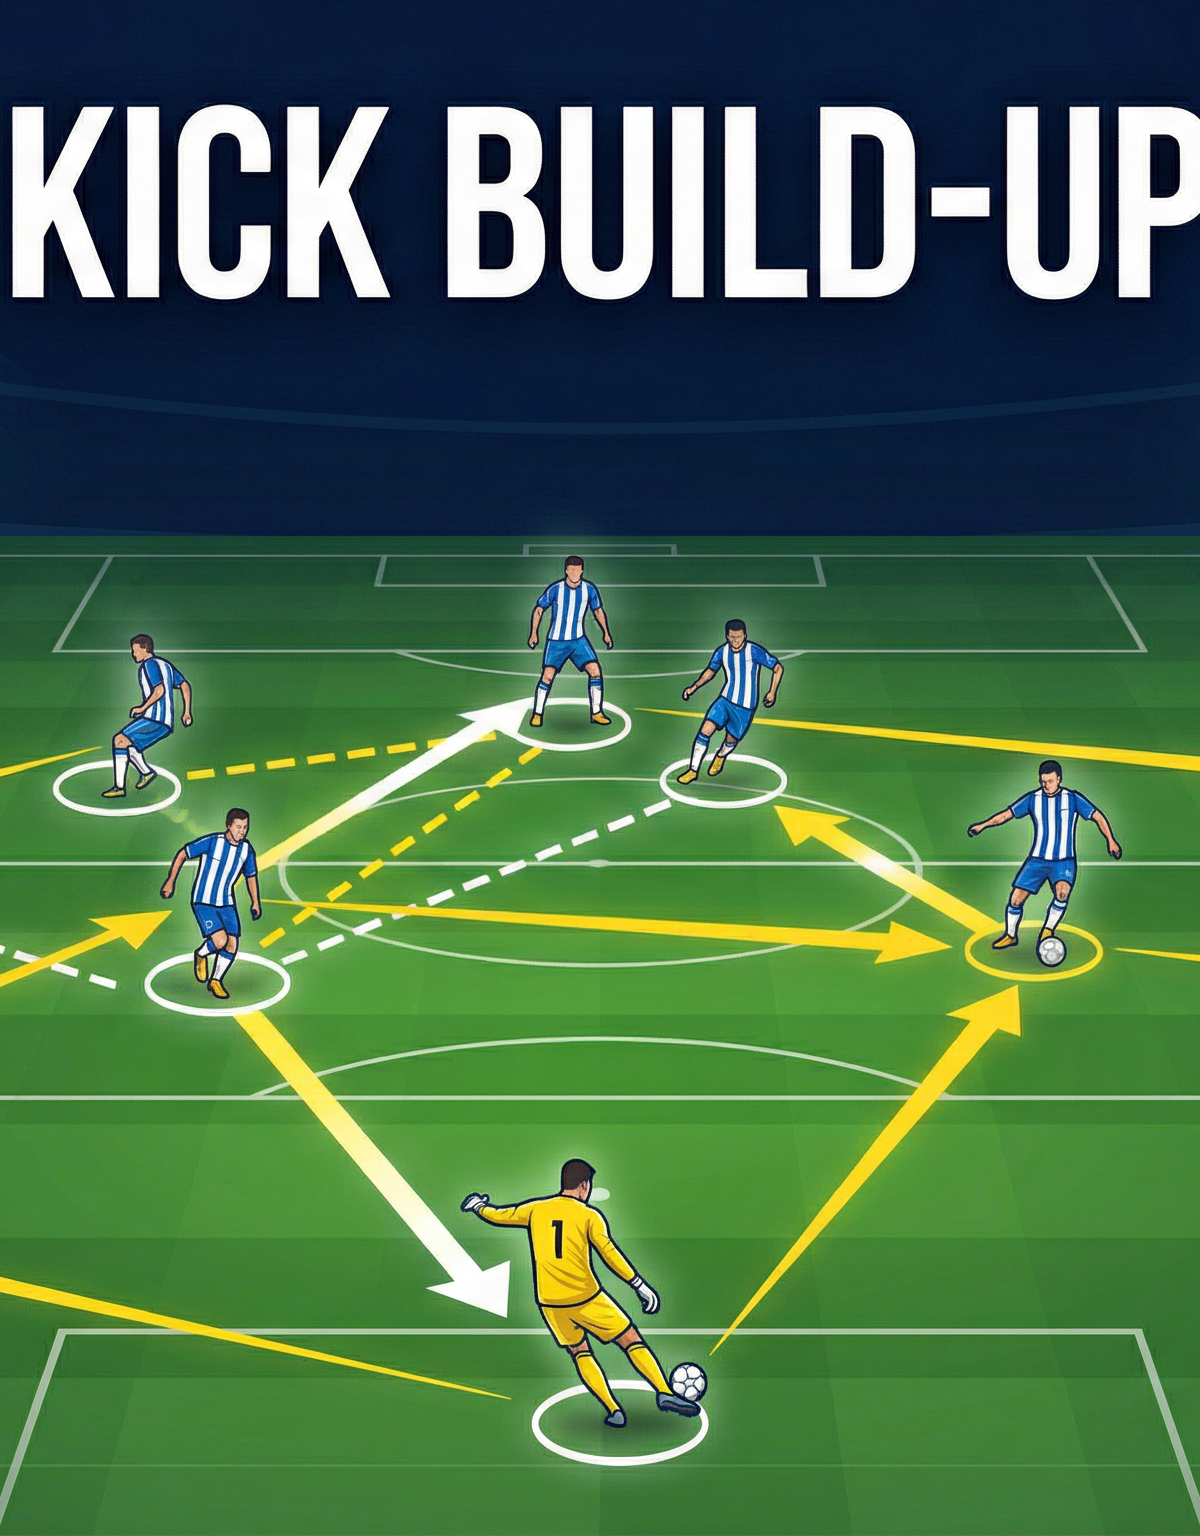
Step 1. Before the GK places the ball, all outfield players must be in their designated starting positions. The GK scans the pitch and identifies which side has the most space — this determines the direction of the first pass.
Step 2. CB-L (5) and CB-R (6) split to the edges of the penalty area, approximately 12–15m apart. They must be on the same horizontal line to provide two clear short options for the GK.
Step 3. CDM (4) makes a deliberate dropping run toward the GK, arriving at a position between the two centre-backs (approximately 28–30m from goal). This creates a central triangle and a third short option.
Step 4. LB (3) and RB (2) push wide to the touchline at 25–30m from goal, stretching the opposition's press horizontally. They must stay behind the ball line until the kick is taken.
Step 5. The front five (8, 10, 7, 11, 9) hold their positions in the middle and attacking thirds to pin the opposition's defensive and midfield lines deep, preventing them from compressing the build zone.
Phase 2 — First Pass and Progression

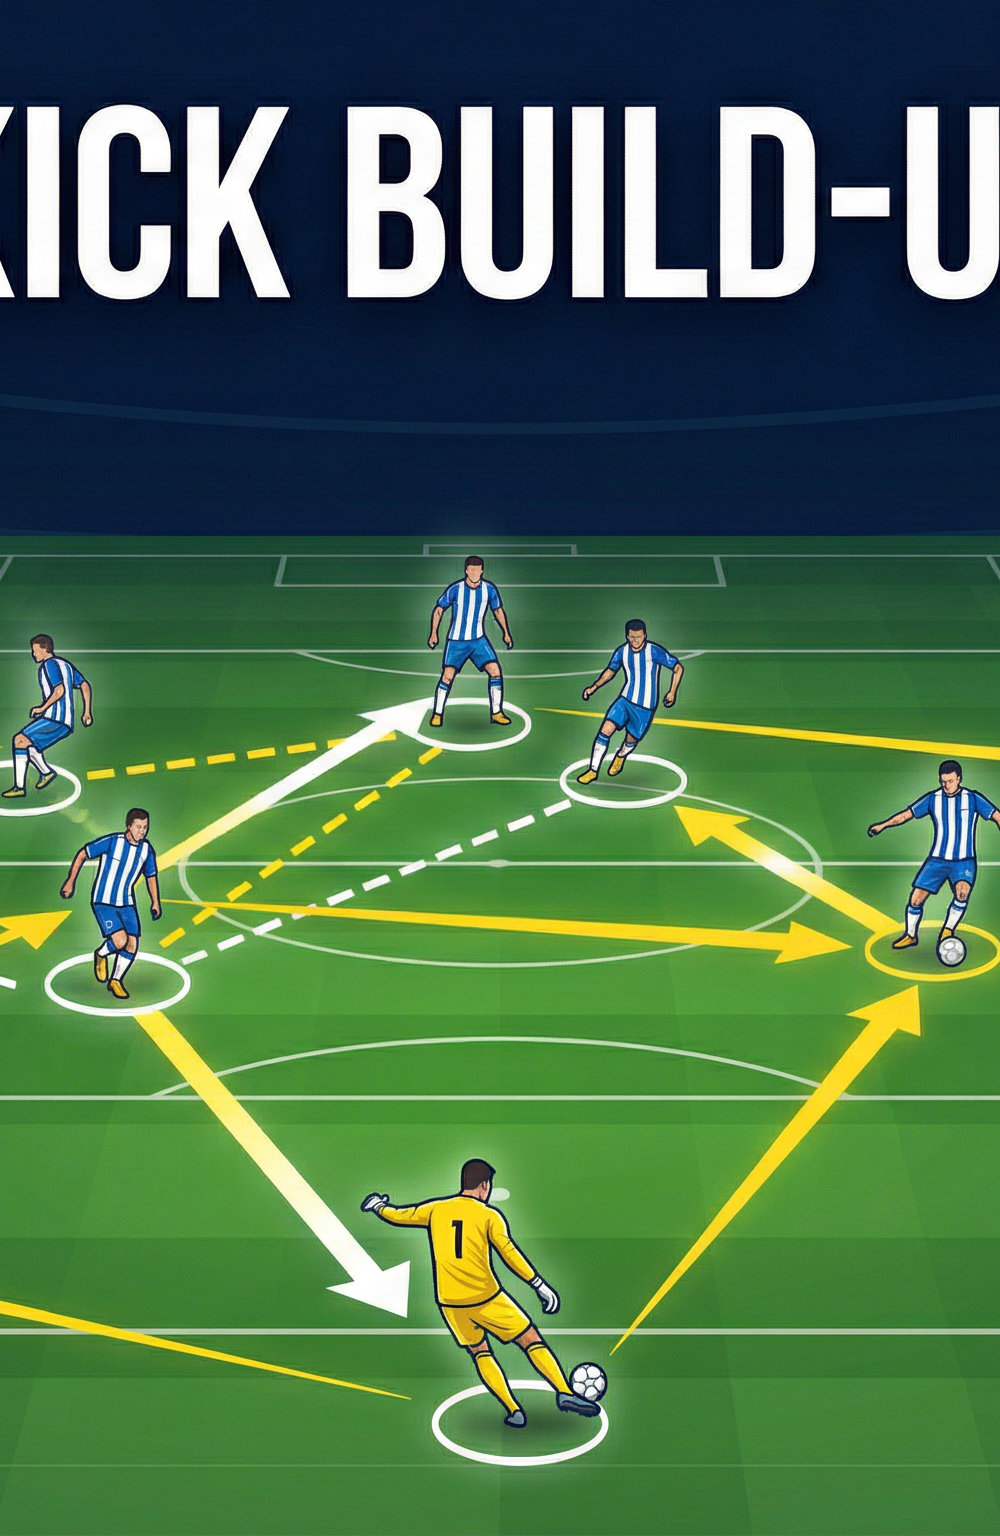
Step 6. GK plays a firm, accurate short pass (10–15m) to the more comfortable centre-back — typically the one with more space. The ball must be played to the receiving foot (the foot furthest from pressure).
Step 7. The receiving CB (e.g., CB-R, #6) immediately scans for the next option. The priority order is:
- Option A: Short pass to CDM (4) if he is free and facing forward.
- Option B: Switch to CB-L (5) to change the point of attack.
- Option C: Diagonal pass to RB (2) who has pushed into the wide channel.
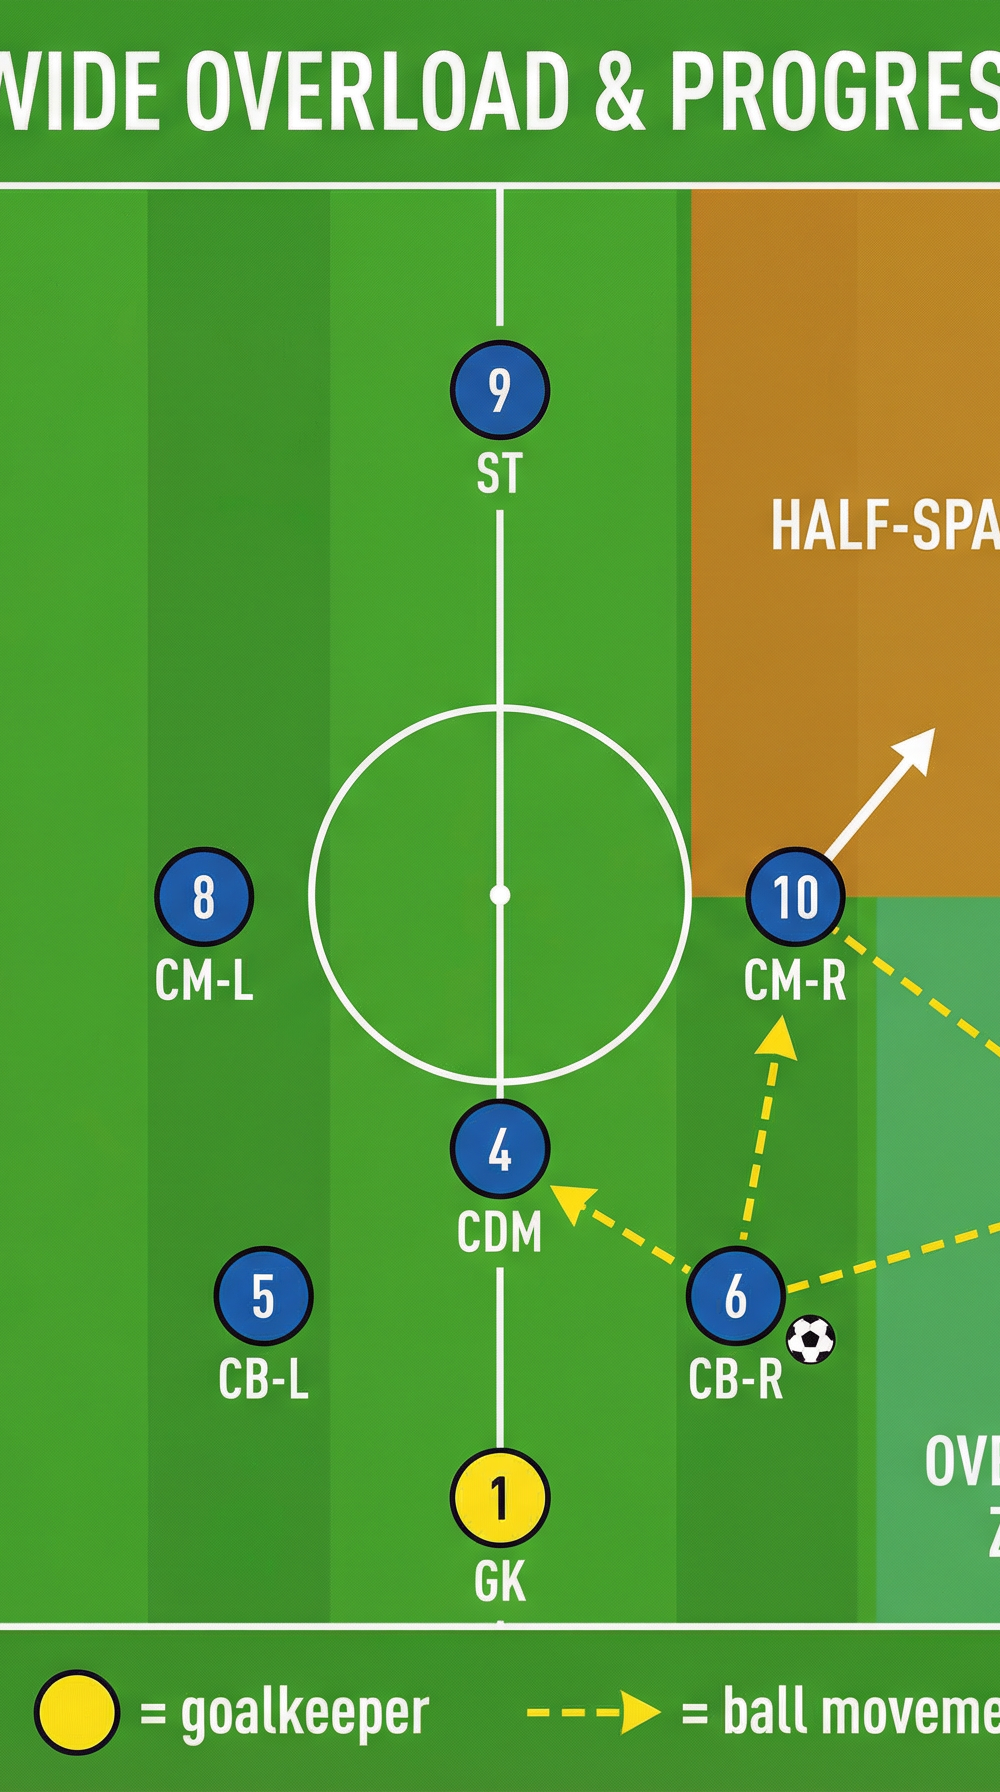
Step 8. Once the ball reaches the full-back (RB or LB), the corresponding winger (RW or LW) tucks inside to create a 2v1 overload in the wide channel with the full-back. The CDM drops to provide a back-pass option and maintain the triangle.
Step 9. The CM on the ball-side (10 or 8) makes a diagonal forward run into the half-space to receive the next pass and turn to face goal. This is the key moment of progression — the ball has now bypassed the first line of press.
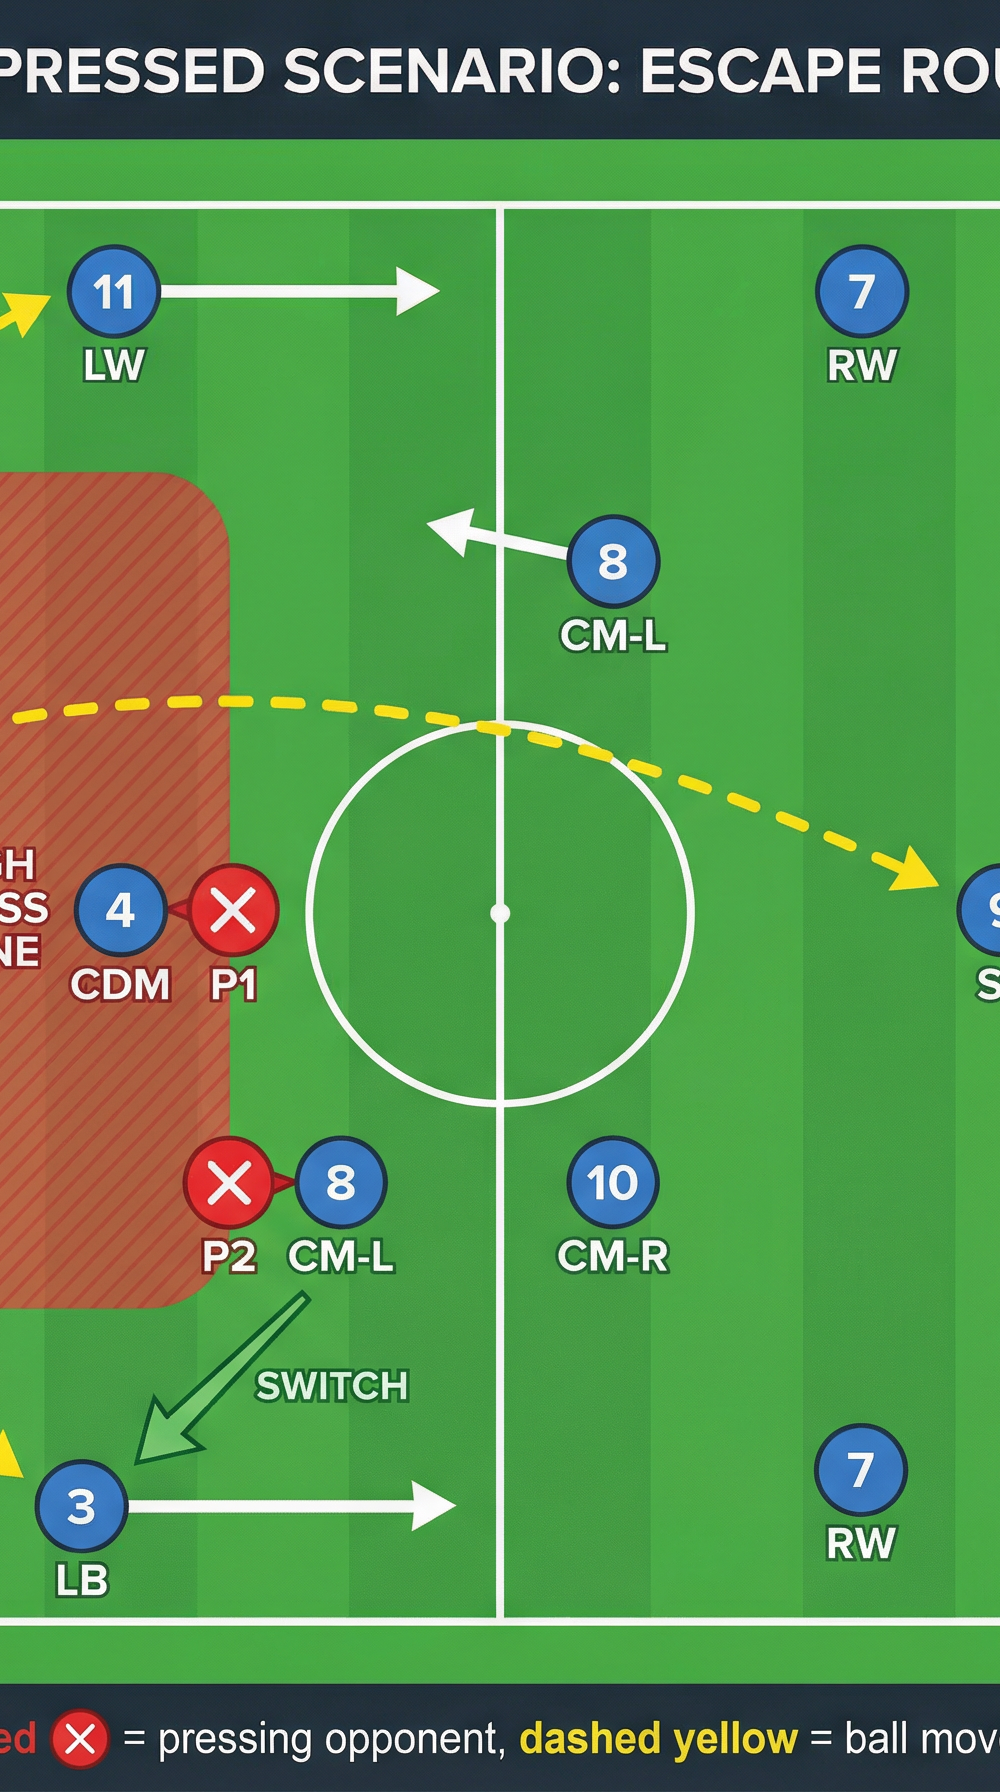
Phase 3 — Escape Routes Under Pressure

Step 10. If the opposition presses aggressively and closes down all short options, the GK must recognise this before taking the kick. The trigger is: if two or more opposition players are within 10m of the intended first receiver.
Step 11. In the pressed scenario, two escape routes are available:
- Route A — Direct Ball: GK plays a driven, diagonal long ball (50–60m) to ST (9) who has made a run in behind the opposition's defensive line. ST must check his shoulder and time the run to stay onside.
- Route B — Switch Play: CB-L (5) or CB-R (6) receives the short pass and immediately plays a long diagonal switch (35–40m) to the opposite full-back (LB or RB) who is in acres of space on the far touchline.
Step 12. After executing the escape route, the team transitions immediately into their standard attacking shape, with midfielders pushing forward to support the ball carrier.
Key Coaching Points
The GK is the Quarterback. The goalkeeper must be vocal and decisive. Before placing the ball, they should point to the intended first receiver and call a code word (e.g., "LEFT" or "RIGHT") to communicate the direction of play. Train your GK to read the press, not just execute the kick.
Angles and Distance Matter. Receiving players must position themselves at a 45-degree angle to the GK, not directly in front. This makes the pass easier to play and allows the receiver to open their body and play forward immediately. The ideal receiving distance is 12–18m from the GK.
The CDM's Drop is Non-Negotiable. The CDM (4) dropping between the centre-backs is the cornerstone of this system. Without it, the team has only two short options and the opposition can press man-for-man. The CDM's movement creates a 3v2 or 3v3 in the build zone.
Wide Players Must Pin Defenders. The wingers (7 and 11) and striker (9) must stay high and wide during Phase 1 and Phase 2. If they drop to help, they compress the space the build-up is trying to exploit. Their job is to occupy the opposition's defensive line, not to receive the ball in the build zone.
First Touch Sets the Tempo. Every player who receives the ball in the build zone must take a positive first touch away from pressure — typically across the body and slightly forward. A heavy or backwards first touch invites the press and eliminates options.
Communicate the Trigger for the Long Ball. Players must have a shared understanding of when to abandon the short build-up. Establish a clear trigger (e.g., "if the CDM is marked, go long") and rehearse it in training so the decision is automatic under match pressure.
Common Mistakes

1. The GK Plays Too Slowly. Taking more than 4–5 seconds to play the kick gives the opposition time to set their press. Emphasise urgency: once the GK has scanned and made a decision, the ball must be played within 2 seconds. Drill this with a countdown in training.
2. Receivers Standing Still. Players who stand flat-footed waiting for the ball are easy to press. Every receiver must be moving onto the ball — a short check-run away from the GK followed by a sharp movement toward the pass creates separation from the marker and makes the pass easier to play.
3. Playing Through the Press Instead of Around It. When the opposition is pressing high, teams often try to force the short pass anyway, leading to turnovers in dangerous areas. Reinforce the trigger for the long ball and reward players who make the correct decision to go direct, even if the long ball is not retained.
4. Full-Backs Pushing Too High Too Early. If LB (3) and RB (2) push beyond 30m before the kick is taken, they can be caught in advanced positions if possession is lost. Full-backs must wait until the ball is played before making their forward runs.
5. Midfielders Dropping Too Deep. CM-L (8) and CM-R (10) sometimes drop into the defensive third to help, which congests the build zone and eliminates the forward passing option. Midfielders must stay in the middle third and be available as the progression target, not the safety valve.
Variations & Progressions

Variation 1 — Inverted Full-Back Build-Up
Instead of LB (3) and RB (2) pushing wide, instruct them to invert into central midfield positions during the build-up. This creates a back-three shape (CB-L, CDM, CB-R) with two central midfielders ahead of them, overloading the central corridor. The wingers then have the entire wide channel to themselves, creating 1v1 opportunities against the opposition's wide midfielders.
Variation 2 — GK as an Outfield Player
In this variation, after playing the short pass, the GK steps out of the penalty area to act as an additional outfield player in the build zone. This creates a 4v3 numerical advantage in the defensive third and gives the team an extra passing option. This is particularly effective against a 3-man press. Note: the GK must be confident with their feet and the team must be organised to cover the empty goal.
Progression — Add a Live Press Unit
Once the team has mastered the shape in a shadow play (unopposed), introduce a 4-player press unit (representing the opposition's front four) who press aggressively from the moment the ball is placed. The build-up team must read the press and choose between the short build-up (Phase 1/2) or the escape routes (Phase 3). Score points: 1 point for successfully progressing the ball to the middle third, 2 points for reaching the attacking third.
Age Adaptations

| Age Group | Key Modifications |
|---|---|
| Under 10–12 | Reduce to a 7v7 or 9v9 format. Use a smaller pitch (60m × 40m). Focus only on Phase 1 (GK to CB short pass). Remove the CDM dropping role — keep it simple with just two CB options. Allow the GK to use their hands to roll the ball out. |
| Under 14–16 | Introduce Phase 2 (wide overload) once Phase 1 is consistent. Add one passive presser to create decision-making pressure. Introduce the concept of the CDM dropping. Focus on body shape and first touch quality. |
| Open/Senior | Run the full three-phase system with a live press. Introduce coded calls ("LEFT", "RIGHT", "LONG") for the GK. Add the inverted full-back variation. Measure success with KPIs: % of goal kicks retaining possession past the halfway line. |
Coach's Note: Regardless of age group, the non-negotiable principle is scanning before receiving. Every player, at every level, must check their shoulder before the ball arrives. Build this habit from the youngest age groups and it will pay dividends throughout a player's career.