High Press Play: Dominating from the Front Three
Master the art of the high press with your front three, forcing turnovers in dangerous areas and disrupting the opponent's build-up play.

Equipment Needed
1. Overview
The high press from the front three is a proactive defensive strategy designed to disrupt the opponent's build-up play right from their goalkeeper or centre-backs. By committing your striker (9) and wingers (7 and 11) high up the pitch, you aim to force errors, win the ball back in dangerous areas, and immediately transition into a goal-scoring opportunity. This tactic is highly effective against teams that insist on playing out from the back, as it denies them the time and space required to execute clean passes.
When executed correctly, the high press not only prevents the opposition from establishing a rhythm but also sets the tempo for your team, demonstrating aggressive intent and controlling the game's territory. It requires high levels of fitness, coordination, and tactical understanding from the entire team, not just the front three, as the midfield and defense must push up to maintain compactness and eliminate passing options.
2. Setup
Pitch Setup: Use a full standard pitch (100-110m x 64-75m) or mark out a 70m x 60m area if focusing solely on the pressing phase without a full-field transition.
Equipment Needed:
- 1 full-size goal
- 2 mini-goals or target zones near the halfway line for the defending team to score in (simulating a successful breakout)
- Minimum 10 footballs placed near the main goal to maintain drill intensity
- Cones to mark the 'Press Zone' (the final third of the pitch)
- Bibs in two contrasting colours (e.g., Red for the pressing team, Blue for the building team)
Player Positions:
- Pressing Team (Red): Set up in a 4-3-3 formation. The focus is on the front three: Striker (9), Right Winger (7), and Left Winger (11). They are supported by two advanced central midfielders (8 and 10) and a holding midfielder (6).
- Building Team (Blue): Set up in a 4-3-3 or 4-2-3-1 shape, starting with the Goalkeeper (GK), two Centre-Backs (CB1, CB2), and two Fullbacks (RB, LB).
3. Step-by-Step Instructions
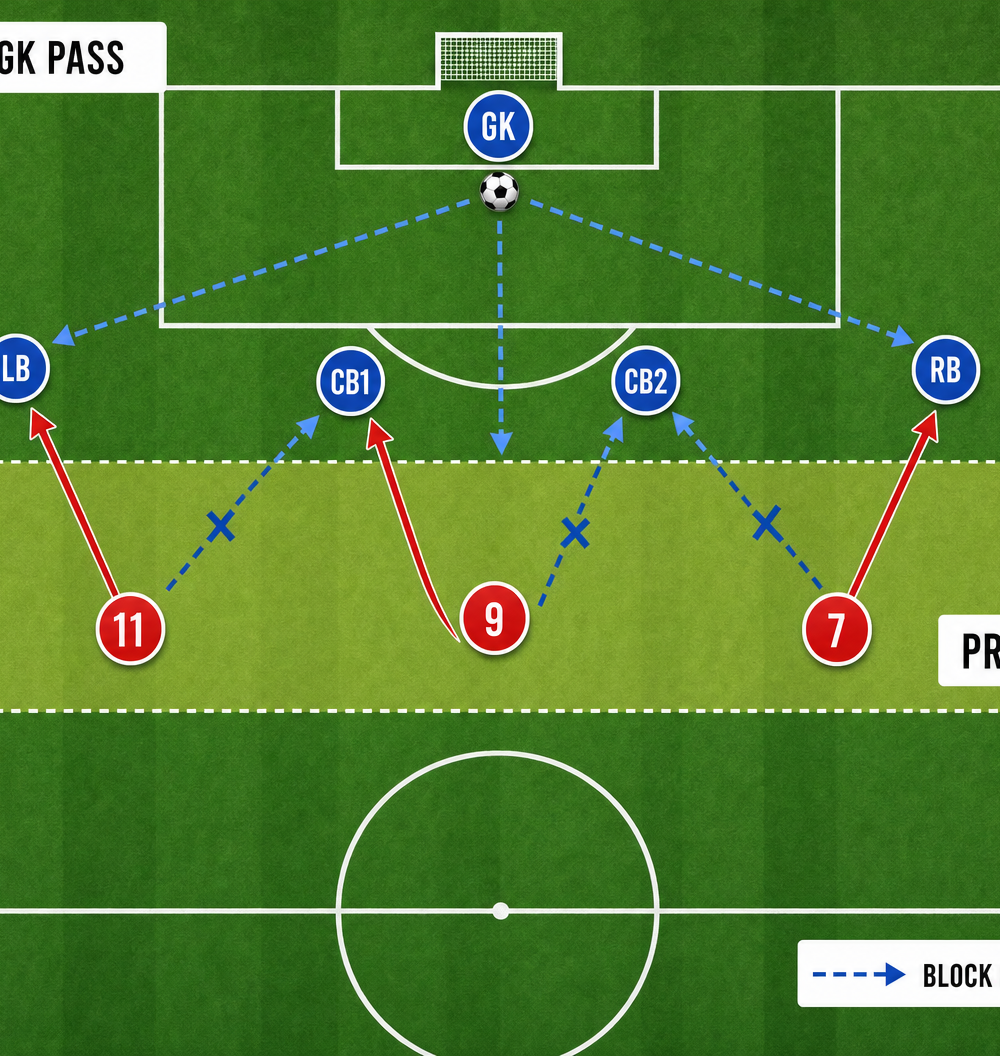
- The Trigger: The play begins when the opposing Goalkeeper plays a short pass to one of the Centre-Backs (e.g., CB1). This pass is the universal trigger for the press to commence.
- The Striker's Run: The Striker (9) immediately sprints towards CB1. The run must be angled to block the passing lane back to the Goalkeeper or across to the other Centre-Back (CB2), forcing CB1 to look wide or play a risky forward pass.
- The Wingers' Positioning: Simultaneously, the Right Winger (7) and Left Winger (11) push high. The winger on the ball side aggressively closes down the fullback. The opposite winger tucks inside slightly to maintain compactness and cut off diagonal switches.
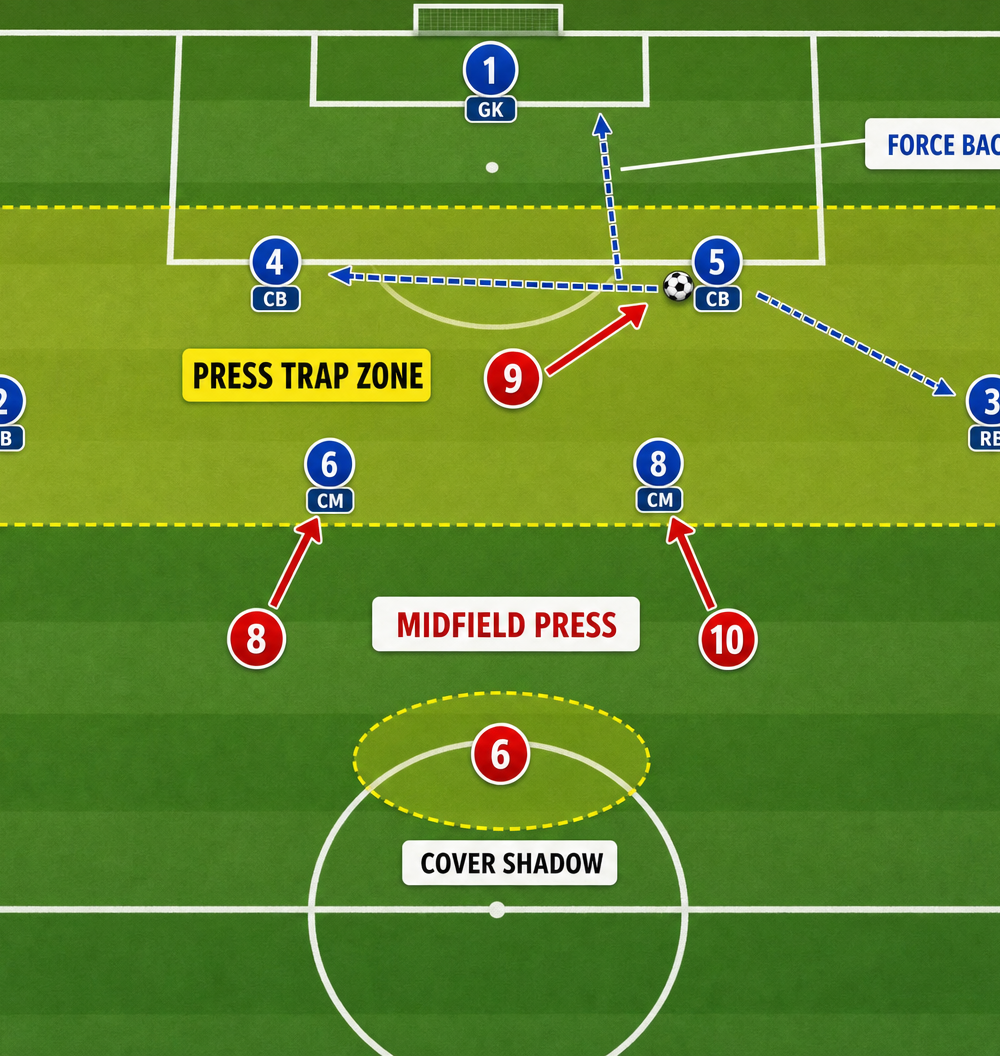
- Midfield Support: As the front three engage, the central midfielders (8 and 10) must step up tightly onto the opposition's central midfielders, denying any short, central passing options. The holding midfielder (6) provides cover, anticipating long clearances.
- The Trap: The goal is to force the ball into a wide area (to the fullback) or force a rushed, inaccurate pass. Once the ball is played to the fullback, the winger, striker, and nearest central midfielder swarm the player, creating a numerical advantage to win the ball.
- Transition: Upon winning the ball, the team must immediately look to exploit the disorganized defense, aiming to get a shot on goal within 3-5 seconds.
4. Key Coaching Points
- Curved Runs: Attackers must use curved runs to cut off passing lanes while pressing the ball carrier. A straight run allows the defender to easily pass around the press.
- Aggressive but Controlled: The press must be intense, but players must arrive balanced, ready to react if the defender attempts to dribble past them.
- Compactness: The distance between the forward line and the midfield line must remain tight (no more than 10-15 meters). If the forwards press but the midfield drops, the opponent will easily play through the lines.
- Communication: The trigger to press must be clear, often initiated by the Striker or a designated pressing leader. Shouts of 'Go!' or 'Squeeze!' help synchronize the movement.
- Anticipation: Players should read the body language of the ball carrier to anticipate the next pass, moving as the ball travels rather than waiting for it to reach the target.
5. Common Mistakes
- Pressing Alone: One player sprinting to press while the rest of the team holds their position. This simply wastes energy and is easily bypassed.
- Poor Angles of Approach: Running straight at the ball carrier without blocking passing lanes, allowing easy escapes.
- Lack of Intensity: A slow or half-hearted press gives the opponent time to find a pass. The press must be executed at sprint speed.
- Dropping Deep After the Trigger: Midfielders failing to step up and support the front three, leaving massive gaps in the center of the pitch.
6. Variations & Progressions
- Progression 1 — Time Limit: Give the pressing team exactly 8 seconds to win the ball back and get a shot away. This increases the urgency and replicates match conditions.
- Progression 2 — Target Zones: Instead of mini-goals, place target players for the building team on the halfway line. The pressing team must cut off passes to these specific players.
- Variation — Midfield Trigger: Instead of pressing the centre-backs immediately, allow the first pass to the fullback, using that pass as the trigger to trap them against the touchline.
7. Age Adaptations
- Under 8 / Under 10: Focus purely on the concept of 'winning the ball back quickly'. Simplify the triggers and emphasize energy and teamwork rather than complex positional covering.
- Under 12 / Under 14: Introduce curved runs and the concept of cutting off passing lanes. Start demanding that the midfield steps up to support the forwards.
- Under 16 / Open: Implement the full tactical setup. Demand high intensity, perfect synchronization, and immediate, clinical transitions upon winning the ball.