Wing Overload Attacking Play: Mastering the 3v2 Wide Advantage
Learn how to isolate defenders, create numerical superiority on the flanks, and deliver high-quality crosses with this dynamic wing overload set play.
Equipment Needed
1. Overview
The Wing Overload is a fundamental attacking strategy designed to create numerical superiority (usually a 3v2 or 2v1) on one side of the pitch. By drawing the defending team's shape toward the ball and committing players to the flank, attacking teams can bypass low blocks and create high-quality crossing opportunities.
This play is highly effective against teams that defend narrowly or employ a rigid back four. It relies on quick ball circulation, synchronized off-the-ball movement, and decisive delivery into the penalty area.
2. Setup
Pitch Area: Attacking half of a standard 105m x 68m pitch.
Equipment: 1 full-size goal, 10-12 footballs (placed near the center circle for quick restarts), cones to mark starting positions if running as a drill.
Players Required: Minimum 8 attackers (Back 4, Midfield 3, Striker) vs 6 defenders + 1 Goalkeeper.
Starting Positions (Attacking Team - Blue):
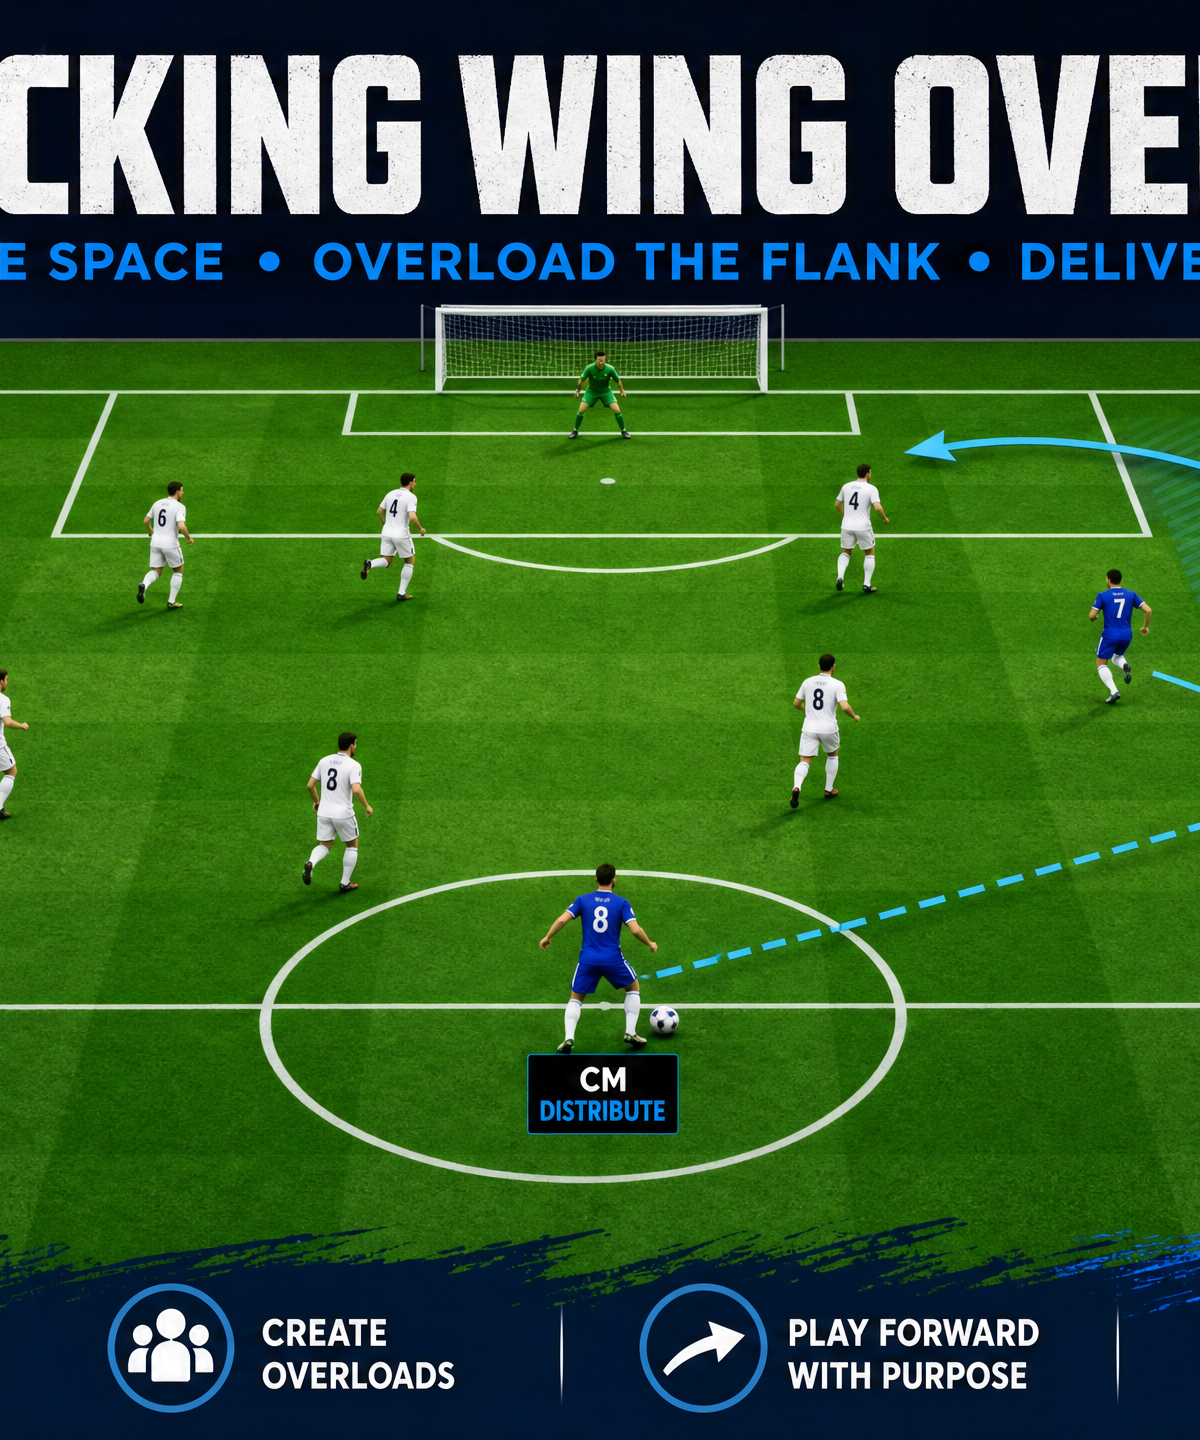
- #8 (Central Midfielder): Holding the ball in the center circle, acting as the trigger.
- #2 (Right Back): Positioned wide right, slightly advanced of the halfway line.
- #7 (Right Winger): Positioned high and wide on the right touchline, stretching the opposition left back.
- #10 (Attacking Midfielder): Positioned centrally, ready to exploit the right channel.
- #9 (Striker): Positioned centrally, roughly 25m from goal.
- #11 (Left Winger): Holding width on the left, preparing for a far-post run.
3. Step-by-Step Instructions
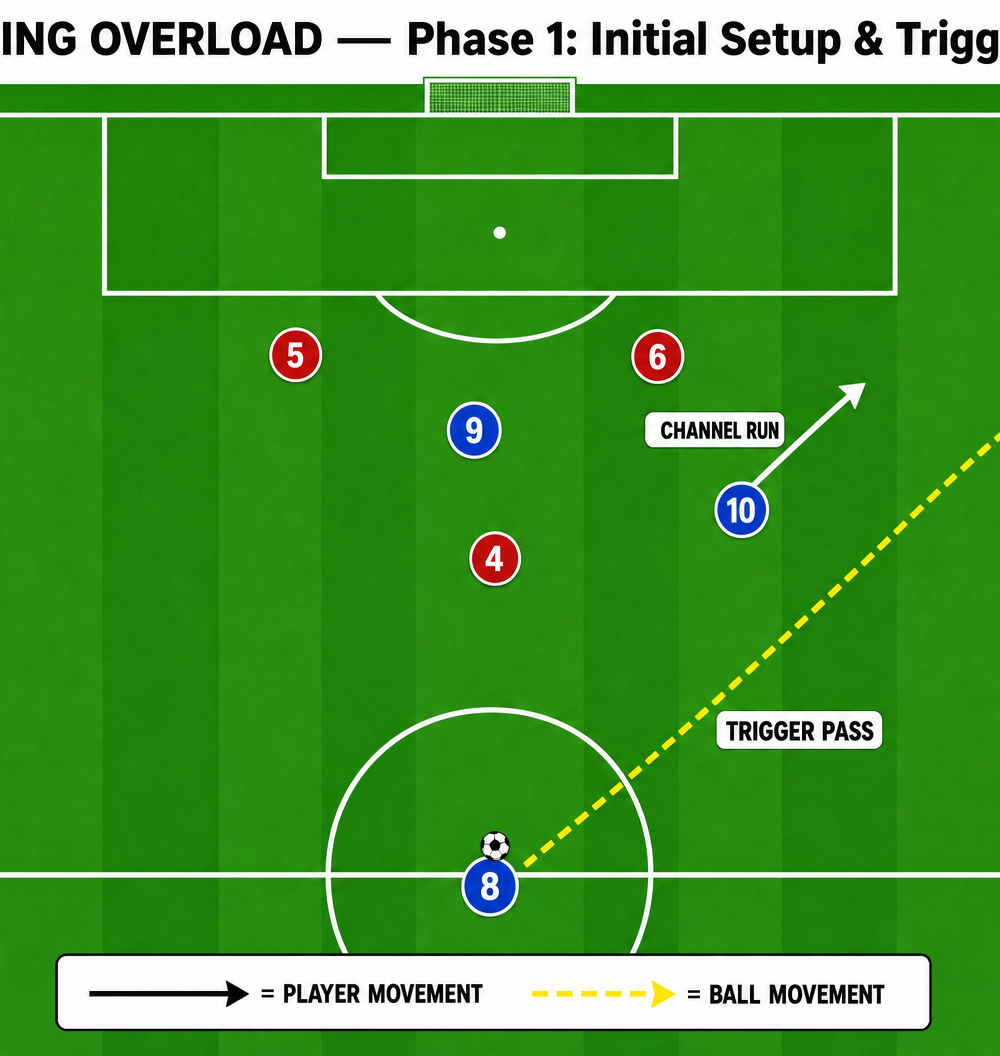
Phase 1: Initial Setup & Trigger
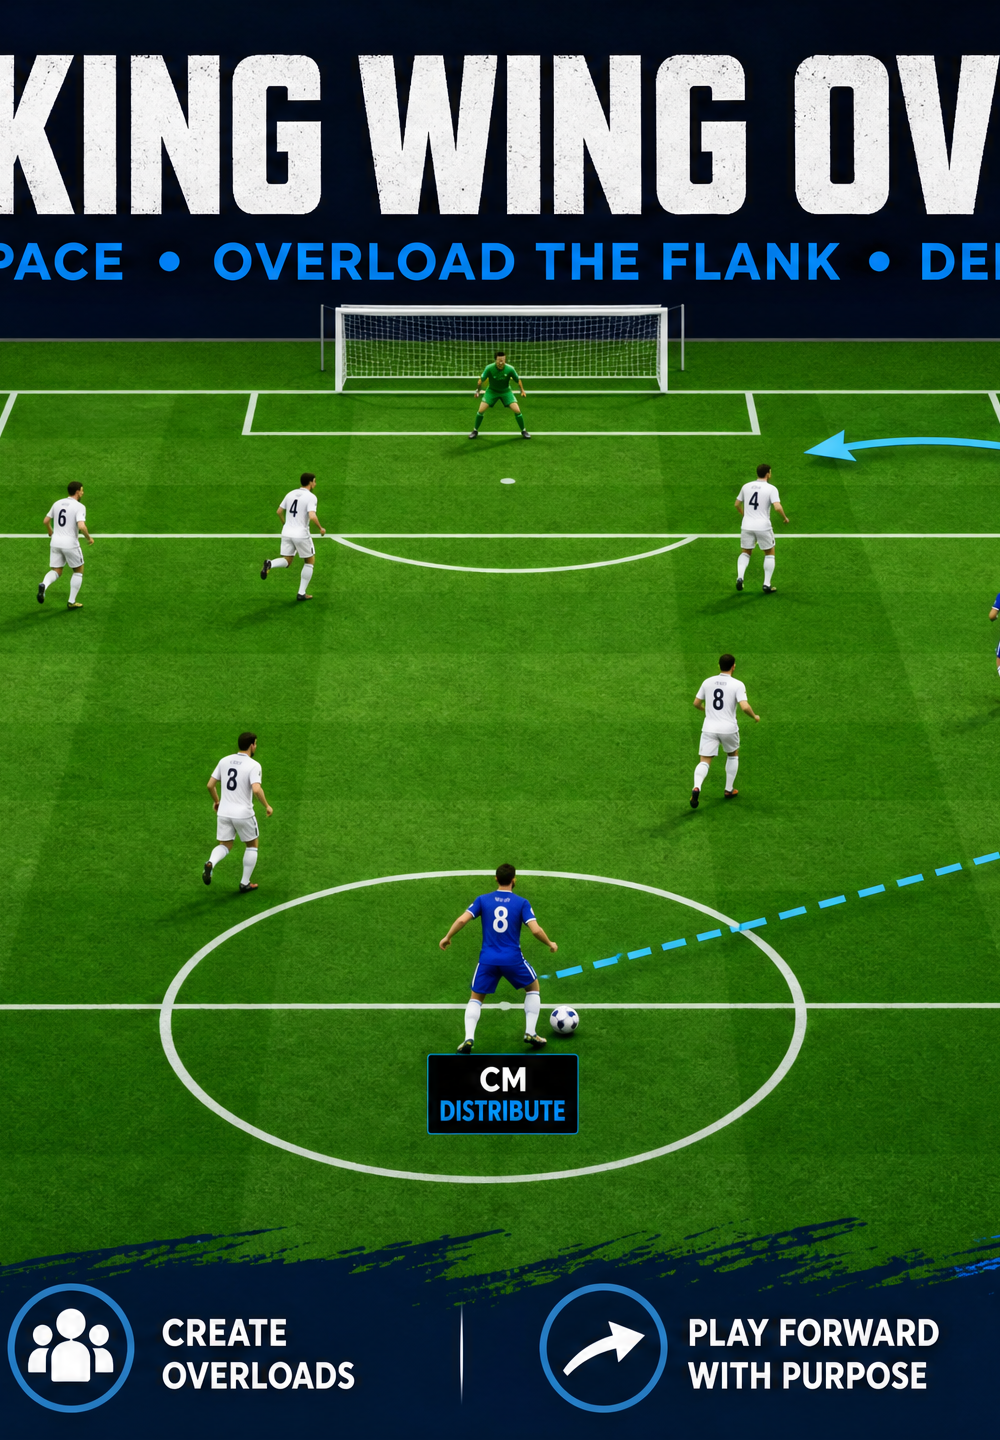
- The Trigger Pass: The play initiates when the Central Midfielder (#8) plays a firm, driven pass out to the Right Winger (#7) who has pulled wide to receive on the touchline.
- The Overlap: As the ball travels, the Right Back (#2) immediately sprints forward, making a high-speed overlapping run down the outside of the Right Winger (#7).
- The Channel Run: Simultaneously, the Attacking Midfielder (#10) makes a sharp diagonal run into the right channel (the space between the opposition's left back and left-sided center back).
- The Dilemma: The opposition Left Back (#3) is now isolated. If they step to #7, the overlap for #2 is open. If they drop, #7 has time to turn and attack.
Phase 2: Overload Execution & Delivery
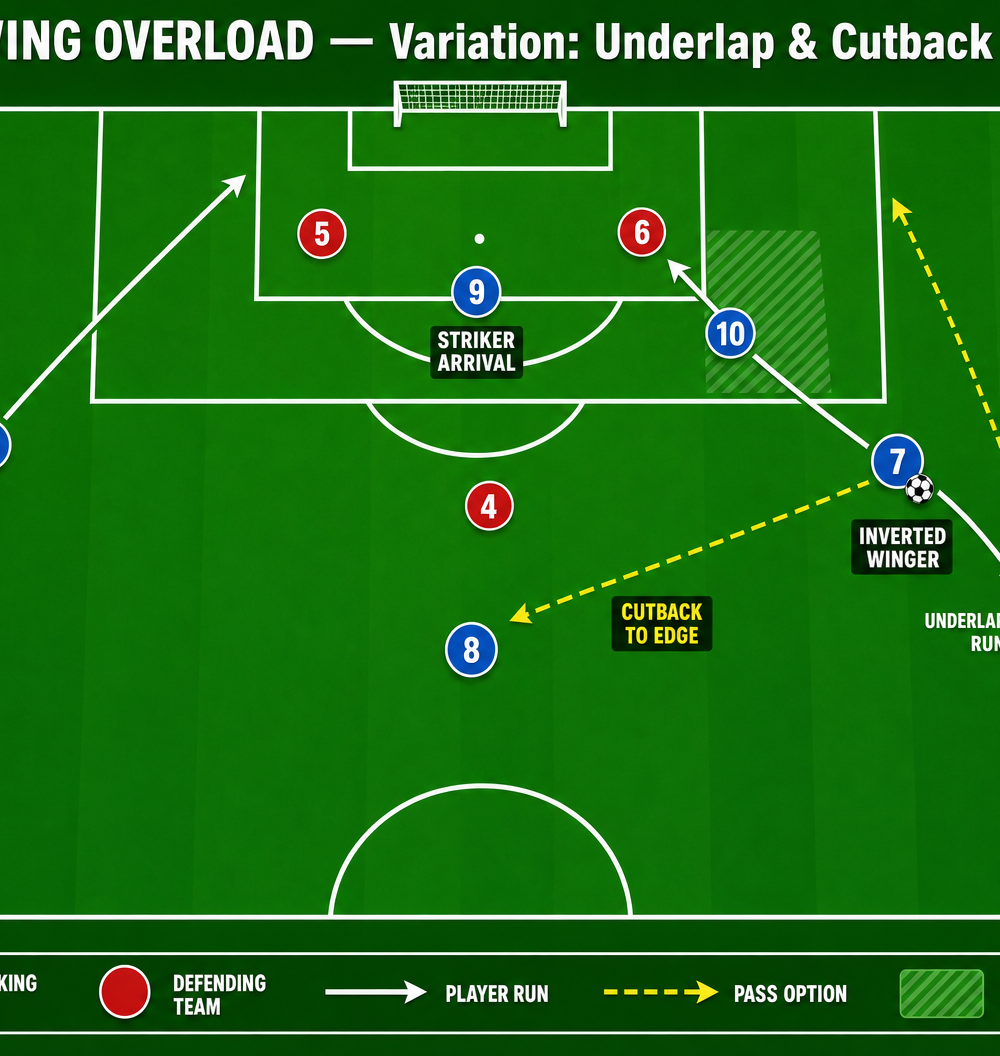
- Decision Making: The Right Winger (#7) receives the ball and drives inside slightly, committing the defender. They now have three primary options based on the defender's reaction:
- Option A (The Overlap): Slip the ball down the line for the overlapping Right Back (#2) to cross.
- Option B (The Channel): Play a slide-rule pass into the path of the Attacking Midfielder (#10) penetrating the box.
- Option C (The Cutback): Retain possession, cut inside, and look for a deeper cutback to the Central Midfielder (#8).
- Box Arrival: As the ball reaches the final third (via #7, #2, or #10), the forwards must execute synchronized runs:
- #9 (Striker): Sprints aggressively across the near post to drag the center backs and attack the first ball.
- #11 (Left Winger): Drives in from the opposite flank to attack the far post (blind side of the right back).
- #8 (Central Midfielder): Arrives late at the edge of the penalty area (approx. 18-20m out) for a cutback or second ball.
- The Delivery: The cross should be hit with pace, targeting the specific runs rather than just being floated into a general area.
4. Key Coaching Points
- Pace of the Pass: The initial trigger pass from #8 to #7 must be firm and accurate to give the winger time to face up the defender before pressure arrives.
- Timing of the Overlap: The Right Back (#2) must time their run so they are arriving at top speed just as #7 receives the ball. Running too early closes the space; running too late kills the momentum.
- Commit the Defender: The player on the ball (#7) must actively drive at the opposition full-back to force a decision. Do not pass too early.
- Synchronized Box Runs: The runs into the penalty area must be staggered (near post, far post, edge of box). Players arriving at the same time in the same zone makes it easy to defend.
- Quality of Delivery: The final cross or pass must have purpose. Encourage low, driven crosses across the face of goal or pulled back to the edge of the box.
5. Common Mistakes
- Static Receiving: The winger (#7) receiving the ball standing still, allowing the defense to shift and cover the overlap.
- Poor Spacing: The overlapping full-back (#2) running too close to the winger, congesting the space and making it easy for one defender to guard both players.
- Ignoring the Cutback: Forwards rushing too deep into the six-yard box, dragging all defenders with them and leaving the crucial cutback zone (penalty spot to edge of box) empty.
- Predictability: Always using the overlapping run. If the winger never cuts inside or uses the channel run, the defense will simply anticipate the overlap.
6. Variations & Progressions
Variation: The Underlap & Cutback

Instead of the full-back overlapping, the winger (#7) stays wide and receives the ball. The Attacking Midfielder (#10) or Right Back (#2) makes a driving underlapping run between the winger and the penalty box. This drags the opposition full-back inside, allowing the winger to cut inside and shoot or deliver an in-swinging cross.
Progression: Adding Defensive Midfield Pressure
To make the drill more realistic, introduce an active defensive midfielder (Red #4) who tracks the late run of the attacking central midfielder (#8). This forces the attacking team to be more precise with their cutbacks and adds a layer of decision-making for the player delivering the final ball.
7. Age Adaptations
- Under 8 - Under 10: Focus purely on the 2v1 on the wing. Keep it simple: Winger gets the ball, full-back runs around them. Don't worry about complex box runs; just encourage getting the ball into the middle.
- Under 12 - Under 14: Introduce the concept of the "third man run" (the channel run by the attacking midfielder). Begin emphasizing the specific near-post and far-post runs in the box.
- Under 16 - Open: Full tactical implementation. Demand high-speed execution, varied decision-making (overlap vs. underlap), and perfect timing of the cutback arrival.