The Front-Block Lineout Steal & Counter-Attack
Master the art of contesting the opposition's lineout at the front block to secure turnover ball and immediately launch a devastating counter-attack.

Equipment Needed
1. Overview
The Front-Block Lineout Steal is a highly effective defensive set play designed to disrupt the opposition's throw-in, secure a turnover, and instantly transition into an attacking shape. By contesting the throw at the front of the lineout (positions 2 or 4), you force the opposition hooker to throw over your pod to reach the middle or back, which increases the margin for error. If the throw is aimed at the front, a well-timed, explosive jump can steal the ball. This play is particularly useful when defending inside your own half, as it alleviates pressure and creates immediate counter-attacking opportunities against an unstructured defense.
2. Setup
Pitch Setup: Standard Rugby pitch (100m x 70m). The play is typically executed between your own 22m and the halfway line.
Equipment Needed: Rugby balls, bibs (for distinguishing teams during practice), and optionally tackle shields for the maul variation.
Player Positions:
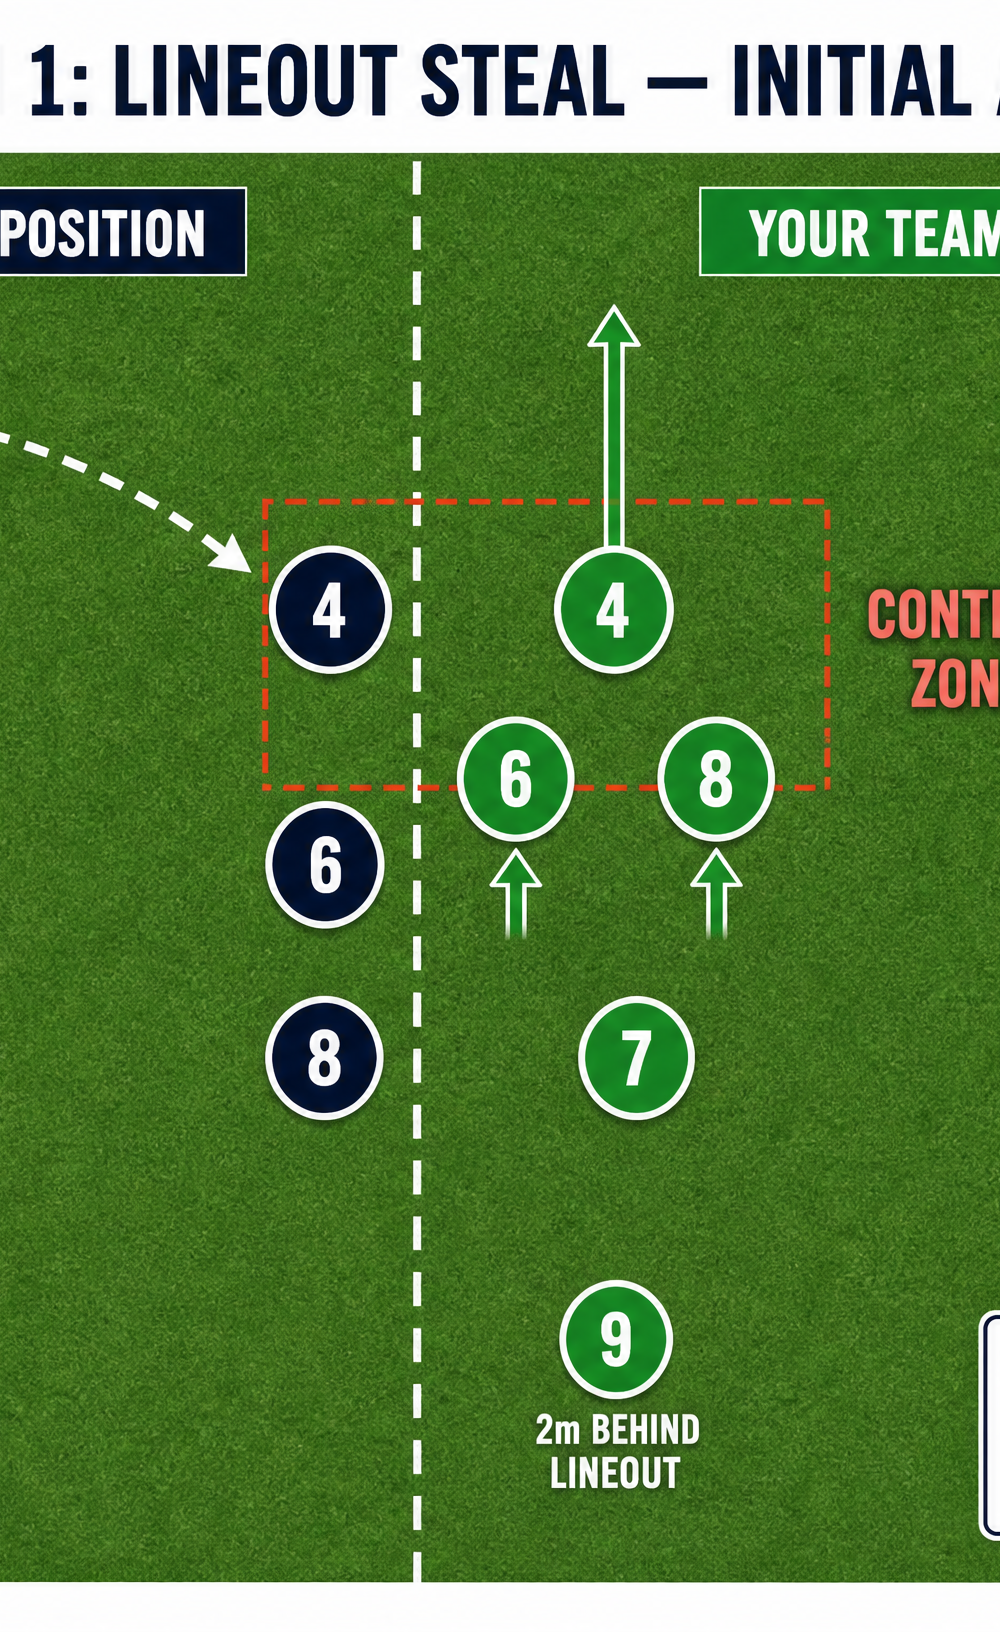
- #4 (Lock): The primary jumper. Needs excellent explosive power and reading of the hooker's cues.
- #6 (Blindside Flanker) & #8 (Number 8): The lifters. Must be strong, stable, and quick to react.
- #9 (Scrum-half): Positioned 2m behind the lineout, ready to receive the tap down or secure the ball.
- #10 (Fly-half) & Backline: Aligned 5-7m deep, ready to exploit the turnover ball.
3. Step-by-Step Instructions

Phase 1: The Setup and Read
- Alignment: The forwards align in a standard defensive lineout formation. The front pod (#6, #4, #8) sets up close to the 5m line.
- The Read: The jumper (#4) and the defensive lineout caller watch the opposition hooker (#2) intently. They are looking for the 'tell'—the subtle movement that indicates the throw is imminent (e.g., a dip of the knees, a tap of the ball).
- The Trigger: As the hooker begins the throwing motion, the lifters (#6 and #8) step in rapidly to close the gap.
Phase 2: The Contest
- The Lift: The lifters execute a dynamic, synchronized lift, driving #4 high into the air. The lift must be explosive to beat the opposition jumper to the apex.
- The Steal: #4 extends their inside arm (closest to the opposition) to disrupt or catch the ball. The goal is to either secure possession cleanly or tap it down aggressively to your side.
Phase 3: The Counter-Attack
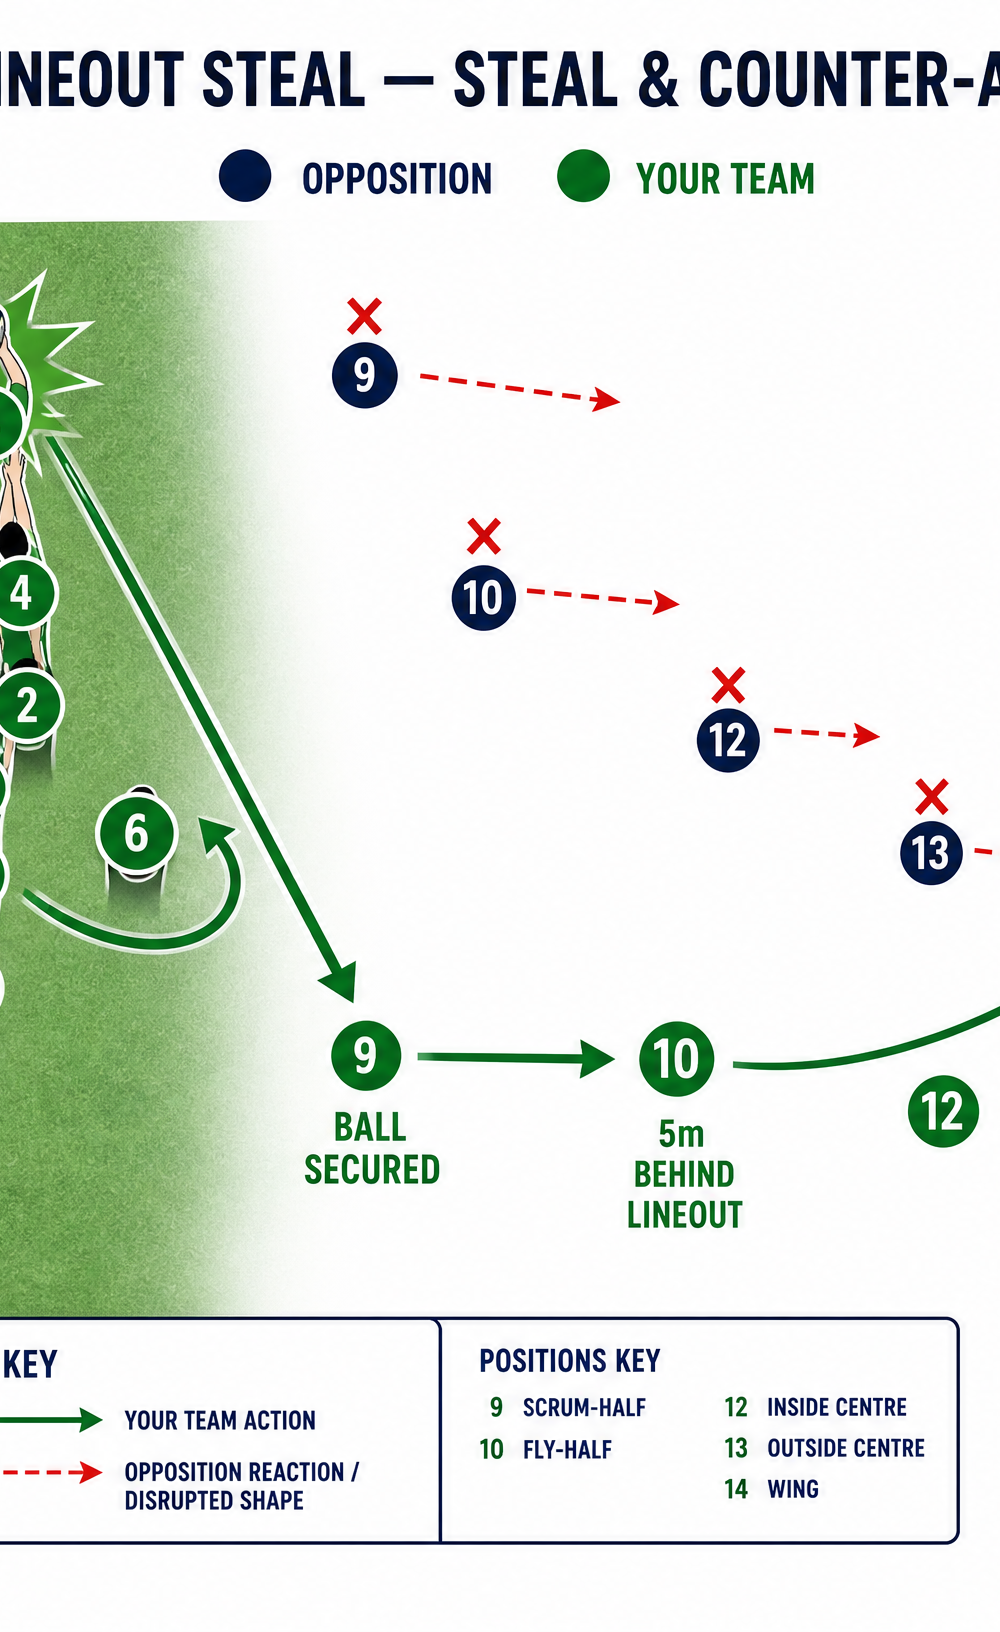
- Securing the Ball: If tapped down, #9 must react instantly to secure the loose ball. If caught, #4 delivers a quick, downward pass to #9.
- The Launch: #9 immediately fires a pass to #10, who is positioned flat and moving forward.
- Exploiting Space: The backline executes a predetermined strike move (e.g., a crash ball by #12 or a wide shift to the outside backs) to attack the disorganized opposition defense, which is still transitioning from lineout to open play.
4. Key Coaching Points
- Speed of the Lift: The success of the steal relies entirely on beating the opposition into the air. The lifters must react to the thrower, not the ball.
- Reading the Hooker: Teach your jumpers to study the opposition hooker's body language. Every thrower has a 'tell' before they release the ball.
- Aggressive Tap-Down: If a clean catch isn't possible, the jumper must aggressively tap the ball down on their side, away from the opposition scrum-half.
- Instant Transition: The mindset must switch from defense to attack the millisecond the ball is secured. The #9 and #10 must communicate loudly to initiate the counter-attack.
- Lifter Footwork: Lifters must step into the lift, getting their feet close together to generate maximum upward power and stability.
5. Common Mistakes
- Watching the Ball, Not the Thrower: If the jumper waits to see the ball in the air, they will be too late. They must react to the thrower's movement.
- Poor Lifter Technique: Lifters using only their arms instead of driving with their legs, resulting in a low, unstable jump.
- Hesitation on Turnover: The scrum-half (#9) or fly-half (#10) hesitating after the steal, allowing the opposition defense to realign.
- Closing the Gap Too Early: The defensive pod moving too early, giving away their intention and allowing the opposition to change their call.
6. Variations & Progressions
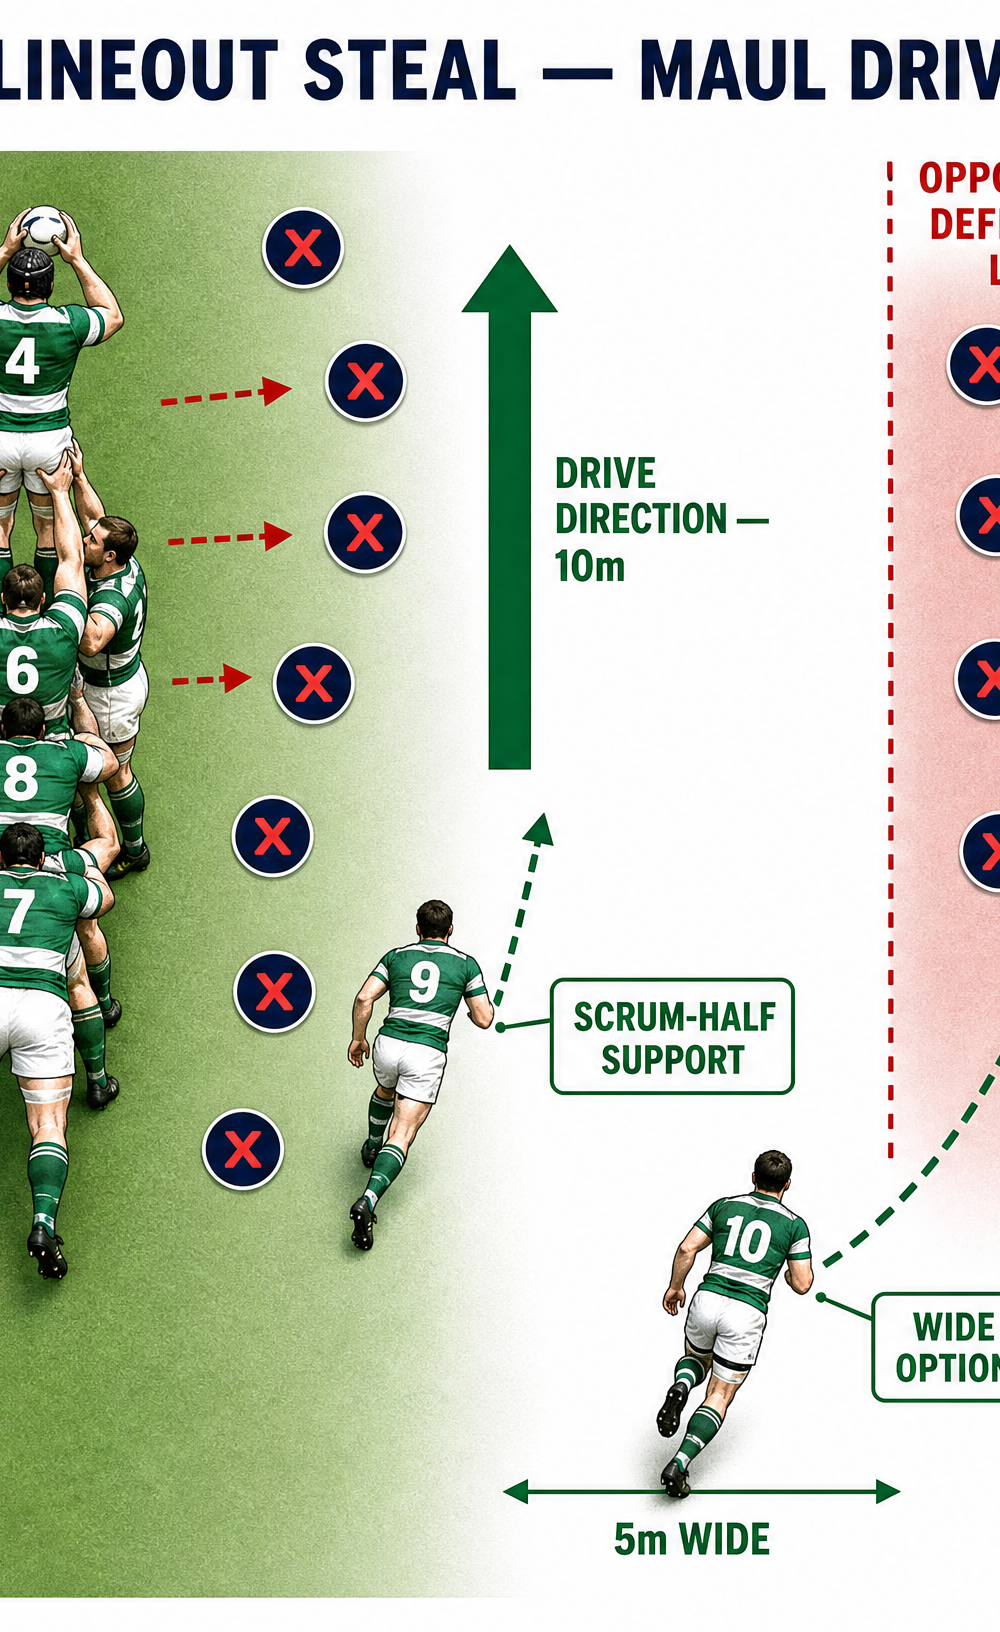
- Variation 1: The Maul Drive: If #4 catches the ball cleanly and the opposition forwards are disorganized, immediately bind into a driving maul. Use #6, #8, and #7 to drive straight through the middle of the lineout, marching the opposition backward before releasing the ball to the backs.
- Variation 2: The Middle-Block Steal: Progress to contesting the middle of the lineout using #5 as the jumper, supported by #3 and #7. This requires better timing and reading of the throw.
- Progression: Practice the play with a 'live' opposition hooker who varies their throwing cadence and targets to test the defensive pod's reaction time.
7. Age Adaptations
- Under 14s & Below: Lifting is generally not permitted in these age groups. Focus instead on jumping technique, reading the thrower, and rapid transition from defense to attack upon securing loose ball.
- Under 16s: Introduce basic lifting techniques, emphasizing safety, proper binding, and leg drive. Focus on the front-block steal as it is the simplest to coordinate.
- Under 18s & Open: Full implementation of the play, including complex reads, middle/back block variations, and integrated counter-attacking strike moves.

