The Disruptor: Lineout Steal & Counter-Attack on Opposition Throw
Master the art of reading the opposition throw, executing a clean steal, and launching a devastating counter-attack from disorganized defense.

Equipment Needed
1. Overview
Winning your own set-piece is fundamental, but stealing the opposition's lineout ball can be a game-changer. "The Disruptor" is a high-reward defensive set play designed to steal the ball on an opposition throw and immediately transition into a lethal counter-attack. When executed correctly, it exploits the inherent disorganization of the opposition team, who are suddenly forced to defend while transitioning from an attacking mindset.
This play is most effective when used strategically—for instance, when the opposition is throwing inside their own half, or when you have identified a predictable pattern in their lineout calls. The primary goal is to contest the jump, secure the ball, and rapidly shift it to the open side before the defensive line can reset.
2. Setup

Pitch Setup: Standard rugby pitch (100m x 70m). The play takes place between the 5-metre and 15-metre lines.
Equipment Needed:
- 1 Rugby ball (match standard)
- Training bibs (two contrasting colours)
- Cones (to mark the 5m and 15m lines if necessary)
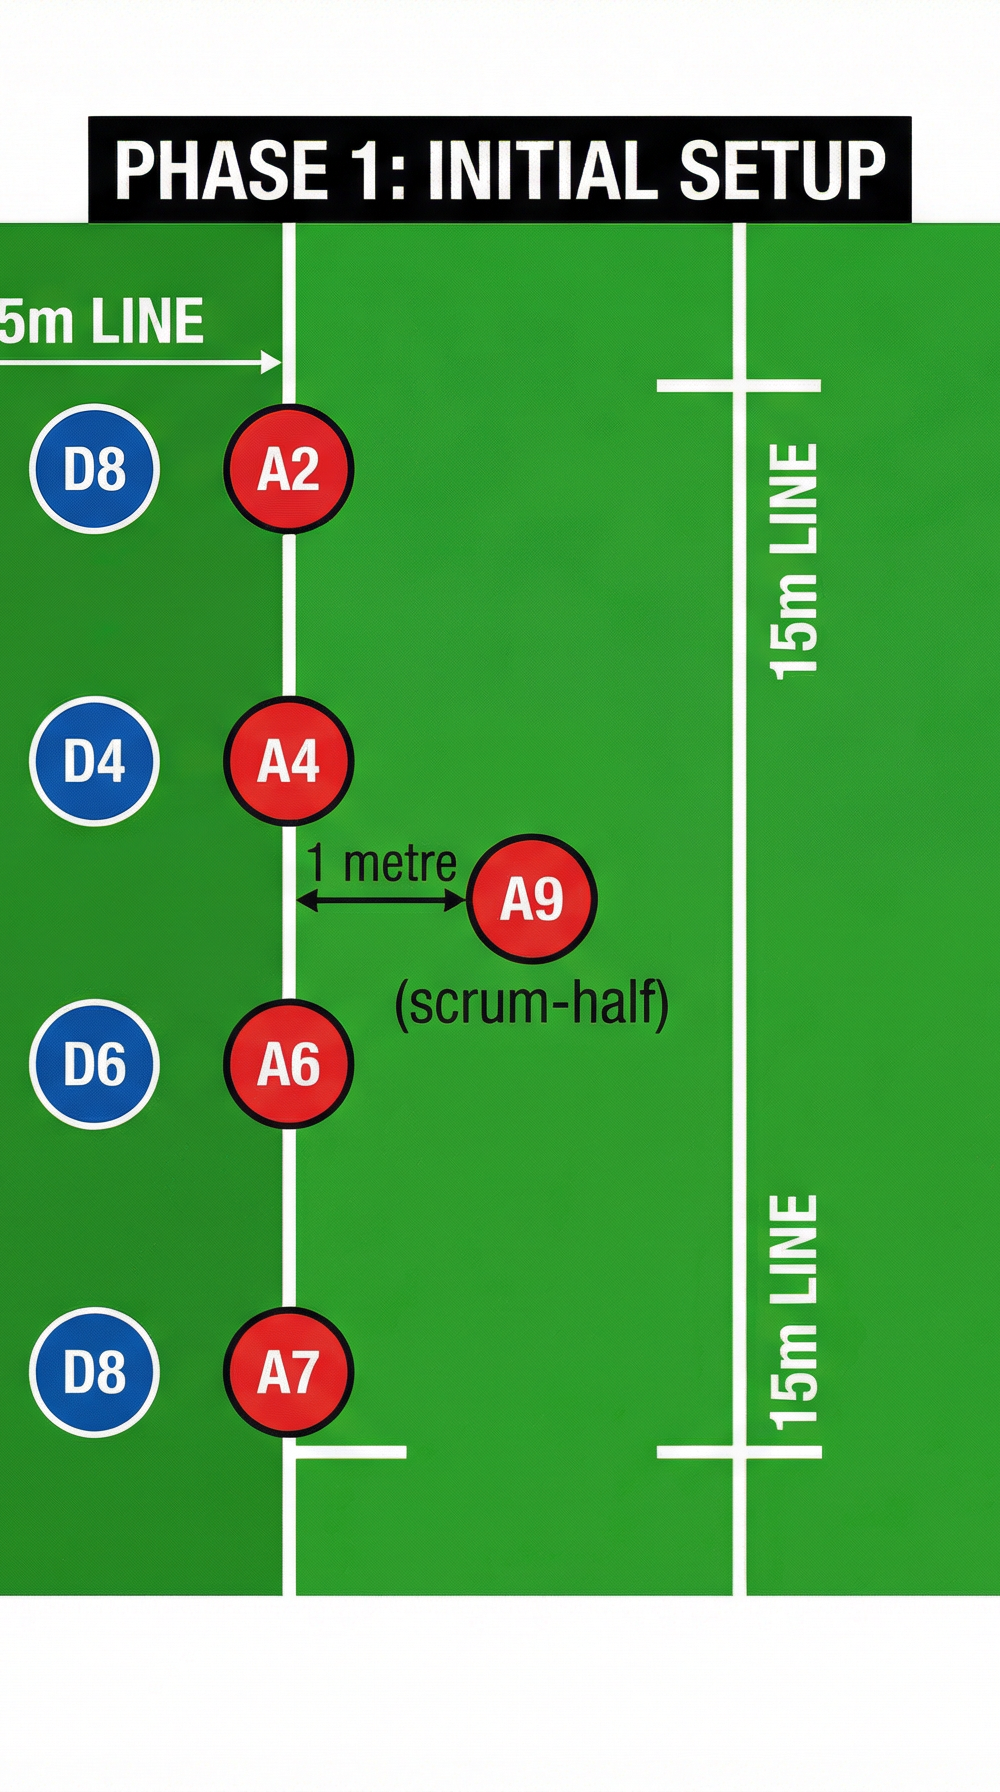
Player Positions (Attacking/Stealing Team):
- A2 (Hooker): Positioned at the front of the lineout, ready to lift or contest the front.
- A4 (Lock - Primary Jumper): Positioned in the middle of the lineout (position 2 or 3), designated as the primary jumper to contest the throw.
- A3 & A5 (Props/Lifters): Positioned immediately in front of and behind A4, ready to execute a rapid, explosive lift.
- A9 (Scrum-half): Positioned 1 to 2 metres behind the lineout, tracking the ball and ready to receive the deflection.
- A10 (Fly-half): Positioned approximately 10 metres back and slightly infield, ready to distribute the ball.
- A12 & A14 (Backs): Positioned further infield, ready to exploit the open space on the counter-attack.

3. Step-by-Step Instructions

- Read the Call: The defensive lineout leader (usually A4 or A5) must read the opposition's body language, triggers, or lineout calls to anticipate the target area of the throw.
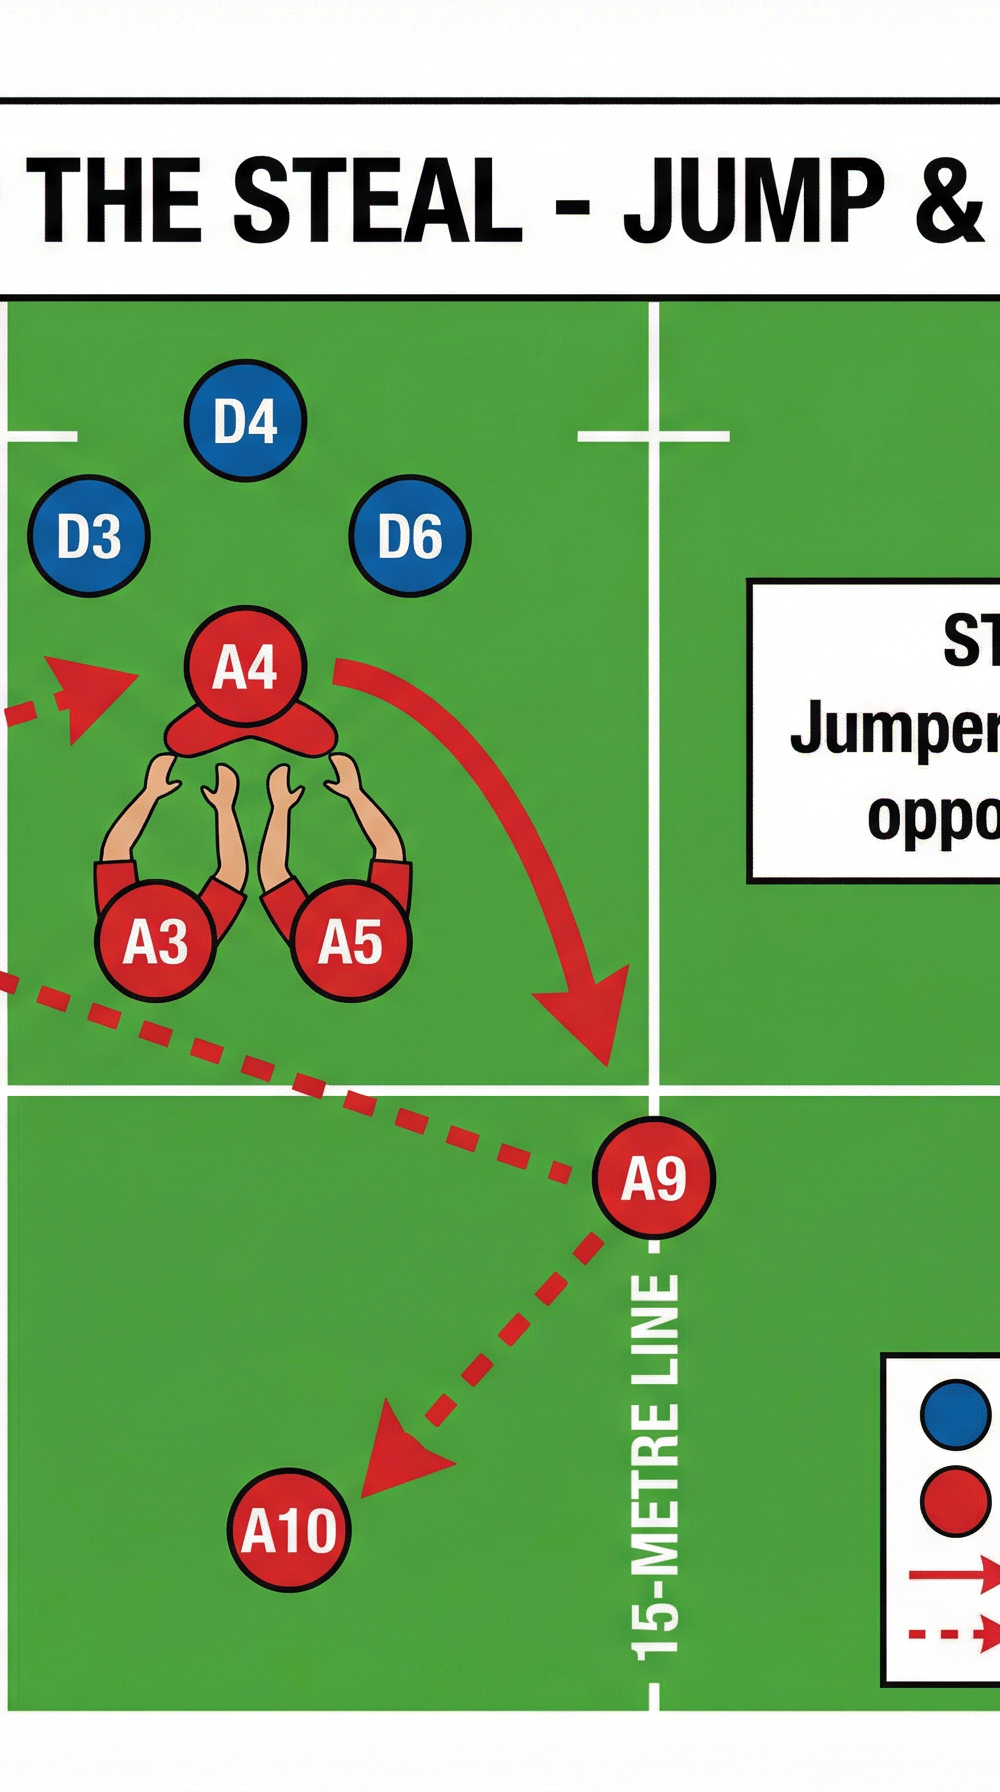
- The Explosive Lift: As the opposition hooker (D2) begins the throwing motion, A3 and A5 must execute a rapid, synchronized lift on A4. The goal is to get A4 into the air a fraction of a second before the opposition jumper.
- The Contest: A4 extends fully at the apex of the jump, focusing entirely on the ball. Instead of trying to cleanly catch the ball (which is difficult under pressure), A4 should aim to forcefully tap or deflect the ball backward toward their own side.
- The Deflection: The deflection must be directed accurately toward A9, who is anticipating the steal and moving into position to receive the ball.

- Securing the Ball: A9 must react instantly to the deflection, securing the loose ball before the opposition forwards can react and swarm the area.
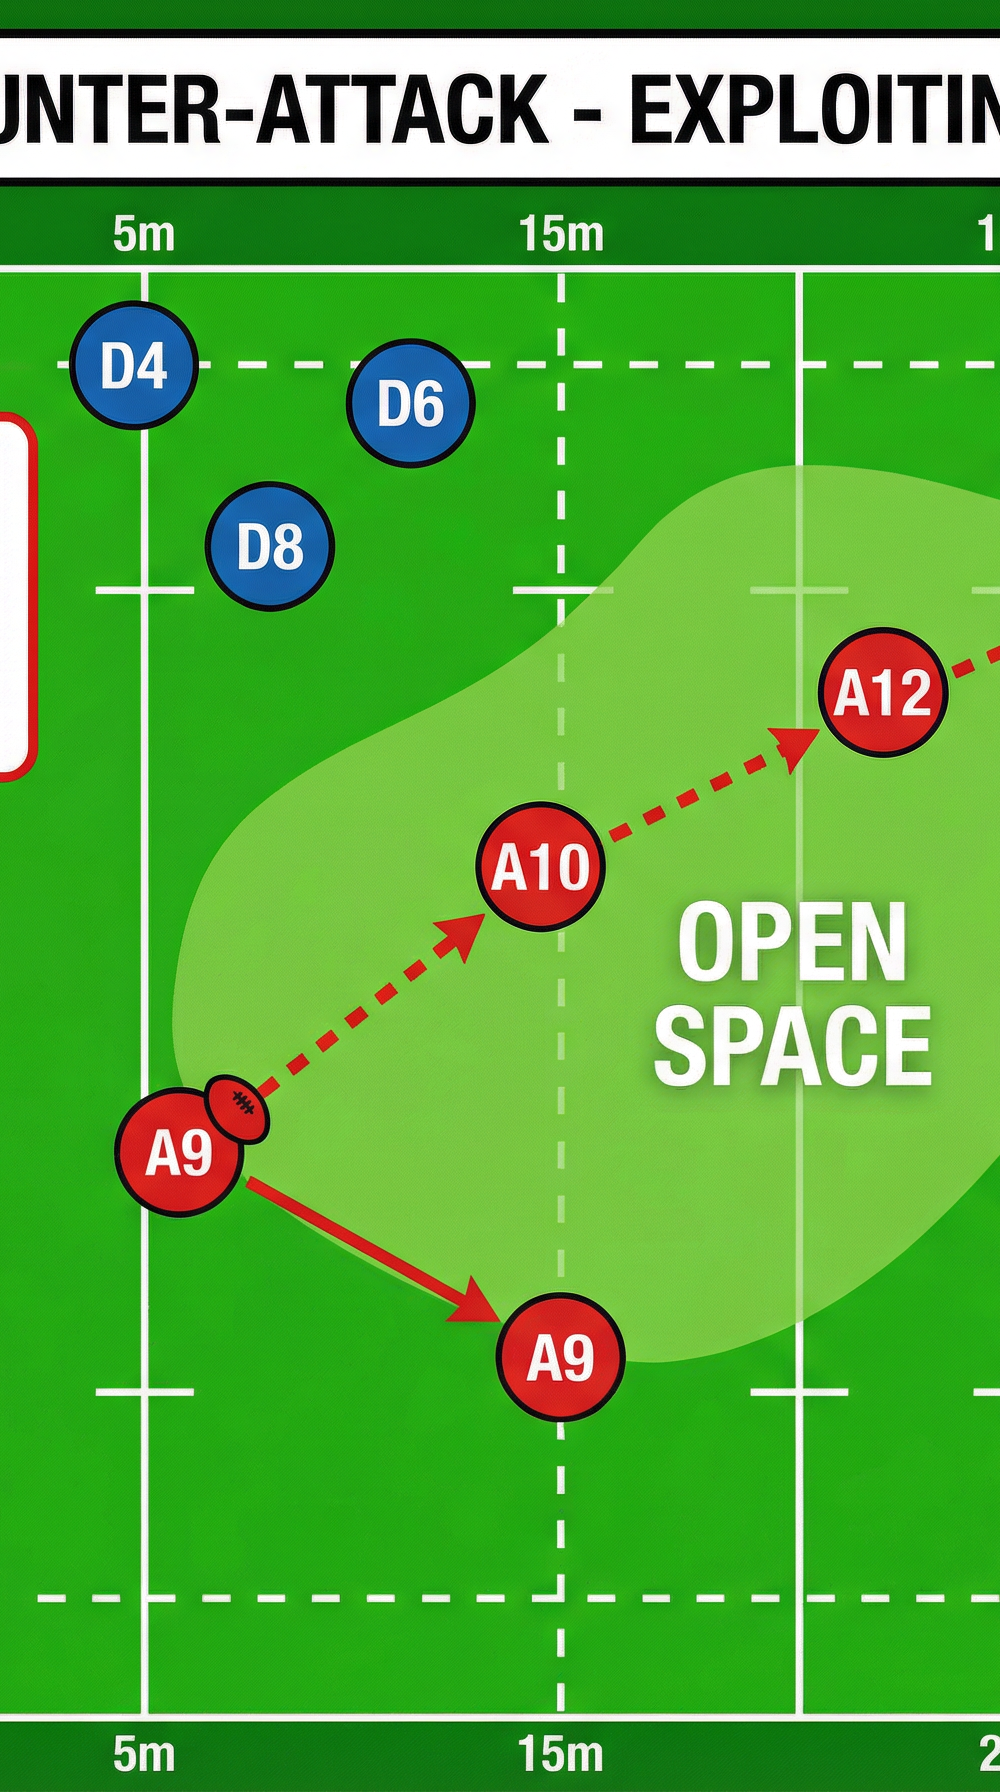
- The Counter-Attack: Once A9 secures the ball, the transition to attack must be instantaneous. A9 delivers a rapid, flat pass to A10.
- Exploiting the Space: A10 receives the ball on the move and immediately attacks the line. The opposition forwards are now trapped near the touchline, leaving a massive void in the midfield. A10 distributes the ball to A12 or A14, who accelerate into the open space, exploiting the disorganized defense.

4. Key Coaching Points
- Timing is Everything: The lift must be initiated the moment the opposition hooker's hands move forward. A late lift guarantees failure.
- Explosive Core: Lifters must use their legs and core, not just their arms, to drive the jumper upward rapidly.
- Aggressive Deflection: The jumper must be aggressive in the air. A weak tap will result in a messy scramble. Aim for a firm, controlled deflection down to the scrum-half.
- Scrum-half Anticipation: A9 must not be a spectator. They must read the flight of the ball and anticipate the deflection zone, ready to pounce the moment the ball is touched.
- Instant Transition: The backs must recognize the steal immediately and switch from a defensive alignment to an attacking shape in a split second.
5. Common Mistakes
- Watching the Opposition: Lifters focusing on the opposition jumper rather than their own jumper and the ball.
- Poor Lifting Technique: Lifters using only their arms, resulting in a slow, low jump that is easily beaten.
- Catching Instead of Tapping: The jumper attempting a clean catch under heavy pressure, leading to a knock-on or a turnover.
- Static Backline: The backline standing flat-footed and failing to anticipate the steal, missing the window of opportunity to counter-attack.
6. Variations & Progressions
- Progression 1 (The Clean Catch): Once the tap-back is mastered, challenge the jumper to make a clean two-handed catch in the air, allowing for a more controlled distribution by the scrum-half.
- Progression 2 (The Drive): If the ball is secured cleanly, immediately transition into a driving maul instead of passing it out to the backs. This is highly effective close to the opposition's try line.
- Variation 1 (Front/Back Steal): Practice the steal at different positions in the lineout (e.g., a rapid lift at the very front, or a deep throw to the back) to keep the opposition guessing.
7. Age Adaptations

- Under 12s / Under 14s: Focus entirely on the timing of the jump and reading the throw. Lifting is generally not permitted at these age groups, so the emphasis must be on anticipation and explosive vertical leaping.
- Under 16s: Introduce basic lifting techniques (if permitted by local union regulations), focusing heavily on safety and core stability for both lifters and jumpers.
- Open / Seniors: Full execution with complex lifting pods, dummy jumps, and rapid transitions into multi-phase counter-attacks.