Lineout Steal & Strike: The 'Tip-Back' Counter Attack
Disrupt the opposition's primary possession platform and launch an immediate, devastating counter-attack against a disorganized defensive line.

Equipment Needed
1. Overview
The lineout steal is not merely a defensive action; it is one of the most potent attacking platforms in modern rugby. When an opposition team throws into a lineout, their primary focus is on securing possession and setting up their predetermined phase play. Their defensive line is often narrow, anticipating their own attack rather than preparing to defend. By successfully contesting and stealing the ball, your team instantly transitions from defence to attack against a disorganized and retreating opposition.
This specific set play, the 'Tip-Back' Counter Attack, focuses on a rapid steal by your primary jumper (usually the 4 or 5) and an immediate wide shift to exploit the space created on the outside. It requires precise timing, explosive lifting, and seamless communication between the jumper, lifters, and the scrum-half (9). When executed correctly, it demoralizes the opposition and frequently results in line breaks or scoring opportunities.
2. Setup
To effectively run this play in training, you need to simulate match conditions as closely as possible.
Equipment Needed:
- 2-3 Rugby balls
- Cones to mark the 5m and 15m lines, and the line of touch
- Bibs to distinguish the attacking (opposition) and defending (your team) lineouts
Pitch Setup:
Set up a full lineout on a standard 100m x 70m pitch. Use the touchline and mark the 5-metre and 15-metre lines clearly. The line of touch should be distinctly marked.
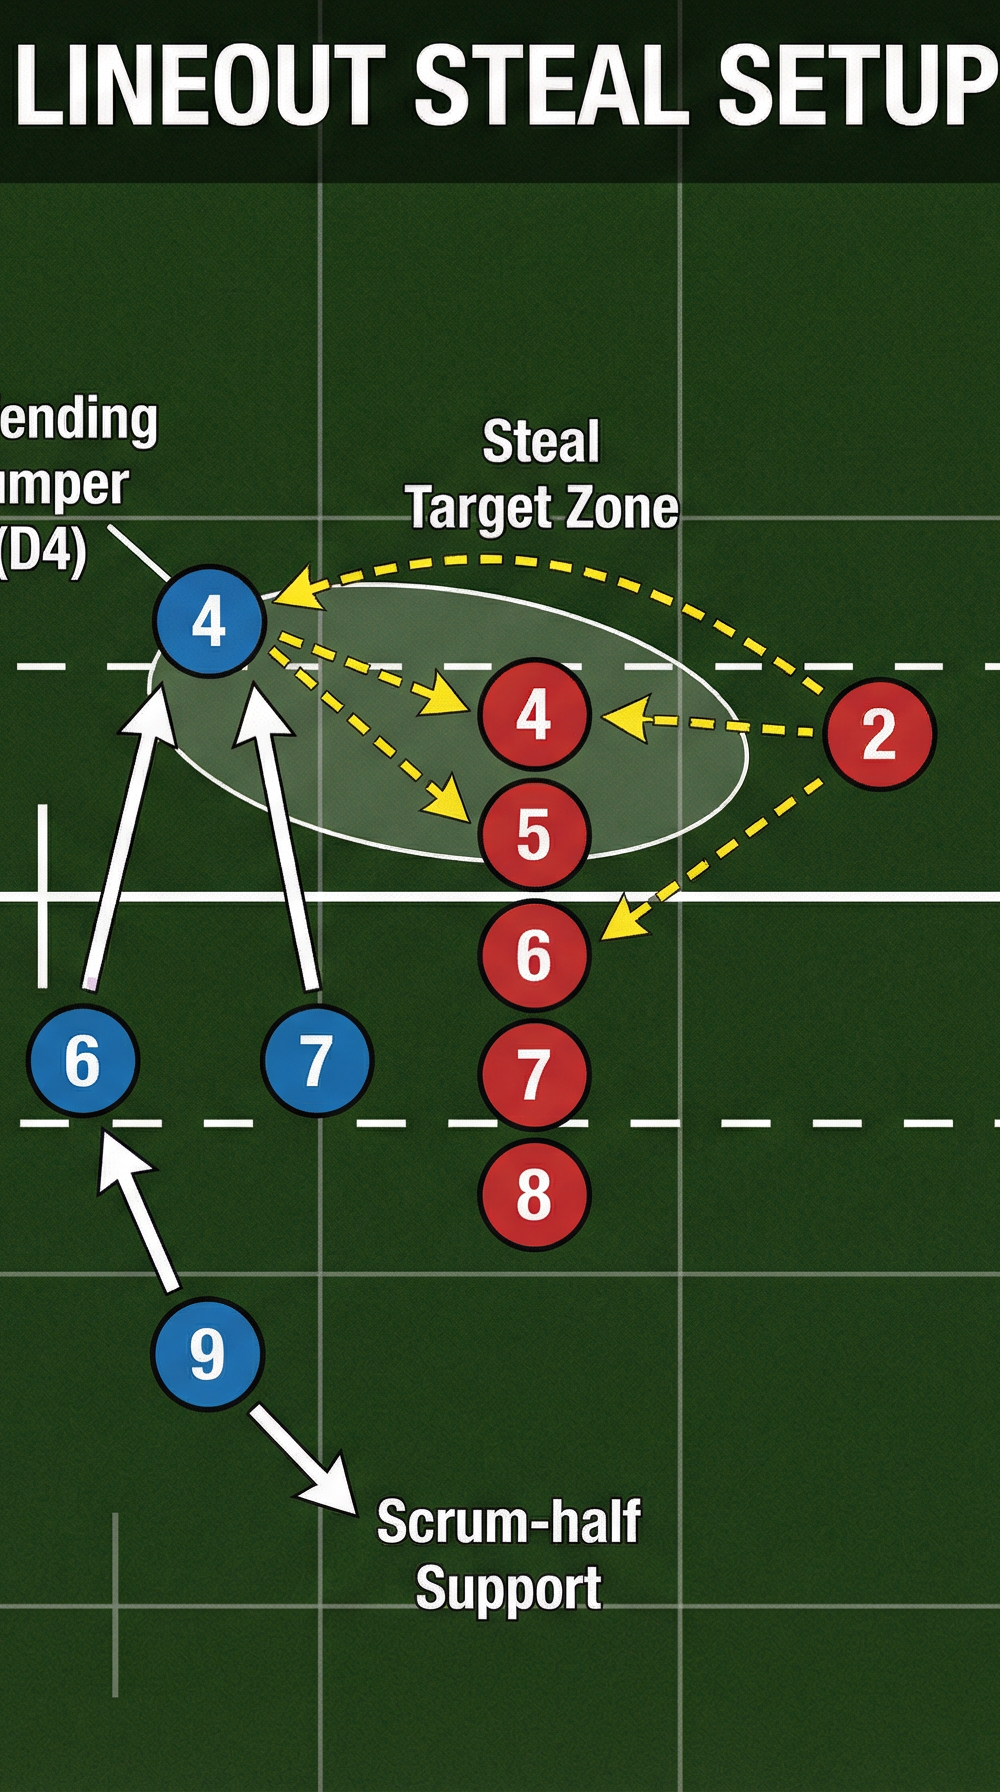
Player Positions (Defending Team):
- Hooker (2): Positioned in the 5m channel, ready to defend the blindside or fold into the defensive line.
- Lifters (6 & 7): Positioned at the front and back of the primary jumper pod. They must be explosive and technically proficient.
- Primary Jumper (4): The target for the steal. Positioned in the middle of the lineout, reading the opposition thrower's cues.
- Secondary Jumper (5): Positioned further back to cover deeper throws or act as a decoy.
- Number 8 (8): Positioned at the back of the lineout, ready to defend the tail or cover the blindside.
- Scrum-half (9): Positioned 1-2 metres behind the lineout, slightly shaded towards the primary jumper, ready to receive the tip-back.
- Backline (10, 12, 13, 11, 15): Aligned flat and wide, anticipating quick ball to exploit the disorganized defence.

3. Step-by-Step Instructions
Executing the steal and subsequent counter-attack requires synchronized movement and rapid decision-making.
Step 1: Reading the Thrower (The Trigger)
The primary jumper (4) and the defensive lineout caller must closely observe the opposition hooker. The trigger for the jump is not the call, but the physical movement of the thrower—specifically, the drawing back of the ball or the shifting of weight.
Step 2: The Explosive Lift
As soon as the trigger is identified, the lifters (6 & 7) step in aggressively, closing the space around the jumper (4). The jumper drives explosively upwards, utilizing the momentum from the lifters to achieve maximum height. The lift must be rapid to beat the opposition jumper into the air.
Step 3: The Steal (The Tip-Back)
The jumper (4) must extend their arms fully, keeping their eyes on the ball. Instead of trying to catch the ball cleanly (which can be difficult under pressure), the jumper uses a 'tip-back' technique. Using the fingers and a slight inward angle of the wrists, the jumper deflects the ball backward and slightly downward toward the waiting scrum-half (9).
Step 4: The Scrum-half Delivery
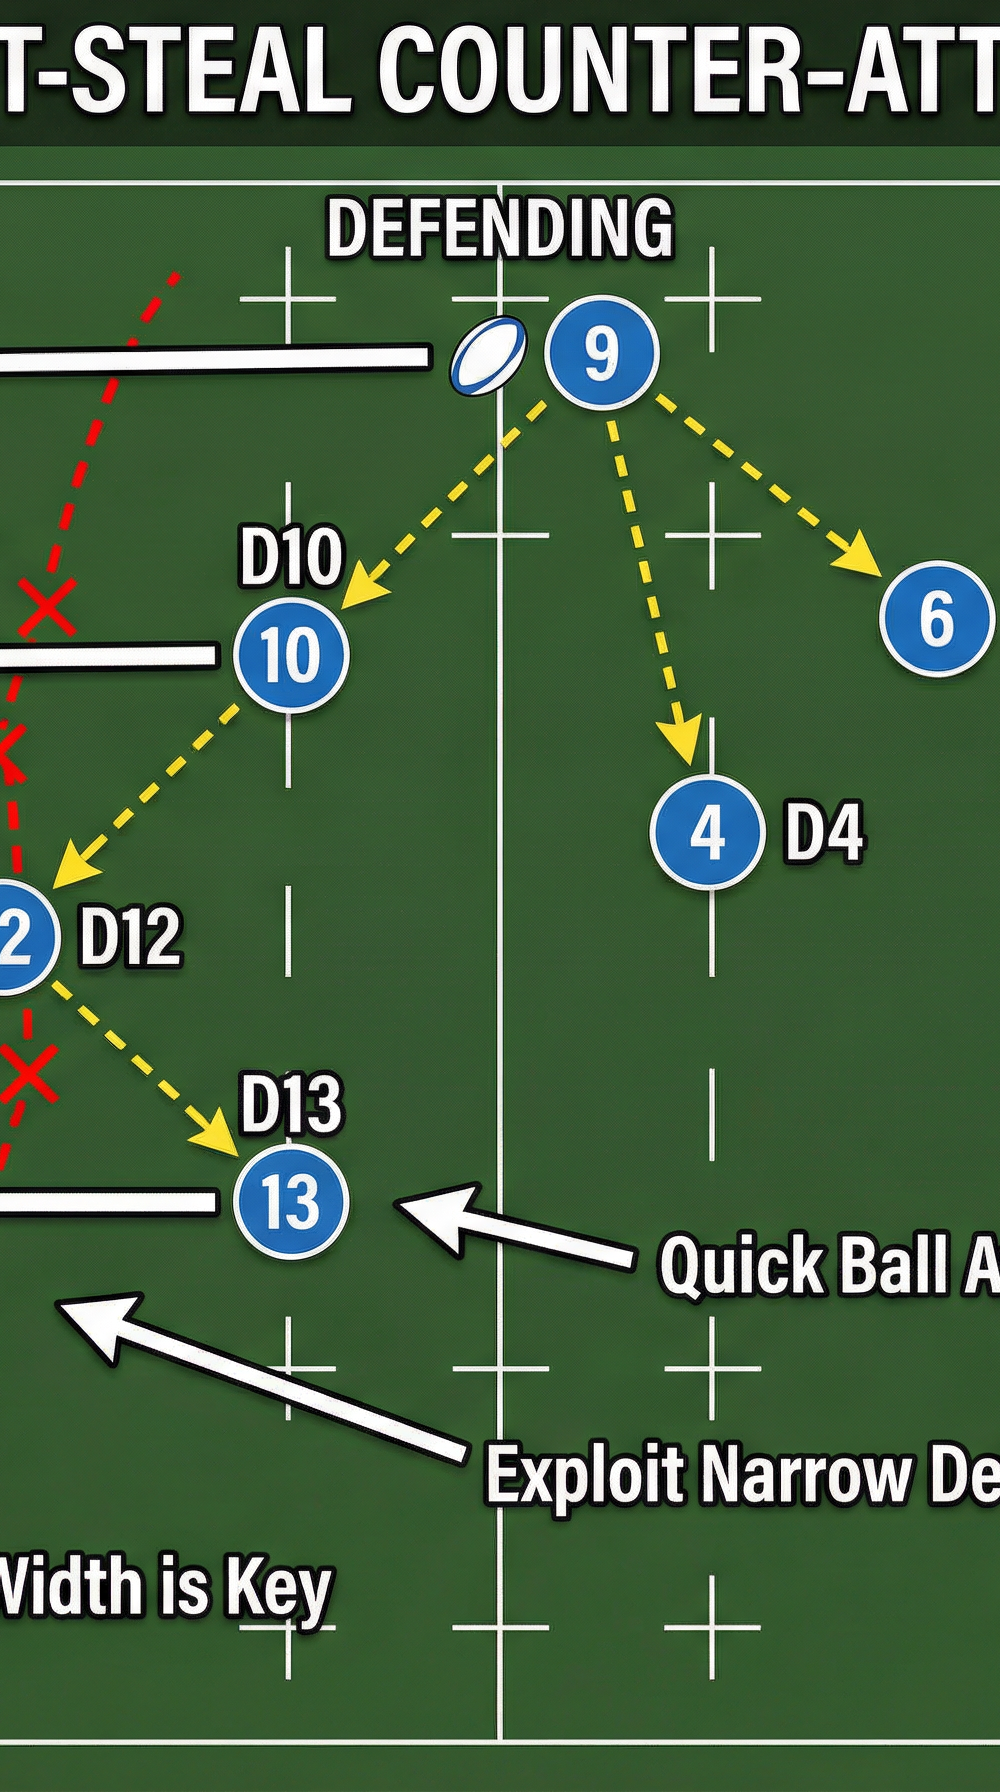
The scrum-half (9) must anticipate the trajectory of the tipped ball. They must catch the ball cleanly and, in one fluid motion, deliver a fast, flat pass to the fly-half (10). There is no time for taking steps or resetting; the delivery must be immediate.
Step 5: The Wide Strike
The fly-half (10) receives the ball moving forward. The opposition defence will be narrow and likely scrambling backward. The 10 must immediately shift the ball wide to the inside centre (12) or outside centre (13), who should be running hard, flat lines into the space outside the 15-metre line. The wing (11) and fullback (15) provide width and support for offloads.

4. Key Coaching Points
To ensure success, focus on these critical elements during practice:
- Watch the Ball, Not the Man: The jumper must focus entirely on the flight of the ball, not the opposition jumper. Timing the jump to meet the ball at its highest point is paramount.
- Aggressive, Synchronized Lifting: Lifters must get their feet close to the jumper and use their legs and core to drive upward. A slow lift will result in a lost contest.
- The 'Tip' Technique: Emphasize tipping the ball rather than catching it. Tipping requires less precision under pressure and allows for a faster transfer to the scrum-half.
- Scrum-half Anticipation: The 9 must read the jump and position themselves perfectly to receive the tip-back. They must be vocal, calling for the ball if necessary.
- Immediate Width: The backline must trust the steal and align flat. The first pass from 10 must go wide to exploit the disorganized defence before they can realign.
5. Common Mistakes
Watch out for these frequent errors that can derail the play:
- Jumping Too Early: If the jumper leaves the ground before the ball is thrown, they will be on their way down when the ball arrives, making the steal impossible.
- Poor Lifting Technique: Lifters using only their arms or standing too far away will result in a low, unstable jump, putting the jumper at risk and losing the contest.
- Catching Instead of Tipping: Trying to catch a contested ball often leads to knock-ons. Insist on the tip-back technique for quicker, safer ball retention.
- Deep Backline Alignment: If the backline stands too deep, the opposition defence has time to push up and close the space. The attack must be flat and aggressive.
6. Variations & Progressions
Keep the play unpredictable by introducing these variations:
- The Front-of-Line Steal: If the opposition consistently throws to the middle, shift the primary jumper to the front (position 2 or 4) to disrupt their quick ball.
- The Dummy Steal and Drive: The jumper goes up as if to steal, but instead brings the ball down and the forwards immediately form a driving maul, catching the opposition off guard.
- The Inside Ball: After the steal, instead of going wide, the 10 hits a hard-running forward (like the 8 or a peeling lifter) on an inside line against the grain of the drifting defence.
7. Age Adaptations
Tailor the play to suit the development level of your players:
- Under 10s / Under 12s: Lifting is generally not permitted. Focus on timing the jump, reading the thrower, and the quick transfer from the jumper to the scrum-half. Emphasize the wide pass from the 10.
- Under 14s / Under 16s: Introduce basic lifting techniques (if permitted by local regulations). Focus on safety, core strength, and the mechanics of the tip-back. The backline strike can become more complex.
- Open / Senior: Full implementation of the play. Focus on explosive lifting, deceptive movement before the jump, and high-speed execution of the wide strike against sophisticated defences.