Mastering the 3-Pod Lineout System: Setup, Execution, and Attack Options
A comprehensive guide to building a resilient 3-pod lineout structure that provides secure possession and dynamic attacking platforms.
Equipment Needed
1. Overview
The lineout is a critical set piece in modern Rugby, offering a prime opportunity to secure clean possession and launch structured attacks. This comprehensive drill focuses on the 3-Pod Lineout System, a versatile and robust formation that forces the opposition to defend multiple jumping options. By mastering this system, coaches can ensure their team has the tactical flexibility to adapt to defensive reads, whether opting for a dominant maul drive or quick, off-the-top ball delivery to the backline.
This resource breaks down the precise setup, step-by-step execution, and two primary attacking variations (the Maul Drive and the Catch & Pass) to equip your forwards with the technical proficiency required to dominate the set piece.
2. Setup
To run this drill effectively, you will need to replicate match-day conditions as closely as possible.
Equipment Needed
- 4-6 Rugby balls (clean and dry, plus wet balls if preparing for adverse weather)
- 10-12 marker cones (to define the 5m and 15m lines if not clearly marked)
- Tackle shields or hit shields (for defensive pressure in progressions)
Pitch Setup
Utilise a standard Rugby pitch area (100m x 70m). If using a training grid, ensure you clearly mark the touchline, the 5m line, and the 15m line. The space between the 5m and 15m lines is the designated contest zone.
Player Positions
This drill requires a full pack of forwards (8 players) plus key backline decision-makers:
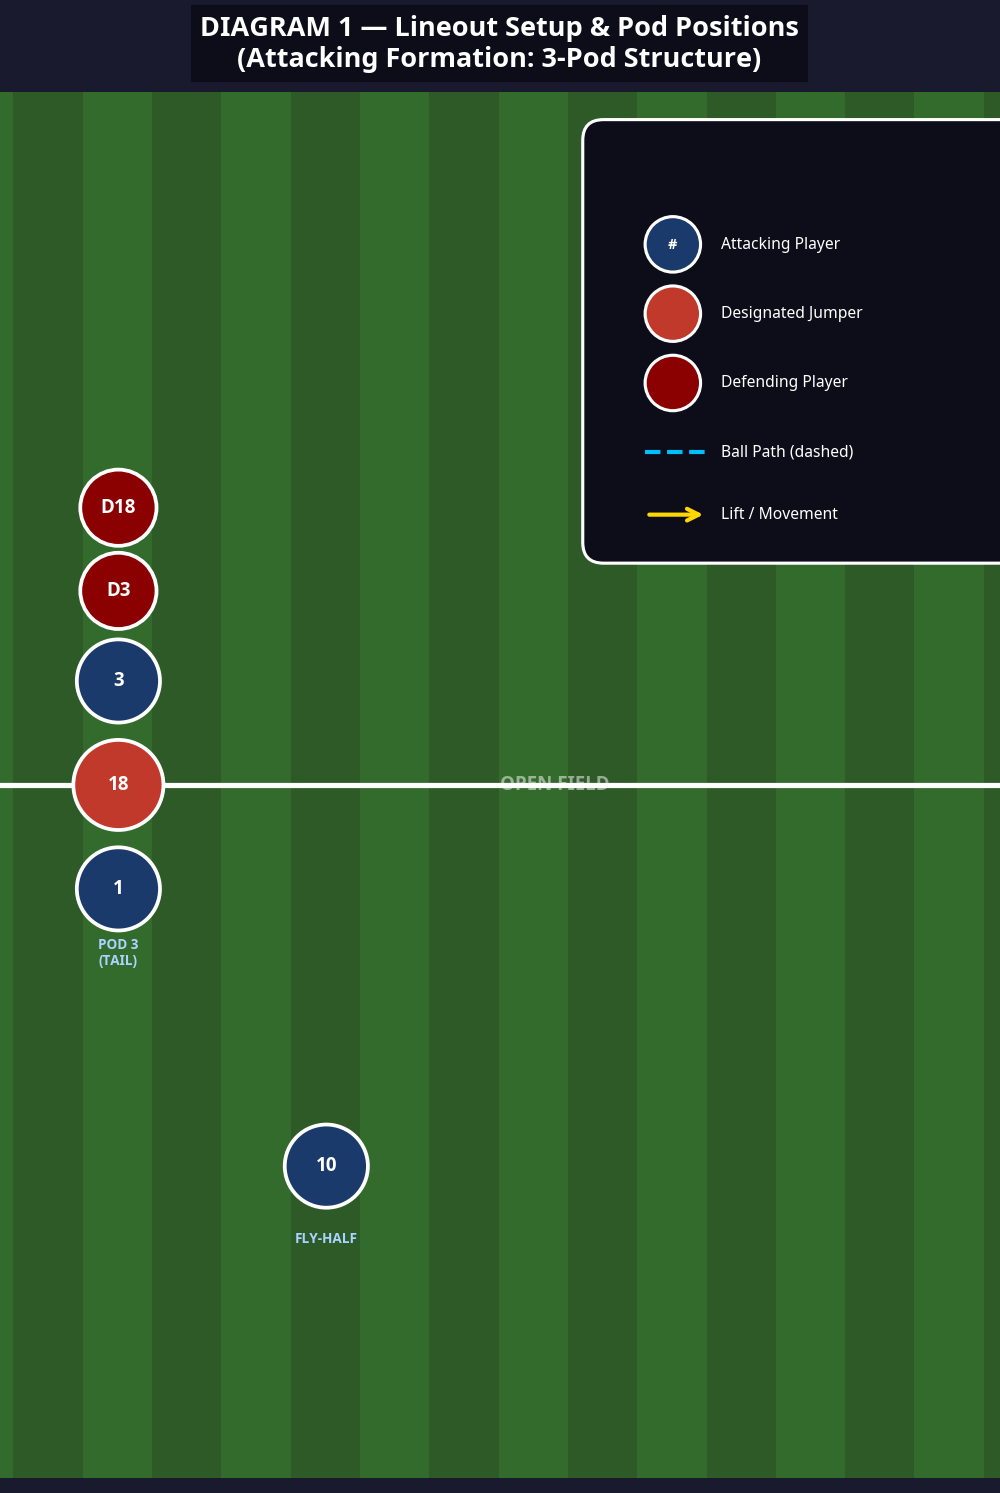
- Hooker (2): Positioned on the touchline to execute the throw.
- Lifters (1, 3, 4, 5, 7, 8): Positioned in pairs to support the jumpers.
- Jumpers (6, 18/19): Athletic forwards designated as primary aerial targets.
- Scrum-half (9): Positioned 2-3 metres behind the lineout to receive or support.
- Fly-half (10) & Backs: Positioned wider to execute attacking moves off the possession.
3. Step-by-Step Instructions
Phase 1: The Approach and Setup
- The Huddle: The forwards gather 5-10 metres away from the line of touch. The lineout caller (usually a lock or the number 8) observes the defensive setup and calls the play (e.g., target pod and variation).
- The Approach: The pack moves to the line of touch as a cohesive unit, immediately adopting the 3-pod formation between the 5m and 15m lines.
- The Stance: Lifters adopt a strong, low body position with feet shoulder-width apart. Jumpers stand relaxed but ready, maintaining peripheral vision on the hooker.
Phase 2: The Trigger and Throw
- The Trigger: The designated jumper uses a subtle physical trigger (e.g., a slight dip or step) to signal the hooker.
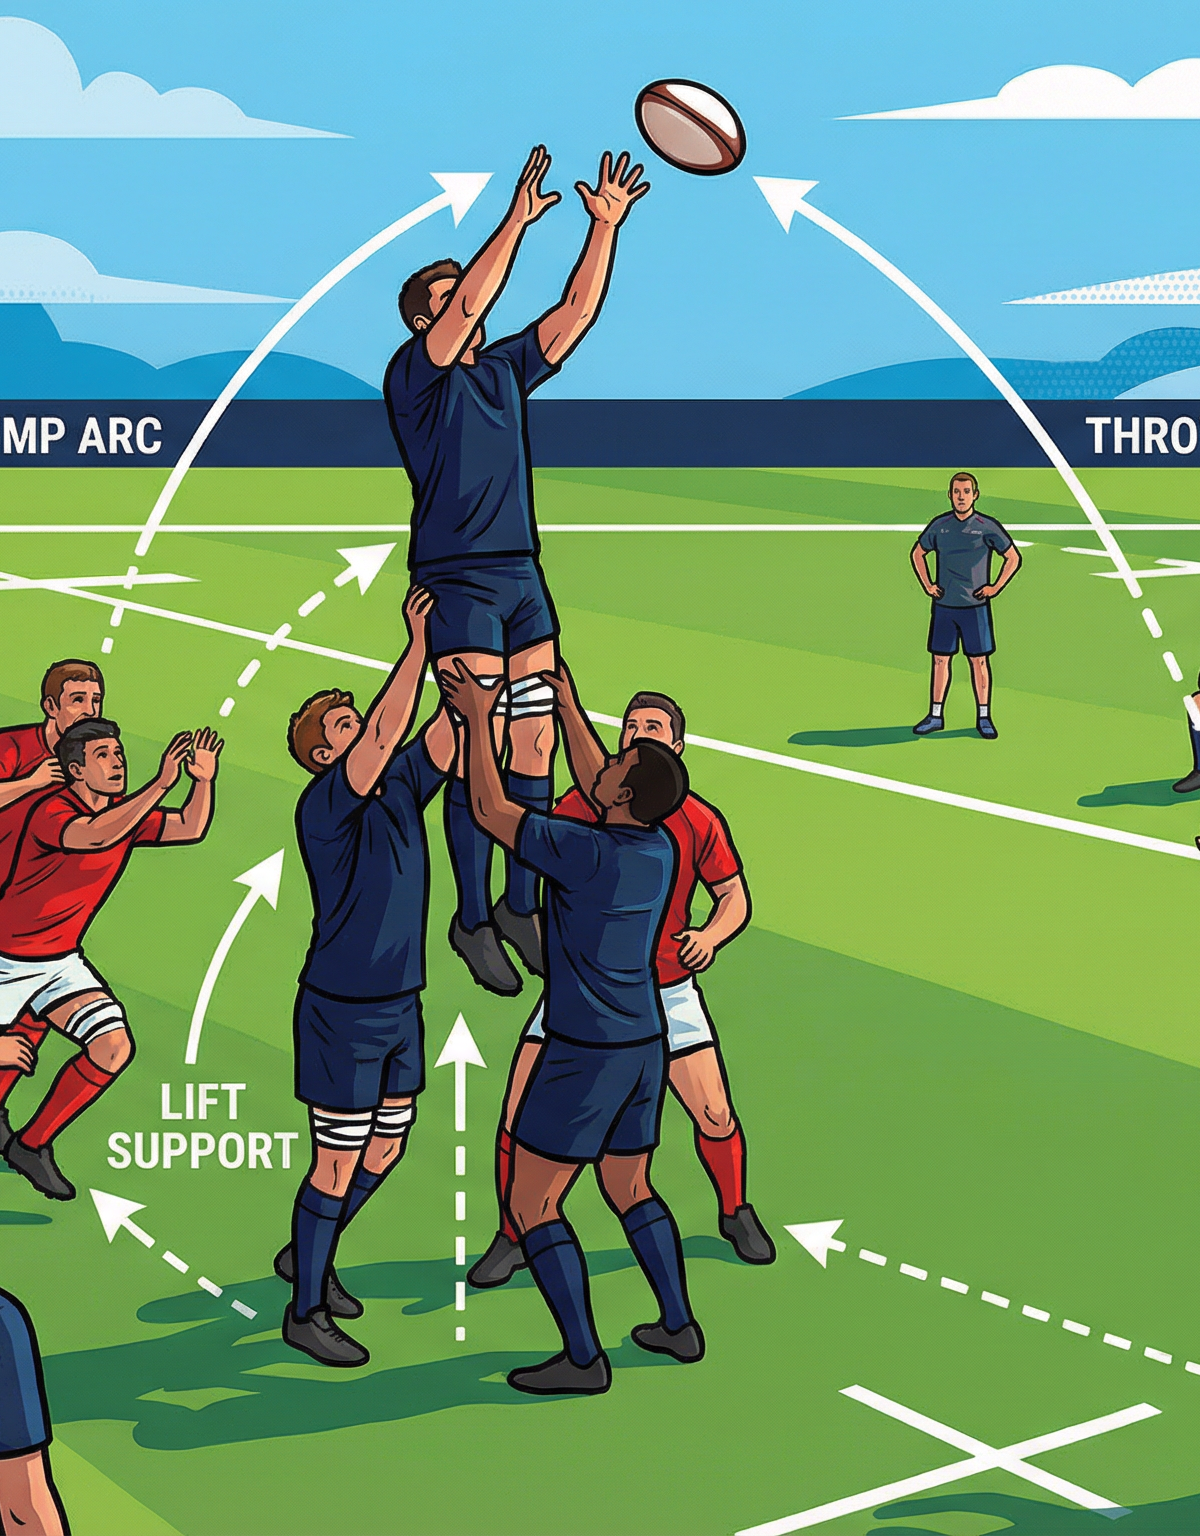
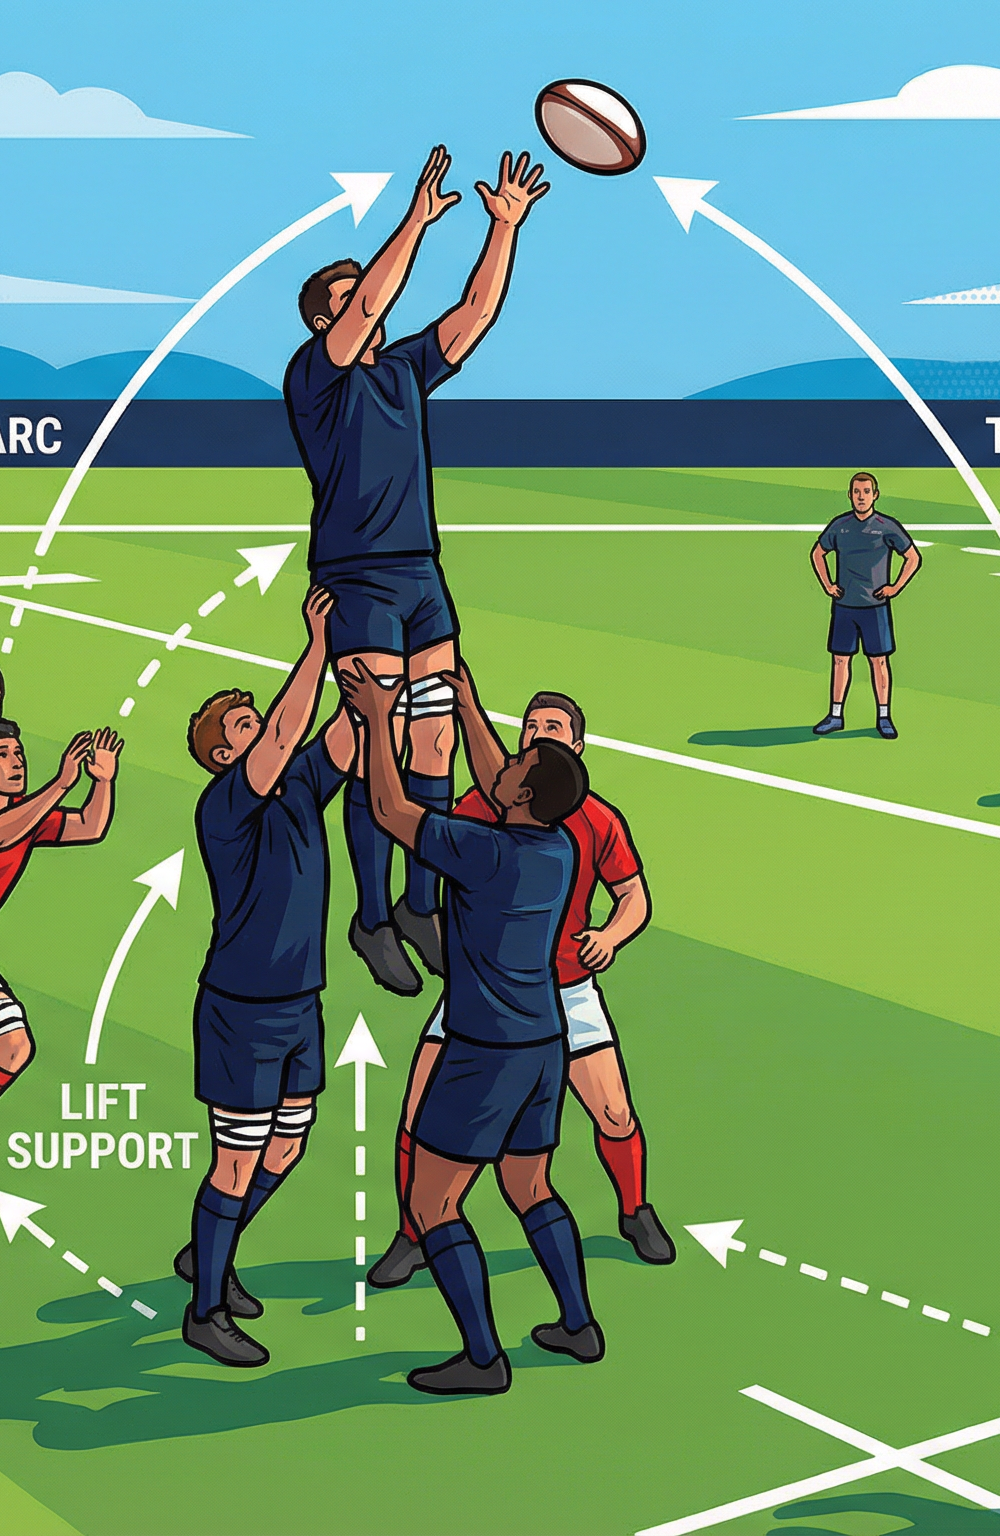
- The Throw: The hooker executes a firm, accurate throw along the line of touch, aiming for the apex of the jumper's anticipated arc.
- The Lift: The lifters step in aggressively, gripping the jumper securely (front lifter on the lower thighs/knees, rear lifter on the glutes/hamstrings) and extending fully to hoist the jumper into the air.
Phase 3: The Catch and Delivery
- The Catch: The jumper extends both arms fully, catching the ball cleanly at the highest possible point.
- The Delivery: Depending on the called play, the jumper either brings the ball down to form a maul or delivers it immediately off the top to the waiting scrum-half.
4. Key Coaching Points
- Timing is Everything: The throw, the jumper's explosive leap, and the lifters' hoist must happen in perfect synchronisation. A fraction of a second delay allows the defense to compete.
- Lifter Technique: Lifters must get their hips under the jumper and drive through their legs. They should never lift with just their arms or back.
- Hooker Accuracy: The hooker must throw to the space where the jumper will be, not where they are standing. The trajectory must be flat and fast for front/middle pods, and appropriately lofted for the tail.
- Strong Core in the Air: Jumpers must engage their core to remain stable in the air, making it easier for lifters to support them and harder for the opposition to disrupt the catch.
- Rapid Delivery: If playing off the top, the jumper's transfer to the scrum-half must be seamless, acting as a pendulum to swing the ball down accurately.
5. Common Mistakes
- Telegraphing the Jump: Jumpers looking directly at the spot they intend to jump, or dipping too early, giving the opposition time to react and contest.
- Poor Lifting Posture: Lifters standing too upright before the lift, resulting in a weak, unstable hoist that leaves the jumper vulnerable.
- Throwing Down the Middle: The hooker failing to keep the ball on their team's side of the line of touch, risking a straight-throw infringement or an easy steal.
- Lack of Support: In maul situations, supporting players (like the 7 and 8) failing to bind quickly and legally, leaving the catcher isolated.
6. Variations & Progressions
Progressions
- Add Passive Defense: Introduce 2-3 defenders with hit shields to contest the space but not the ball, forcing the attacking pod to execute under physical pressure.
- Live Contesting: Introduce a fully opposed defensive pod to actively compete for the throw, requiring the attacking caller to read the defense and change options dynamically.
Variations
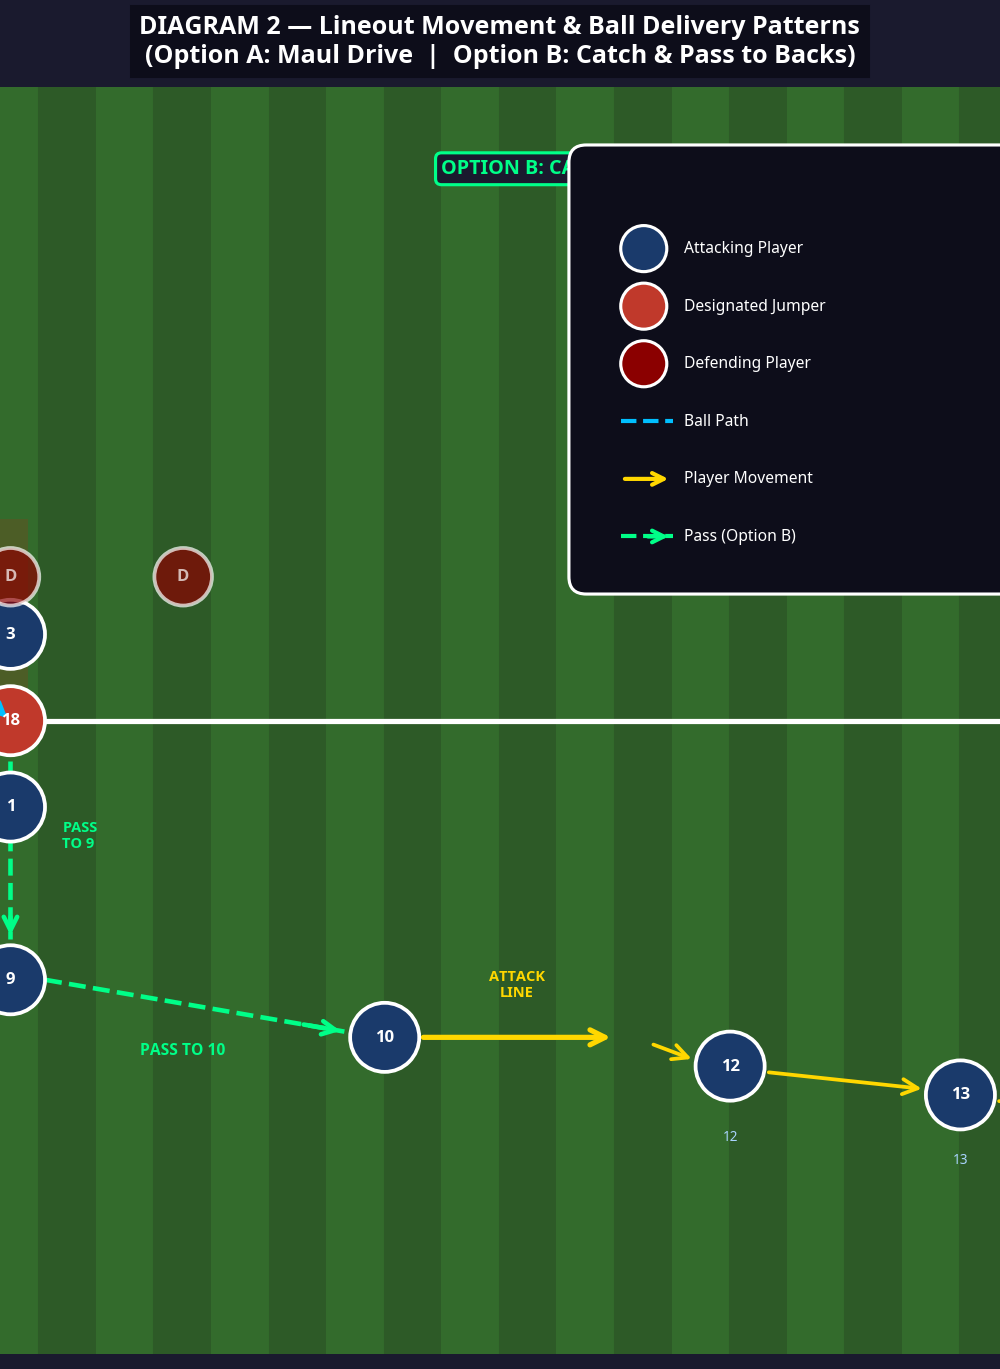
- Option A: The Maul Drive: As shown in Diagram 2, the jumper brings the ball down, and the pod immediately binds tightly. The 7 and 8 join the formation, driving the opposition backward to gain territory or draw a penalty.
- Option B: Catch & Pass to Backs: The jumper delivers the ball off the top to the scrum-half (9), who fires a rapid pass to the fly-half (10). This provides clean, fast ball to attack the wider channels before the defensive line can reset.
7. Age Adaptations
- Under 8 to Under 12: Lifting is not permitted. Focus entirely on the hooker's throwing accuracy and the jumper's timing and catching technique from a standing or running jump.
- Under 14 to Under 16: Introduce supported lifting with strict adherence to safety protocols. Focus on core stability for jumpers and correct leg-drive technique for lifters. Limit the drill to uncontested lineouts until technical proficiency is achieved.
- Open/Senior: Execute the full 3-pod system with complex calls, dummy jumps, and full-contact maul progressions. Emphasise speed of execution and reading the defensive setup.