Defensive Marking Pressure Drill: Deny the Space, Win the Ball
Master the art of tight defensive marking with this progressive drill that builds body positioning, footwork, and ball-denial skills across 1v1 and 2v2 scenarios.

Equipment Needed
Overview
Defensive pressure is the foundation of every successful Netball team. This drill isolates and develops the core skills of tight marking, ball denial, and reactive footwork — the three pillars that separate average defenders from elite ones. By working in controlled 1v1 and 2v2 scenarios, players learn to read an attacker's body language, maintain a legal 0.9m defensive distance, and apply sustained pressure that forces turnovers or rushed decisions under game-like conditions.
This drill is best used in the middle third of a training session, once players are warmed up and moving freely. It is equally effective as a standalone defensive skills block (20–25 minutes) or as a lead-in to a full-court defensive game scenario. Coaches working with Goal Keepers (GK), Goal Defenders (GD), Wing Defenders (WD), and Centre (C) will find this drill particularly valuable, though all positions benefit from understanding defensive principles.
Setup

Equipment Required
| Item | Quantity |
|---|---|
| Netball court (full or half) | 1 |
| Netballs | 3–4 |
| Bibs (two contrasting colours) | 1 set per pair |
| Cones | 8–10 |
| Whistle | 1 |
Court Setup
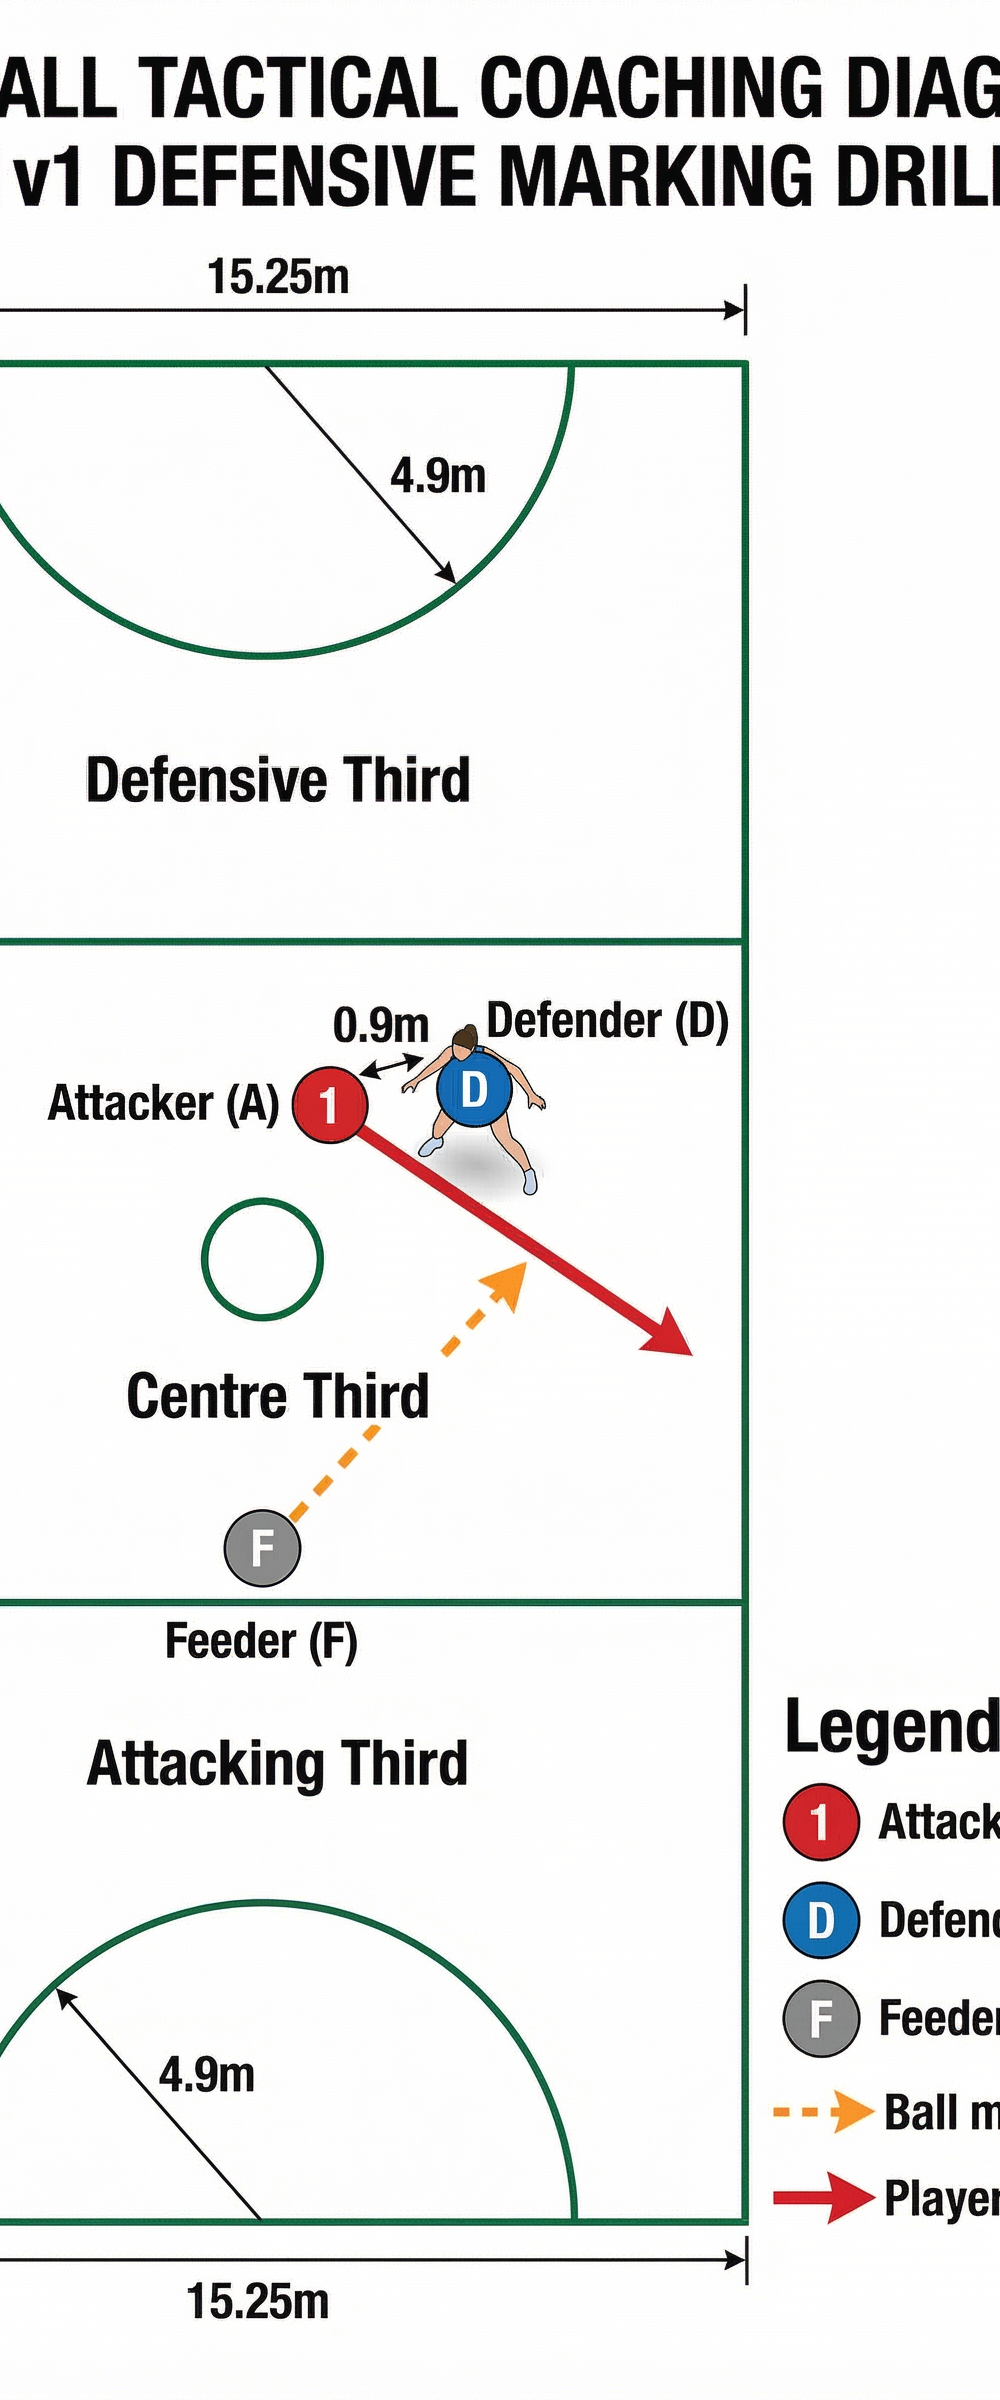
This drill operates primarily within the centre third and attacking third of a standard Netball court (30.5m × 15.25m). Use cones to mark a working zone approximately 10m × 10m within the centre third for the Phase 1 (1v1) component. For Phase 2 (2v2), expand the working zone to include the full width of the attacking third, bounded by the transverse line and the goal circle edge.
Player Positions
Organise players into groups of three for Phase 1 (one Feeder, one Attacker, one Defender) and groups of five for Phase 2 (one Feeder, two Attackers, two Defenders). Rotate roles every 60–90 seconds so all players experience both attacking and defending.
Step-by-Step Instructions

Phase 1 — 1v1 Marking in the Centre Third
Step 1. Position the Feeder (F) at the transverse line, holding the ball. The Attacker (A) starts 5m away in the centre third. The Defender (D) takes up a position 0.9m from the Attacker, facing them in a low, balanced defensive stance — knees bent, weight on the balls of the feet, arms active but not obstructing.
Step 2. On the coach's whistle, the Attacker makes a sharp lead — either a straight drive toward the Feeder or a diagonal cut toward the sideline. The Defender must react immediately, moving their feet to maintain the 0.9m distance and positioning their body to deny the direct passing lane.
Step 3. The Feeder has 3 seconds to decide whether to pass. If the Defender has successfully denied the space, the Feeder holds the ball and the Attacker must change direction and re-lead. If a gap opens, the Feeder passes and the Defender attempts to intercept or immediately closes down the Attacker upon receipt.
Step 4. Each repetition lasts 10–15 seconds. After each rep, pause briefly to give the Defender one specific piece of feedback before rotating. Run 4–6 reps per defender before rotating roles.
Step 5. After two full rotations, increase the working zone slightly and allow the Attacker to use two leads before the Feeder must pass. This builds the Defender's stamina and ability to sustain pressure across multiple movements.

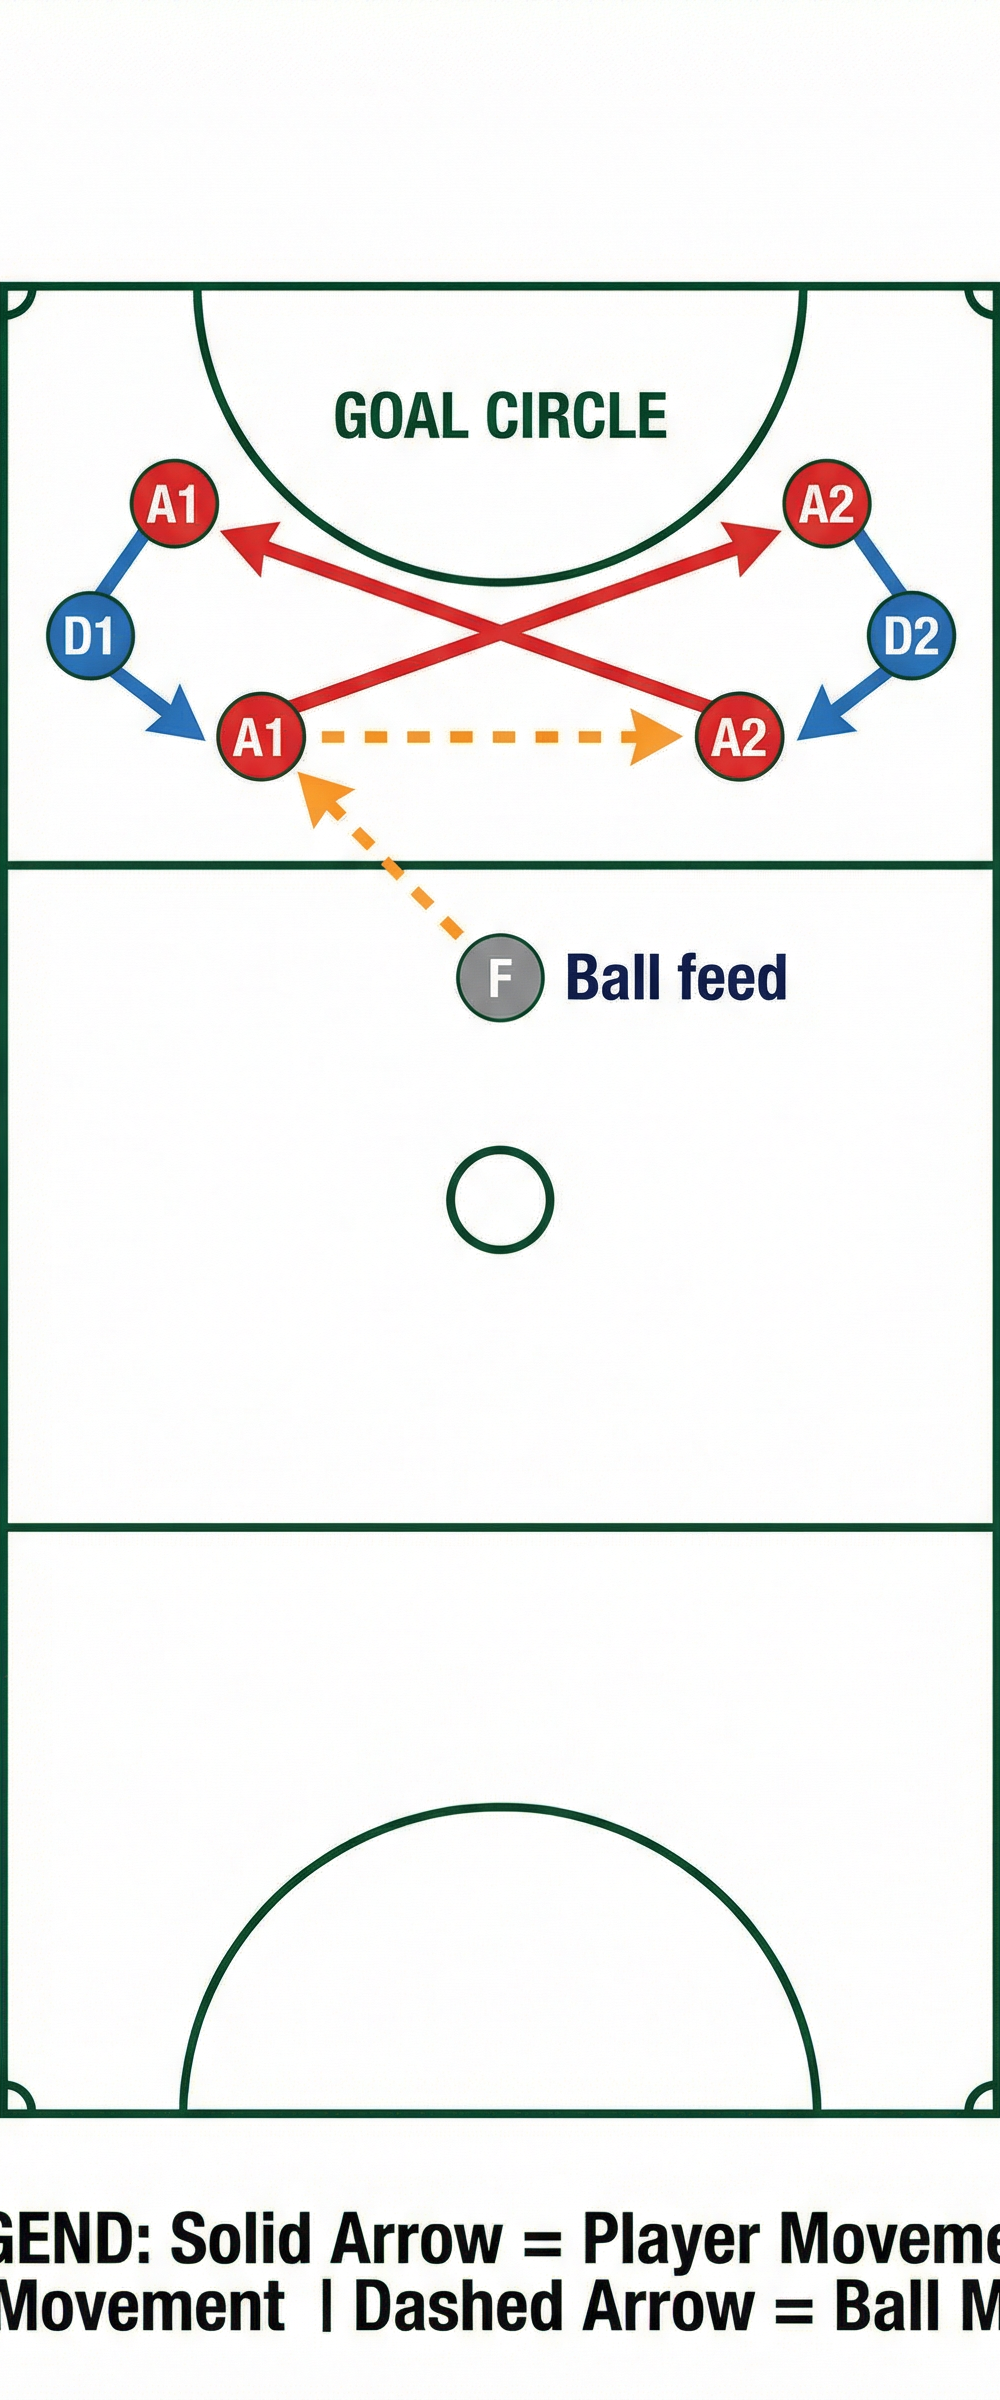
Phase 2 — 2v2 Crossing Runs in the Attacking Third
Step 6. Set up two Attackers (A1 and A2) positioned wide on either side of the attacking third, just inside the transverse line. Two Defenders (D1 and D2) mark them respectively. The Feeder stands at the centre of the transverse line.
Step 7. On the whistle, A1 and A2 execute a crossing run — A1 drives diagonally toward the right post, while A2 cuts across to the left. D1 and D2 must communicate immediately, deciding whether to switch marks or track through the cross. Coaches should initially let players make their own decisions, then debrief the choice made.
Step 8. The Feeder passes to whichever Attacker creates the best lead. The receiving Attacker has one catch-and-hold; the non-receiving Attacker continues their run to create a second option. Defenders must react to the ball movement and apply immediate pressure on the ball carrier (maintaining 0.9m) while the off-ball Defender repositions to deny the next pass.
Step 9. Play continues for 20 seconds per repetition, with the goal being either a clean pass into the goal circle (Attackers win) or a turnover/forced error (Defenders win). Track outcomes over 6 reps to build competitive accountability.
Step 10. Rotate roles after every 6 reps. Ensure all players complete at least two rotations as defenders before moving to the next progression.
Key Coaching Points

The following six teaching points should be reinforced consistently throughout the drill. Coaches are encouraged to pause the drill and demonstrate these points physically rather than relying solely on verbal instruction.
1. The 0.9m Rule is a Weapon, Not a Restriction. Many young defenders treat the mandatory 0.9m distance as a limitation. Reframe it: a defender who is exactly 0.9m away with active arms and correct body angle creates enormous pressure. Emphasise that closeness with correct positioning is far more effective than standing 1.5m away.
2. Footwork Before Arms. The most common defensive error is reaching with the arms before the feet have moved. Drill the mantra: feet first, then arms. The defender's first movement on any lead must be a foot step to close the angle, not a lunge of the upper body.
3. Read the Hips, Not the Eyes. Teach defenders to watch the attacker's hips and torso rather than their eyes or the ball. The hips tell you where the body is going; the eyes and head can deceive. This is a skill that requires deliberate repetition before it becomes instinctive.
4. Deny the Preferred Lead. Elite defenders do not simply react — they anticipate. Encourage defenders to study their opponent's preferred lead direction in the first 30 seconds and then position their body to make that lead unavailable, forcing the attacker onto their weaker side.
5. Communication in 2v2 Scenarios. In Phase 2, loud and early communication between D1 and D2 is non-negotiable. The call of "switch" or "yours/mine" must happen before the crossing run is completed, not after. Reward pairs who communicate clearly, even if the outcome is not perfect.
6. Sustained Pressure — No Switching Off. Defenders must maintain intensity for the full duration of each rep. A common tendency is to relax after the ball has been passed to the other attacker. Emphasise that off-ball positioning and denial work is just as important as on-ball pressure.
Common Mistakes

The following errors are the most frequently observed in this drill. Coaches should watch for them specifically and address them immediately with targeted feedback.
Mistake 1 — Flat-footed defensive stance. Defenders who stand upright with weight on their heels cannot react quickly enough to sharp leads. Correct this by having the defender hold a low, active stance for 5 seconds before the whistle blows, reinforcing the habit of being ready before the movement begins.
Mistake 2 — Chasing the attacker's back. When a defender is beaten on the initial lead, they often chase from behind rather than taking a recovery angle. Teach the concept of cutting the angle — instead of following the attacker's exact path, the defender should run a shorter arc to get ahead of the movement.
Mistake 3 — Obstruction through body contact. Under pressure, defenders frequently lean into or make contact with the attacker, resulting in obstruction calls. Reinforce that a defender who gives away a free pass has done more damage than one who was beaten cleanly. Use a no-contact rule in early repetitions to build correct habits before introducing competitive pressure.
Mistake 4 — Ball-watching in 2v2. In Phase 2, defenders frequently watch the ball rather than their assigned attacker, losing track of off-ball movement. Use a drill variation where the coach calls a specific defender's name — that defender must immediately state where their attacker is without looking at them, building spatial awareness.
Mistake 5 — Dropping off too early after a pass. Once the attacker releases the ball, some defenders immediately relax and create space. Emphasise that the moment of release is when the defender should increase pressure, as the attacker is most vulnerable to a quick intercept on the return pass.
Variations & Progressions
Progression 1 — Add a Second Feeder (Increase Ball Speed). Introduce a second Feeder at the opposite end of the working zone. Now the ball can be moved between the two Feeders before being delivered to the Attacker, simulating game-speed ball movement and forcing the Defender to track both the ball and their opponent simultaneously. This significantly increases the cognitive and physical demand.
Progression 2 — Conditioned Game: Defenders Must Win. Convert the 2v2 drill into a short conditioned game where Defenders score a point for every turnover, intercept, or forced error (including a pass that goes out of bounds). Attackers score a point for every clean pass into the goal circle. First pair to 5 points wins. The competitive element replicates game pressure and reveals which defensive habits hold up under stress.
Variation 1 — Easier: Passive Attacker. For players new to defensive marking, begin with the Attacker moving at 50–60% pace and telegraphing their lead direction. This allows the Defender to practise footwork and positioning without the cognitive overload of reacting to unpredictable movement. Gradually increase attacker intensity as confidence builds.
Variation 2 — Harder: Three-Lead Sequence. Require the Attacker to make three consecutive leads before the Feeder can pass. The Defender must sustain pressure and correct positioning across all three movements without conceding space. This is an excellent conditioning tool as well as a technical one, and is particularly effective for senior and elite-level players.
Age Adaptations

| Age Group | Key Adaptations |
|---|---|
| Under 10 | Use a smaller working zone (6m × 6m). Focus only on Phase 1. Allow the Attacker to move at walking pace initially. Emphasise the concept of "staying close" rather than technical footwork. Use coloured cones to show the 0.9m distance visually. |
| Under 12–14 | Introduce Phase 1 fully with game-speed leads. Begin Phase 2 with coached switching calls rather than player-initiated communication. Allow 4 seconds for the Feeder to pass to reduce initial pressure. Focus coaching points on footwork and body angle. |
| Under 16 & Open | Run both phases at full intensity. Introduce the second Feeder progression. Add the conditioned game format. Expect and demand verbal communication between defensive pairs. Use video review if available to debrief positioning and decision-making. |
Drill designed for use on a standard Netball court (30.5m × 15.25m). Suitable for all competitive levels with appropriate adaptations. Review and adapt based on your squad's specific defensive needs each season.