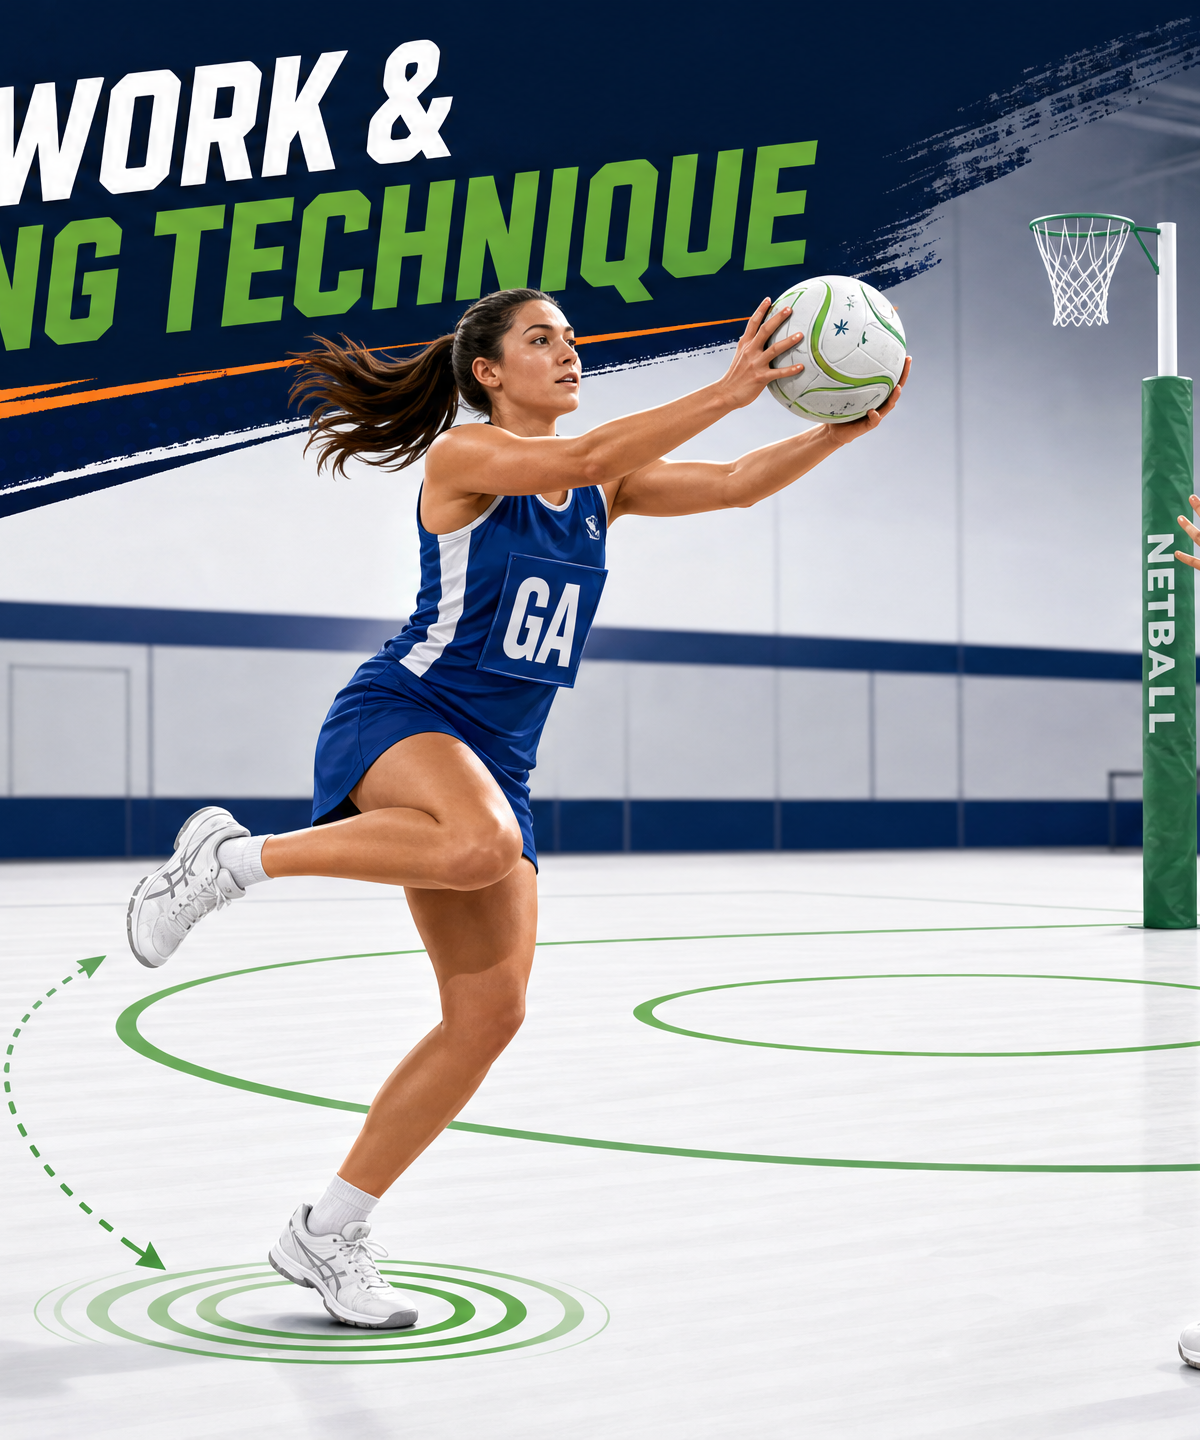
Mastering the Lead & Land: Progressive Footwork and Landing Technique Drill
A comprehensive, progressive drill designed to improve player balance, single-foot landing technique, and dynamic receiving skills under match-like pressure.
Equipment Needed
1. Overview
Solid footwork and balanced landing are the absolute foundation of Netball. Without a stable base upon receiving the ball, players are prone to stepping calls, inaccurate passing, and an inability to execute the next phase of play quickly. This drill resource provides a progressive framework to teach, refine, and pressure-test single-foot landings and pivoting.
This session moves from isolated technique to dynamic, multi-player sequences, making it perfect for the start of a training session or as a core conditioning block. By the end of this progression, your players will demonstrate improved core stability, lighter footwork, and a better understanding of how to transition smoothly from catching to throwing.
2. Setup

Equipment Needed:
- 3-4 Netballs per group
- 5-8 Agility markers or flat spots (orange)
- Bibs (optional, but recommended for Drill 3)
- One full Netball court (30.5m x 15.25m)
Court Setup:
- Drill 1: Uses one goal third (15.25m x 10m).
- Drill 2: Uses the centre third.
- Drill 3: Uses the full length of the court.
3. Step-by-Step Instructions

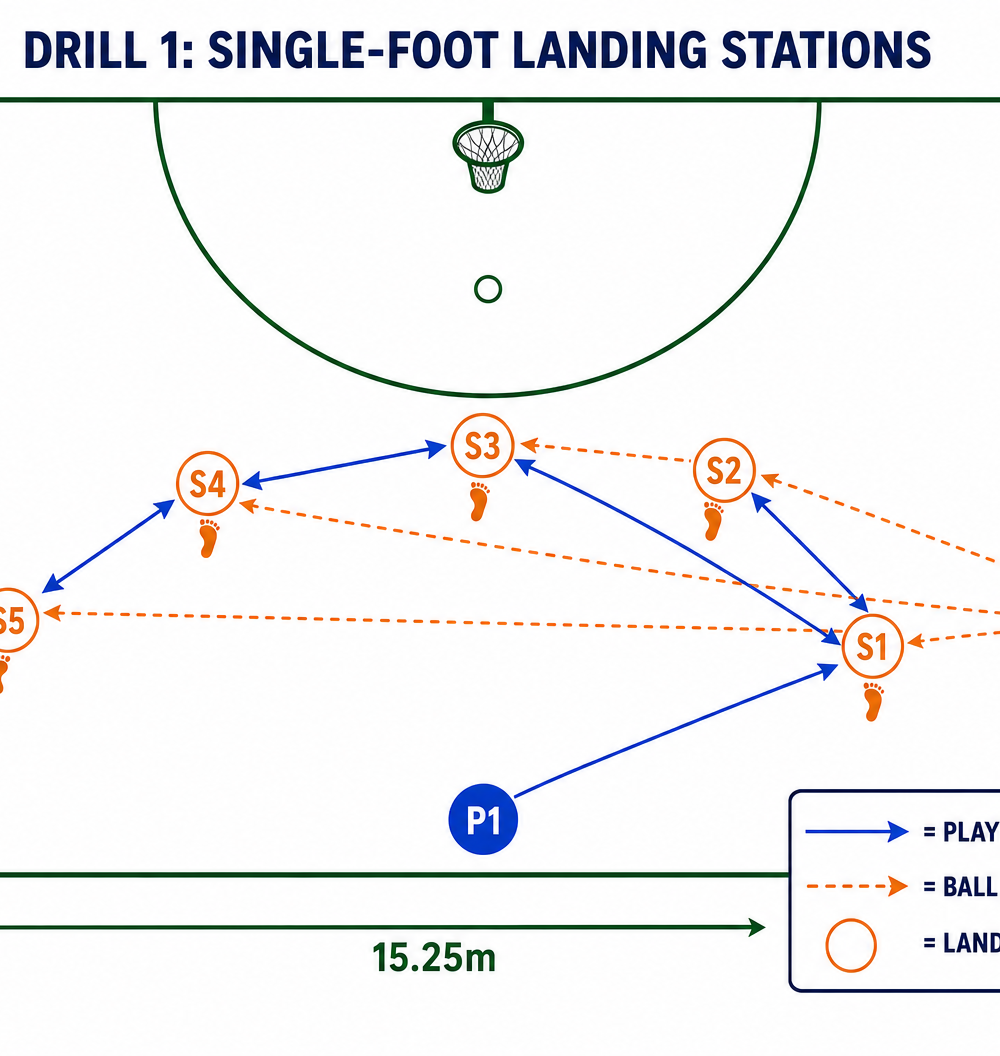
Progression 1: Single-Foot Landing Stations
This initial phase isolates the landing mechanic. The focus is purely on the drop, the catch, and the immediate stabilization of the body.

- Set up 5 flat markers (S1 to S5) in a loose arc across the goal third.
- The working player (P1) starts on the baseline.
- A feeder (F) stands on the sideline with a ball.
- P1 drives hard to marker S1.
- F delivers a crisp chest pass as P1 arrives at the marker.
- P1 must catch the ball and land on one foot exactly on or beside the marker, holding the landing for 2 full seconds to demonstrate absolute balance.
- P1 passes back to F, then immediately drives to S2.
- Repeat through all 5 stations. Ensure the player alternates their landing foot at each station.
Progression 2: Lead & Land — Two-Player Receiving Pattern
Now we introduce timing, a supporting player, and the pivot. This mimics the Wing Attack (WA) leading to the circle edge and hitting the Centre (C).
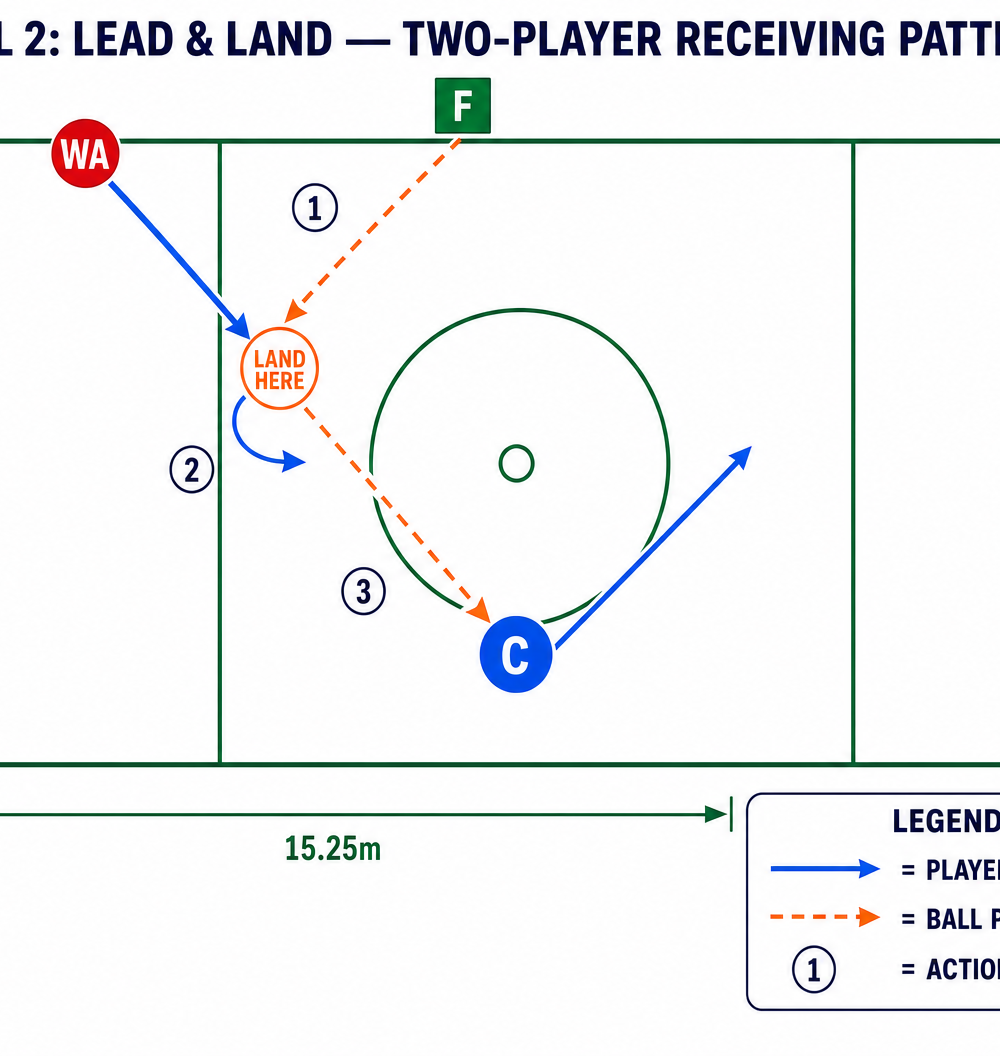
- Position the WA on the transverse line and the C near the centre circle.
- The Feeder (F) starts at the top of the centre third.
- The WA makes a sharp, angled lead drive toward the middle of the third.
- F passes to the WA.
- WA catches and executes a strong single-foot landing, immediately pivoting to face down-court.
- As the WA lands, the C makes a supporting lead drive into space.
- The WA delivers a quick, flat pass to the C.
- Reset and repeat. Run 10 repetitions, then swap sides so the WA leads from the right transverse line, forcing a landing and pivot on the opposite foot.
Progression 3: Full-Court Footwork Progression
This final phase brings it all together in a match-realistic, full-court transition from the centre pass down to the shooters.
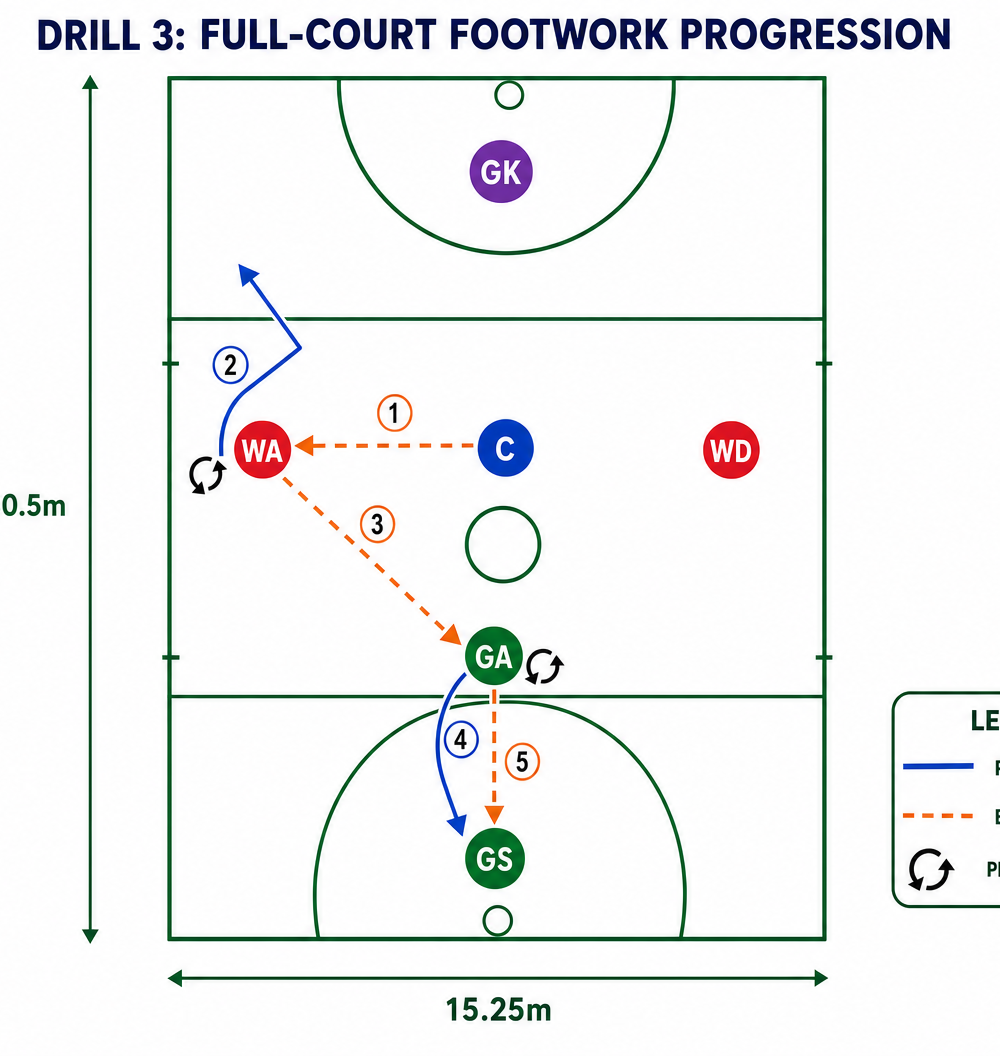
- Set up players in a standard attacking structure: C, WA, GA, GS. Place defenders (WD, GK) in passive shadowing roles to add visual pressure.
- The C starts with the ball and passes to the WA who is making a hard drive.
- The WA must catch, land on one foot, and pivot outside to protect the ball from the shadowing WD.
- The GA times their drive out of the shooting circle to offer for the next pass.
- The WA passes to the GA.
- The GA catches the ball, but this time executes a strong two-foot landing (jump stop) right on the circle edge to square up to the post.
- The GA then feeds the holding GS under the post.
- Have players rotate positions after every 3 successful sequences.
4. Key Coaching Points

- "Eyes up, hands ready:" Players should be calling for the ball with their hands up before the pass is thrown.
- Soft Knees: On landing, the knee of the grounded leg must bend to absorb the impact. A stiff, locked leg leads to heavy landings and potential injury.
- Core Engagement: A strong core stops the upper body from swaying upon catching the ball. "Chest over toes" is a good cue.
- The Pivot: The pivot must be on the ball of the grounded foot, keeping the heel slightly elevated. Do not drag the pivoting foot.
- Two-Foot Landing (Jump Stop): Both feet must hit the ground simultaneously, slightly wider than shoulder-width apart, creating a wide, stable base.
5. Common Mistakes
- The "Stutter Step": Taking several tiny steps before catching the ball instead of committing to a strong, definitive stride and landing.
- Landing Heavy: Landing flat-footed or on the heels, which jars the body and makes quick pivoting impossible.
- Dropping the Ball on the Pivot: Players often lower the ball to their waist when turning. Coach them to keep the ball high and protected at chest level during the pivot.
- Looking Backwards: Landing and staying faced toward the feeder instead of immediately turning the head and shoulders to look down-court for the next option.
6. Variations & Progressions

- Make it easier: Remove the ball entirely for Drill 1. Have players run to the markers and practice the 1-2 landing without the cognitive load of catching.
- Make it harder: Add active defenders to Drill 2 and Drill 3. Force the receiver to land, pivot, and pass under physical pressure.
- Conditioning Focus: In Drill 1, after passing back to the feeder, the player must sprint back to the baseline before driving to the next marker.
7. Age Adaptations

- Under 8 / Under 10: Focus heavily on the two-foot landing (jump stop) as it is easier to balance. Play "statues" where they must freeze upon catching the ball.
- Under 12 / Under 14: Emphasize the outside foot landing (landing on the foot closest to the sideline) to naturally open the body to the court.
- Under 16 / Open: Demand speed. The transition from the catch, to the pivot, to the release of the next pass should be under 1.5 seconds.