WD to GA Transition Play: Breaking the Press with Speed and Width
Master the WD to GA transition play — a high-tempo, structured set play that exploits defensive pressure in the centre third and delivers the ball to your Goal Attack in space.
Equipment Needed
Overview
The WD to GA Transition Play is a structured, high-tempo set play designed to exploit defensive pressure in the centre third by using the Wing Defence as a primary ball carrier to initiate a fast break toward the Goal Attack. It is most effective immediately after your team wins possession in the defensive third — whether from a turnover, a goalkeeper's rebound, or a defensive intercept — and the opposition's defensive structure has not yet reset.
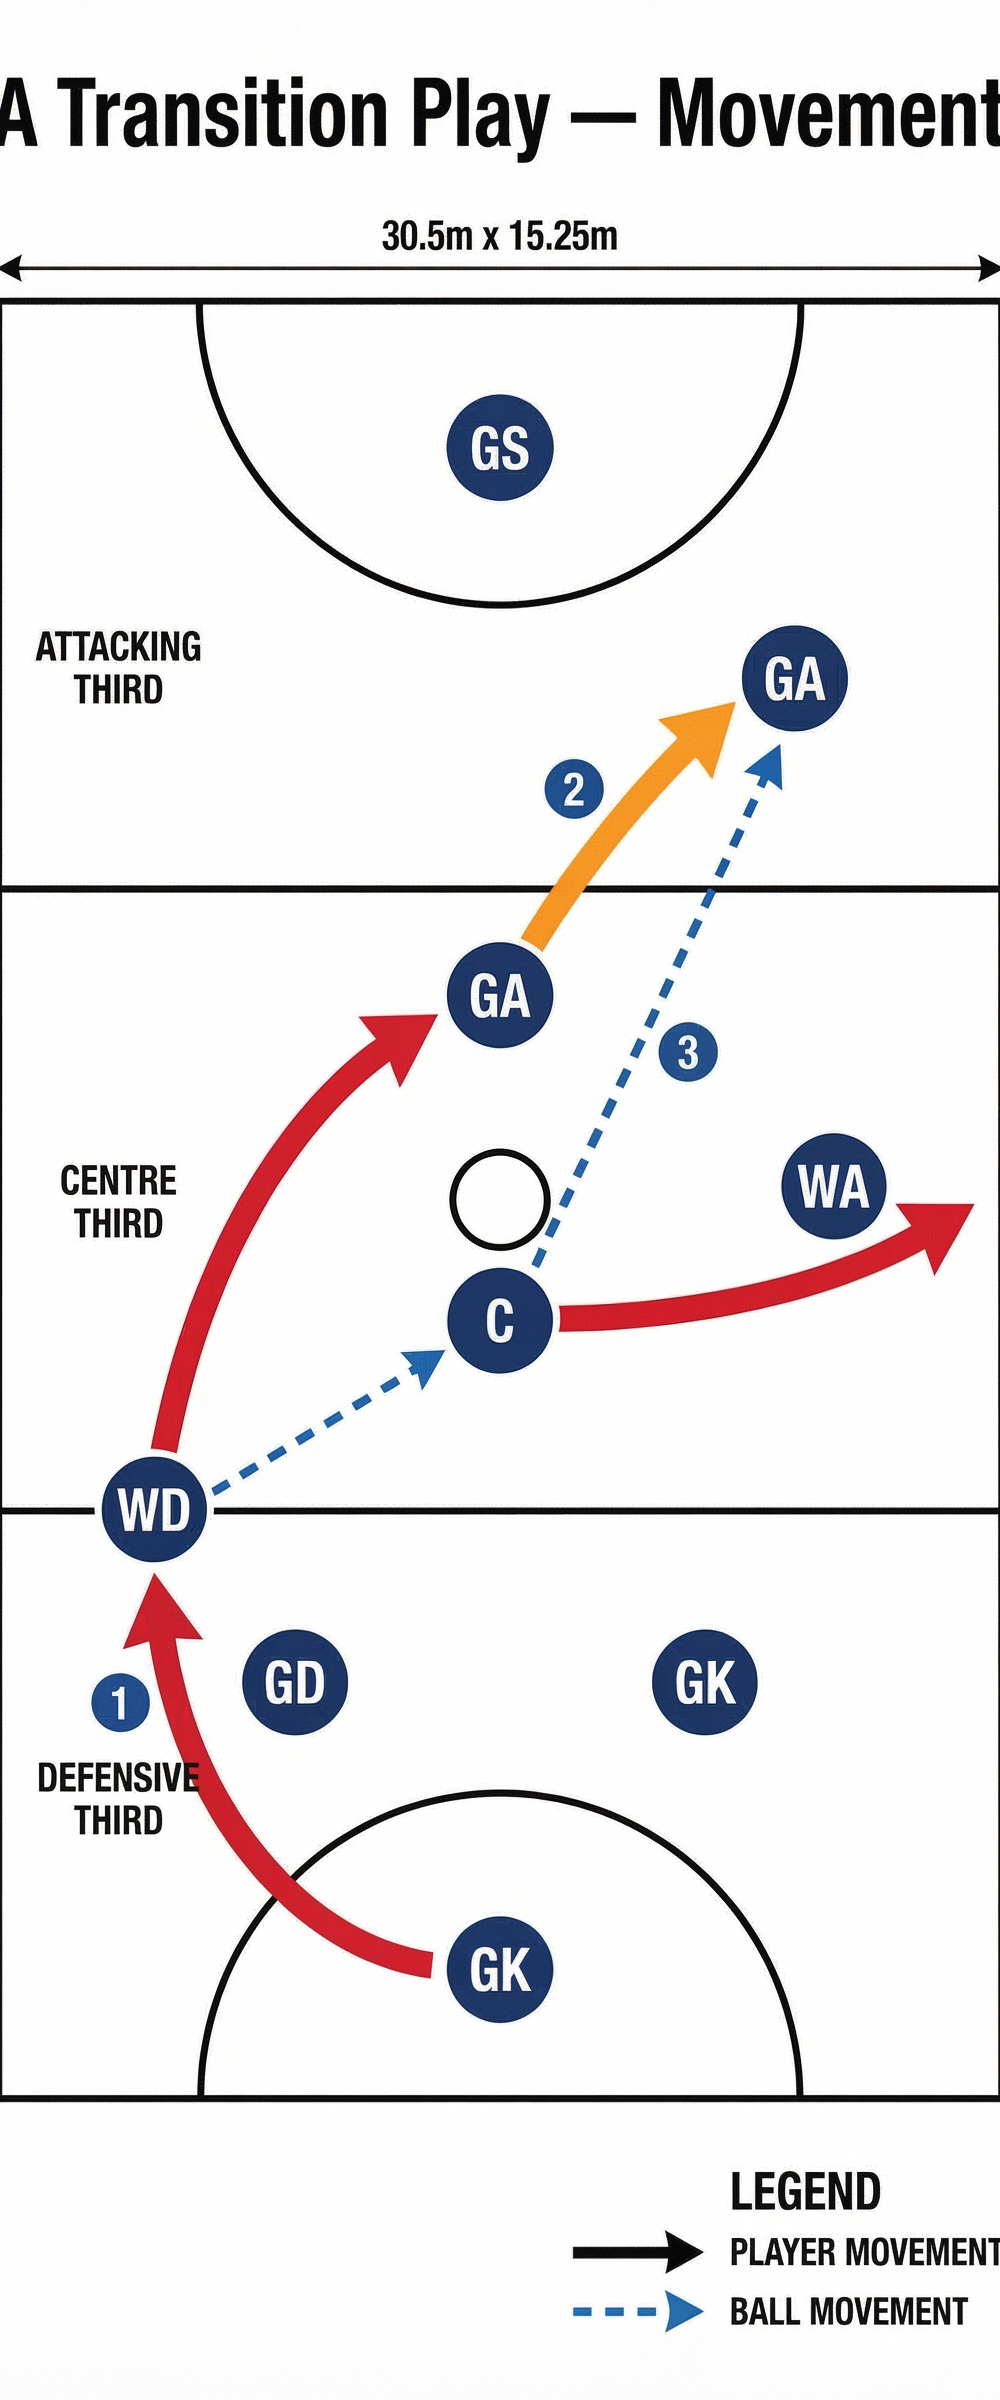
The core principle is simple but powerful: the Wing Defence, having just contributed to winning possession, becomes the first outlet pass target, drives hard into the centre third, and uses the Centre as a relay pivot to deliver a long, penetrating pass to the Goal Attack, who has timed a diagonal lead from the centre third into the attacking third. When executed with pace and precision, this play bypasses two lines of defensive pressure in under four seconds and creates a high-percentage shooting opportunity for the Goal Shooter.
Use this play when your team has just won a turnover in the defensive third, when the opposition is caught in transition and their mid-court defenders are out of position, or when you want to push the tempo of the game and prevent the opposition from settling into their defensive shape.
Setup

Equipment
- 1 full-size netball court (30.5m x 15.25m)
- 1 netball (size 5 for senior/open, size 4 for under-12 and below)
- Bibs or training vests in two contrasting colours
- Optional: cones to mark key zones and lead zones
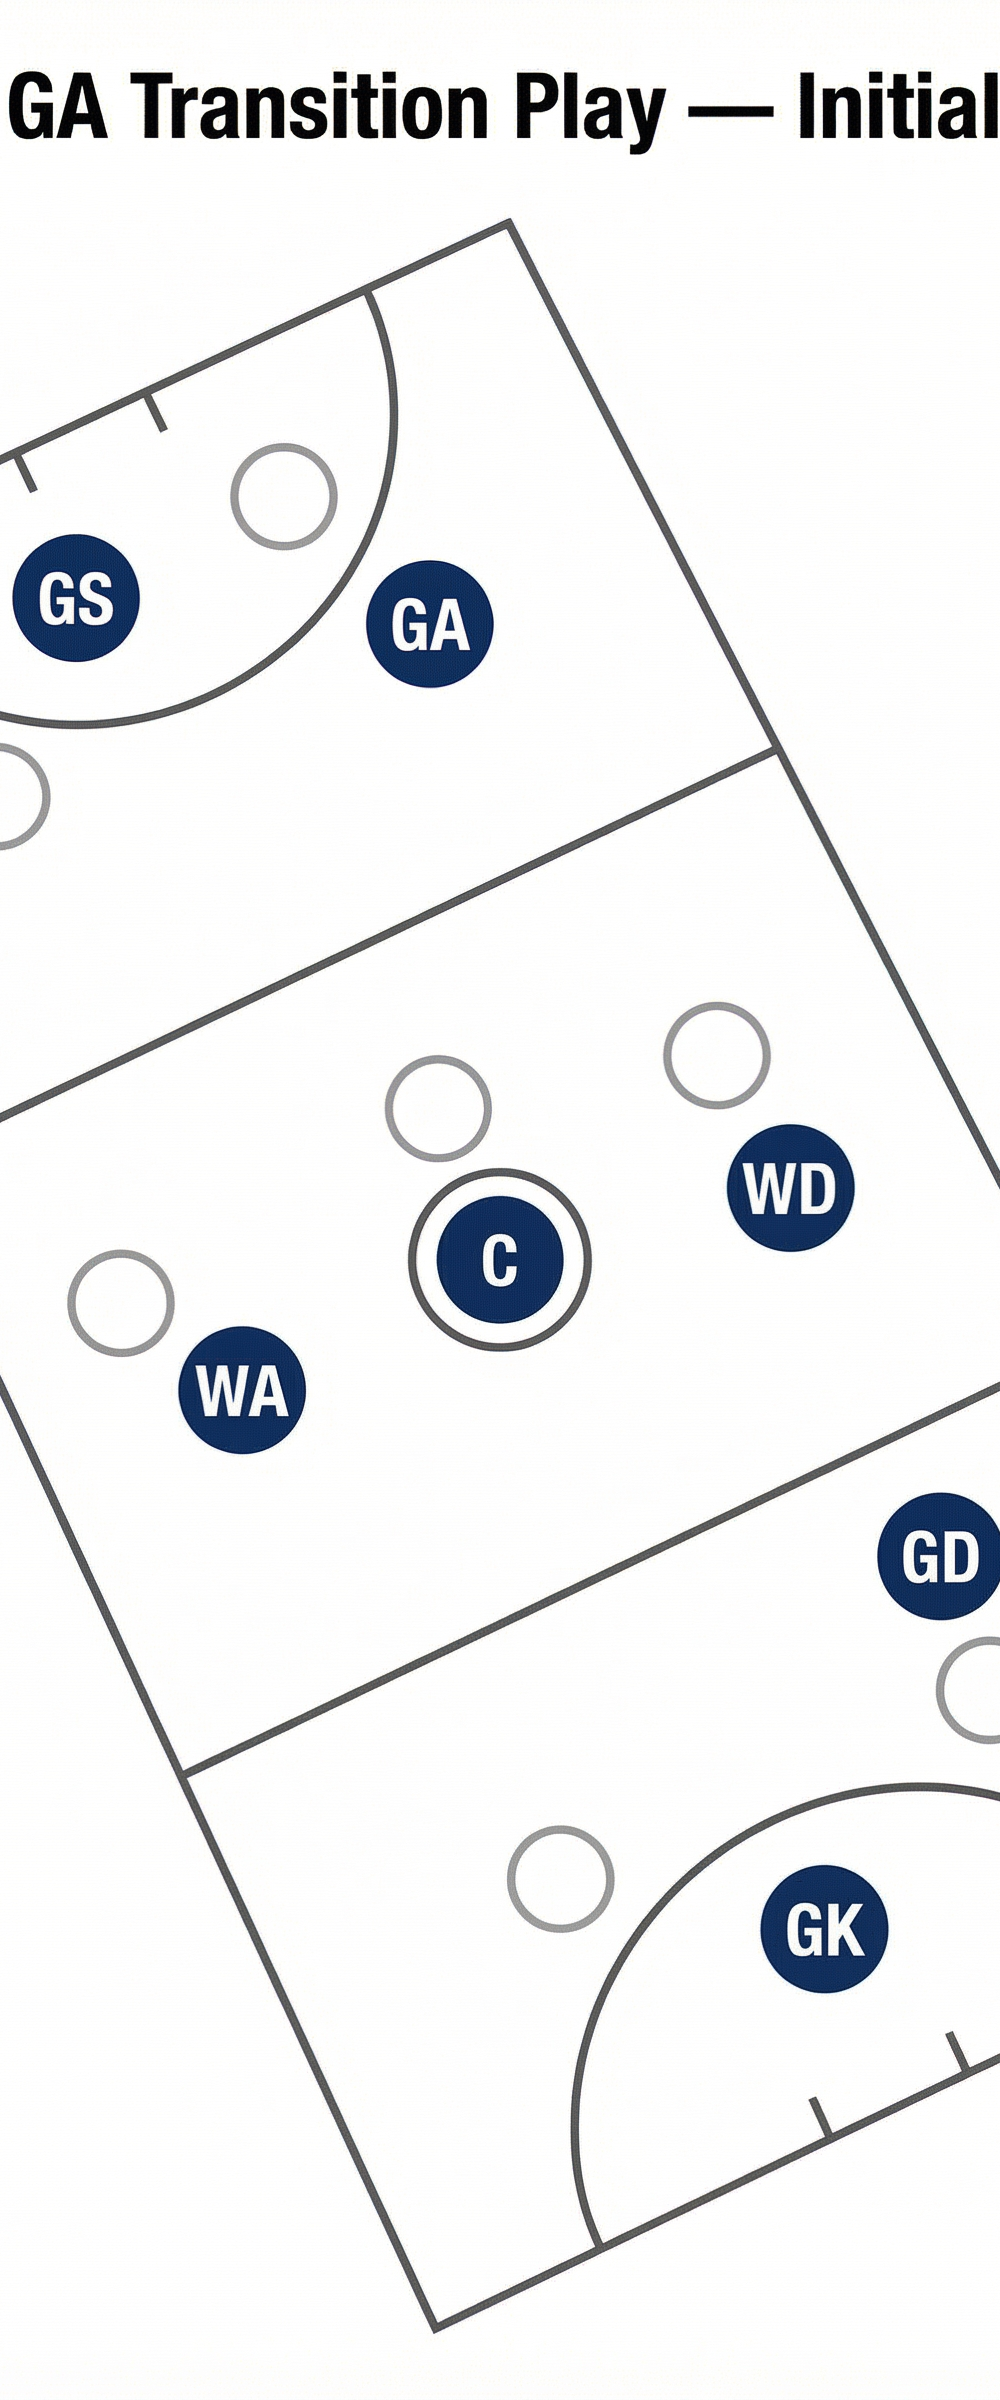
Player Positions at Initiation
| Position | Starting Location | Primary Role in This Play |
|---|---|---|
| GK (Goalkeeper) | Own goal circle | Wins possession; initiates first outlet pass |
| GD (Goal Defence) | Defensive third, near transverse line | Provides secondary outlet option; clears space |
| WD (Wing Defence) | Defensive/centre third transverse line | Primary first-pass target; drives into centre third |
| C (Centre) | Centre circle | Relay pivot; receives from WD, delivers to GA |
| WA (Wing Attack) | Centre third, wide right channel | Width runner; stretches opposition and creates space |
| GA (Goal Attack) | Centre third, near attacking transverse line | Primary target; times diagonal lead into attacking third |
| GS (Goal Shooter) | Attacking goal circle | Holds position; prepares to receive final pass |
Coach's Note: Before running this play in a match, walk players through their starting positions and confirm each player knows their role. The WD's immediate availability as an outlet is the trigger for the entire sequence.
Step-by-Step Instructions

Step 1 — Win Possession (GK or GD)
The play begins the moment your GK or GD secures possession — either from a rebound off the post, an intercept, or a forced turnover. The GK or GD must look up immediately and locate the WD, who should already be positioned at or just behind the defensive/centre third transverse line on the right-hand side of the court (approximately 1–2 metres from the sideline).
Step 2 — WD Presents and Receives (0–1 second)
The WD makes a sharp, decisive lead — a two-step drive toward the ball — to present a clear passing target. This is not a long lead; it is a short, committed movement of 1–2 metres to create separation from any opposing WA who may be marking. The GK or GD delivers a flat, chest-height pass directly to the WD's hands.
Step 3 — WD Drives into the Centre Third (1–2 seconds)
Upon receiving, the WD immediately pivots and drives forward (toward the attacking end) into the centre third. The WD should aim to penetrate at least 3–4 metres past the transverse line before releasing the ball. This forward momentum is critical — it pulls the opposition's mid-court defenders toward the ball and opens the passing lane to the Centre.
Step 4 — C Presents as Relay Pivot (1–2 seconds)
Simultaneously, the Centre has moved from the centre circle to a position approximately 2–3 metres ahead of the WD's drive line, slightly toward the centre of the court. The C presents with hands high and receives a short, sharp pass from the WD. The C must catch and release in one fluid motion — no holding, no hesitation.
Step 5 — GA Times the Diagonal Lead (2–3 seconds)
This is the most technically demanding element of the play. The GA must time their lead so that they are moving at full pace when the C is ready to release. The GA's lead is a sharp diagonal run from the centre third (approximately 3–4 metres from the attacking transverse line) into the attacking third, targeting the right-hand channel approximately 5–6 metres from the goal circle edge. The lead should be timed so the GA receives the ball in full stride, already facing the goal circle.
Step 6 — WA Provides Width (2–3 seconds)
While the GA makes the primary lead, the WA makes a simultaneous width run to the far (left) side of the court in the centre/attacking third. This run serves two purposes: it occupies the opposing GD and stretches the defence horizontally, and it provides an alternative outlet if the GA's lead is cut off.
Step 7 — GA Receives and Delivers to GS
The GA receives the C's pass in the attacking third and immediately looks to feed the GS in the goal circle. The GS should have held their position in the circle and be ready to receive a flat, low pass on the circle edge. The entire sequence from Step 1 to the GS receiving should take no more than 4–5 seconds.
Key Coaching Points

1. The WD Must Be Ready Before Possession Is Won
The biggest mistake teams make is waiting until possession is secured before the WD begins to position. Drill your WD to anticipate turnovers and be at the transverse line, body turned toward the defensive end, before the ball is in your team's hands. A half-second head start makes this play virtually unstoppable.
2. The First Pass Must Be Fast and Flat
The GK or GD must deliver a flat, direct pass — not a lob, not a bounce. A lofted pass gives the opposition time to recover and reset. Emphasise that the first pass is a trigger pass: it sets the tempo for everything that follows. Practise this pass in isolation until it becomes automatic under pressure.
3. The Centre Is a Relay, Not a Decision-Maker
The C's role in this play is to receive and release quickly — ideally within one second of catching. Coaches should actively discourage the C from holding the ball and surveying options. In this play, the C has one job: get the ball to the GA. Simplicity and speed are everything.
4. GA's Lead Timing Is the Heartbeat of the Play
If the GA leads too early, their defender recovers. If they lead too late, the C has nowhere to go. Spend dedicated time in training drilling the GA's lead timing in relation to the WD's drive. A useful cue: the GA should begin their lead the moment the WD receives from the C — not before, not after.
5. WA's Width Run Must Be Committed
Even if the WA never receives the ball in this play, their width run is not wasted. A half-hearted width run does not occupy the opposing GD. Insist that the WA runs at full pace to the sideline every single time, regardless of whether they expect to receive.
6. GS Must Hold and Be Ready
The GS should resist the temptation to come out of the circle to assist. Their job is to hold a strong position on the circle edge, read the GA's body position, and be ready to receive a quick feed. A GS who drifts out of the circle disrupts the final pass and reduces the shooting opportunity.
Common Mistakes

Mistake 1: WD Starts Too Deep in the Defensive Third
If the WD is positioned more than 4–5 metres inside the defensive third at the time of the turnover, the first pass is too long and too slow. The opposition has time to recover. Correction: use cones in training to mark the WD's starting zone — no deeper than 2 metres inside the defensive third transverse line.
Mistake 2: The Centre Holds the Ball Too Long
This is the most common breakdown point. When the C receives from the WD and pauses to look around, the GA's lead is wasted and the defence resets. Correction: introduce a "one-touch" rule in practice — the C must release within one second of receiving, or the play is reset and run again from the start.
Mistake 3: GA Leads Straight Instead of Diagonally
A straight lead from the centre third into the attacking third is easy for the opposing GD to defend because it is predictable. A diagonal lead — cutting across the court — is far harder to defend because it changes the angle of the pass and the defender's position simultaneously. Correction: place a cone at the GA's target landing zone and insist on a diagonal approach angle of at least 30–45 degrees.
Mistake 4: WA Does Not Run Width
When the WA jogs or drifts rather than sprinting to the wide channel, the opposing GD is free to double-team the GA. This collapses the space the play is designed to exploit. Correction: in training, award a point to the defence every time the WA fails to reach the sideline within three seconds of the play starting.
Mistake 5: GS Leaves the Circle Too Early
Anticipating the play, some Goal Shooters drift toward the transverse line to get involved. This vacates the goal circle and forces the GA to hold the ball, giving the defence time to recover. Correction: explicitly instruct the GS to keep both feet inside the goal circle until the GA has received the ball in the attacking third.
Variations and Progressions
Variation 1 — Double Lead Option (Intermediate)
Add a second option for the Centre: if the GA's lead is cut off, the WA loops back from the wide channel into the centre of the attacking third to receive the C's pass instead. This requires the WA to read the play and make a decision — making it suitable for more experienced players. It also prevents the opposition from simply overloading the GA's lead zone.
Variation 2 — WD as Direct Feeder (Advanced)
Remove the Centre relay entirely. The WD drives into the centre third and delivers the long pass directly to the GA in the attacking third, bypassing the C altogether. This is a higher-risk, higher-reward option that requires excellent passing accuracy from the WD and precise lead timing from the GA. Introduce this variation only once the standard three-pass version is well established.
Progression — Add Live Defence (All Levels)
Begin the drill with passive defenders (defenders who shadow but do not intercept), then progress to semi-active defenders (defenders who can intercept but not contact), and finally to full live defence. This graduated approach allows players to build confidence in the movement patterns before being tested under match-realistic pressure.
Age Adaptations

Under 10 and Under 12: Simplify the play to two passes only — GK to WD, WD to GA. Remove the Centre relay to reduce the number of decisions required. Focus on the WD's lead and the GA's diagonal movement. Use a larger target zone (marked by cones) for the GA's landing zone. Allow more time between passes and encourage verbal communication between players.
Under 14: Introduce the full three-pass version with the Centre relay. Begin with passive defence and progress to semi-active. Focus coaching attention on the GA's lead timing and the WA's width run. Introduce the Variation 1 double lead option once the base play is consistent.
Under 16 and Open: Run the play at full pace with live defence from the outset. Introduce Variation 2 (WD as direct feeder) as a second option. Challenge players to execute the full sequence in under four seconds. Add a competitive element — score a point for each successful completion under match conditions, and track improvement over multiple sessions.