WD to GA Transition Play: The Wing Drive
Learn how to exploit mid-court transitions by using your Wing Defence as an attacking weapon, delivering the ball quickly into your Goal Attack for high-percentage scoring opportunities.
Equipment Needed
Overview
The Wing Drive is a structured transition set play designed to move the ball rapidly from your defensive half into a scoring position by using the Wing Defence (WD) as an unexpected attacking link player. When your team wins possession in the defensive or centre third — through an intercept, rebound, or turnover — the WD immediately transitions into an offensive role, driving hard along the right-hand corridor toward the attacking transverse line. This creates a two-option attacking platform: a direct feed into the Goal Attack (GA) cutting into the goal circle, or a reset pass back to the Centre (C) for a secondary attacking sequence.
This play is most effective when used following a defensive turnover in the centre third, during a centre pass variation, or when the opposition's defensive structure is temporarily disorganised. The speed of the WD's transition is the key — defenders rarely track a WD moving forward aggressively, and this positional surprise creates the scoring opportunity.
Setup

Court: Full netball court (30.5m x 15.25m), all three thirds in use.
Players Required: 5 (GS, GA, C, WD, GD) — can be run with 7 for full-team practice.
Equipment: 1 netball, bibs for all positions, cones to mark the transverse lines if needed.
Starting Positions:
| # | Position | Starting Location |
|---|---|---|
| 1 | GS (Goal Shooter) | Deep in the attacking goal circle, holding width |
| 2 | GA (Goal Attack) | Edge of the attacking goal circle, facing centre |
| 3 | C (Centre) | Centre circle, ball in hand |
| 4 | WD (Wing Defence) | Right side of centre third, approximately 3–4m from transverse line |
| 5 | GD (Goal Defence) | Defensive third, providing support and outlet |
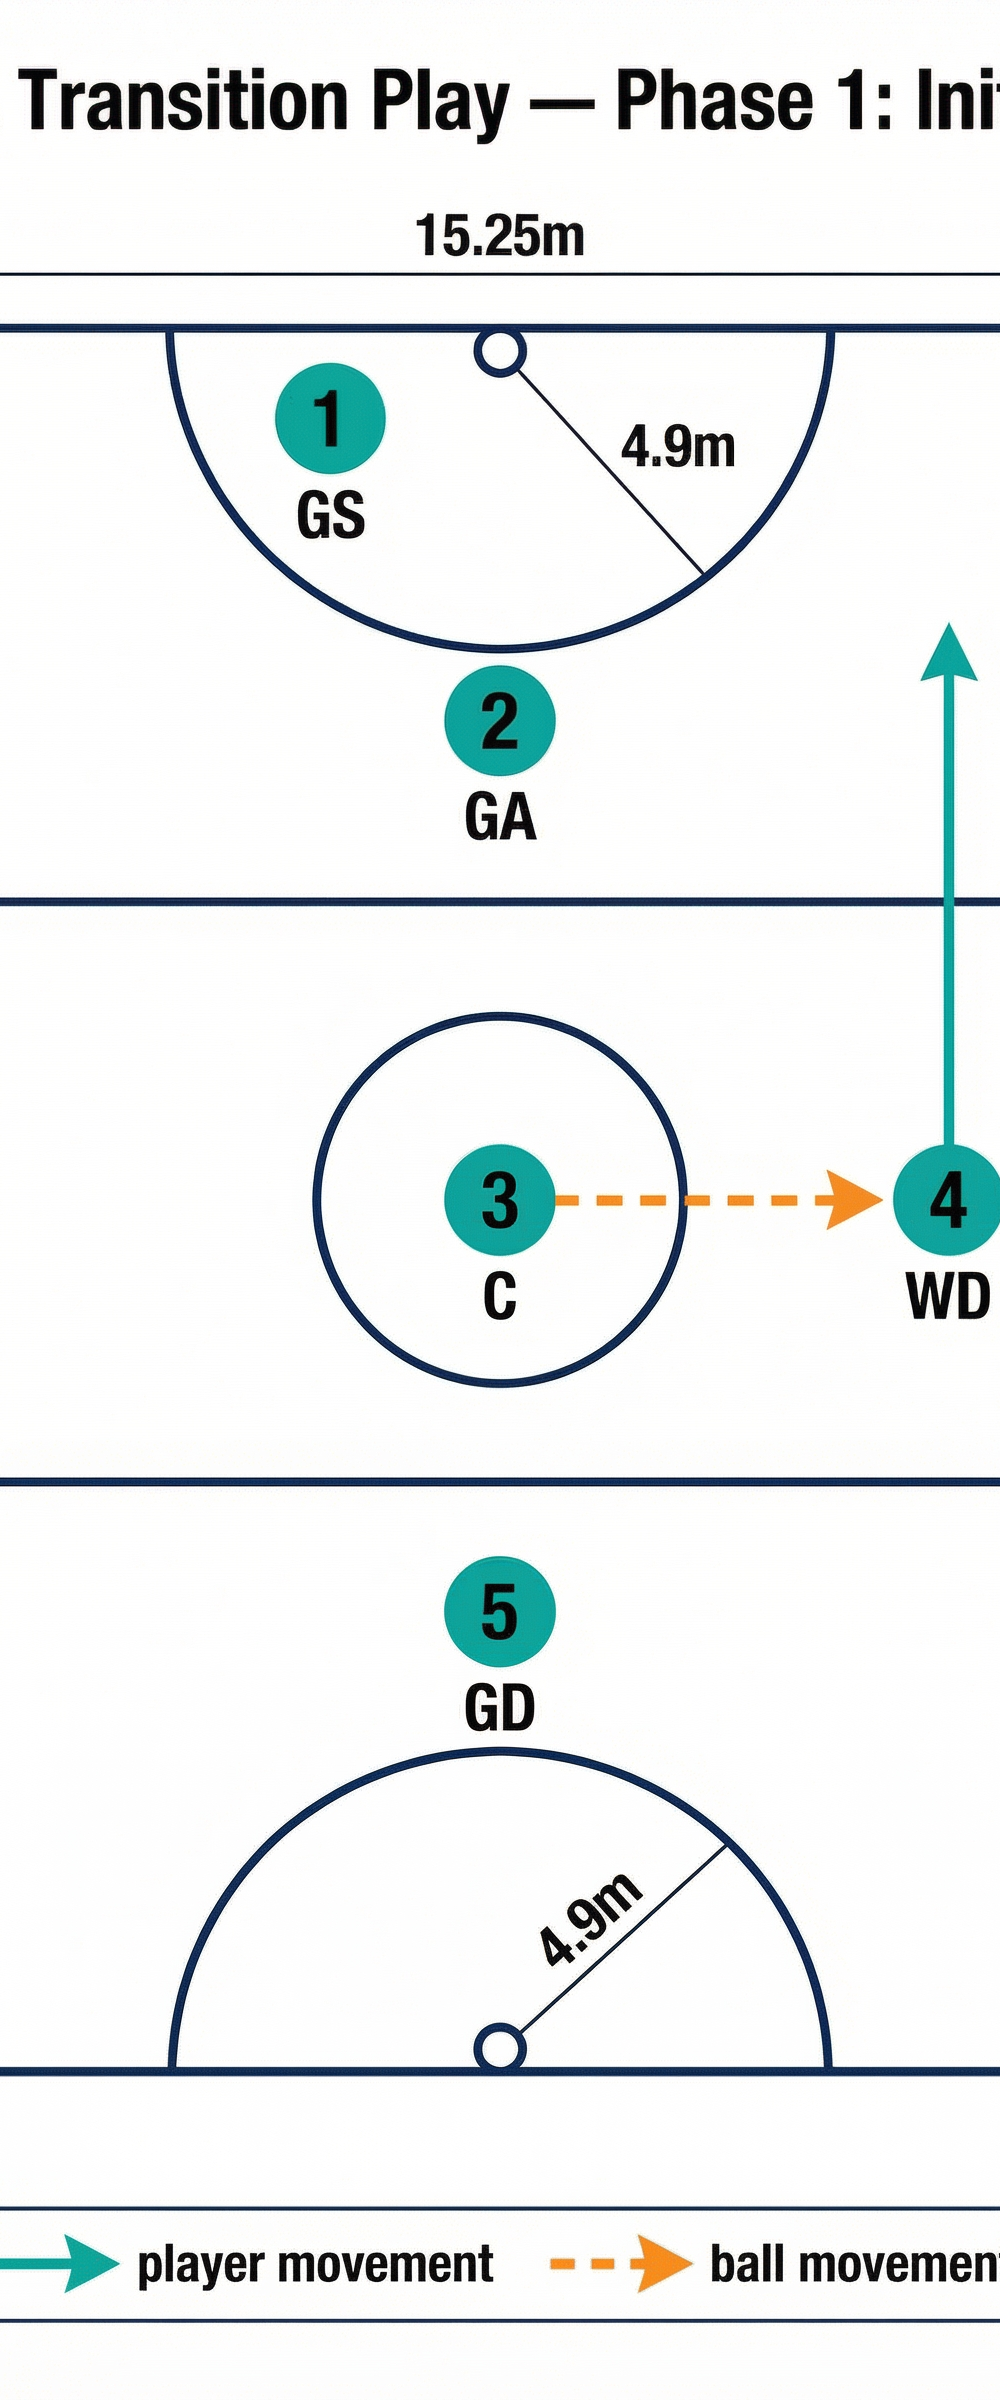
Diagram 1 — Phase 1: Initial Setup. The WD (4) receives the ball from C (3) and drives hard along the right corridor toward the attacking third.
Step-by-Step Instructions
Step 1 — Trigger the Play (0–1 second)
The play is triggered the moment your team wins possession in the centre or defensive third. The C holds the ball at the centre circle. The WD immediately reads the turnover and begins a sharp, angled run toward the right sideline of the centre third, positioning themselves approximately 3–4m from the attacking transverse line.
Step 2 — WD Receives the First Pass (1–2 seconds)
The C delivers a flat, direct pass to the WD on the right-hand corridor. This pass should travel no more than 5–6m and be timed to meet the WD mid-stride. The WD must land cleanly with both feet inside the centre third to remain within their legal playing area. The WD catches the ball with their body turned toward the attacking end.
Step 3 — GA Sets the Lead (1–2 seconds, simultaneous with Step 2)
As the C releases the ball to the WD, the GA makes a decisive lead run. Starting from the edge of the goal circle, the GA drives diagonally toward the attacking transverse line — moving away from their defender — before sharply cutting back toward the near post at a 45-degree angle. This two-movement fake (out then in) is critical to losing the opposing Goal Defence.
Step 4 — GS Creates Space (simultaneous with Steps 2–3)
The GS moves to the far post, pulling the opposing Goal Keeper deep and opening the near-post space for the GA's cutting run. The GS must hold their position wide and deep — do not collapse toward the ball.
Step 5 — WD Drives to the Transverse Line (2–3 seconds)
With the ball in hand, the WD takes one controlled step and drives hard toward the attacking transverse line, positioning themselves approximately 1m inside the right sideline and just behind the transverse line. This gives the WD a clear sightline into the goal circle and a legal delivery angle to the GA.
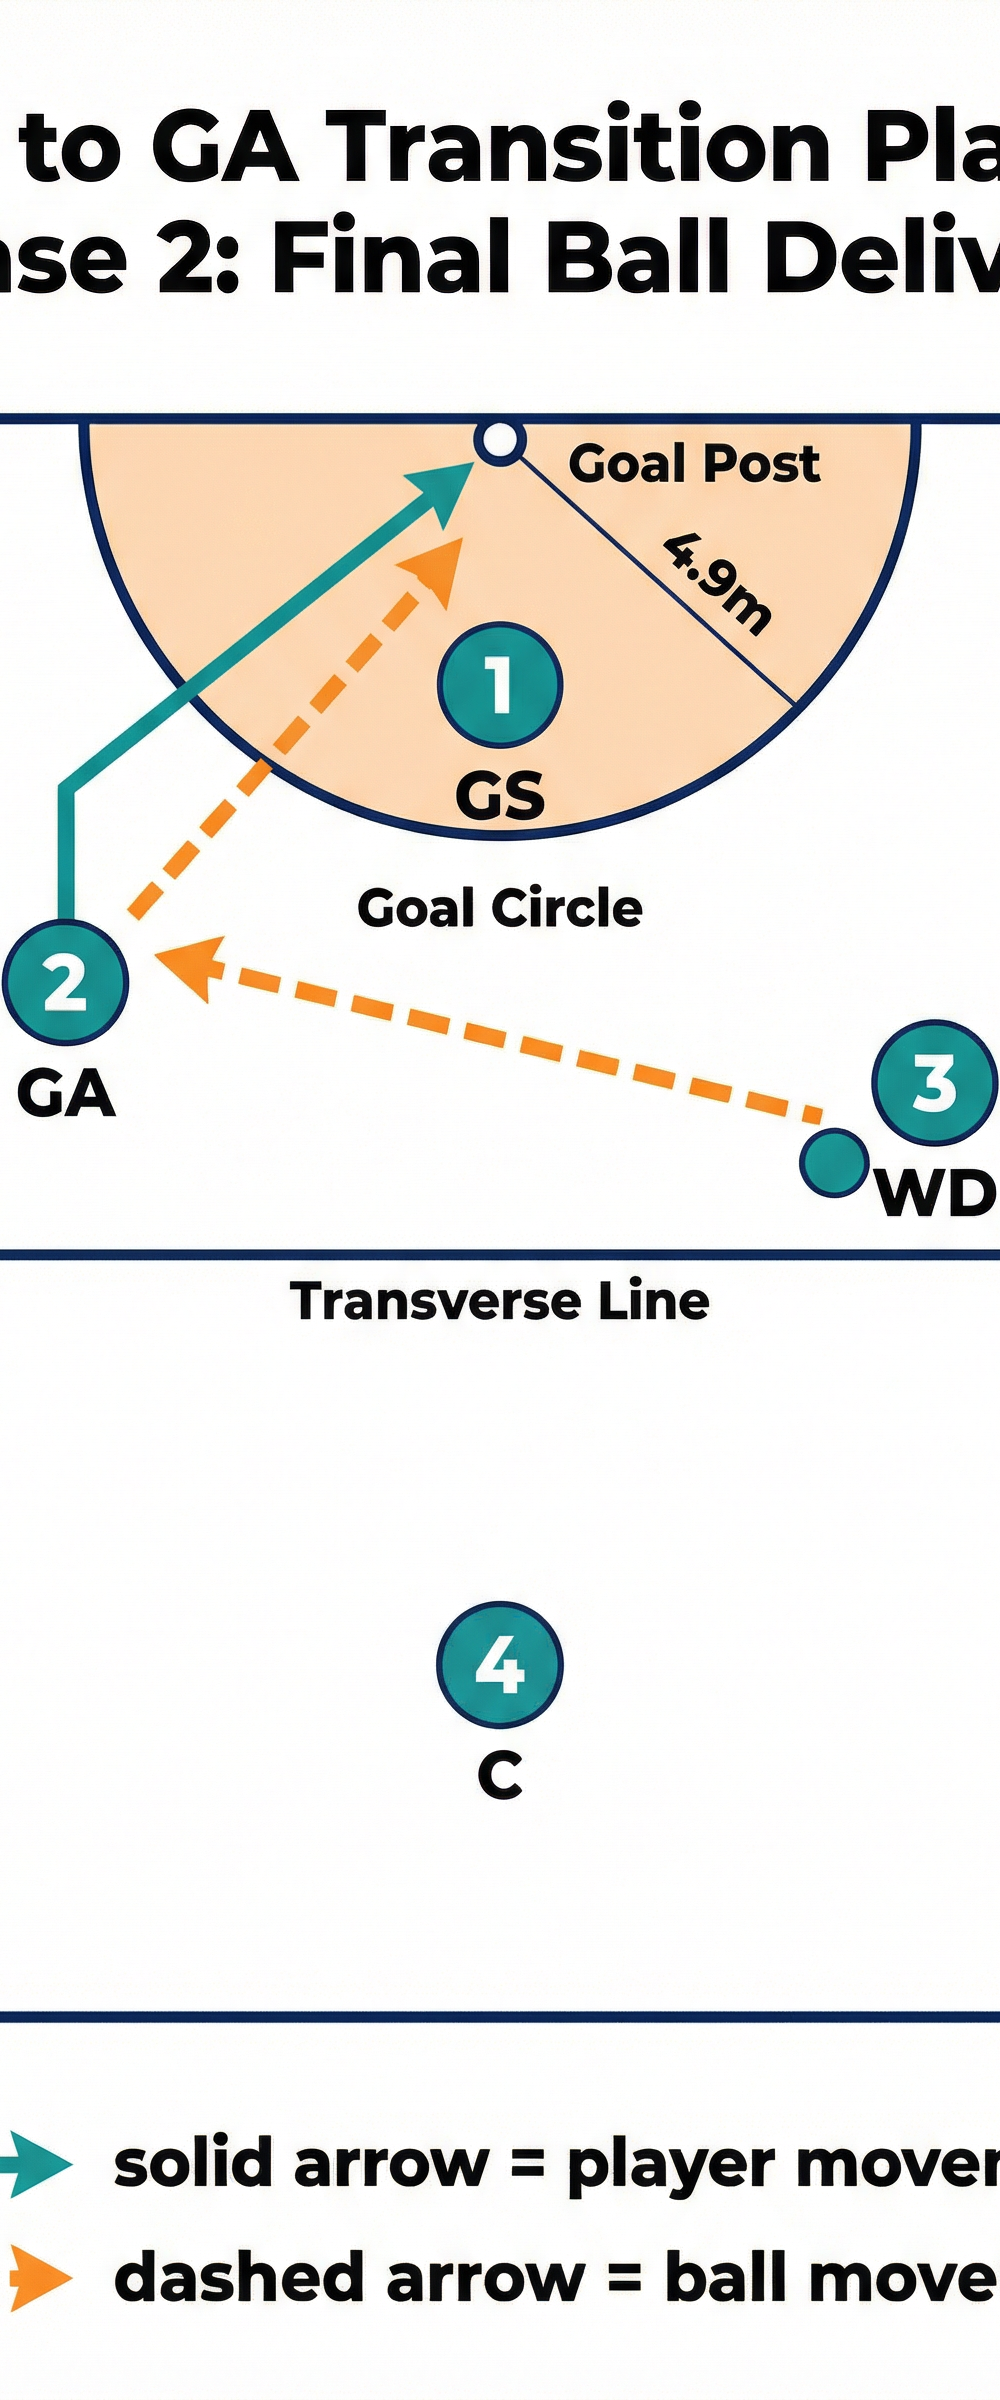
Step 6 — Final Ball Delivery into GA (3–4 seconds)
The WD delivers a sharp, low pass to the GA as they cut across the face of the goal circle. The pass should be timed to arrive as the GA completes their cut — approximately 2–3m from the near post, inside the goal circle. The GA catches, pivots, and shoots or passes to the GS depending on the defensive pressure.

Diagram 2 — Phase 2: Final Ball Delivery. WD (3) delivers the ball to GA (2) cutting diagonally into the goal circle. GS (1) holds the far post to create space. The shaded zone highlights the high-percentage shooting area.
Key Coaching Points

1. WD Transition Speed is Everything
The entire play depends on the WD reading the turnover and moving immediately — within one second of possession being won. Drill your WD to scan forward the moment a defensive action is completed. A slow WD transition gives defenders time to reset and the play loses its advantage.
2. The GA's Two-Movement Lead
Coach your GA to never lead in a straight line. The out-then-in diagonal cut is what creates separation from the Goal Defence. The first movement (away from the circle) must be committed and fast — at least 2–3 steps — before the sharp cut back toward the post. A half-hearted first movement will not deceive an experienced defender.
3. WD Ball Placement — Low and Ahead
The WD's pass into the GA must be delivered low (below shoulder height) and placed ahead of the GA's run — not to where they are, but to where they will be in 0.5 seconds. A high or late pass forces the GA to stop and reach, giving the defender recovery time.
4. GS Holds Width — No Collapsing
A common error is the GS drifting toward the ball when they see the play developing. Coach the GS to actively move away from the ball toward the far post. This single action creates the space the GA needs to complete the cut and is essential to the play's success.
5. C Provides the Reset Option
After delivering the first pass to the WD, the C must immediately move into a supporting position in the centre third — approximately 4–5m behind the WD. If the WD cannot deliver cleanly into the GA, they must have a safe reset pass available. The C should call loudly to signal their availability.
6. Timing Over Speed
While urgency is important, the play must be executed with composure. Rushed passes lead to turnovers. Coach players to run at 80% effort with 100% focus — controlled aggression, not panic.
Common Mistakes

Mistake 1 — WD Holds the Ball Too Long
After receiving from the C, some WDs will pause and look for options rather than driving immediately to the transverse line. This gives defenders time to recover and mark the GA. Correct this by adding a time pressure in training — the WD must release the ball within 2 seconds of receiving.
Mistake 2 — GA Leads Too Early
If the GA begins their lead run before the C has passed to the WD, they will have already committed their movement before the ball is in a position to be delivered. The GA's lead should begin as the C's pass is in the air — not before. Use a visual cue in training: GA watches the C's release arm, not the ball.
Mistake 3 — WD Drifts Too Far from the Sideline
When the WD drifts centrally, they reduce the angle of delivery into the goal circle and make the pass easier for the Goal Defence to intercept. The WD's corridor is the right-hand third of the court. Use cones to mark a 5m-wide channel during training and insist the WD stays within it.
Mistake 4 — GS Collapses Toward the Ball
As noted in the coaching points, GS movement toward the ball destroys the space the GA needs. Address this directly in video review or by freezing the drill at the moment the GS moves incorrectly. Ask the GS what space they have just removed.
Mistake 5 — No Communication Between WD and GA
Silent execution leads to timing errors. The WD should call the GA's name as they reach the transverse line, and the GA should call 'NOW' as they complete their cut. Embed verbal communication as a non-negotiable part of the play from the first session.
Variations and Progressions
Variation 1 — Left-Side Mirror Play
Run the identical pattern on the left-hand corridor, with the WD driving along the left sideline and the GA cutting from the opposite side of the circle. This gives your team a two-sided threat and prevents opposition defenders from pre-loading to the right. Alternate sides in training so both patterns become automatic.
Variation 2 — WD Shoot Option
In higher-level play, if the GA's cut is covered and the WD has driven to a position just outside the goal circle, the WD can step into the circle and take the shot themselves. This requires the WD to be a competent shooter and should only be introduced once the base play is well-established. It adds a third decision point that defenders must account for.
Progression 1 — Add Passive Defenders
Once the play is running cleanly without opposition, add a passive (non-contesting) GD and GK to the drill. Their presence forces the GA and GS to read body positions and adjust their leads accordingly. Progress to semi-active defenders who can intercept but not contact.
Progression 2 — Full Defensive Opposition
Run the play in a 5v5 or 7v7 scenario with full defensive pressure. Add a condition: the team scores a point for every successful completion of the play, and the defenders score a point for every turnover. This competitive element drives execution quality under pressure.
Age Adaptations

Under 10 / Under 12 — Simplify the Lead
For younger players, remove the two-movement fake and replace it with a simple straight lead from the GA toward the transverse line. Focus on the WD receiving cleanly and passing accurately rather than the tactical complexity of the cut. Use a shorter court (two-thirds only) and reduce the speed requirement.
Under 14 — Introduce the Two-Movement Lead
At this age, players have the coordination and game understanding to execute the out-then-in cut. Spend dedicated time on the GA's footwork — walk through the cut slowly before adding speed. Introduce passive defenders once the footwork pattern is established.
Under 16 / Open — Full Play with Variations
Expect full execution of all phases including the GS width-holding, verbal communication, and both left and right corridor variations. Introduce the WD shooting option as a third decision point. At this level, the play should be triggered automatically from turnover situations without a coach calling it — the players should read the game and self-initiate.