Rugby
Drill
intermediate
7-Man Front-Peel Attacking Lineout Drill
Master the timing and execution of a structured 7-man lineout, incorporating a dynamic peel move to create a powerful attacking platform.
Mar 22, 20265 min read20 min drill10 players

Equipment Needed
1 Rugby ball
4 Cones
1 Tackle bag (optional)
1. Overview
The lineout is a critical set piece in rugby union, offering a structured platform to launch attacking plays or secure essential possession. This drill, the 7-Man Front-Peel Attacking Lineout, focuses on executing a clean catch and delivering quick ball to the backline while introducing a dynamic peel move by the number 8 to commit opposition defenders. This drill is perfect for developing timing between the hooker, lifters, and jumper, and for establishing a robust attacking foundation inside the opposition's 22-metre line.
2. Setup
Equipment Needed:

- 1 Rugby ball (minimum, 3 recommended for continuous reps)
- 4 Cones (to mark the 5-metre and 15-metre lines if not clearly painted)
- 1 Tackle bag or hit shield (optional, for the scrum-half to clear)
Pitch Setup:
- Utilize a standard 100m x 70m rugby pitch.
- Set up on the touchline, ensuring the 5-metre and 15-metre lines are clearly visible.
- The drill takes place between the 5m and 15m lines.
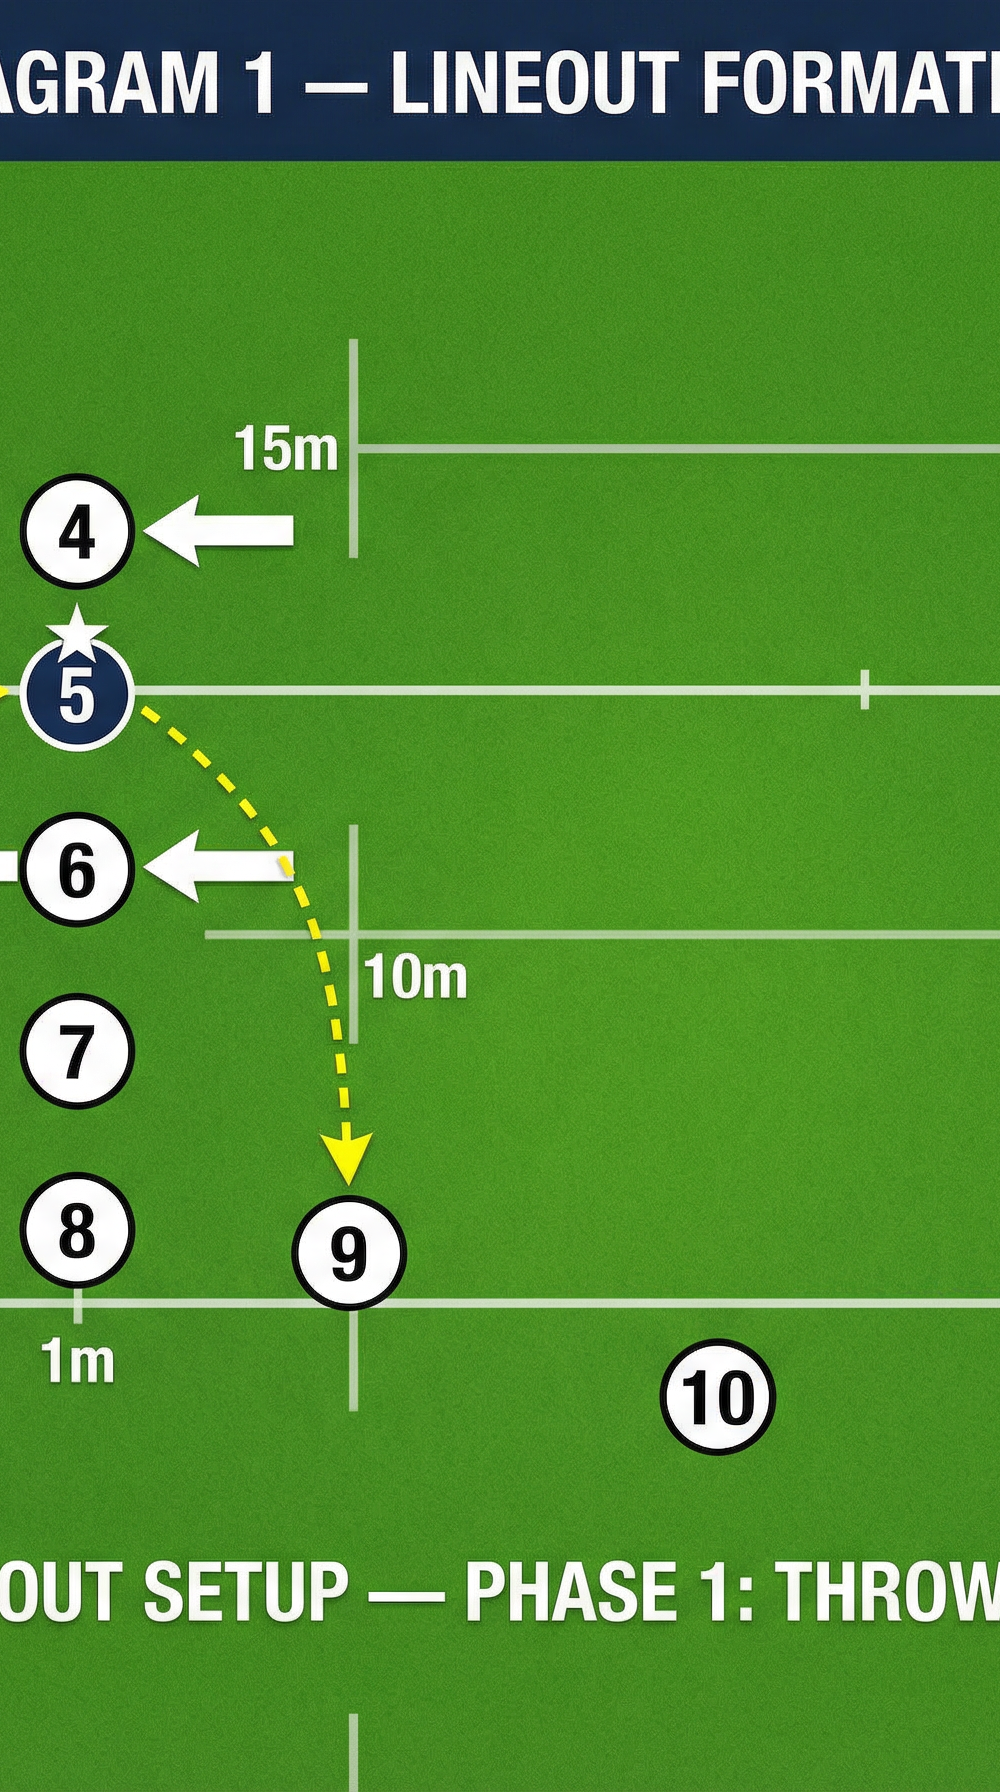
Player Positions:
- 2 (Hooker): Standing on the touchline at the 5-metre mark, ready to throw.
- 4 & 6 (Lifters): Positioned in the lineout, ready to support the jumper.
- 5 (Jumper): Positioned between the lifters, typically in the middle of the lineout.
- 7 (Openside Flanker): Positioned behind the main jumping pod.
- 8 (Number 8): Positioned at the tail of the lineout (near the 15m line).
- 9 (Scrum-half): Positioned 1 metre behind the lineout, ready to receive the ball.
- 10 (Fly-half): Positioned 10 metres deep, ready to receive a pass from the 9 or the peeling 8.
- 12 (Inside Centre): Positioned wider and deeper than the 10, offering a crash ball option.
3. Step-by-Step Instructions

- The Setup: The forwards assemble in a standard 7-man lineout formation. The hooker (2) stands on the touchline with the ball. The scrum-half (9) takes up a position 1 metre behind the lineout. The backline (10, 12) aligns 10 metres deep.
- The Call: The lineout caller (usually the 5 or a designated forward) makes the call to initiate the movement. The call should dictate the target area (e.g., middle) and the subsequent attacking move.
- The Movement: Upon the call, the jumper (5) makes a sharp, explosive movement to create separation from their opposite number. The lifters (4, 6) step in to provide a stable, dynamic lift.
- The Throw: The hooker (2) delivers a flat, accurate throw to the apex of the jumper's reach. The throw must be perfectly timed with the jumper's ascent.
- The Catch & Delivery: The jumper (5) catches the ball cleanly with both hands at the highest point. As the jumper descends, they immediately deliver a downward pass to the waiting scrum-half (9).
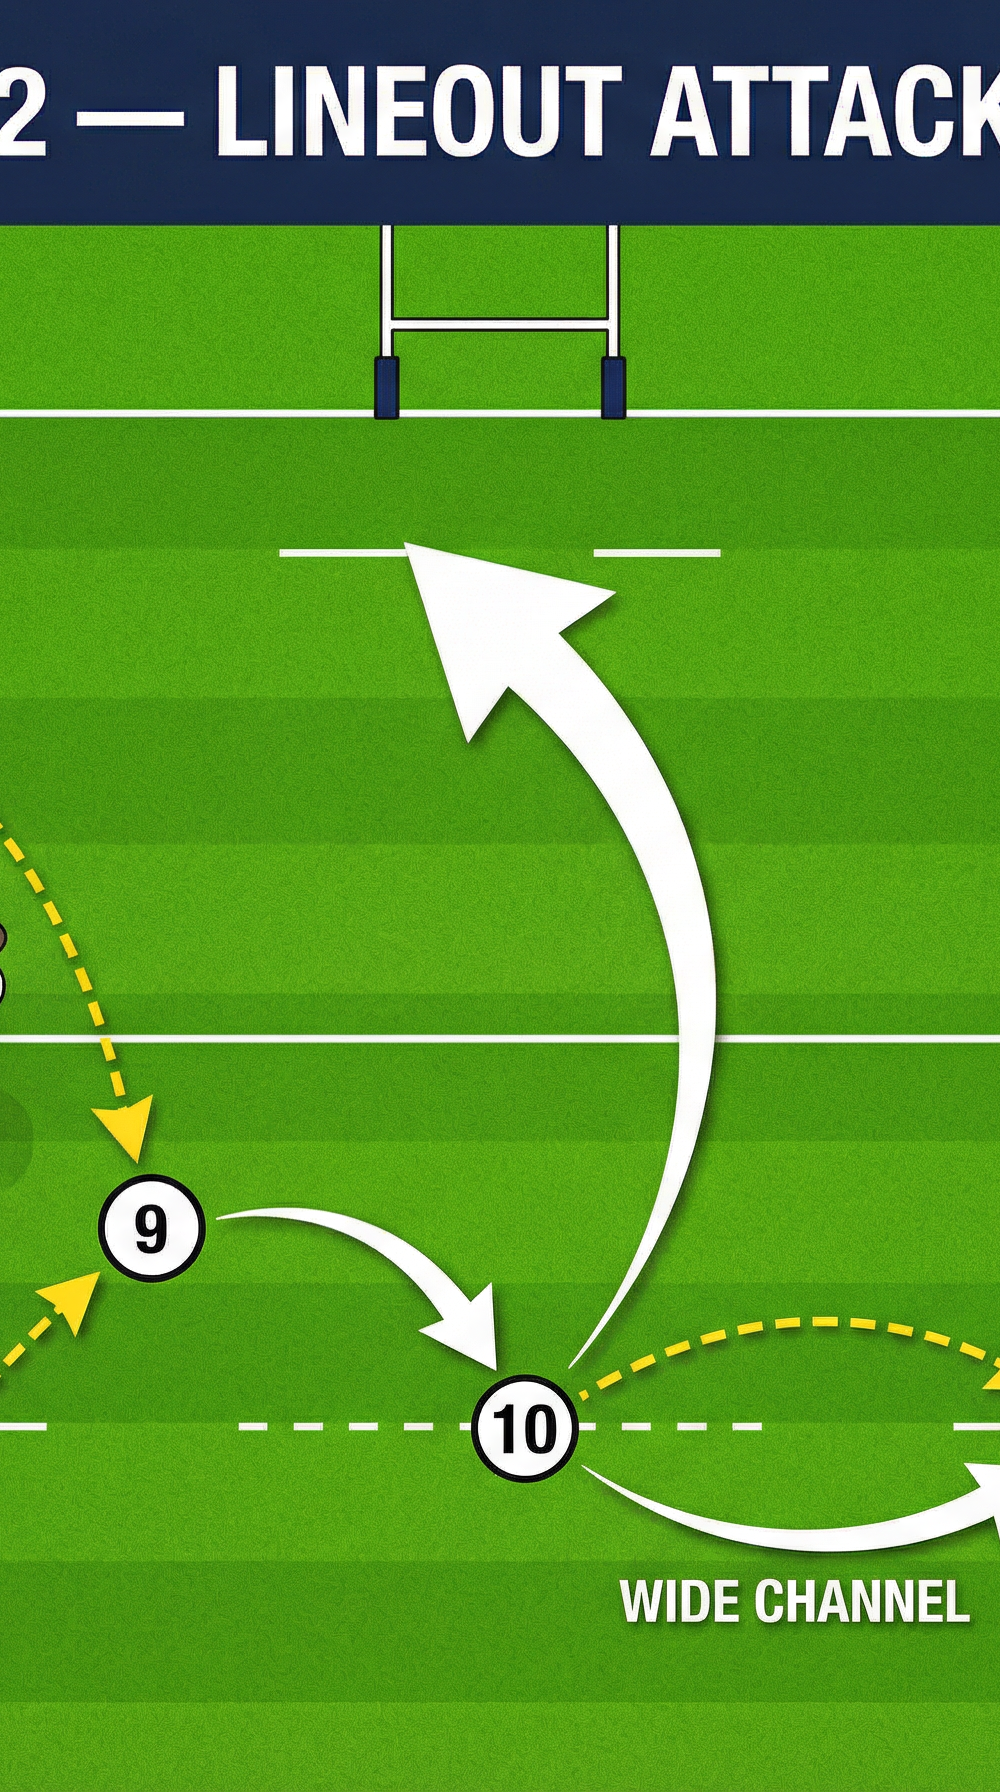
- The Peel (Diagram 2): Simultaneously, as the ball is thrown, the number 8 peels around the back of the lineout, running a hard line towards the scrum-half's position.
- The Decision: The scrum-half (9) receives the ball and has two primary options based on the defense:
- Option A (The Peel): Pass short to the peeling number 8, who crashes over the gain line.
- Option B (The Backs): Fire a swift, flat pass to the fly-half (10), who then distributes to the inside centre (12) running a hard, direct line.

4. Key Coaching Points
- Timing is Everything: The synchronization between the hooker's throw and the jumper's lift is paramount. The ball should arrive exactly as the jumper reaches their peak height.

- Strong Core and Posture: Lifters must maintain a strong, straight back and use their legs to generate power. The jumper must brace their core and remain rigid in the air to provide a stable target.
- Aggressive Peel: The number 8 must accelerate aggressively around the tail of the lineout. A slow peel allows the defense to drift and cover the threat.
- Crisp Delivery: The scrum-half must clear the ball quickly and accurately. A delayed pass gives the opposition forwards time to disrupt the play.
- Communication: Clear, concise calls from the lineout leader are essential to ensure everyone knows their role and the intended target.
5. Common Mistakes
- Telegraphing the Throw: The hooker looking directly at the intended target before throwing, allowing the opposition to anticipate the jump.
- Poor Lifting Technique: Lifters using their arms rather than their legs, resulting in a low, unstable lift that is easily contested.
- Jumper Not Dominating the Space: The jumper failing to aggressively attack the ball in the air, allowing the opposition to steal possession.
- Scrum-half Standing Too Deep: The scrum-half positioning themselves too far behind the lineout, increasing the distance of the pass and slowing down the attack.
6. Variations & Progressions
- Variation 1 (Front Peel): Instead of the number 8 peeling, the openside flanker (7) peels around the front of the lineout to receive a short pass from the scrum-half.
- Variation 2 (Dummy Jump): The designated jumper makes a dummy movement, and the ball is thrown to a different pod (e.g., the front or the back).
- Progression 1 (Opposed): Introduce passive, then active, opposition to contest the lineout and apply pressure on the scrum-half.
- Progression 2 (Phase Play): After the initial lineout move, continue the drill into 2-3 phases of structured attack against a defensive line.
7. Age Adaptations
- Under 10s / Under 12s: Focus heavily on the basics of throwing and catching. Lifting is generally not permitted at these age grades, so emphasize quick movement and accurate passing. Use a smaller, lighter ball.
- Under 14s / Under 16s: Introduce basic lifting techniques (if permitted by local regulations) with a strong emphasis on safety and proper form. Begin incorporating simple variations and backline integration.
- Open (Adult): Execute the full drill at match intensity with complex calls, multiple variations, and fully opposed scenarios.