Box Kick Chase and Press Play: Winning Possession in the Air
Master the box kick chase and press play to turn your scrum-half's boot into a precision weapon that wins territory, creates turnovers, and puts the opposition under relentless aerial pressure.

Equipment Needed
Overview
The box kick chase and press play is one of the most tactically potent weapons in modern Rugby Union. Executed from a ruck or maul, the scrum-half (No. 9) delivers a high, spiralling box kick into the opposition's back-field — typically targeting the space behind the defensive line between the 9 and 15 of the defending team — while a pre-organised chase unit sprints to contest the ball in the air and apply immediate pressure on the catcher.
When executed correctly, this play achieves three critical outcomes: it pins the opposition deep in their own half, creates a genuine aerial contest that can yield a direct turnover, and — even when the kick is caught cleanly — forces the defending back-three into a hurried, pressured decision under physical threat. At the elite level, teams such as Ireland, Leinster, and the Springboks have weaponised this play to devastating effect, using it as a primary territory-gaining mechanism and a catalyst for transition attacks.
When to use it: Deploy this play when your team is in the opposition's half (between the 40m and 60m line), when the defensive line is rushing up aggressively and leaving space behind, when the opposition's back-three are poor under the high ball, or when you need to shift field position quickly without risking a turnover in contact.
Setup
Equipment Required
- Full-size Rugby pitch (100m x 70m) or training area minimum 50m x 50m
- 8–10 Rugby balls
- 16 coloured training bibs (two colours)
- 20 cones for zone marking
- 4 tall poles or flags to mark the kick landing zone (optional but recommended)
Pitch Setup
Mark a target landing zone approximately 15–20m behind the defensive line, roughly 10–15m in from the touchline on the short side (blindside). Use four cones to create a 5m x 5m box. This is the precision target for the kicker.
Player Positions at the Point of Kick
| Position | Player | Role at Kick |
|---|---|---|
| Scrum-half (9) | Box Kicker | Delivers the kick from the base of the ruck |
| Openside Flanker (7) | Lead Chaser | First to the contest, primary ball-winner |
| Blindside Flanker (6) | Second Chaser | Supports the contest, prevents offload |
| Lock (4) | Third Chaser | Provides depth, secures any loose ball |
| Number Eight (8) | Fourth Chaser | Covers the wider channel |
| Lock (5) | Fifth Chaser | Sweeps behind the contest |
| Fly-half (10) | Kick Caller / Organiser | Calls the play, takes dummy run to hold defenders |
| Right Wing (14) | Wide Support | Positions 10–15m wide of the contest for offload option |
| Fullback (15) | Depth Support | Holds 20m behind the ruck, covers counter-attack |
| Left Wing (11) | Opposite Cover | Covers the far side in case of a long pass |
| Prop/Hooker (1, 2, 3) | Ruck Clearers | Clear the ruck quickly, then support the chase |

Diagram 1 shows the initial player positions at the moment of the box kick, with the scrum-half (9) delivering from the ruck at the 40m line, the five-man chase unit beginning their run, and the dashed trajectory of the kick targeting the landing zone.
Step-by-Step Instructions

Step 1 — Ruck Establishment (0–3 seconds)
Secure a clean ruck on or near the centre of the field, between the 40m and 50m lines. The ball must be presented quickly and cleanly. The scrum-half communicates the call — a pre-agreed signal such as "BOX!" or a hand signal — to the chase unit while the ruck is still being formed.
Step 2 — Chase Unit Alignment (0–2 seconds, concurrent with Step 1)
Flankers (6 and 7), locks (4 and 5), and the number eight (8) must set their starting positions within 1m of the ruck on the near side. They must be square to the defensive line and ready to sprint. Critically, they must not cross the offside line until the ball leaves the scrum-half's boot. Instruct players to load their weight onto their front foot and watch the scrum-half's hands.
Step 3 — The Box Kick (2–3 seconds)
The scrum-half receives the ball from the ruck, takes one lateral step away from the ruck (creating a clear kicking lane), and delivers a high, spiralling box kick using the outside of the dominant foot. The ideal kick has a hang time of 3.5–4.5 seconds and lands in the pre-marked zone, 15–20m behind the defensive line. The trajectory should be steep — aim for a kick that reaches a height of at least 12–15m — to maximise hang time and allow the chase unit to arrive simultaneously with the ball.
Step 4 — Chase Execution (2–6 seconds)
The moment the ball leaves the boot, the five chasers sprint at full pace toward the landing zone. The lead chaser (No. 7) targets the ball directly. The second chaser (No. 6) positions 2–3m to the left of the lead chaser to prevent an offload. The third and fourth chasers (Nos. 4 and 8) arrive 1–2 seconds later to secure any loose ball or form an immediate ruck. The fifth chaser (No. 5) sweeps 5m behind as a safety valve.

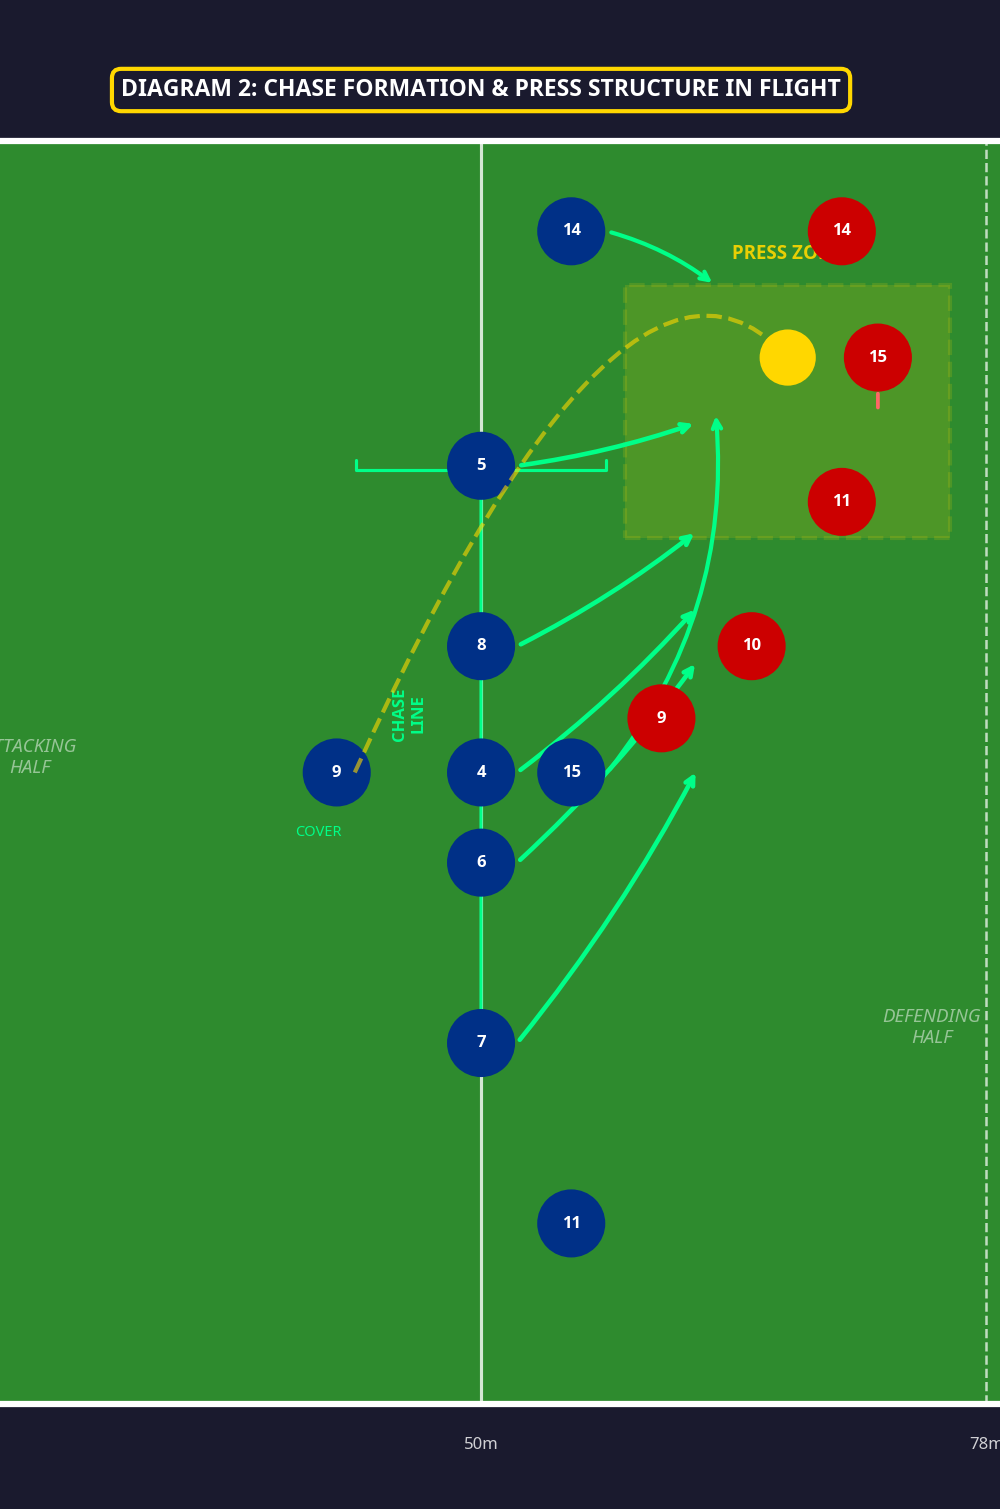
Diagram 2 illustrates the chase formation in flight, showing the five-man chase line converging on the press zone, the scrum-half (9) holding in cover, and the back-three in their support positions.
Step 5 — The Contest (4–6 seconds)
The lead chaser must time their jump to contest the ball at its highest point, or — if the ball is dropping — arrive at full pace to apply maximum physical pressure on the catcher the instant they land. The objective is to either: (a) win the ball directly in the air, (b) cause a knock-on, or (c) force the catcher into a poor decision under pressure.
Step 6 — Post-Contest Options (6+ seconds)
Refer to the decision tree below:
- If the ball is won in the air: The lead chaser passes immediately to the right wing (14) or scrum-half (9) for a quick attack into the disorganised defensive line.
- If the catcher is isolated: Drive through the tackle, secure the ball on the ground, and present for a quick ruck. The scrum-half attacks the space immediately.
- If the catcher offloads or clears: The chase unit must re-organise into a defensive press line within 3 seconds, with the fullback (15) covering the deep channel.

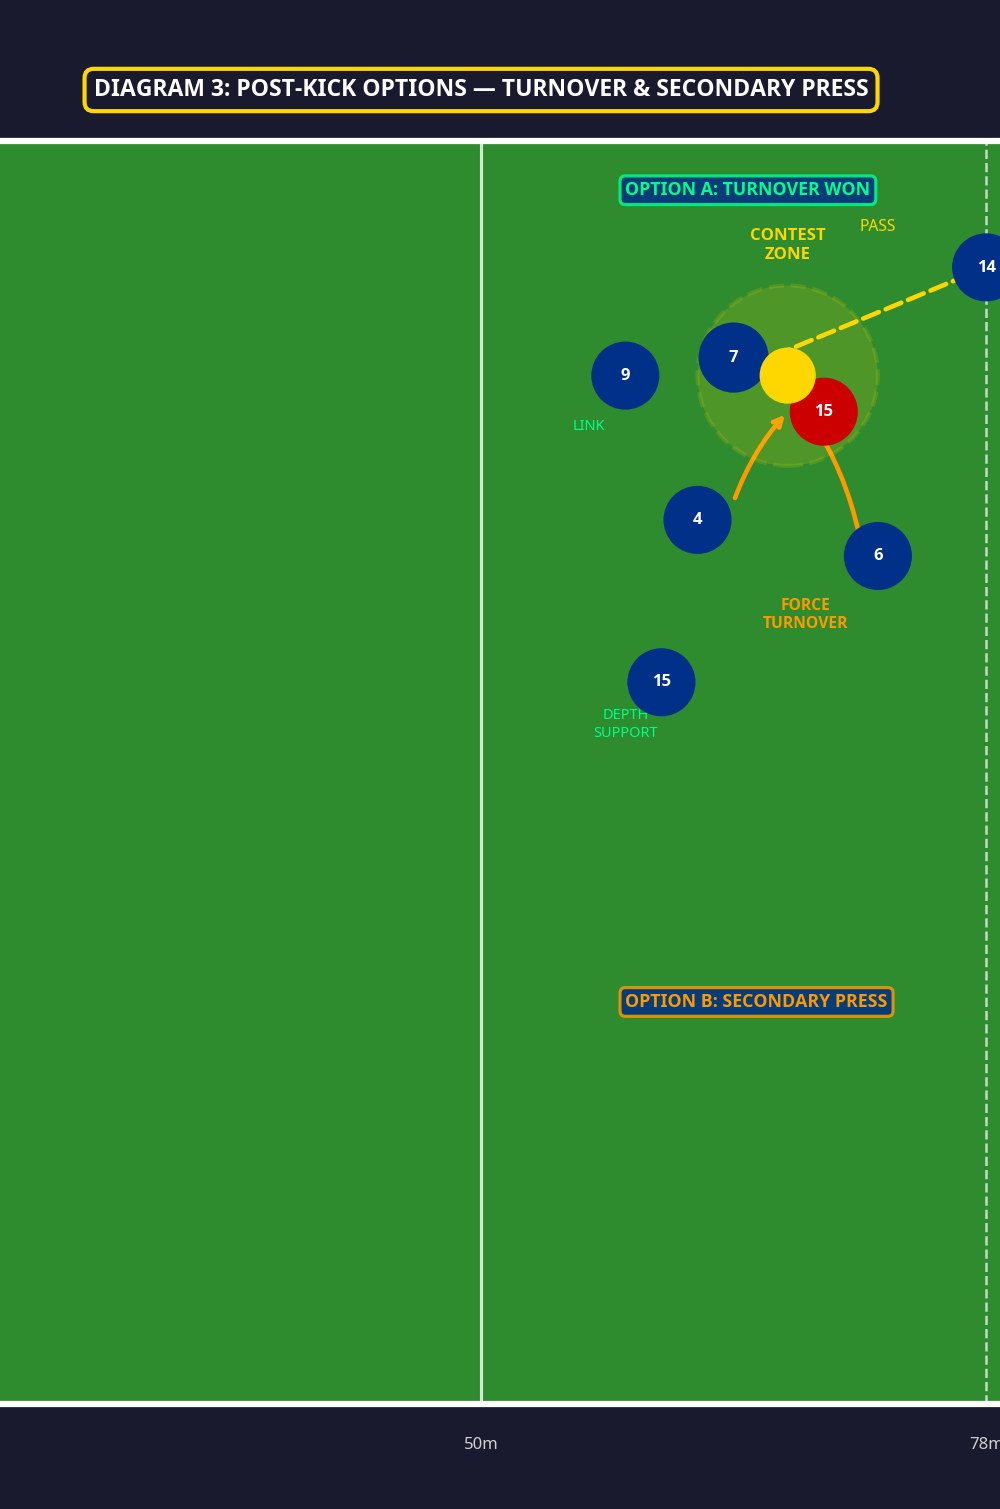
Diagram 3 shows the two primary post-kick outcomes: Option A (turnover won, attack wide with No. 14) and Option B (secondary press by Nos. 4 and 6 to force a turnover on the defender No. 15).
Key Coaching Points
1. Hang Time is Everything. A box kick that lands in 2.5 seconds is worthless — the chasers cannot arrive in time and you have simply given the ball away. Drill your scrum-half to achieve a minimum of 3.5 seconds hang time. Use a stopwatch in training and set a hard standard.
2. The Chase Line Must Be Flat. All five chasers should cross the gain line at roughly the same time, arriving as a wall. A staggered chase line allows the catcher to identify gaps and run into space. Use cones to mark a flat starting line and demand that all five players reach the 50m line simultaneously.
3. The Lead Chaser Wins the Ball — Everyone Else Wins the Contest. The No. 7's job is to get to the ball. The No. 6's job is to prevent the offload. The Nos. 4, 8, and 5 are there to secure possession after the contest. Each player must understand their specific role and not freelance.
4. The Scrum-Half Must Communicate Early. The call must be made before the ruck is even secured. If the scrum-half calls the play late, the chasers are not in position and the kick is wasted. Build the communication trigger into your ruck-clearance drills.
5. The Kicker Must Kick to the Zone, Not Just "Up." Accuracy is non-negotiable. A kick that lands 5m too wide or 10m too short puts the chasers in the wrong position. Dedicate at least 15 minutes per session to kicking accuracy drills with the target zone marked.
6. Defensive Reset is Mandatory. If the kick is not won, the team must immediately shift into a defensive press structure. The fullback (15) must call "PRESS" or "DEFEND" to organise the back line. Failure to reset quickly after a lost contest is the most common source of counter-attack tries conceded from this play.
Common Mistakes

Mistake 1 — Kicking Too Flat (Low Trajectory)
A flat box kick with insufficient height gives the chasers no time to arrive. The defending fullback catches the ball with 5–10m of space and launches a counter-attack. Correction: Mark a height target on a pole or use a drone/video review. The ball must clear a minimum height of 12m. Drill the scrum-half on a steep, looping trajectory rather than a flat punt.
Mistake 2 — Chasers Crossing Offside Before the Kick
Eager chasers often drift forward before the ball leaves the boot, resulting in a penalty. This is a discipline issue that must be addressed immediately. Correction: Use a "freeze" drill where the coach blows the whistle at the moment of the kick — any player who has crossed the offside line is penalised in training. Repeat until the habit is ingrained.
Mistake 3 — Kicking to the Touchline (Out of Bounds)
Novice scrum-halves often kick the ball into touch, surrendering a lineout to the opposition. Correction: Place cones 5m inside the touchline as a boundary marker. Instruct the kicker to aim for the inner edge of the target zone. Practise with a consequence (e.g., five press-ups) for every kick that goes into touch.
Mistake 4 — The Chase Line Bunching Together
When chasers run in a tight cluster, the defending catcher simply runs around them. Correction: Assign each chaser a numbered lane (1–5) across a 20m channel. Each player is responsible for their lane. Use cones to mark the lanes in training.
Mistake 5 — No Secondary Press After a Lost Contest
When the kick is caught cleanly and the chasers fail to apply immediate pressure, the defending team has a free ball and space to counter. Correction: Introduce a "second wave" rule in training: if the first chaser does not win the ball within 2 seconds, the second and third chasers must immediately execute a double-tackle press. Drill this as a separate unit skill.
Variations and Progressions

Variation 1 — Short-Side Box Kick (Blindside Variant)
Instead of kicking to the open field, the scrum-half targets the short side (blindside), aiming for the space between the touchline and the last defender. This variation is most effective when the opposition's blindside winger (11 or 14) is positioned flat in the defensive line. The lead chaser (No. 7) must track the touchline and contest the ball within 2m of the line. This creates a high-pressure situation where the catcher has almost no room to move.
Variation 2 — Dummy Box Kick (Decoy Play)
The scrum-half shapes to box kick but instead passes flat to the fly-half (10), who attacks the space vacated by the rushing defensive backs who have already begun their retreat in anticipation of the kick. This variation is most effective after 2–3 successful box kicks have conditioned the defence to drop back on the scrum-half's kicking shape. The key trigger is the fly-half calling "HANDS" at the last moment.
Progression 1 — Contested Aerial Drill (Skill Development)
Set up a 20m x 20m grid. The scrum-half kicks from one end; one attacker and one defender compete for the ball in the air at the other end. Gradually increase the number of chasers (2v1, 3v2) to simulate match conditions. Focus on timing the jump and body positioning under the ball.
Progression 2 — Full 15v15 Live Execution
Once the unit skills are established, run the play in a full 15v15 training game. Set the starting position at the 40m line. The scrum-half calls the play from a live ruck. Award bonus points for turnovers won directly from the kick contest to incentivise execution quality.
Age Adaptations

Under 12 and Under 14: At these age groups, the focus should be on the kick technique and basic chase alignment only. Do not introduce the full five-man chase unit — use two chasers (No. 7 and No. 6) and focus on straight-line running and timing. Replace the aerial contest with a simple "arrive first" competition. Reduce the kick distance to 10–12m and use a size 4 ball.
Under 16: Introduce the three-man chase unit (Nos. 7, 6, and 4) and begin teaching the concept of lane discipline. The scrum-half should be working on kick accuracy to a target zone. Introduce the dummy box kick variation once the base play is consistent. Begin video review of kick hang time.
Open Age / Senior: The full five-man chase unit, aerial contest technique, and all three post-kick options should be drilled. Add the secondary press protocol and defensive reset. Introduce opponent-specific targeting (e.g., identifying a weak aerial player in the opposition's back-three). Integrate the play into your full kicking game strategy alongside grubbers and cross-field kicks.