The Box Kick Exit: Securing Territory from Your Own 22
Master the essential 9-10 box kick exit strategy to relieve pressure, secure territory, and turn defense into attack from within your own 22-metre zone.

Equipment Needed
1. Overview
Exiting your own 22-metre zone efficiently is one of the most critical aspects of modern Rugby. When under pressure near your own try line, a poorly executed exit can result in immediate points for the opposition. The Box Kick Exit is a foundational set play designed to relieve pressure, advance the ball downfield, and set up a strong defensive line or regain possession in a more favorable area of the pitch.
This play primarily utilizes the Scrum-half (9) and Fly-half (10) to execute a precise kick, supported by a coordinated chase line to pressure the receiving player. It is best used from a secure set piece (like a lineout or scrum) or a stable ruck just outside your own 5-metre line.
2. Setup

Pitch Area: Your own 22-metre zone, specifically between the 5-metre and 15-metre channels.
Key Players: Scrum-half (9), Fly-half (10), Wingers (11, 14), Fullback (15), Flankers (6, 7).
Equipment Needed: 1 Rugby ball, 10-15 cones for marking target zones during practice.
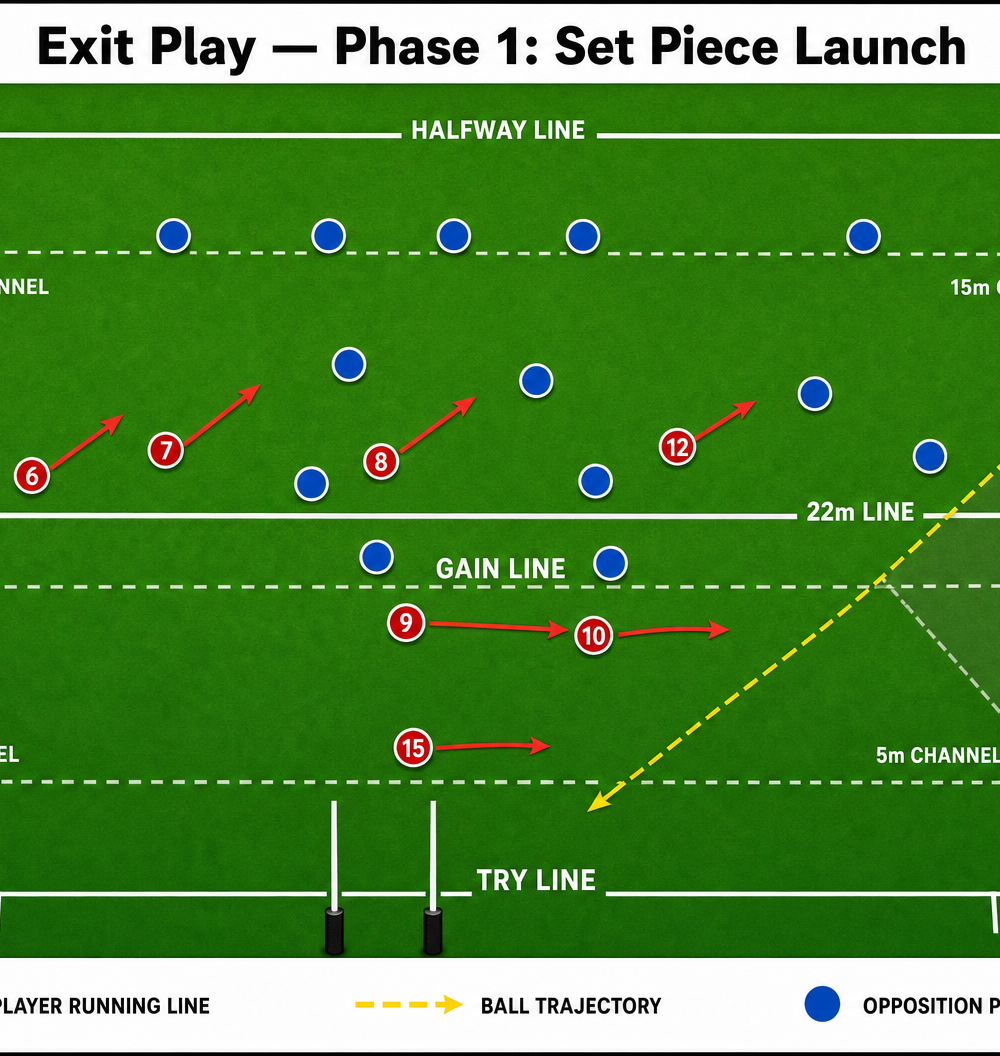
Player Positioning (From a Lineout on the Left Touchline)
- Forwards (1-8): Secure the ball at the lineout and provide a solid protective screen (caterpillar ruck) if needed.
- Scrum-half (9): Positioned at the base of the ruck/lineout, ready to pass or kick.
- Fly-half (10): Positioned flat, about 5-7 metres deep, offering a passing option but primarily setting up the kick.
- Wingers (11, 14) & Fullback (15): Positioned deep and wide, ready to chase the kick or cover a counter-attack.
3. Step-by-Step Instructions


Phase 1: Set Piece Launch
- Secure Possession: The forwards secure the ball at the lineout (e.g., a throw to the middle jumper, 4 or 5) and bring it to ground, forming a stable ruck.
- The Setup Pass: The Scrum-half (9) assesses the defensive line. If the blindside is covered, 9 passes the ball swiftly to the Fly-half (10), who is positioned in the pocket.
- The Execution: The Fly-half (10) takes one step to align and executes a high, hanging kick (box kick or spiral) aiming for the touchline between the opposition's 10-metre line and 22-metre line.
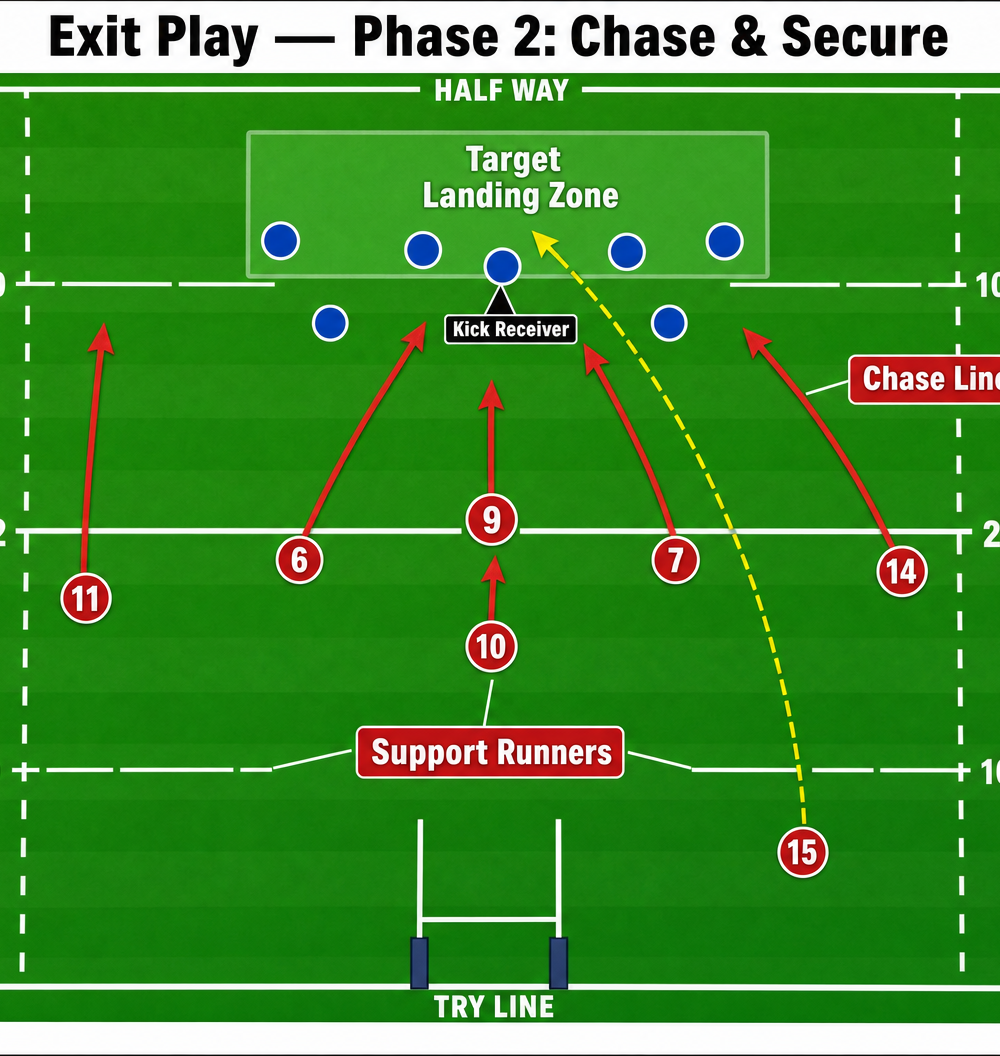
Phase 2: Chase & Secure
4. The Chase Line: As soon as the ball is kicked, the Wingers (11, 14) and Flankers (6, 7) sprint downfield. They must stay behind the kicker until the ball is struck to remain onside.
5. The Contest: The primary chaser (usually the winger on the side of the kick) aims to contest the ball in the air. If they cannot catch it, their job is to tackle the receiver immediately upon landing.
6. The Support: The Scrum-half (9) and Fullback (15) follow up as secondary support, ready to secure the breakdown if a tackle is made or gather a loose ball.
7. Realign Defense: The rest of the team moves up rapidly to form a new defensive line at the point of the tackle, successfully exiting the 22-metre zone.
4. Key Coaching Points
- Hang Time over Distance: The kick must hang in the air for at least 3-4 seconds. Distance is useless if the chase cannot get there in time. Aim for a target zone 25-30 metres downfield.
- Discipline in the Chase: Chasers must hold their run until the ball is kicked. Being penalized for offside inside your own 22 defeats the purpose of the exit play.
- The 'Caterpillar' Ruck: Forwards must bind tightly behind the ruck to increase the distance between the Scrum-half and the charging defenders, giving the kicker more time.
- Communication: The Scrum-half and Fly-half must communicate clearly about who is taking the kick based on the defensive pressure.
5. Common Mistakes

- Kicking Too Long and Flat: This allows the opposition Fullback to catch the ball uncontested and launch a devastating counter-attack.
- Poor Ruck Protection: Forwards failing to secure the breakdown or block the charge-down channel, resulting in a blocked kick.
- Fragmented Chase: Chasers running in single file rather than a coordinated line, creating gaps for the return runner to exploit.
6. Variations & Progressions

- The 9 Box Kick: Instead of passing to 10, the Scrum-half (9) executes the box kick directly from the base of the ruck. This is faster but requires excellent technical skill from the 9.
- The Cross-Field Exit: If the opposition heavily overloads the side of the ruck, the 10 can kick diagonally across the field to the opposite winger, who has a 1-on-1 matchup.
7. Age Adaptations

- Under 10/12: Focus purely on securing the ball and making a simple pass to the 10 to kick to touch. Contesting in the air should be minimized for safety.
- Under 14/16: Introduce the coordinated chase line and the concept of hang time. Begin practicing the 9 box kick.
- Open/Senior: Full execution including the caterpillar ruck, complex chase lines, and reading the defensive backfield to choose the right kick variation.