Mastering the Forward Pod: A Coach's Guide to the Offload Option
Learn how to coach the forward pod play with a dynamic offload option — a high-impact attacking set piece that creates momentum, crosses the gain line, and unlocks space for your backs.

Equipment Needed
Overview
The forward pod with an offload option is a fundamental attacking set piece designed to create momentum and break the defensive line. By using a small group of forwards — typically three players — working in tight unison, you can generate significant go-forward while retaining the ability to keep the ball alive through a well-timed offload. This play is most effective when launched from a stable platform such as a ruck or maul, typically in the middle third of the field on a 100m x 70m pitch, forcing the defence to commit multiple tacklers and creating space out wide.
Its primary goal is to achieve a clean line break or, at a minimum, to cross the gain line with speed, disorganising the defence and setting up the next phase of attack. The offload option transforms what might otherwise be a simple forward carry into a multi-phase weapon that backs can exploit.
Setup
Equipment Required
- 4–6 rugby balls
- Cones or markers (to delineate the playing grid and defender starting positions)
- Hit shields (optional, for unopposed or semi-opposed practice to build confidence before full contact)
Pitch Setup
Mark out a 15m x 15m grid. Set up a simulated ruck at the centre of the grid's starting line. Place 3–4 defenders (or hit shields) 1 metre back from the ruck, forming a flat defensive line.
Player Positions
| Position | Player | Role |
|---|---|---|
| Scrum-half | 9 | Delivers the pass from the base of the ruck |
| Pod Leader (Ball Carrier) | 6 | First receiver, attacks the defensive line |
| Pod Support | 4 | Binds on the inside shoulder of the ball carrier |
| Pod Support | 8 | Binds on the outside shoulder of the ball carrier |
| Offload Target | 12 | Inside centre, runs a hard support line off the pod |
| Secondary Option | 9 (looping) | Scrum-half loops around as a second offload receiver |
| Openside Flanker | 7 | Provides cover and clean-out support |
Diagram 1: Forward Pod Set-Up — Initial Alignment. The pod (6, 4) aligns 2–3 metres behind the ruck, with the scrum-half (9) at the base. The defensive line is set 1 metre from the ruck.
Step-by-Step Instructions

The Pass: The Scrum-half (9) delivers a sharp, flat pass from the base of the ruck to the Pod Leader (6). The pass should be quick and accurate, targeting the player's hands at chest height to allow them to move onto the ball at pace.
The Attack Line: As the pass is made, all three pod forwards accelerate together, running hard, straight lines towards the defensive line. Their aim is to fix the defenders directly in front of them and prevent the defence from drifting. The pod must be moving at full pace when they hit the defensive line — a stationary pod is a dead play.
The Bind: The two support players (4 and 8) bind tightly onto the ball carrier's hips just before contact. This binding adds significant power to the drive and keeps the ball carrier on their feet longer, creating more time for the offload.
The Contact: The Ball Carrier (6) attacks the space between two defenders, driving hard and low. The aim is to get their hips through the tackle, staying on their feet for as long as possible. The support players drive through, pushing the ball carrier forward.
The Offload Decision: As the Ball Carrier is engaged in the tackle, they scan for the offload option. If the Inside Centre (12) is running a clean support line into the gap created by the pod, the ball carrier pops the ball with their arms out of the tackle. If the option is not clean — if the support runner is not in position, or if the tacklers have secured the ball carrier's arms — the ball carrier goes to ground and presents the ball cleanly for the ruck.
The Exploitation: The Inside Centre (12) accelerates through the gap created by the pod. The Scrum-half (9) loops around to provide a second offload option or to support the next phase. The remaining pod players clear out the ruck if the ball carrier goes to ground.
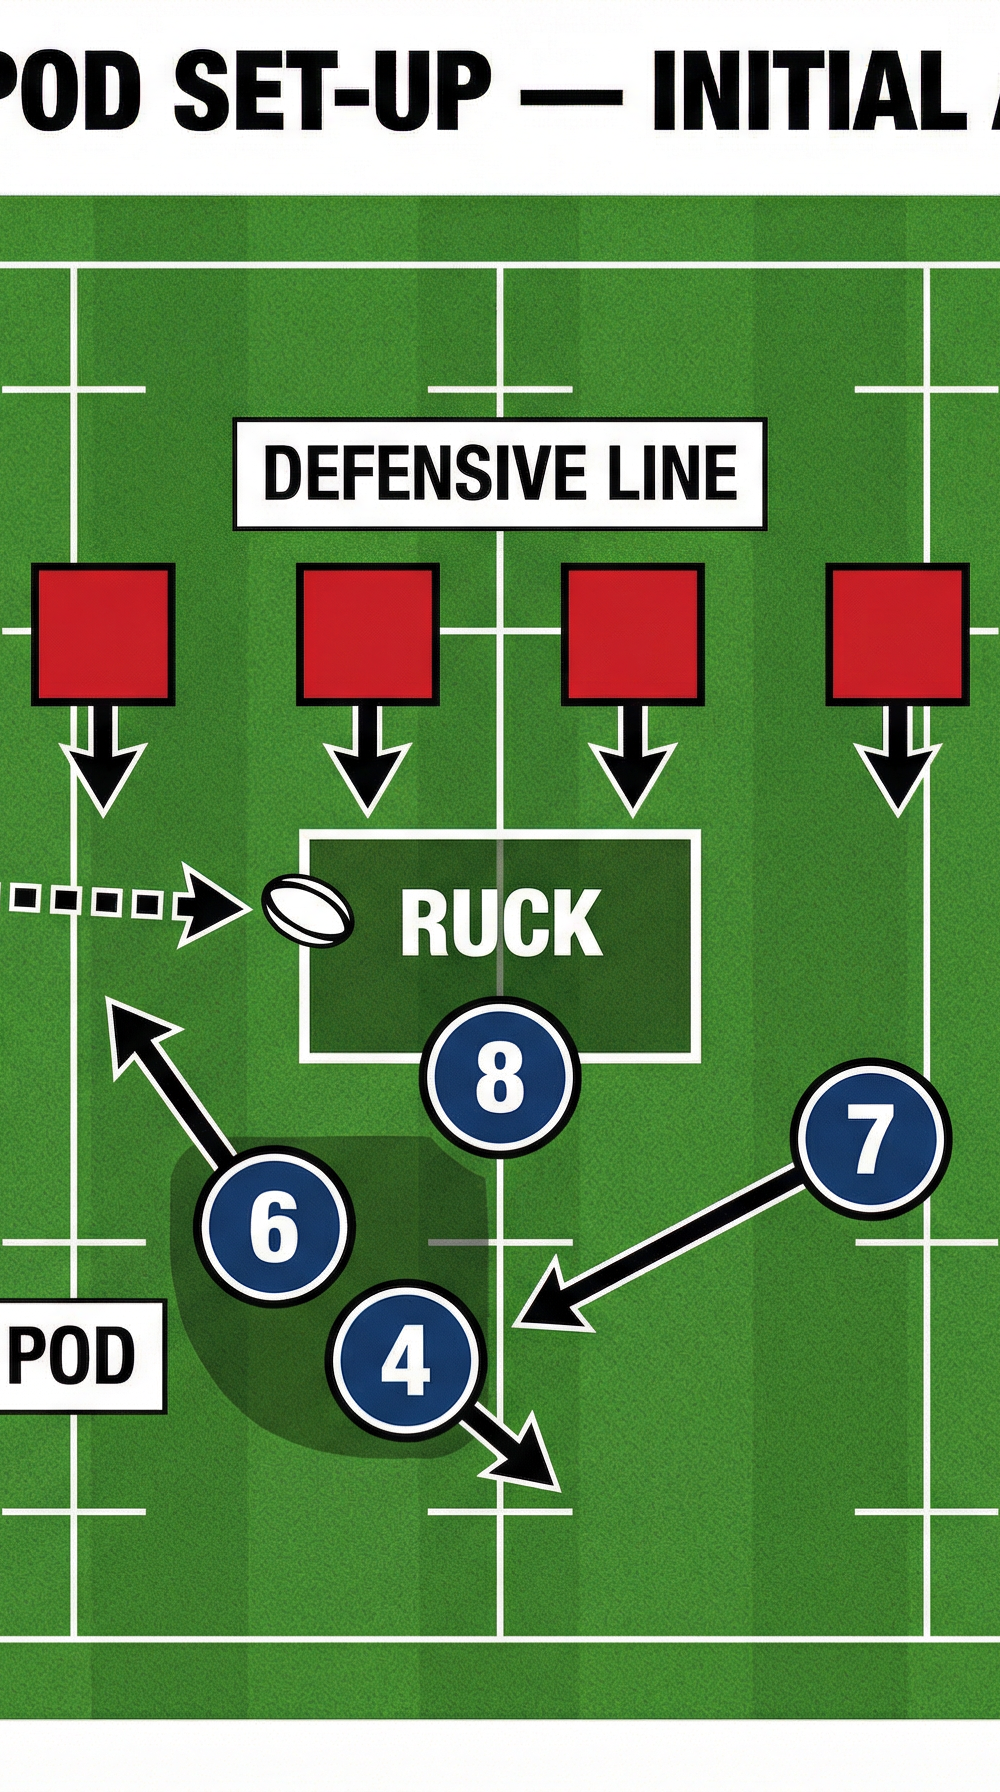
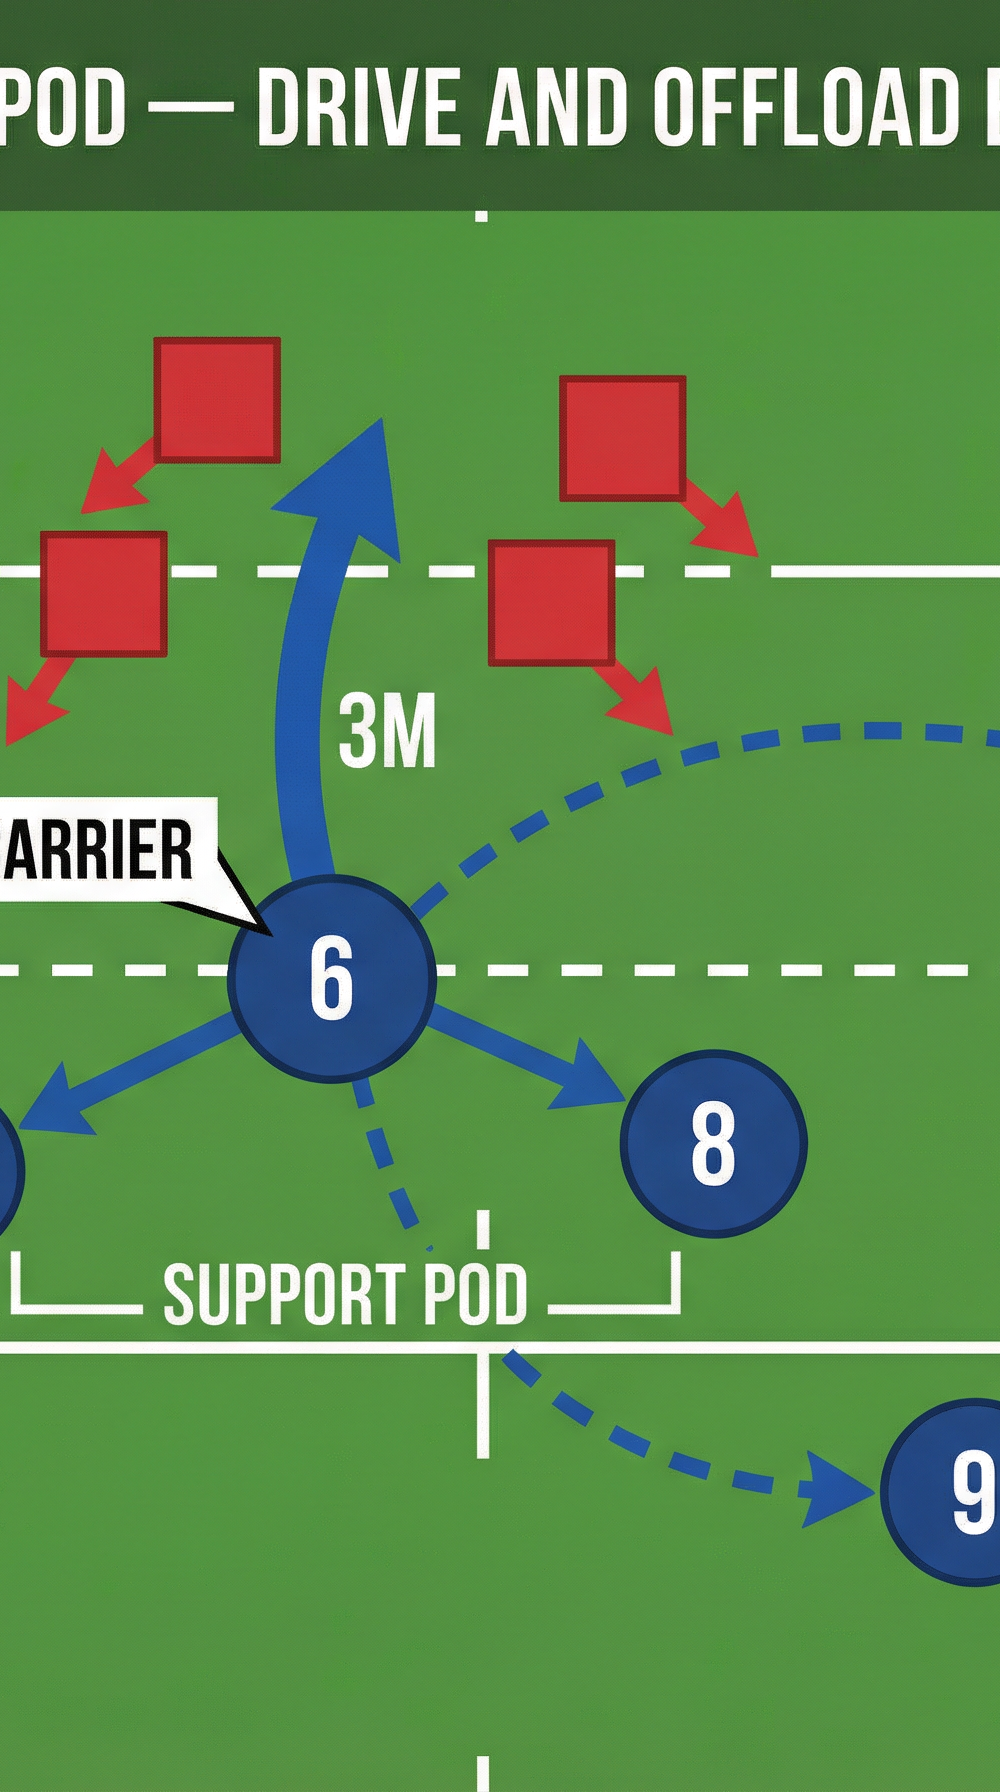
Diagram 2: Forward Pod — Drive and Offload Execution. The ball carrier (6) drives 3 metres through the gain line. A dashed arrow shows the offload to the Inside Centre (12), with the Scrum-half (9) looping as a secondary option.
Key Coaching Points

1. Depth and Timing of the Pod
The pod must maintain 2–3 metres of depth behind the ruck to ensure they are moving onto the ball at pace. A flat pod kills momentum. Emphasise this relentlessly in training — if a player is standing still when they receive the ball, stop the drill and reset.
2. Communication is Non-Negotiable
The offload receiver (12) must call loudly and clearly to the ball carrier as they enter the support line. The ball carrier cannot offload to a player they cannot see or hear. Introduce a simple call system — for example, a single word like "HERE!" — to make this instinctive.
3. The Ball Carrier Commits First
The ball carrier's primary job is to commit the defenders and cross the gain line. The offload is the bonus, not the expectation. Coach your players to understand that a clean carry into contact, followed by a secure ruck, is always a successful outcome. This mindset prevents forced offloads.
4. Hands Through the Tackle
This is the technical cornerstone of the play. The ball carrier must fight to keep their arms free in the tackle. Drill this in isolation: have players carry a ball into a tackle bag and practise keeping their hands and arms outside the tackler's grip. A strong core and low body position are essential.
5. Support Pod Cohesion
The three forwards must run as a single unit, not as individuals. Use the cue: "arrive together, leave together." If the pod is disjointed, the defence can isolate the ball carrier and shut down the offload option entirely.
6. Decision-Making Under Pressure
The offload is a high-risk, high-reward skill. Build in a clear decision rule for your players: offload only when the support runner is in front of your hips and running at pace. Any other situation, take the contact. Reinforce this with video analysis of both successful offloads and costly turnovers.
Common Mistakes

| Mistake | What It Looks Like | How to Correct It |
|---|---|---|
| Flat Pod | Players receive the ball standing still or walking | Enforce a minimum depth of 2m; use a cone gate to ensure players run through it before receiving |
| Forcing the Offload | Ball carrier offloads into a tackle, leading to a knock-on or turnover | Reinforce the decision rule; use video to show the cost of a bad offload |
| Support Runner Overruns | The offload target (12) arrives too early and is in front of the ball carrier | Work on timing in isolation; have the support runner count two steps after the pod hits contact before accelerating |
| Lack of Pod Cohesion | The three forwards arrive at different times, reducing the drive's power | Drill the bind before contact; use a hit shield to practise the three-man drive as a unit |
| Silent Support | The offload receiver doesn't call, and the ball carrier is unaware of the option | Make communication a non-negotiable coaching standard; award points in training for good communication |
Variations & Progressions

Progression 1 — Increase Defensive Pressure
Add a fifth and sixth defender and allow them to apply full tackling pressure. This tests the decision-making of the ball carrier under realistic match conditions and forces the pod to work harder at the point of contact. Introduce a live scrum-half who can also compete for the ball at the breakdown.
Progression 2 — Live Game Scenario
Integrate the play into a wider game scenario (e.g., 10 vs. 10 on a 40m x 40m grid). The pod play becomes the first phase of a structured attack, with the offload creating a 2-on-1 or 3-on-2 situation out wide. This develops the backs' understanding of how to read and exploit the space created.
Variation 1 — The Double Offload
Introduce a second offload option. After the Inside Centre (12) receives the first offload, the Scrum-half (9) — who has looped around the pod — is available for a second offload if the defence has drifted. This is an advanced variation that requires excellent timing and communication.
Variation 2 — The 'No-Look' Offload
For advanced players, introduce the 'no-look' or 'out the back' offload to deceive the defence. The ball carrier executes the offload without looking at the receiver, relying entirely on the pre-agreed timing and line. This should only be introduced once the core skill is fully mastered and the support runner's timing is reliable.
Age Adaptations

Under 10s–12s (Foundation)
Focus on the core concept of three players working together and running straight. Use touch or grab-tackle rules to remove the physical barrier and allow players to focus on the movement patterns. The 'offload' at this age can be a simple pop pass before any contact is made. The emphasis is entirely on teamwork, communication, and running good support lines.
Under 14s–16s (Development)
Introduce contact using hit shields and then full tackling. Begin to coach the technical skill of getting hands through the tackle. The offload becomes a primary focus, but with a strong emphasis on decision-making — when to offload and when to take the contact. Introduce the decision rule explicitly and test it in small-sided games.
Open Age / Senior Rugby (Performance)
At this level, the play should be executed at high speed with full contact from the outset. Players are expected to make correct decisions under pressure without prompting. Introduce the more complex variations — the double offload, the no-look pass, and the integration of the play into a full team attacking structure. Use video analysis to review execution and reinforce coaching points.