The 'Sling-Shot' Counter: Mastering Kick-Off Reception & Counter-Attack
A detailed guide for rugby coaches on how to turn a defensive kick-off reception into a potent, multi-phase counter-attacking opportunity that exploits wide channel space.
Equipment Needed
1. Overview
The 'Sling-Shot' Counter is a dynamic set play designed to transform a kick-off reception — a moment of defensive pressure — into an immediate and aggressive attacking launchpad. The core principle is to secure possession cleanly, commit defenders to the initial breakdown, and then rapidly exploit the space created on the flanks. This play is most effective against teams that commit heavily to the kick chase, leaving their wider channels exposed. By drawing the opposition in, we create the 'tension' in the sling-shot before releasing the ball into space for our fastest runners.
This play is particularly effective in the opening exchanges of a match when the opposition's kick-chase shape is predictable, or following a score when the kicking team's energy and alignment may be disorganised. It rewards teams with a strong-catching Fullback (15), a powerful strike runner in the back row, and a Fly-half (10) who can make quick decisions under pressure.
2. Setup

Equipment Needed
- 1 full-size rugby pitch (100m x 70m)
- 10–15 rugby balls
- Cones (to mark reception zones and target channels)
- Contact pads or hit shields (for the progression phases)
Pitch Setup
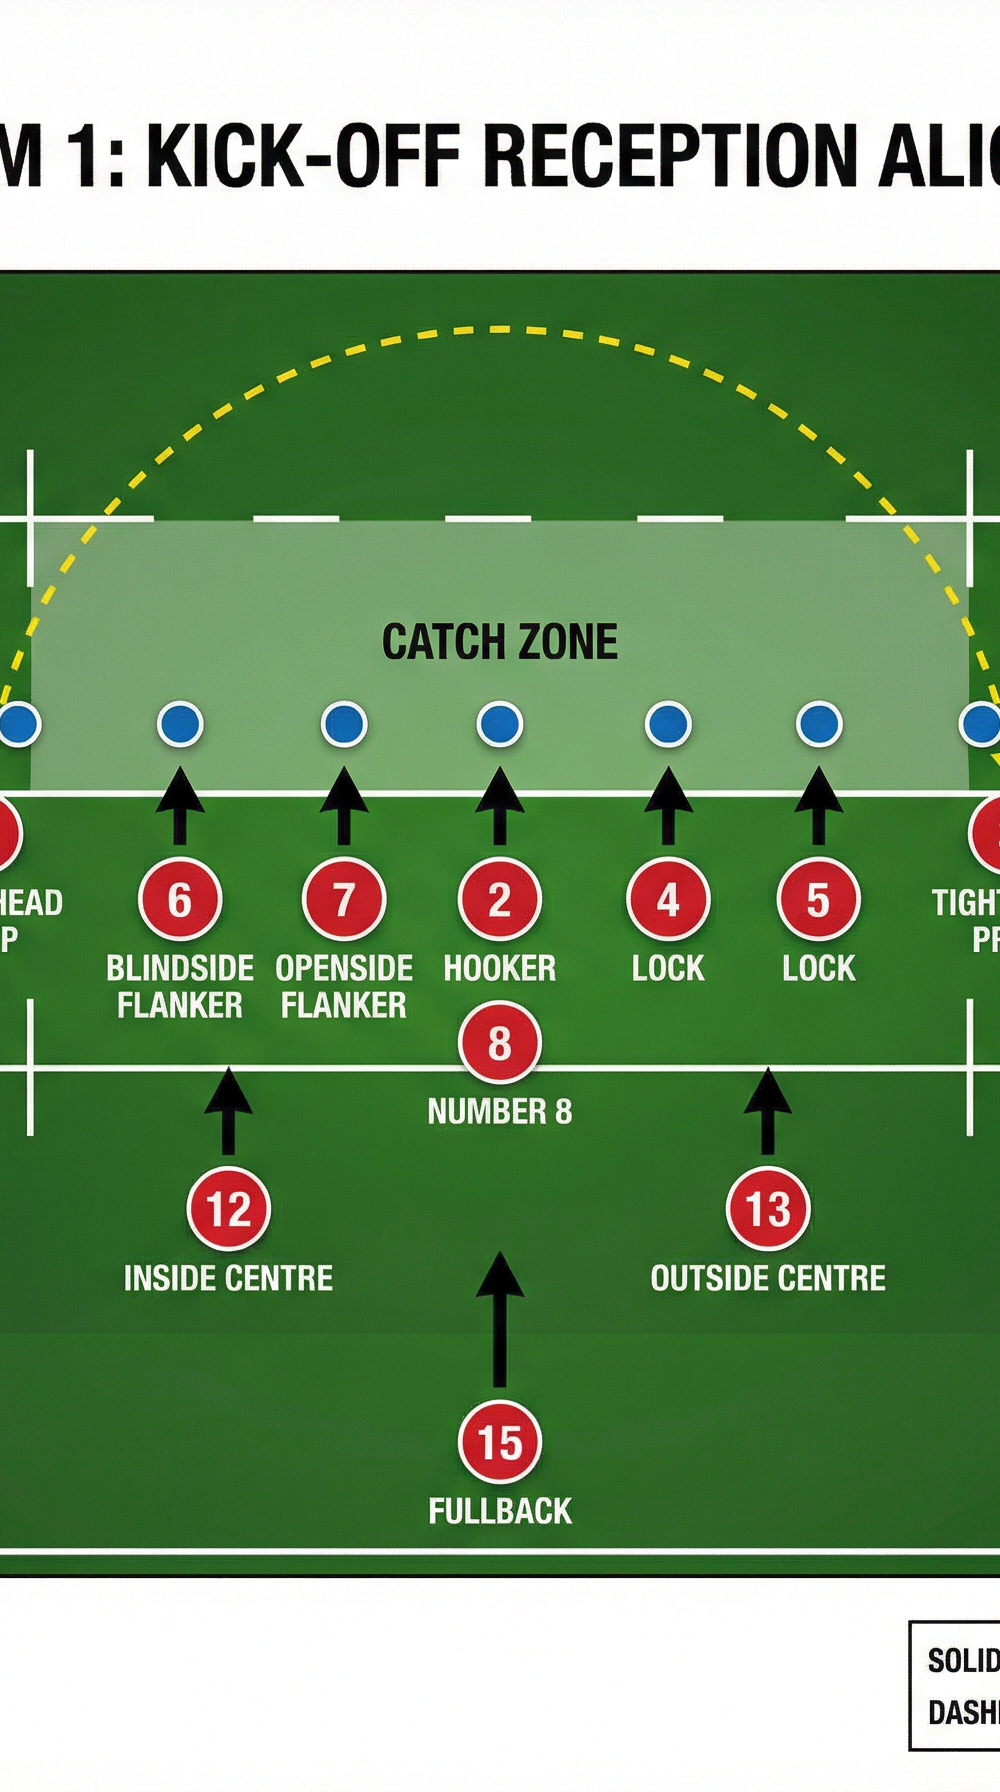
The play is run from a standard kick-off. The receiving team sets up in their own half, with the primary reception zone between the halfway line and 10m behind it. Cones can be placed to define the Catch Zone (a 20m-wide corridor in the centre of the pitch) and the Wide Attack Channels (the outer 15m on each flank).
Player Positions at Kick-Off
| Position | Number | Starting Location | Primary Role |
|---|---|---|---|
| Fullback | 15 | 10–15m behind halfway, centre | Primary ball catcher |
| Left Winger | 11 | 10m behind halfway, left flank | Secondary catcher / wide strike |
| Right Winger | 14 | 10m behind halfway, right flank | Secondary catcher / wide strike |
| Inside Centre | 12 | 5m behind halfway, left of centre | Strike runner / support |
| Outside Centre | 13 | 5m behind halfway, right of centre | Strike runner / distributor |
| Fly-half | 10 | 5m behind halfway, left of centre | Decision-maker / second distributor |
| Scrum-half | 9 | At halfway, centre | Ruck service / link player |
| Number 8 | 8 | At halfway, centre | Close support / second carry |
| Flankers | 6, 7 | At halfway, flanks of forward pod | Breakdown support / clearout |
| Locks | 4, 5 | At halfway, centre of forward pod | Jumping pod / secondary support |
| Hooker | 2 | At halfway, centre of forward pod | Jumping pod / support |
| Props | 1, 3 | At halfway, outer flanks of pod | Lifters / immediate support |
3. Step-by-Step Instructions
Signal the Call: Before the opposition kicks, the captain or Scrum-half (9) calls 'Sling-Shot' to confirm the play is on. All 15 players must hear and acknowledge the call.
The Reception: As the kick is made, the Fullback (15) tracks the ball and positions themselves under it. They call loudly ('My ball!' or 'Fullback!') to claim the catch. The two Flankers (6, 7) and the Number 8 immediately begin running to support the landing zone. The Props (1, 3) and Locks (4, 5) follow 2–3 seconds behind.
Secure the Breakdown: The moment the Fullback (15) catches and is contacted, the support players (6, 7, 8) drive into the breakdown with aggression. Their priority is to clear out the first chase players and present clean, fast ball. The Scrum-half (9) positions themselves at the base of the ruck.
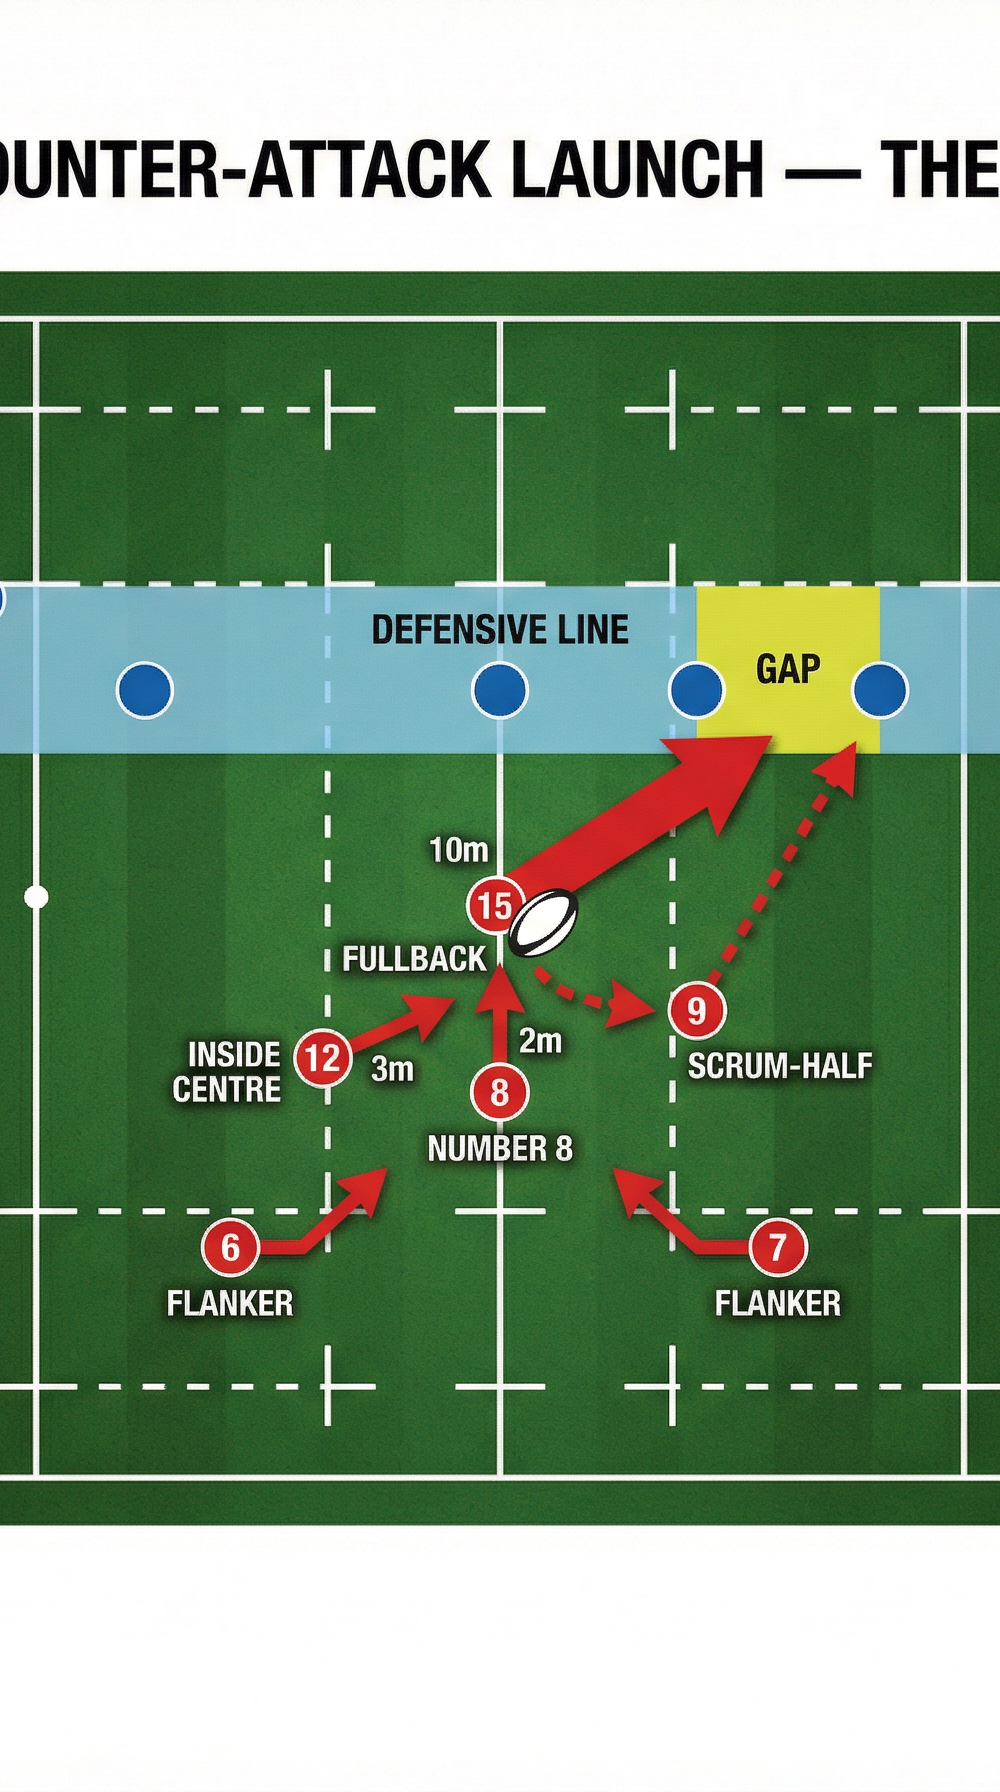
The Strike Phase (Phase 1): The Scrum-half (9) passes quickly to the Inside Centre (12) or Number 8, who is running a hard, straight line directly at the defensive line. The aim is to cross the gain line and fix 2–3 defenders. This is the 'tension' phase — we are loading the sling-shot.
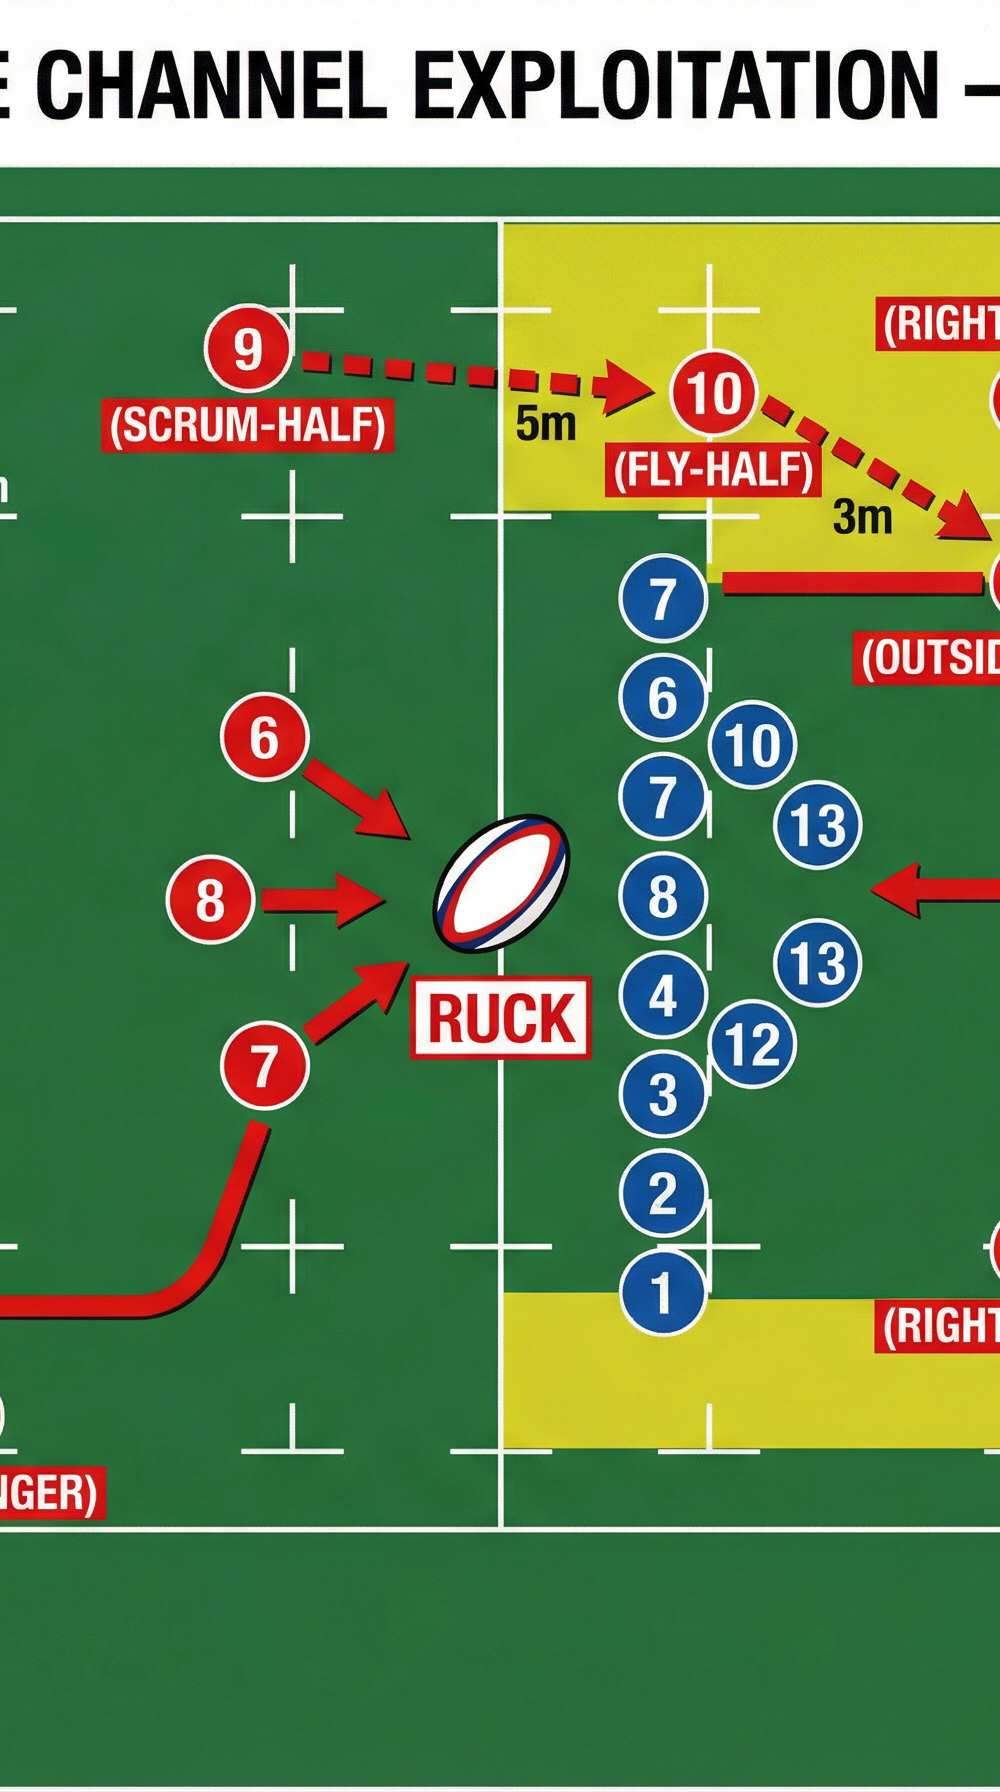
Quick Recycle: The strike runner goes to ground or offloads. Support players (6, 7) secure the second ruck. The Scrum-half (9) delivers the ball immediately to the Fly-half (10), who has moved into space.
The Release (Phase 2): The Fly-half (10) reads the defensive line. If the defence has compressed infield (which is the trigger for this play), they move the ball wide via the Outside Centre (13) to the Right Winger (14) and the re-joining Fullback (15), who provides the extra man in the wide channel. The Left Winger (11) runs a hard decoy line infield to hold the left-side defender.

4. Key Coaching Points

Communication is Everything: The catcher must be decisive and call for the ball early and loudly. Hesitation invites a collision and a turnover. Coach your players to be vocal from the first whistle.
Win the Race to the Breakdown: The entire play depends on the speed and aggression of the support players arriving at the catch zone. Run this as a drill — time how long it takes your Flankers to arrive. Target: under 3 seconds from the kick landing.
Attack Straight, Not Sideways: The Phase 1 strike runner must run a hard, straight line. A lateral run allows the defence to drift and cover the space out wide, killing the play before it starts.
Maintain Depth and Width: The attacking backs must hold their depth (at least 5m behind the gain line) and their width (spread across the full 70m pitch). This creates the passing lanes and forces the defence to make a choice.
The Fly-half is the Trigger: The Fly-half (10) is the conductor of the play. Coach them to read the defensive line and make the decision quickly. If the defence has not compressed, they must have the confidence to hold the ball and wait for it to happen.
Fullback's Re-entry Angle: The Fullback (15) must re-enter the attacking line at pace and at the right angle — arriving between the Outside Centre (13) and the Winger (14) to create the overlap. A flat or slow re-entry is easy for the defence to read.
5. Common Mistakes

Catcher is Isolated: If support players are too slow, the catcher is left alone and can be turned over or driven back. Remedy: drill the support run repeatedly without the ball, focusing purely on arrival time and body position.
Slow Ball from the Ruck: A slow recycle from the first or second breakdown allows the defence to realign and eliminates the space the play is designed to exploit. Remedy: coach the Scrum-half to demand fast ball and the forwards to present the ball immediately.
Lateral Running in Phase 1: The strike runner drifts sideways, allowing the defence to drift with them. Remedy: place a cone 5m ahead of the strike runner's starting position as a target — they must run to the cone.
Loss of Width: Wingers creep infield out of excitement or habit, reducing the space and making the defence's job easier. Remedy: use cones on the touchline to mark the Winger's starting position and remind them to hold their width until the ball is in the Fly-half's hands.
Forwards Not Transitioning: After the initial breakdown, forwards are slow to get into position for Phase 2. Remedy: assign specific roles — Flankers (6, 7) stay at the ruck, Number 8 becomes a second-phase carrier, and Props and Locks push wide to support the attack.
6. Variations & Progressions

Variations
The Switch: After the Phase 1 strike runner (12) commits the defence, they play a switch pass back inside to the Number 8, who has looped around behind them. This exploits a defence that has over-committed to the initial ball carrier.
The Miss Pass: The Fly-half (10) throws a long 'miss pass' that cuts out the Inside Centre (12) and Outside Centre (13) entirely, going directly to the Right Winger (14) who has a clear run to the corner. This is most effective when the defensive line is slow to drift.
Progressions
Passive to Active Defence: Begin with a passive defence (defenders walking) and gradually increase the pressure and line speed of the chasing team to full match intensity.
Live Tackling Game: Progress from touch or two-handed touch to full tackling. Set up a game where every kick-off reception is an opportunity to run the play. Award bonus points for successful counter-attacks that cross the halfway line or score a try.
Conditioned Game: Add a condition where the receiving team must execute the play within 4 phases or possession is turned over. This forces quick decision-making and urgency.
7. Age Adaptations

Under 10 / Under 12: Focus on the core skill of catching the high ball confidently with 1–2 support players arriving quickly. The counter-attack can be simplified to a single pass to a player in space. Use softer balls and reduce the number of players involved to 7v7.
Under 14 / Under 16: Introduce the concept of the forward pod and the specific roles of different players. The Phase 1 strike can be introduced, focusing on the straight run and quick recycle. The wide attack can be simplified to a 3v2 or 4v3 scenario on the flank.
Open Age / Senior: All elements of the play can be coached and refined. Focus on the fine-tuning of timing, communication, and decision-making under full match pressure. Introduce more complex variations based on the opposition's specific defensive setup and tendencies.