Kick-Off Reception & Counter-Attack: The 'Deep Strike' System
Master the 'Deep Strike' system to turn every kick-off into a structured counter-attacking opportunity — giving your team field position, momentum, and try-scoring chances from the first whistle.

Equipment Needed
Overview
The 'Deep Strike' kick-off reception and counter-attack system is one of the highest-leverage set plays in rugby. Every match begins with a kick-off, and every score is followed by one — meaning this play is executed more frequently than almost any other structured set piece. Yet the majority of teams at community and club level treat the kick-off reception as a survival exercise rather than an attacking opportunity.
This system reframes the kick-off reception entirely. Rather than simply securing possession and kicking the ball back, the 'Deep Strike' play gives your team a pre-rehearsed, multi-option counter-attack that exploits the one structural weakness all kicking teams share: they must be onside at the halfway line when they kick, which means they are spread across a 70m width and have 20–30 metres to cover before they can make a legal tackle. That is your window. This play is designed to exploit it.
Use this play at the start of each half, after your team scores, and whenever you need to shift momentum. It is most effective against teams that kick short and chase aggressively, as the pre-set structure allows your players to make decisions before the ball even lands.
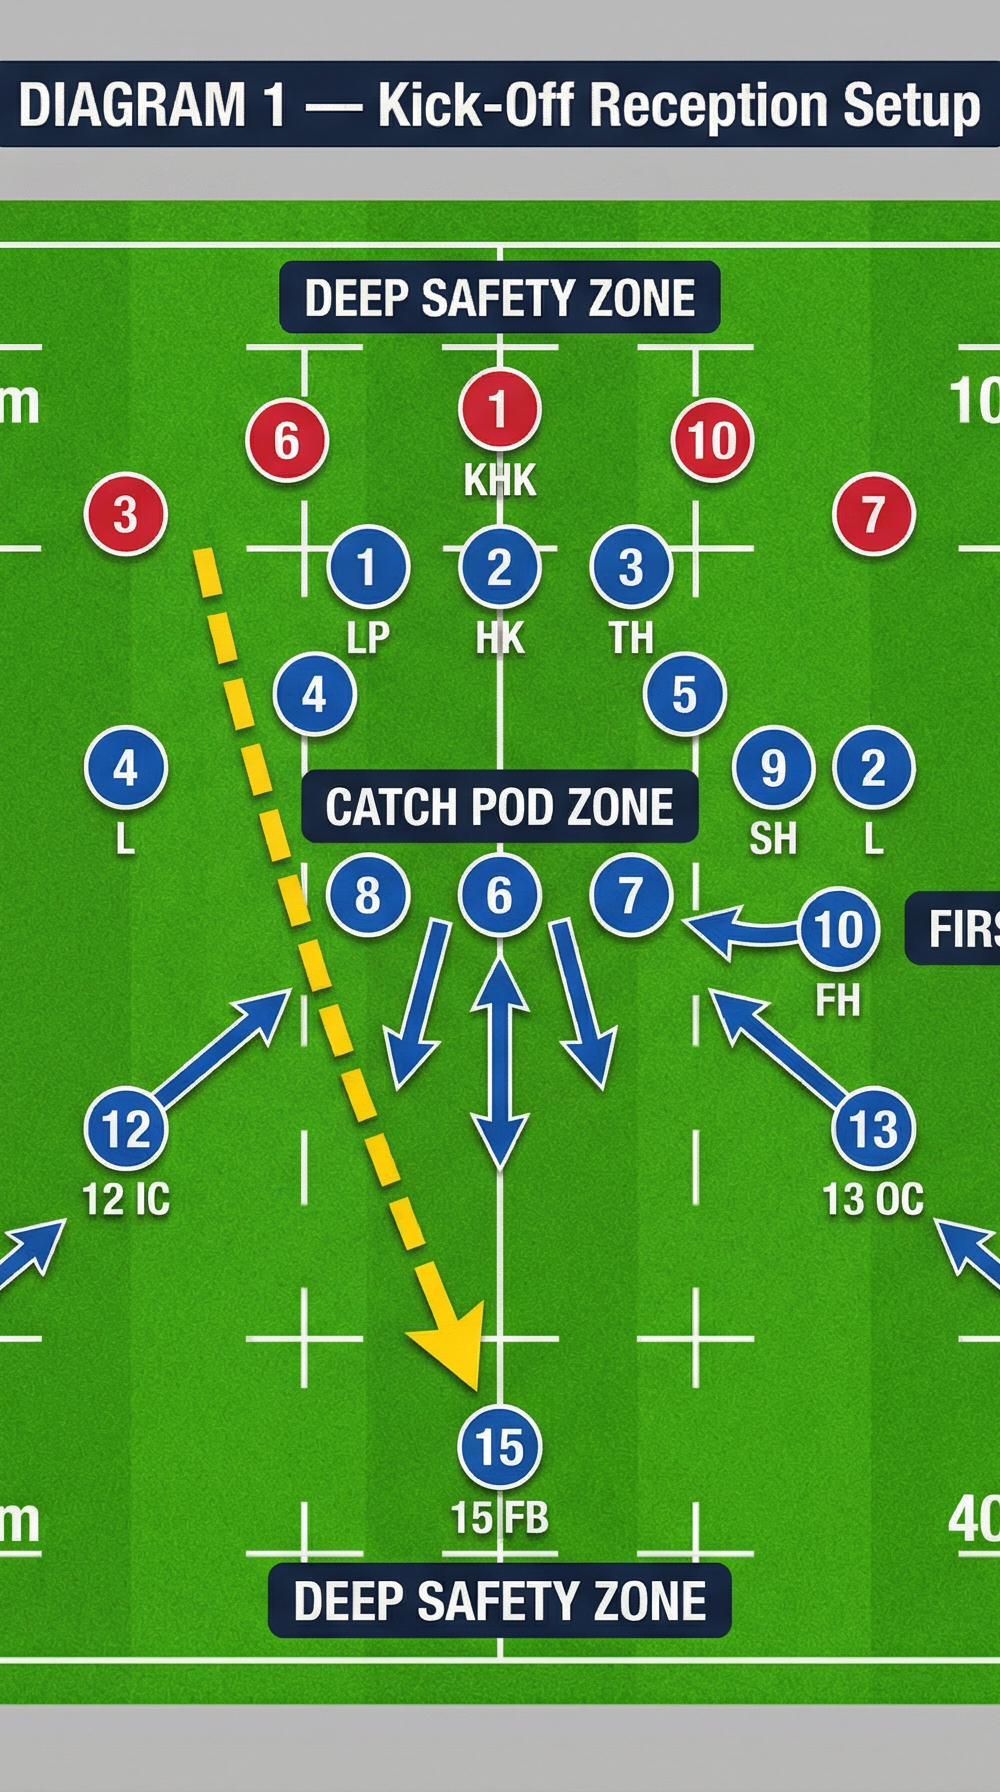
Setup

Equipment Required
- 1 standard rugby ball (size 5 for senior/open, size 4 for U14 and below)
- Cones (minimum 12) to mark zones during training
- Bibs in two colours for opposed practice
- Whiteboard or coaching board for pre-session walkthrough
Pitch Zones (100m × 70m)
The play operates across three defined zones on the receiving half:
| Zone | Location | Primary Purpose |
|---|---|---|
| Deep Safety Zone | Own 40m line to own 22m line | Ball catch and initial carry |
| Catch Pod Zone | Own 30–35m line, central channel | Forward pod support and first carry option |
| First Receiver Channel | Own 32–35m line, 5–10m either side of centre | 10 and 12 set up attack structure |
Player Positions at Kick-Off

Deep Safety (Ball Catchers):
- 15 (Fullback): Central position, 40m line. Primary catcher for all kicks landing in the central corridor.
- 11 (Left Wing): 40m line, 15m left of centre. Secondary catcher for kicks drifting left.
- 14 (Right Wing): 40m line, 15m right of centre. Secondary catcher for kicks drifting right.
Catch Pod (Forward Support):
- 8 (Number Eight): 30m line, directly behind the anticipated catch zone. Pod leader and primary carry option.
- 6 (Blindside Flanker): 30m line, 3m left of No. 8.
- 7 (Openside Flanker): 30m line, 3m right of No. 8.
- 4 (Lock): 28m line, left of pod.
- 5 (Lock): 28m line, right of pod.
Attack Structure:
- 9 (Scrum-Half): 32m line, central. Links catch zone to attack structure.
- 10 (Fly-Half): 32m line, 8m right of centre. First receiver and decision-maker.
- 12 (Inside Centre): 35m line, 12m left of centre. Hard-line runner.
- 13 (Outside Centre): 35m line, 12m right of centre. Wide strike option.
- 1, 2, 3 (Front Row): 25m line, central. Depth support and second-phase pod.
Step-by-Step Instructions


Step 1 — Pre-Kick Alignment (0–5 seconds before kick)
All 15 players move into their designated zones as described above. The key discipline is that no player should be inside their own 10m line — everyone must be positioned to receive a legal kick. The fullback (15) calls the alignment using a pre-agreed colour or number call to indicate which counter-attack option is live based on what he reads from the kicking team's formation.
Step 2 — Read the Kick (0–2 seconds after kick)
The primary catcher (15, 11, or 14) calls "MINE" loudly and early. The catch pod (6, 7, 8) immediately sprint to within 3m of the anticipated landing zone. The 9 tracks the ball and positions 2m behind the catcher. The 10 and 12 hold their depth at 35m line and begin their running lines.
Step 3 — Secure the Ball (2–4 seconds after kick)
The catcher takes the ball cleanly at chest height or above. If the ball is contestable, the pod provides a two-man lift or body shield. On securing possession, the catcher immediately drives forward 3–5m before contact or offloads. Do not stand still. Forward momentum is critical — it forces the chasing defenders to adjust their lines.
Step 4 — First Carry (4–7 seconds)
The catcher drives into contact. The pod (6, 7, 8) bind immediately to form a maul or present a quick ruck. The 9 fires the ball from the ruck within 3 seconds. The 10 is already running a flat line at pace.
Step 5 — Execute the Counter-Attack Option (7–12 seconds)
The 10 receives from 9 and executes one of three pre-called options:
- Option A — 'Strike': 10 draws the first defender, passes to 12 running a hard inside line. 12 attacks the gain line at pace.
- Option B — 'Wide': 10 passes wide immediately to 13 or 14 who has looped into space on the far side. Requires the chasing defenders to have drifted infield.
- Option C — 'Pod': 10 dummies wide and feeds the forward pod (8, 6, 7) for a direct carry into the defensive line. Used when the defence is spread wide.
Step 6 — Recycle and Continue (12+ seconds)
After first contact, the team continues to attack in phases. The front row (1, 2, 3) arrive as the second-phase pod. The 15 rejoins the backline as an extra attacker. Maintain width — the 11 and 14 must hold the touchlines to prevent defensive drift.
Key Coaching Points

Call Early, Call Loud. The catcher must call "MINE" the moment the ball is in the air. Hesitation leads to collision between catchers and dropped possession. Practise this in isolation before adding opposition.
The Pod Must Sprint, Not Jog. The catch pod (6, 7, 8) need to cover 10–15m in 3–4 seconds. This is a genuine sprint. If they arrive at walking pace, the ruck is slow and the counter-attack window closes. Time this in training with a stopwatch — the pod should be within 3m of the catcher before the ball lands.
The 10 Must Run a Flat Line. The most common error is the fly-half (10) standing deep and static waiting for the ball. The 10 must be running at pace onto the ball from 9. A flat, fast line puts the defence under immediate pressure and opens the options either side.
Width is Non-Negotiable. The 11 and 14 must hold the touchlines throughout the play. If they drift infield, the defence can compress and the wide option (Option B) is eliminated. Remind wingers: "Hold width until the ball is in your hands."
Decision Before Contact. The catcher must decide which option is live before they make contact. Looking up after the ruck is too late. Encourage players to read the defensive shape during the kick flight — if chasers are narrow, go wide; if they are spread, use the pod.
Communicate the Call. The fullback (15) is the quarterback of this play. They must communicate the active option (A, B, or C) to the 10 before the ball is played from the ruck. Use a simple, pre-agreed signal or call.
Common Mistakes

Mistake 1 — Catching the Ball Stationary and Going to Ground Immediately.
This is the single most destructive error. A stationary catcher gives the chasing team time to organise and compress. Correct this by insisting the catcher takes 3–5 forward steps before any contact. Drill this without opposition first.
Mistake 2 — The Pod Arriving Late.
If the pod (6, 7, 8) are not within 3m of the catcher when contact is made, the ruck is slow and isolated. The fix is simple: pod players must start their sprint the moment the ball leaves the kicker's boot, not when it lands. Use a cone drill to mark the 3m arrival zone and hold players accountable.
Mistake 3 — The 10 Standing Flat-Footed.
A static fly-half telegraphs the play and gives the defence time to read and react. The 10 must be running onto the ball. In training, use a rule: if the 10 is not moving when they receive from 9, the rep is reset.
Mistake 4 — Wingers Drifting Infield.
Wingers naturally want to be involved and drift toward the ball. This collapses the width of the attack. Reinforce the rule with a physical marker — place a cone on the 5m line and instruct wingers they must stay outside it until the ball is in their hands.
Mistake 5 — Calling the Wrong Option for the Defensive Shape.
This is a decision-making error, not a technical one. Address it through video review and small-sided games where players must identify the correct option before executing. Build a simple decision tree: "If the chasers are narrow → go wide. If the chasers are spread → use the pod."
Variations & Progressions

Progression 1 — Opposed Kick-Off Simulation (Intermediate)
Introduce a kicking team of 7–8 players who kick from the halfway line and chase. The receiving team must execute the full play under realistic pressure. Start with a slow-chase rule (chasers jog for the first 10m) before building to full pace. This bridges the gap between unopposed pattern work and match conditions.
Progression 2 — Kick Type Variations (Advanced)
Practise the reception against three different kick types: the standard deep kick, the short chip to the 10m line, and the diagonal kick to the corner. Each requires a different primary catcher and a different initial carry direction. Running the same counter-attack structure against all three kick types builds genuine adaptability and confidence.
Variation 1 — Simplified 'Catch & Drive' for Developing Teams
For teams new to structured kick-off reception, remove the three-option counter-attack and replace it with a single objective: catch the ball, drive forward 10m as a group, and secure clean possession. This builds the foundational habits (early call, pod sprint, forward momentum) without cognitive overload.
Age Adaptations
| Age Group | Key Modifications |
|---|---|
| Under 10 | Use a size 3 ball. Reduce to 5 players (1 catcher, 2 pod, 1 first receiver, 1 support). Focus solely on catching the ball and driving forward. No counter-attack structure. |
| Under 12 | Introduce the catch pod concept with 3 forwards. Use a single attack option only (Option A — Strike). Emphasise calling and communication. |
| Under 14 | Introduce all three attack options but pre-assign the option before each rep rather than reading the defence. Build to live decision-making over the course of the season. |
| Under 16 | Full system as described. Add the kick-type variation progression. Begin introducing video review of kick-off reception patterns. |
| Open / Senior | Full system with live opposition, all kick types, and in-play decision-making. Add a 'counter-kick' option where 15 can choose to kick for territory if the defensive shape is compressed and no counter-attack window exists. |
Coaching Note: Allow 3–4 dedicated sessions to build this play from walkthrough to full-pace opposed practice. The first session should be entirely unopposed — establish the positions, the calls, and the pod sprint. Opposition should only be introduced once every player can articulate their role without prompting.