Lineout Mastery: 5-Man Set Piece to First Phase Attack
Master the 5-man lineout with this comprehensive drill that links set-piece execution directly to first-phase attacking structures.

Equipment Needed
1. Overview
The lineout is arguably the most crucial attacking platform in modern rugby. This comprehensive drill focuses on a 5-man lineout structure, specifically training the transition from securing possession to launching a first-phase attack. It bridges the gap between isolated set-piece practice and live game scenarios.
Coaches will use this drill to develop timing between the hooker and jumpers, improve lifting technique under pressure, and ensure the scrum-half (9) and fly-half (10) receive quick, clean ball to initiate the attack.
2. Setup
Equipment Needed
- 4-6 Rugby balls
- 10 Cones (to mark defensive lines and attacking zones)
- 1 Tackle shield (optional, for defensive pressure)
- 1 Scrum cap (for the jumper, optional but recommended)
Pitch Setup
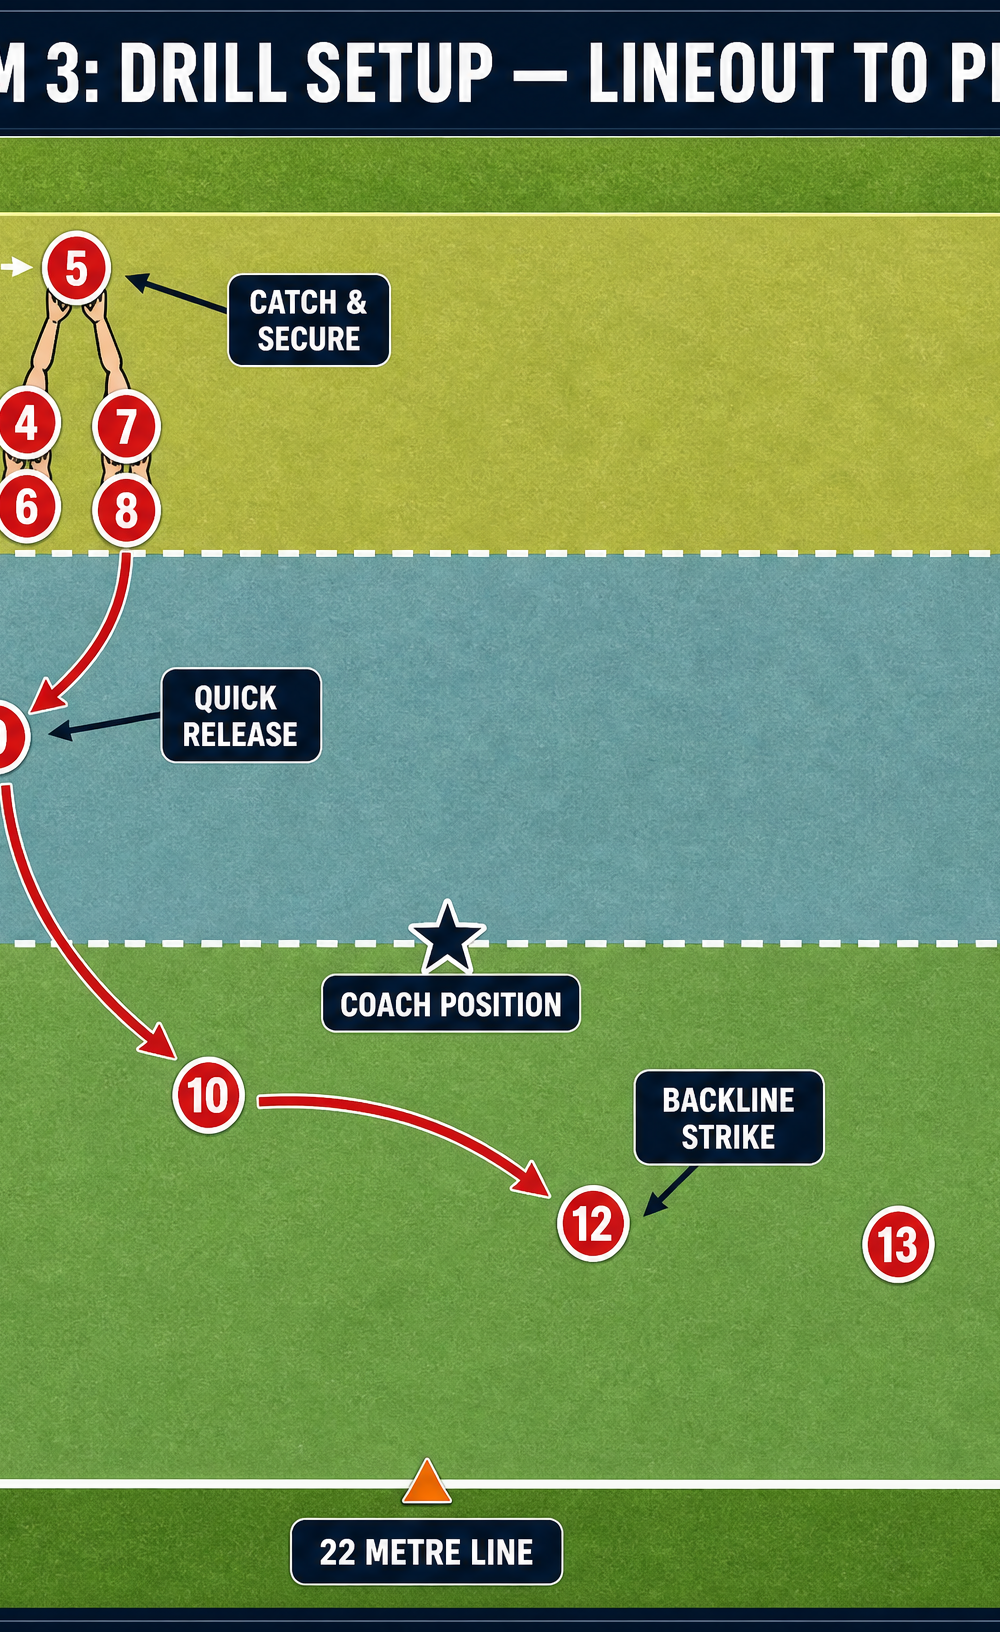
Set up on a standard rugby pitch (100m x 70m) or a marked training grid. Use the touchline, the 5-metre line, and the 15-metre line to establish the lineout channel. Place cones to mark the defensive offside line (10 metres back for non-participants) and the target zones for the backline.

Player Positions
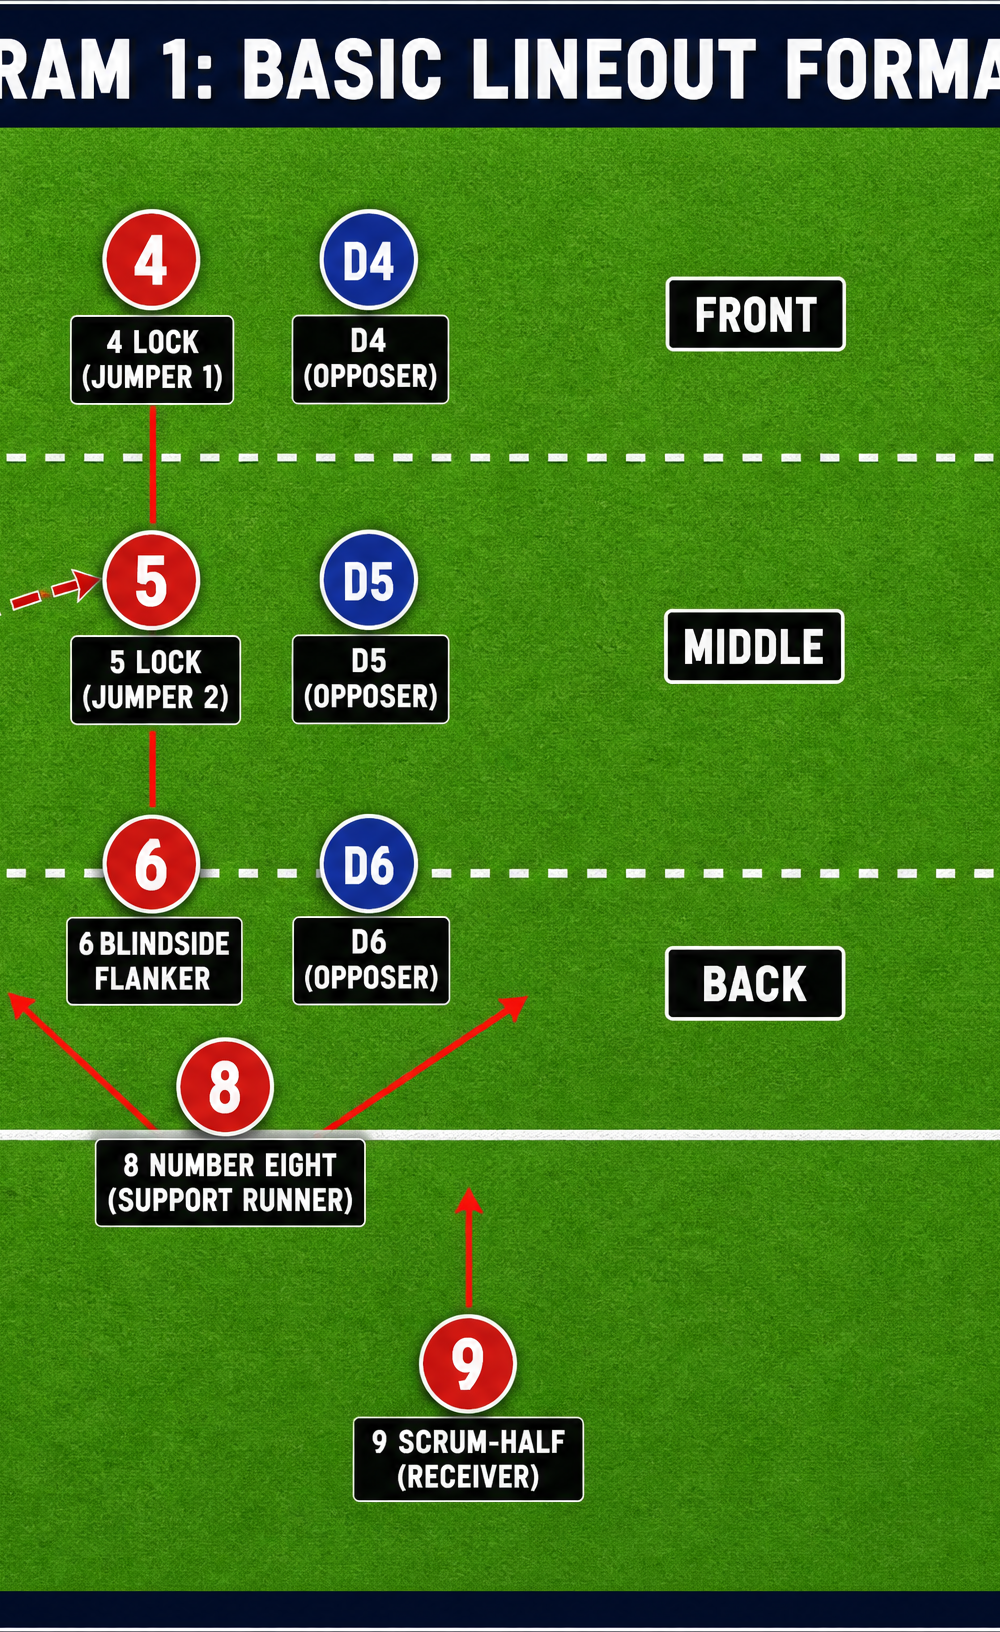
- Attacking Team (Red):
- No. 2 (Hooker): Throwing in from the touchline.
- No. 4 & No. 5 (Locks): Primary jumpers.
- No. 6, No. 7, No. 8 (Back Row): Lifters and support.
- No. 9 (Scrum-half): Positioned 2m behind the lineout to receive the ball.
- No. 10, No. 12, No. 13 (Backs): Aligned in the backline zone.
- Defending Team (Blue):
- 3-4 players (e.g., D4, D5, D6) to act as opposition in the lineout (passive initially, then active).
3. Step-by-Step Instructions
- The Call: The lineout caller (usually No. 5) makes the play call (e.g., "Middle, Option A"). The forwards align in the basic 5-man formation between the 5m and 15m lines.
- The Movement: On the caller's trigger, the lifters (No. 6 and No. 8) step into position, creating a strong base. The jumper (No. 5) dips and explodes upward.
- The Throw: The Hooker (No. 2) throws a straight, flat pass to the apex of the jumper's reach. Timing is critical—the ball should arrive exactly as the jumper reaches maximum height.
- The Catch & Delivery: The jumper secures the ball with two hands, turns slightly toward the scrum-half (No. 9), and delivers a quick, downward pass (the "rip" or "pop").
- The First Phase: No. 9 receives the ball and immediately passes to No. 10, who attacks the defensive line or distributes to the centers (No. 12/13) in the designated Backline Zone.
- Reset: The forwards immediately reset for the next repetition, emphasizing speed between plays.
4. Key Coaching Points
- Square Shoulders: The Hooker must keep their shoulders square to the touchline throughout the throwing motion to ensure a straight throw.
- Strong Lifting Base: Lifters must get their feet close to the jumper, bend at the knees (not the back), and drive upward through their legs, locking their arms at full extension.
- Jumper Core Tension: The jumper must maintain a tight core and "hollow body" position in the air to remain stable and maximize height.
- Scrum-half Positioning: No. 9 must read the jump and position themselves perfectly to receive the ball without having to reach or adjust, enabling a rapid clearance pass.
- Communication: Clear, concise calls and visual triggers are essential for perfect timing between the thrower and the jumping pod.
5. Common Mistakes
- Telegraphing the Jump: Jumpers dipping too early or looking directly at their intended lifting spot, allowing the defense to read the play and contest.
- Lifting with the Back: Lifters bending at the waist rather than the knees, resulting in a weak lift and potential injury.
- Looping Throws: The Hooker throwing a looping, slow ball rather than a flat, direct dart, giving the opposition time to compete in the air.
- Static Scrum-half: No. 9 standing flat-footed and waiting for the ball to come down, rather than anticipating the delivery and moving onto the ball.
6. Variations & Progressions
- Progression 1: Active Defense. Introduce 2-3 active defenders (with tackle shields) who attempt to disrupt the lift or sack the jumper upon landing. This increases pressure and forces quicker execution.
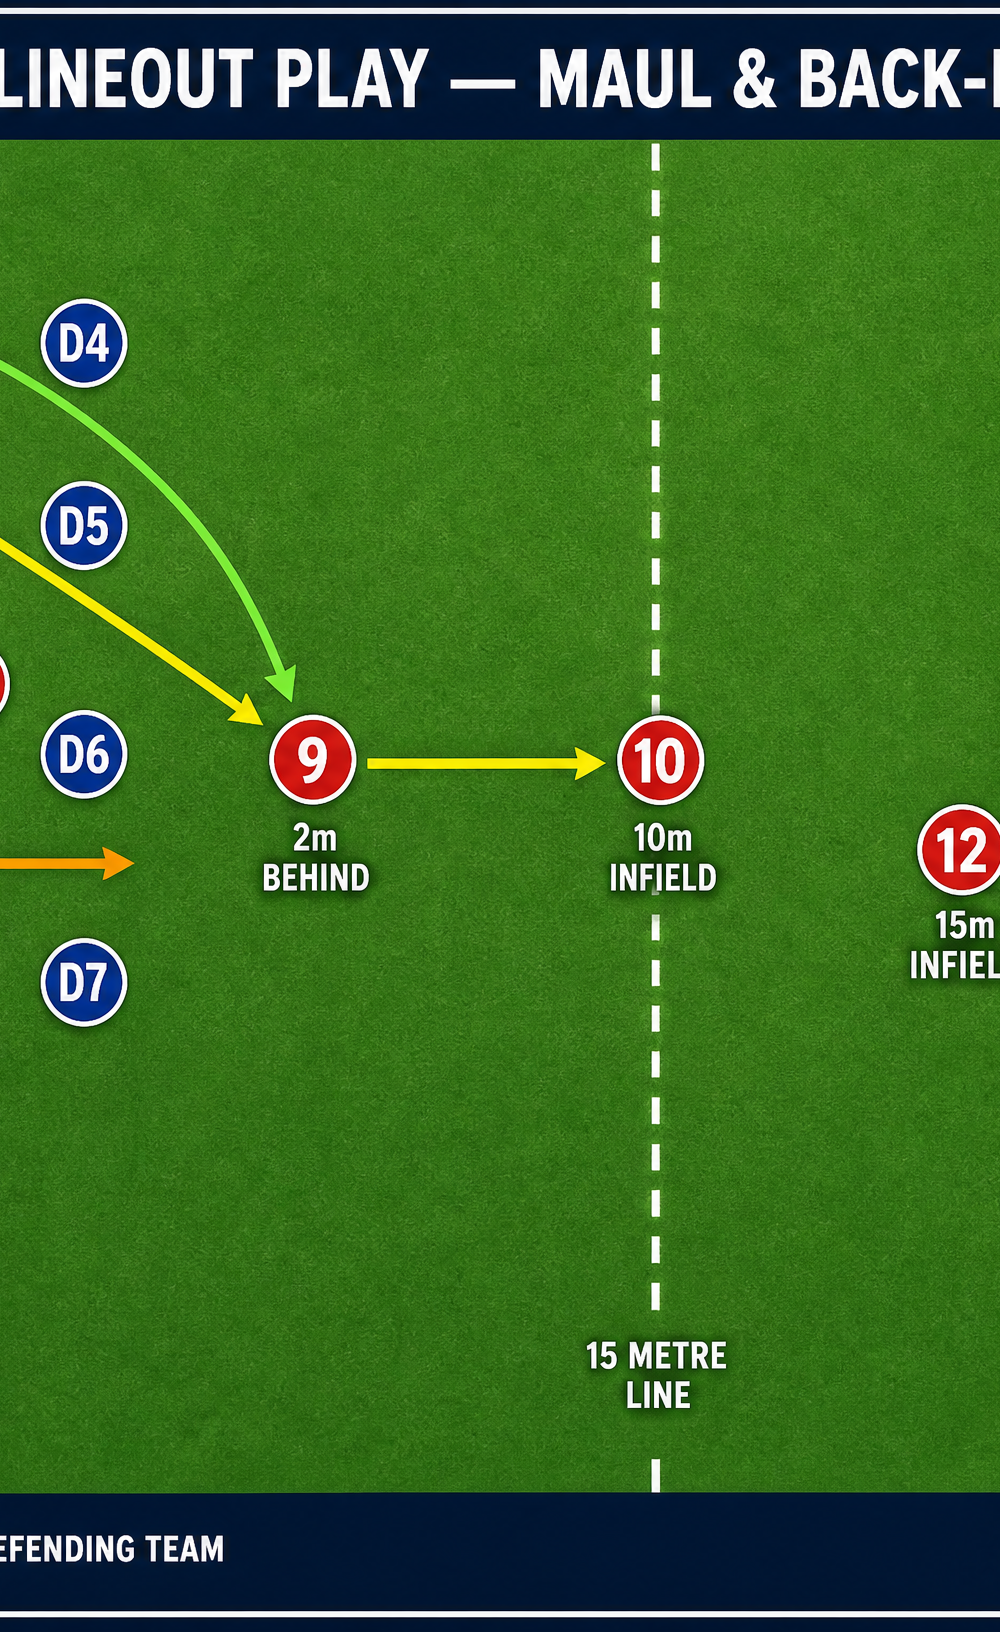
- Progression 2: The Driving Maul. Instead of delivering off the top to No. 9, the jumper brings the ball down, and the lifters immediately bind to form a driving maul (Option B in Diagram 2).
- Variation 1: Front Peel. The Hooker throws short to No. 4 at the front, who immediately peels around the front of the lineout, supported by No. 9 (Option C in Diagram 2).
7. Age Adaptations
- Under 14s: Focus heavily on the mechanics of the throw and the jump without lifting (if lifting is restricted by local union rules). Emphasize the timing of the run and the throw.
- Under 16s: Introduce basic lifting techniques focusing purely on safety and core stability. Use lighter, passive opposition.
- Open/Senior: Full contact, fully contested lineouts with complex movement patterns (dummy jumps, switching positions) before the throw.

