Mastering the Low Tackle: The Body Height Progression Drill
A progressive three-phase drill designed to teach players how to safely and effectively lower their body height into contact, ensuring dominant tackles and reducing the risk of high-tackle penalties.

Equipment Needed
1. Overview
With modern rugby's strict laws surrounding head contact, mastering a low tackle technique is no longer just about dominance—it's about keeping your players on the pitch. The Body Height Progression Drill is a foundational session designed to recalibrate players' natural tackling height. By breaking the tackle down into three distinct phases—static setup, live running, and defensive line integration—coaches can systematically build muscle memory for dipping late and driving through the 'ring of steel' (the area between the hips and knees).
Use this drill early in the season to establish standards, or as a mid-season refresher when high-tackle penalty counts start creeping up.
2. Setup
Pitch Area: 40m x 30m grid, subdivided as needed.
Equipment: 12-16 marker cones (orange/yellow), 2-3 rugby balls, tackle shields (optional for beginners).
Players: 8-16 players, split evenly into Attackers and Defenders.

3. Step-by-Step Instructions
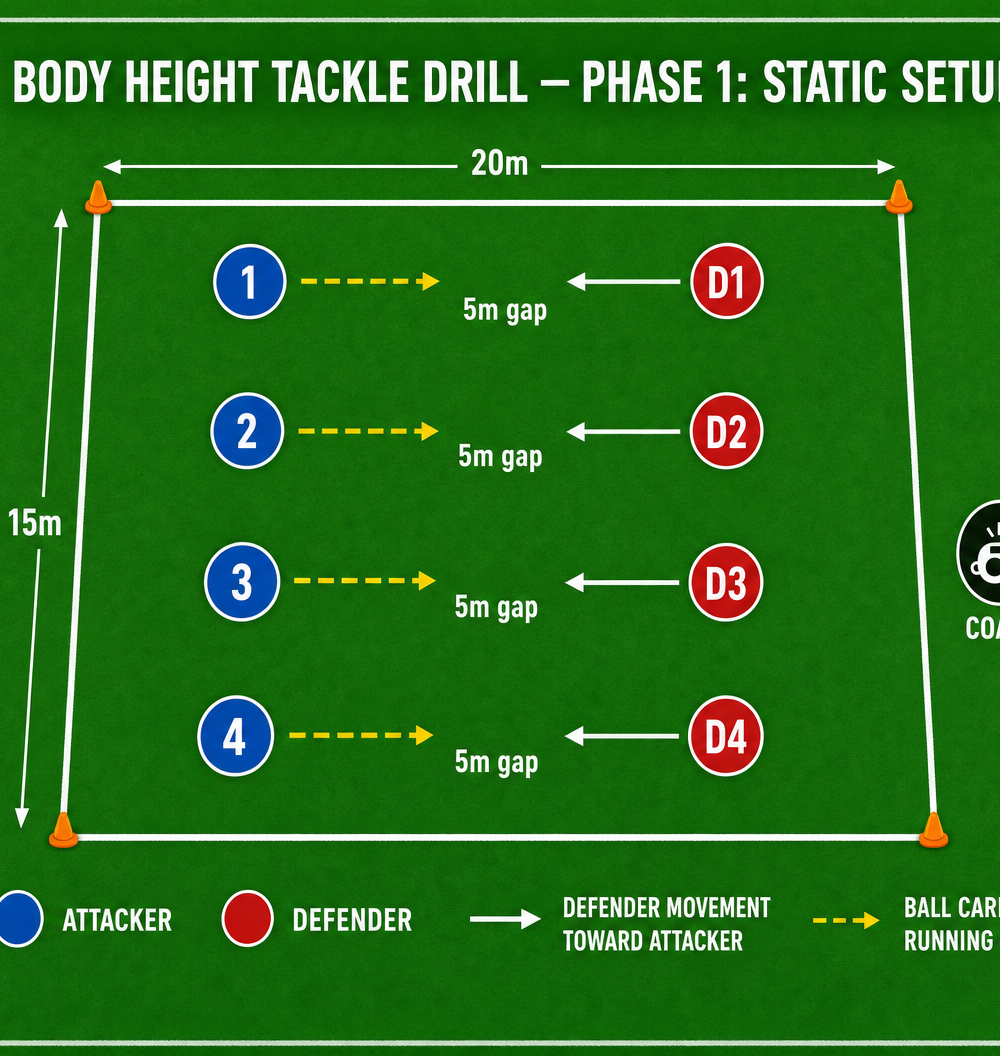
Phase 1: Static Setup & Form (The 5m Gap)
- Set up a 20m x 15m grid. Arrange players into pairs (one Attacker, one Defender) facing each other across a 5-metre gap.
- On the whistle, the Defender takes two quick steps forward, drops their body height by bending at the knees and hips, and 'locks in' to a low tackle posture.
- The Attacker remains static or takes one step forward to provide a target.
- The Defender makes shoulder contact on the Attacker's thighs, wrapping both arms tight (the 'ring of steel').
- Do not take the player to ground. Focus purely on the 'dip and wrap'.
- Reset and repeat 5 times per player, then swap roles.
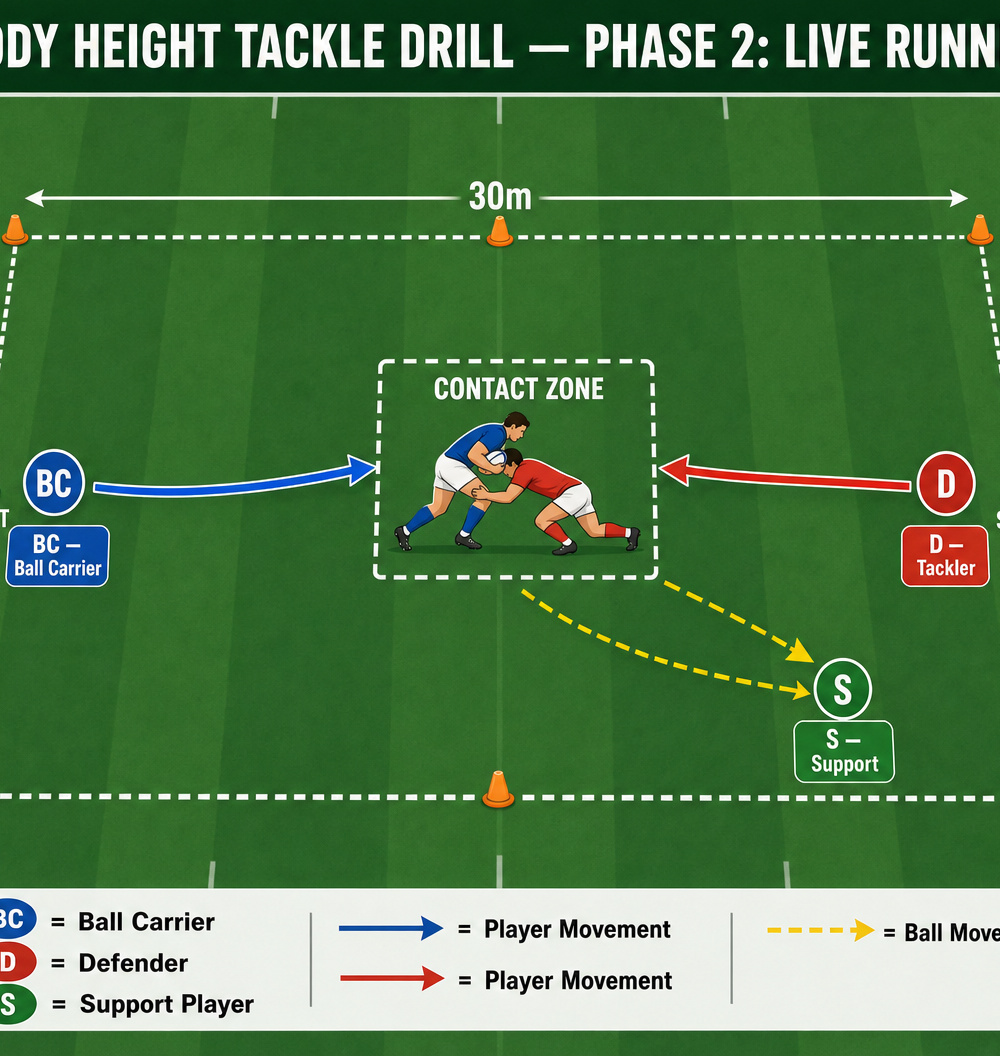
Phase 2: Live Running & Tracking
- Expand the area to a 30m x 20m channel. Set a start cone for the Ball Carrier (BC) on one side, and a start cone for the Defender (D) on the other.
- Mark a 'Contact Zone' (approx. 5m x 5m) in the centre of the channel.
- On the whistle, the BC runs diagonally toward the opposite side of the channel, aiming to pass through the Contact Zone.
- The Defender tracks the runner, closes the space, and must execute a full, low tackle within the Contact Zone.
- The Defender must demonstrate a clear drop in body height before contact.
- Introduce a Support Player (S) trailing the BC. Once the tackle is made, the BC pops the ball to the Support Player.
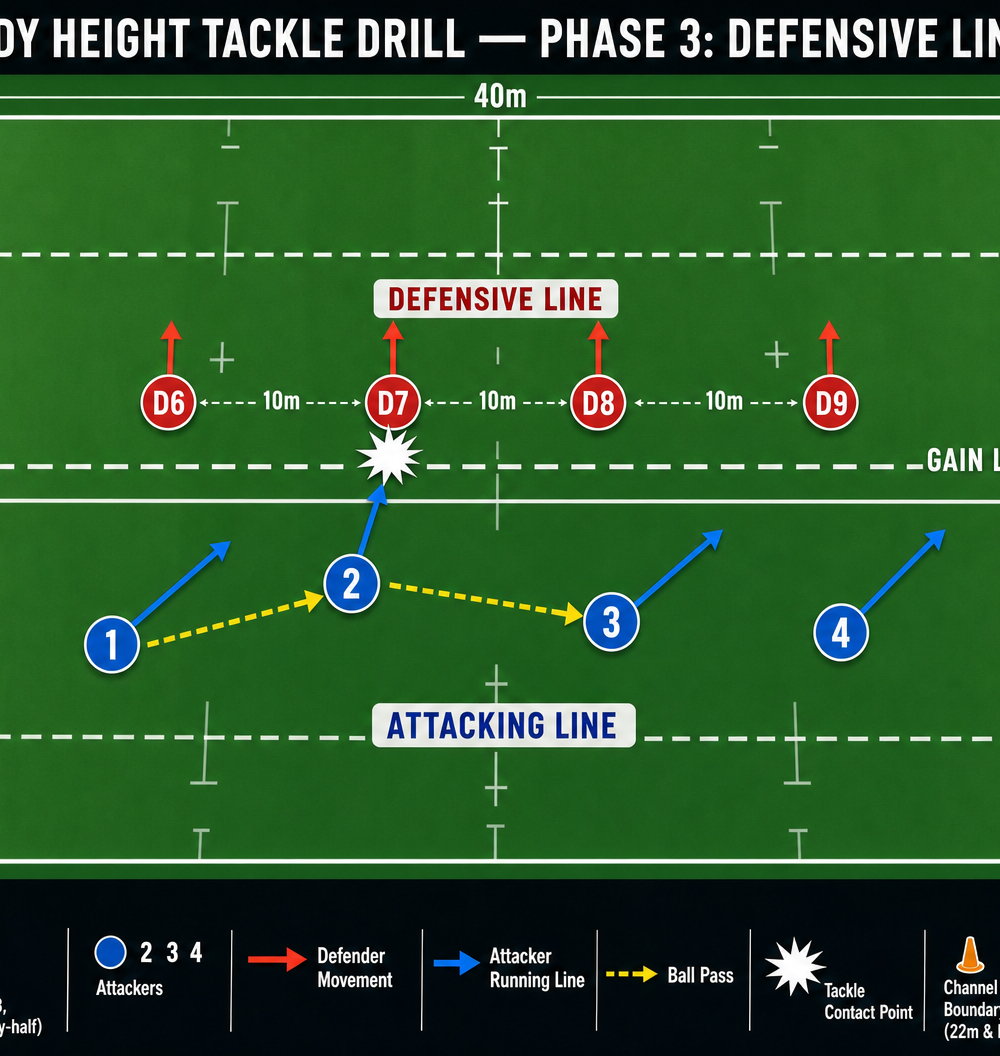
Phase 3: Defensive Line Integration
- Set up a 40m x 30m zone representing a game scenario.
- Align 4 Defenders (e.g., Flanker, No. 8, Scrum-half, Fly-half) in a flat defensive line, spaced 10m apart.
- Align 4 Attackers in a staggered attacking formation opposite them.
- The Attackers move the ball down the line. The Defensive line must move up together as a unit.
- The coach calls out a specific Attacker (e.g., "Two!"). The corresponding Defender must break the line slightly, drop their height, and execute a dominant low tackle on the gain line.
- Ensure the rest of the defensive line folds or supports appropriately.
4. Key Coaching Points
- Eyes on the Thighs: Players must keep their eyes open and focused on the target area (the shorts/thighs of the ball carrier). Looking down leads to poor head placement.
- Cheek to Cheek: The tackler's cheek should be tight against the ball carrier's buttock/thigh area. This ensures the head is safely positioned behind or to the side of the impact.
- Dip Late: Don't run 10 metres bent over. Close the space at a natural running height, then 'sink' rapidly in the last two steps before contact.
- Ring of Steel: The arm wrap must be aggressive and tight around the legs. Squeeze the knees together to immediately stop the ball carrier's leg drive.
- Foot in the Hoop: The tackler's lead foot must step in close to the ball carrier's feet to generate power through the shoulder.
5. Common Mistakes
- Bending at the Waist: Players bending over rather than dropping their hips and bending their knees. This compromises balance and power, and risks neck injury.
- Head on the Wrong Side: Placing the head across the ball carrier's body (in front of the knees). This is a major safety risk.
- Passive Arms: Making shoulder contact but failing to wrap the arms tightly, allowing the ball carrier to step out or offload easily.
- Stopping Feet on Contact: Tacklers making contact and stopping their leg drive, resulting in them falling backward rather than driving through the tackle.
6. Variations & Progressions
- Fatigue Factor: Have the Defenders complete a 10m down-and-up (burpee) before engaging in Phase 2 to practice technique under physical stress.
- Evasion: In Phase 2, allow the Ball Carrier to use footwork (step inside or outside) within the Contact Zone, forcing the Defender to adjust their feet and height dynamically.
- Double Tackle: Progress Phase 3 so that the initial low tackler is immediately supported by the inside defender, who targets the ball for a choke or strip.
7. Age Adaptations
- Under 8s - Under 10s: Use tackle rings or large crash mats instead of live players for Phase 1 and 2. Focus entirely on the 'cheek to cheek' concept and safe head placement. Do not progress to Phase 3.
- Under 12s - Under 14s: Keep the speed of the Ball Carrier at 50-70% in Phase 2. Emphasize the 'Ring of Steel' wrap. Introduce Phase 3 but at a walking/jogging pace.
- Under 16s - Open: Full speed, full contact. Introduce the variations (fatigue and evasion) to challenge the players' decision-making and technique under pressure.