Mastering the Maul: Formation and Forward Drive Drill
Equip your forwards with the technical foundation to build an unstoppable driving maul, focusing on tight binding, low body height, and unified forward momentum.

Equipment Needed
1. Overview
The driving maul is one of the most potent attacking weapons in modern rugby. When executed with precision, it not only guarantees significant territorial gain but also forces the opposition to commit multiple defenders, creating space out wide. This drill focuses on the fundamental mechanics of forming a maul from a simulated lineout or open-play catch, establishing a unified drive, and efficiently recycling the ball. By mastering these core elements, coaches can develop a forward pack capable of dominating the physical contest and dictating the pace of the game.
2. Setup
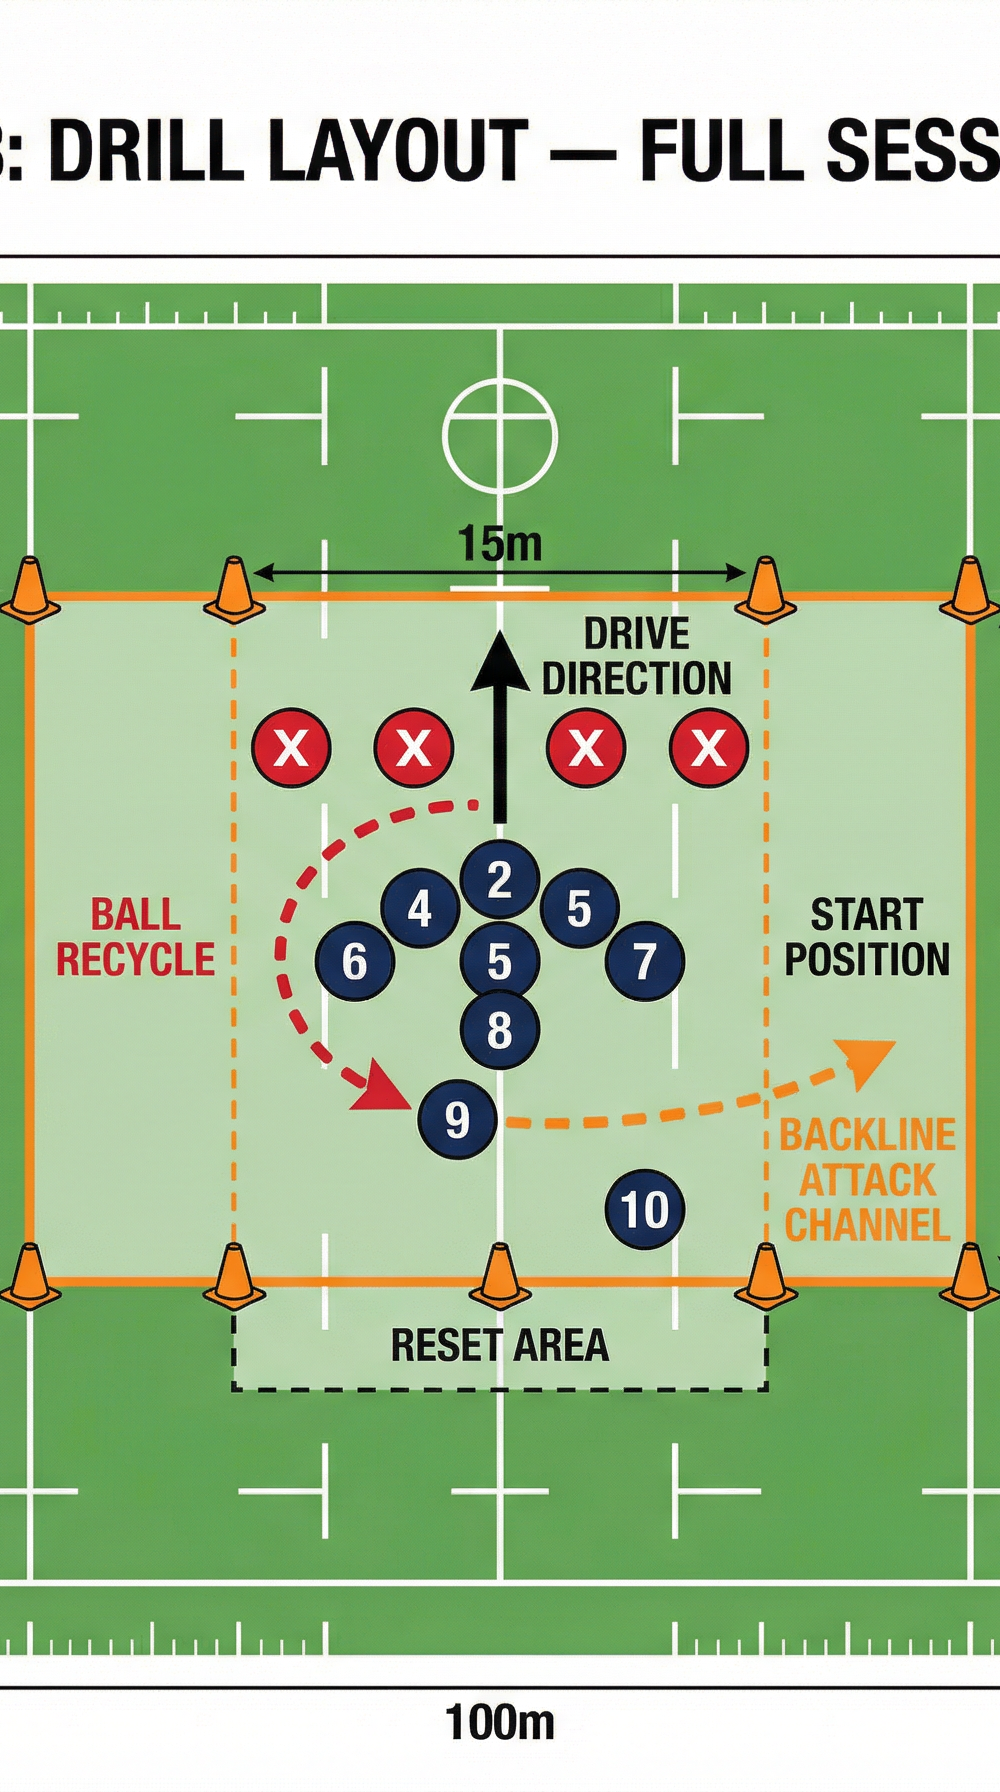
To ensure a realistic and challenging environment, the setup must mirror match conditions. Use a 20m x 15m working grid marked out with cones within the middle third of a standard 100m x 70m pitch.
- Equipment Needed: 8-10 cones, 2-3 rugby balls, and tackle shields (optional for defenders).
- Player Positions: You will need a full attacking forward pack (numbers 1-8), a scrum-half (9), and optionally a fly-half (10) to practice the exit strategy. Assign 3-4 players as defenders equipped with tackle shields.
- Pitch Setup: Place the attacking pack at the starting line of the grid. Position the defenders 5 metres ahead, forming a defensive wall.
3. Step-by-Step Instructions
Follow these steps to execute the drill effectively, ensuring players understand their specific roles within the formation.
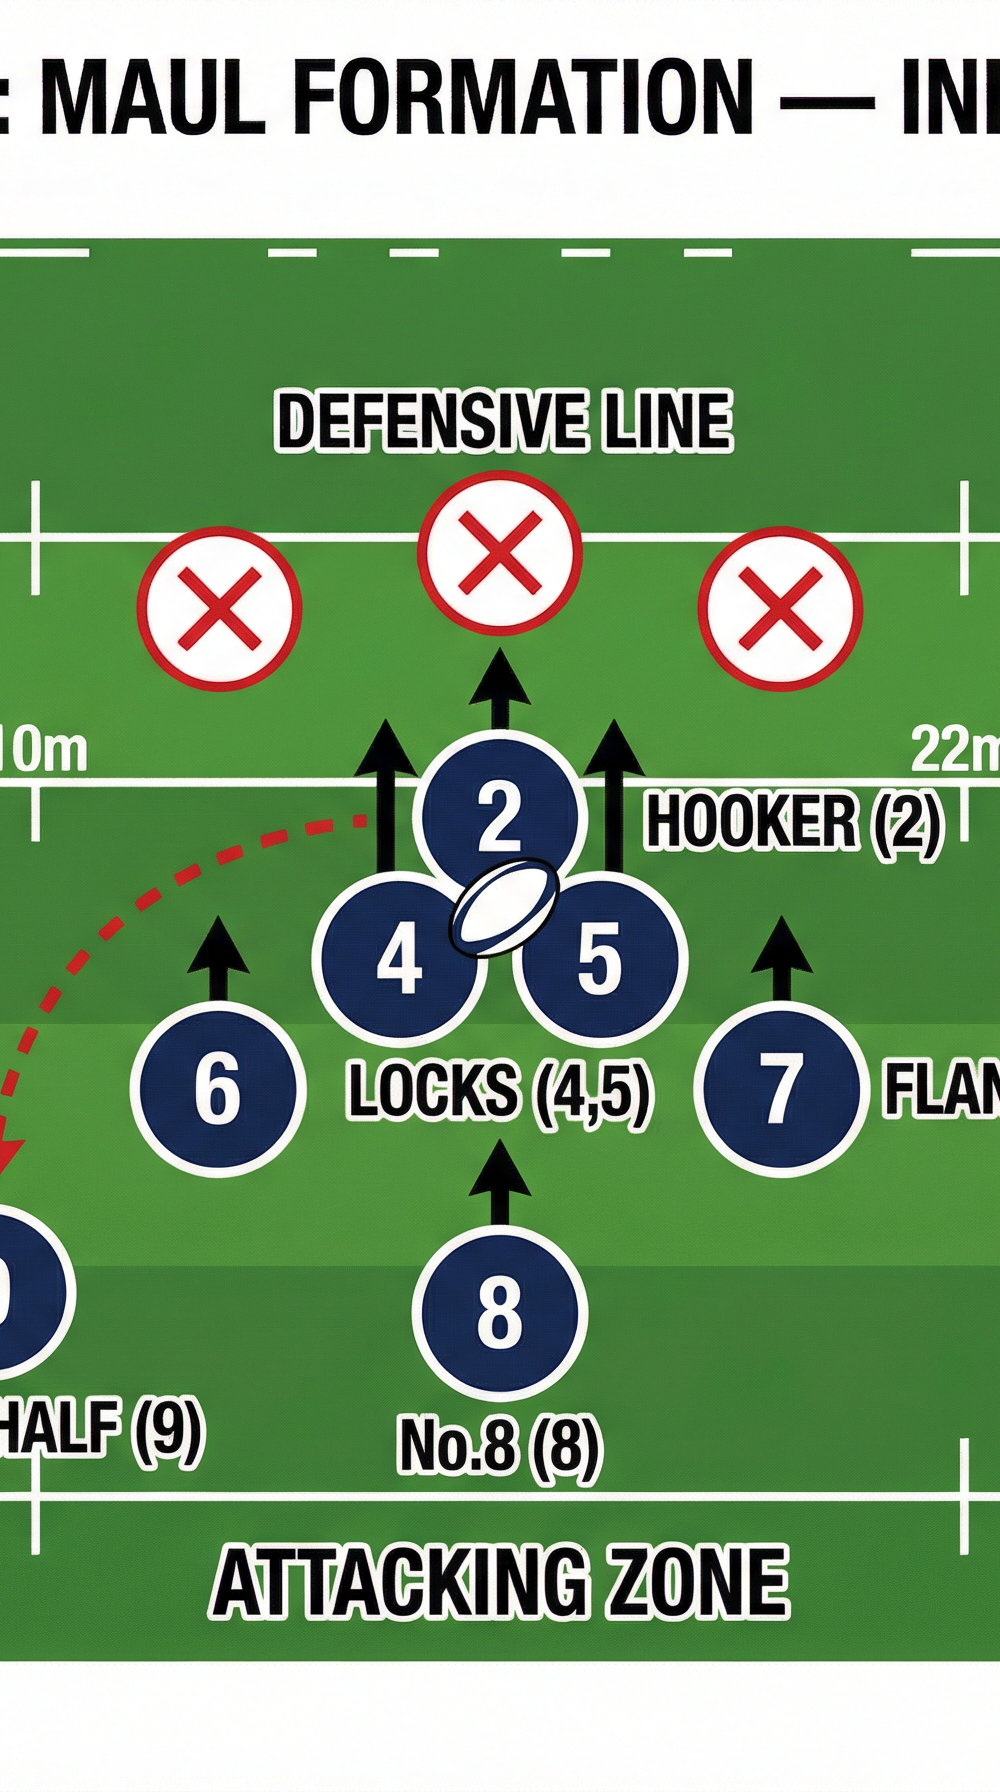
- The Catch and Set: The drill begins with the coach feeding the ball to the designated jumper (usually a Lock, 4 or 5). Upon catching, the jumper must immediately turn their back to the opposition, bringing the ball down securely to their chest.
- The Lifters' Bind: The two lifters (typically Props, 1 and 3) must immediately bind tightly onto the jumper's hips, dropping their own body height to anchor the formation and prevent the jumper from being driven backward.
- The Secondary Drive: The remaining forwards (Flankers 6 and 7, Hooker 2, and Number 8) must arrive swiftly. They should bind onto the lifters, not the jumper, driving their shoulders under the hips of the players in front to establish a low, powerful driving position.
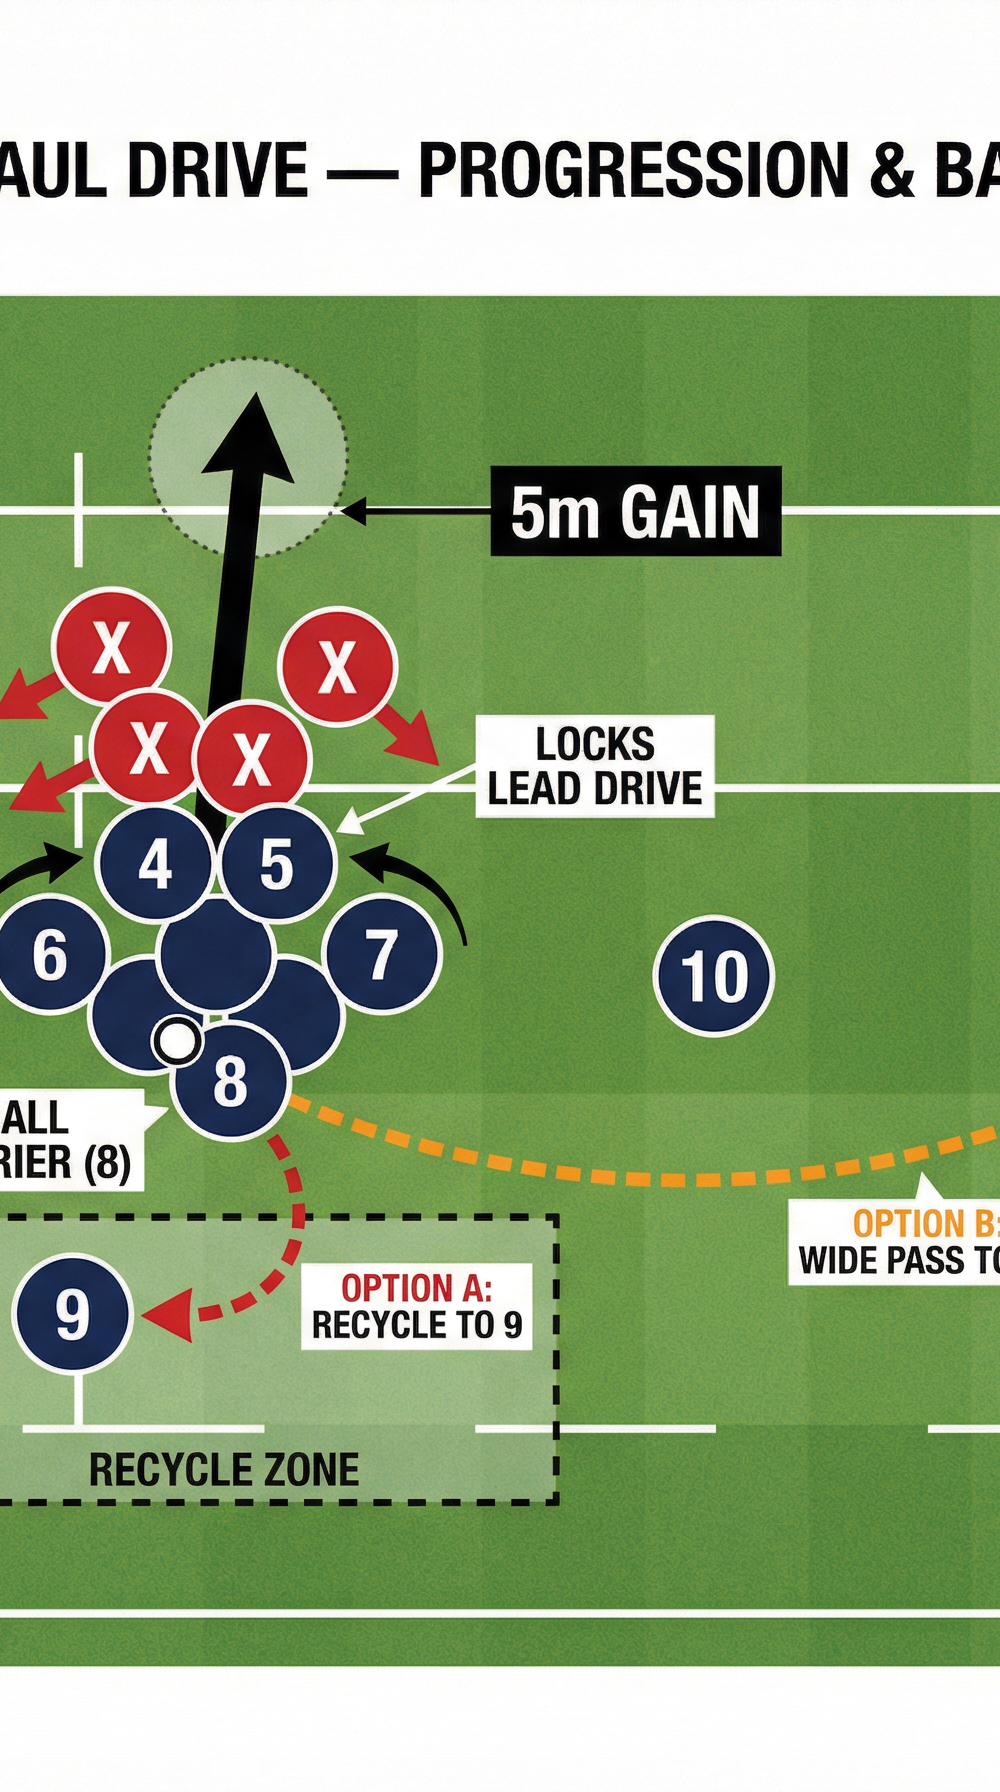
- The Ball Transfer: As the maul stabilizes, the jumper must carefully transfer the ball backward through the hands of the bound players until it reaches the player at the very back (usually the Hooker or Number 8).
- The Unified Drive: On the call of "Drive!" from the player at the back, the entire pack must step forward simultaneously, using short, powerful, synchronized steps. The focus must be on maintaining a square shape and moving forward as a single, cohesive unit.
- The Exit Strategy: Once the maul has advanced 5-10 metres, the player at the back can either break off with the ball or pass it accurately to the waiting Scrum-half (9), who then distributes it to the backline.
4. Key Coaching Points
- Body Height is Crucial: Emphasize that the lowest team wins the maul. All players joining the maul must enter from low to high, getting their shoulders below the opposition's chest level.
- Tight Binding: Players must bind onto bodies, not jerseys. A loose bind allows defenders to splinter the maul and disrupt the drive.
- Patience Before the Drive: Do not initiate the forward drive until the ball has been safely transferred to the back and the formation is fully set and stable.
- Communication: The player at the back controlling the ball is the driver of the maul. They must constantly communicate the direction and timing of the drive to the rest of the pack.
5. Common Mistakes
- Joining Ahead of the Ball: Players eagerly joining the maul ahead of the ball carrier, resulting in an accidental offside penalty.
- High Body Position: Forwards entering the maul standing too upright, making them easy targets to be driven backward or choked out by the defense.
- Splintering: Players breaking their bind to drive individually rather than as a cohesive unit, weakening the overall structure and making it vulnerable to counter-drives.
6. Variations & Progressions
- Dynamic Defense: Replace tackle shields with live, fully-resisting defenders to increase the physical challenge and test the maul's stability under pressure.
- The 'Peel' Option: Instead of a standard release to the scrum-half, practice having the ball carrier and one supporting player 'peel' off the side of the maul to attack the blindside.
- Changing the Point of Attack: Introduce a call that requires the maul to slightly shift its driving angle (e.g., "Drive Left" or "Drive Right") to exploit weak points in the defensive line.
7. Age Adaptations
- Under 10s / Under 12s: Focus purely on the safety aspects of the bind and body height. Use walking pace only and do not allow the defense to actively pull the maul down. Emphasize the transfer of the ball to the back.
- Under 14s / Under 16s: Introduce controlled resistance from the defense. Focus on the timing of the drive and the synchronization of the footwork. Begin practicing the transition from the maul to open play.
- Open / Senior: Full contact and full resistance. Focus on dynamic problem-solving within the maul, such as countering defensive shifts and executing complex exit plays under pressure.