Ruck Clear-Out & Clean-Out Drill: Winning the Collision Zone
Master the fundamentals of ruck clear-out technique with this structured drill that teaches forwards to arrive with purpose, drive through the hips, and secure quick ball for the scrum-half.

Equipment Needed
Overview
The ruck clear-out is one of the most decisive skills in forward play. When executed correctly, it shifts the contest entirely in your team's favour — securing quick, clean ball that allows your backs to attack a disorganised defensive line. When executed poorly, it results in turnover ball, penalties, or a slow ruck that gives the defence time to reset. This drill isolates the clear-out and clean-out mechanics so that every forward in your squad understands their role, their body position, and their timing when arriving at the breakdown.
This drill is best used in the pre-season technical block or as a warm-up activity in any session where breakdown efficiency is a focus. It is equally effective as a standalone 20-minute unit or embedded within a longer contact session. Coaches should run this drill at least twice per week during the competition phase when breakdown speed is a priority.
Setup

Pitch Area: Mark out a 20m x 15m grid on the pitch using cones. This represents a realistic channel of play within the full 100m x 70m pitch. You will need a minimum of two such grids running simultaneously to keep all players active.
Equipment Required:
- 8 cones (to mark the grid)
- 2 tackle bags or contact shields
- 1 rugby ball per grid
- Coloured training bibs (two colours: attackers and defenders)
- Optional: a coaching whistle and a timer
Player Positions & Numbers: This drill requires a minimum of 8 players per grid, split into two groups:
| Role | Position | Jersey Number | Bib Colour |
|---|---|---|---|
| Ball Carrier | Inside Centre | 12 | Red |
| Scrum-Half | Scrum-Half | 9 | Red |
| First Clear-Out | Number 8 | 8 | Red |
| Second Clear-Out | Blindside Flanker | 6 | Red |
| Third Clear-Out | Openside Flanker | 7 | Red |
| Defender 1 | Opposing Flanker | D1 | Navy |
| Defender 2 | Opposing Lock | D2 | Navy |
| Fly-Half (receiver) | Fly-Half | 10 | Red |

Diagram 1 shows the initial setup: the ball carrier (12) goes to ground at the tackle point, defenders D1 and D2 contest, and the three clear-out forwards (8, 6, 7) approach from depth.
Step-by-Step Instructions

Step 1 — Ball Carrier Presents the Ball (0–2 seconds)
The player wearing the number 12 bib jogs forward 5m and is met by a passive defender holding a tackle bag. On the coach's whistle, the ball carrier drives into the bag, goes to ground in a controlled manner, and immediately places the ball back toward their own team — no more than 30cm behind the tackle point. The ball must be presented with two hands, pointing backward along the ground.
Step 2 — Scrum-Half Arrives at the Ruck (2–3 seconds)
The number 9 follows 2m behind the ball carrier throughout the approach. As the ball carrier goes to ground, the scrum-half positions themselves 1m directly behind the ball, crouching low and ready to service. The scrum-half does not enter the ruck — their job is to protect the channel and communicate to the clear-out players.
Step 3 — First Clear-Out Arrives (2–4 seconds)
The number 8 is the primary clear-out forward. They must arrive from behind the gate line (an imaginary line running through the hindmost foot of the ball carrier). They drive low — hips below shoulder height — and make contact with defender D1 using a full-body bind: chest to chest, arms wrapped tight around the torso. The drive must be through the hips of the defender, not the upper body. The number 8 drives D1 at least 1m past the ball.
Step 4 — Second and Third Clear-Outs Bind and Drive (3–5 seconds)
Numbers 6 and 7 arrive simultaneously from either side of the ruck. They must enter through the gate — never from the side. Number 6 binds onto number 8's hips and adds a second driving force. Number 7 targets defender D2 with a chop clear-out: driving low at hip height to remove D2 from the contest. Both players maintain a flat back and a strong core throughout.
Step 5 — Ball is Secured and Recycled (4–6 seconds)
With both defenders cleared, the scrum-half picks up the ball cleanly and delivers a sharp pass to the fly-half (number 10), who has moved into position 5m to the right. The scrum-half must deliver the ball within 2 seconds of the ruck being secured. The fly-half catches and carries forward to simulate the next phase.
Step 6 — Reset and Repeat
All players return to starting positions. Rotate the ball carrier and scrum-half roles every 3 repetitions. After 6 repetitions, swap the attacker and defender groups so all players experience both roles.
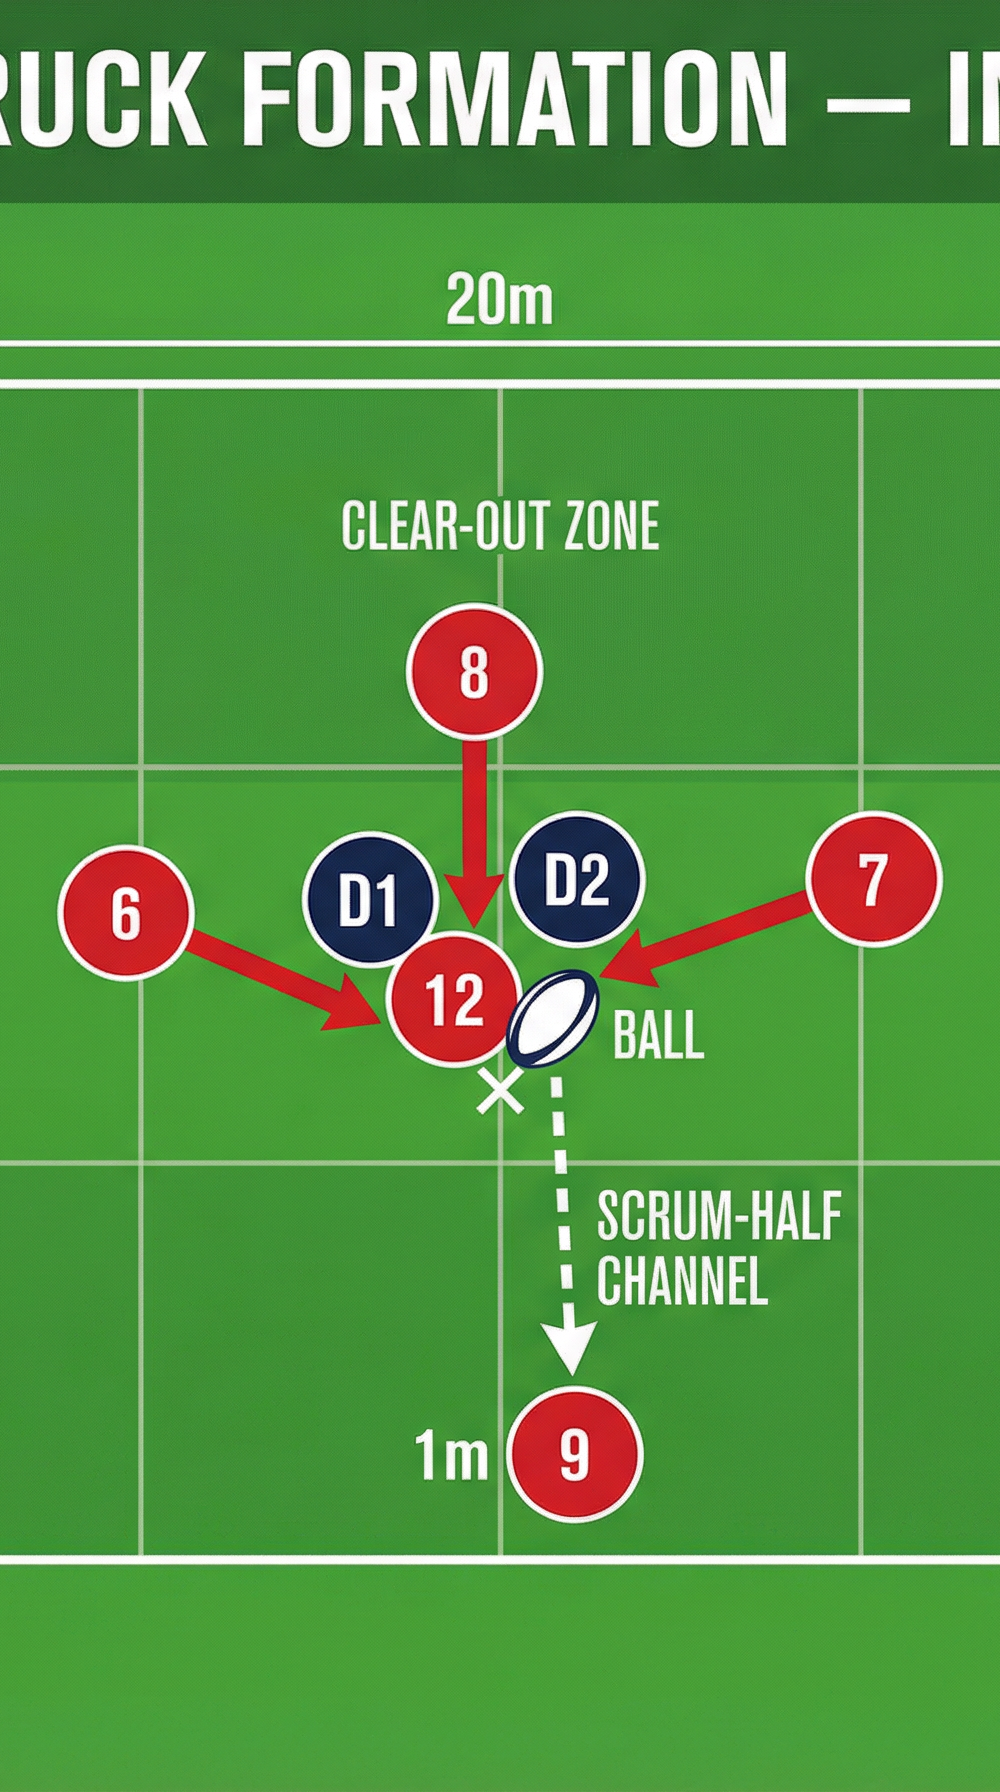
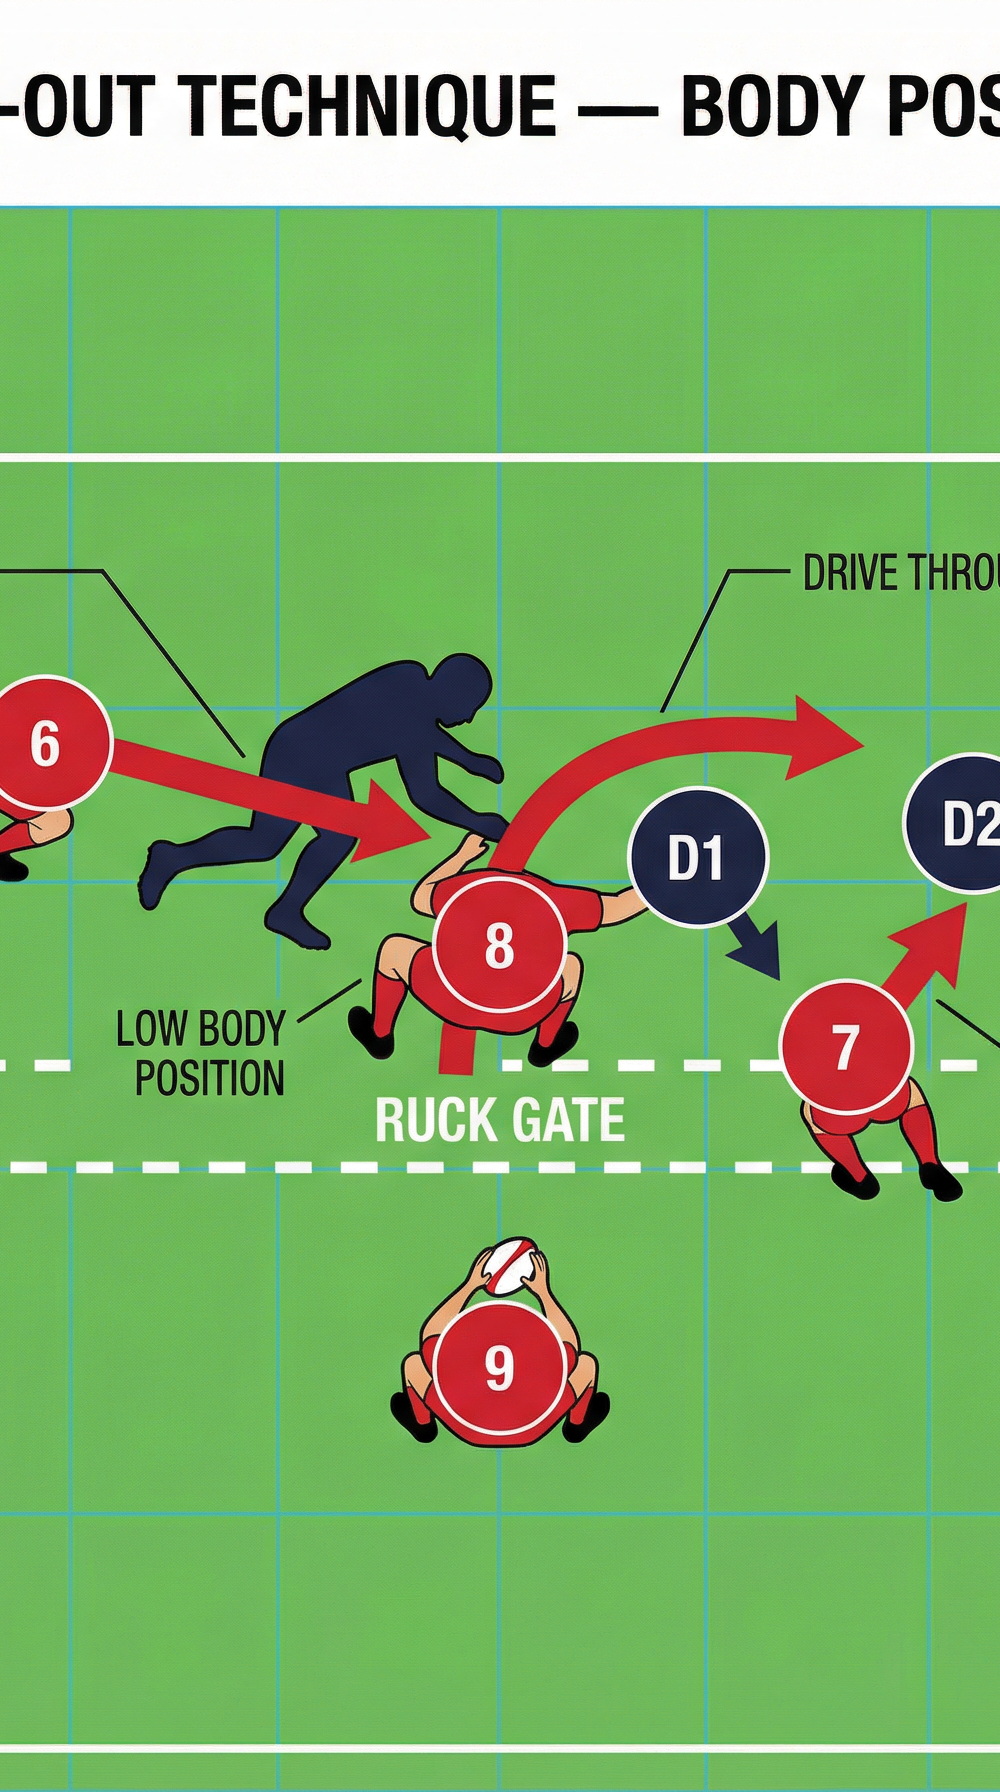
Diagram 2 illustrates the correct body positions during the clear-out: Number 8 drives through D1's hips at a 45-degree angle, Number 6 binds and adds momentum, and Number 7 executes a chop clear-out on D2. Note the gate line and the scrum-half's position behind the ruck.
Key Coaching Points
1. Arrive Through the Gate, Every Time
This is non-negotiable. Any player who enters the ruck from the side is offside and will concede a penalty in a match. During this drill, call out every gate infringement immediately. Reinforce the habit that players must approach from behind the ball carrier's hindmost foot.
2. Hips Below Shoulders — The Power Position
The most common error in clear-outs is arriving upright. A player who hits a defender standing tall will bounce off and achieve nothing. Demand that every clear-out player bends at the knees and hips before contact, achieving a body angle of approximately 45 degrees. This lowers the centre of gravity and maximises driving power.
3. Drive Through the Hips, Not the Shoulders
The target point on the defender is their hip region. Driving through the upper body is less effective and risks a dangerous tackle call. Teach your forwards to aim their shoulder at the defender's hip and drive upward and through — this levers the defender off the ball and removes them from the contest.
4. Bind Tight — No Loose Arms
A clear-out player with loose arms is a liability. Insist on a full, tight bind — both arms wrapped firmly around the defender's body. A tight bind transfers the driving force directly and prevents the defender from spinning or shrugging off the contact.
5. Communicate — 'Ruck!' and 'Clear!'
Forwards must call loudly as they arrive. 'Ruck!' signals to teammates that a ruck has formed and the offside line is active. 'Clear!' signals to the scrum-half that the ball is available. This communication habit, built in training, becomes automatic under match pressure.
6. Scrum-Half Timing and Ball Speed
The drill is only successful if the scrum-half delivers the ball within 2 seconds of the ruck being secured. Use a stopwatch in training and set a target of sub-2-second ball. Slow ball gives the defence time to reset — quick ball is the entire point of the clear-out.
Common Mistakes
Mistake 1 — Arriving Upright at the Ruck
Players sprint in and make contact while standing tall, resulting in no forward momentum and often a penalty for a dangerous clear-out. Correction: Stop the drill, demonstrate the correct body position, and have the offending player repeat the approach three times in slow motion before resuming full speed.
Mistake 2 — Entering from the Side (Offside)
Forwards take the shortest route to the ball rather than looping around behind the gate. Correction: Place two cones 1m either side of the tackle point to create a visible gate. Any player who passes inside the cones is offside. Use this visual aid until the habit is ingrained.
Mistake 3 — Jackknifing Over the Ball
The clear-out player drives in but then collapses over the ball, blocking the scrum-half's access. Correction: Emphasise that the clear-out player's job is to drive the defender away from the ball, not to fall on top of it. The player must stay on their feet and keep driving past the ball.
Mistake 4 — Scrum-Half Entering the Ruck
The number 9 becomes impatient and reaches into the ruck before it is secure, risking a turnover or penalty. Correction: Reinforce the rule: the scrum-half does not touch the ball until the ruck is clearly won. Use the verbal cue 'Clear!' from the clear-out players as the trigger.
Mistake 5 — Too Many Players in the Ruck
Four or five forwards pile into a ruck that only needs two or three, leaving the backline short of numbers. Correction: Set a maximum of three players per ruck in this drill. Any additional forwards must peel off and rejoin the backline. Teach players to read whether the ruck is already won before committing.
Variations & Progressions


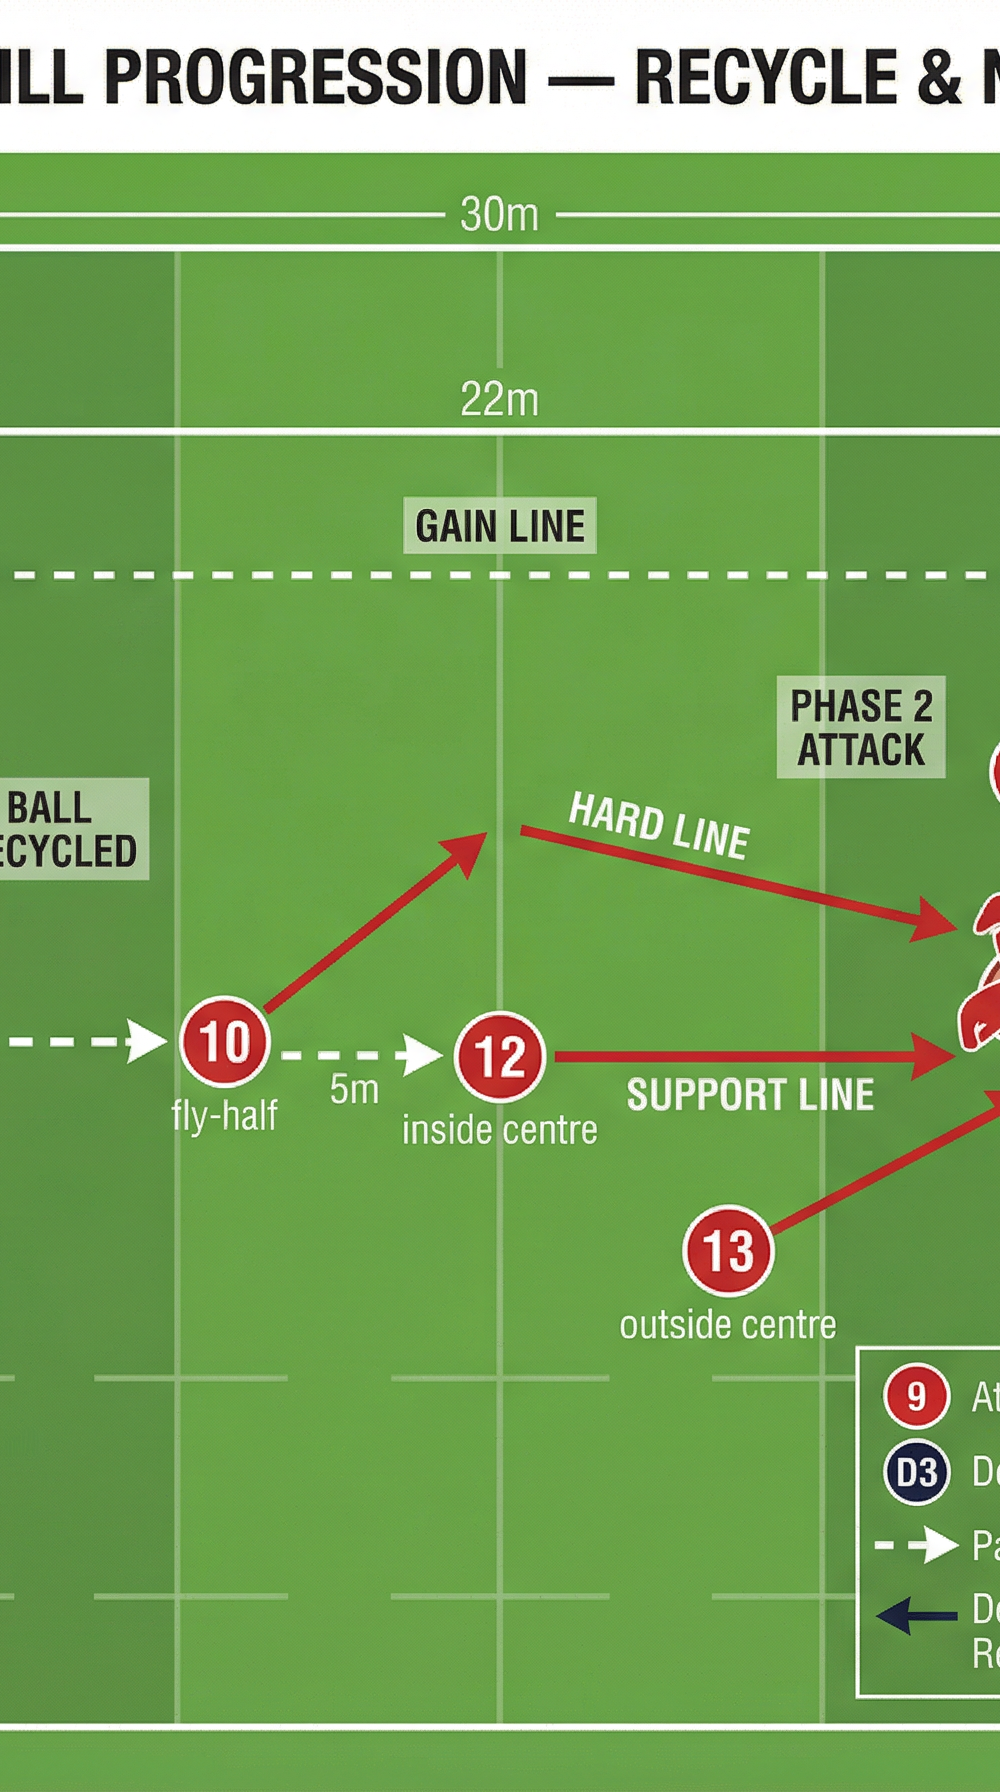
Diagram 3 shows the full drill progression: after securing Ruck 1, the ball is recycled through the scrum-half to the fly-half, who attacks into Phase 2. Locks (4 and 5) arrive as the next clear-out wave, while the backs (12 and 13) provide width and support lines.
Progression 1 — Live Defenders (Intermediate)
Replace the passive tackle bags with active defenders who are allowed to contest the ball. Defenders start in a jackal position over the ball and the clear-out players must legally remove them. This introduces genuine resistance and teaches players to read the defender's body position before choosing their clear-out technique.
Progression 2 — Multi-Phase Ruck Sequence (Advanced)
Chain three consecutive rucks together across a 30m channel. After securing Ruck 1, the fly-half (10) carries the ball forward 10m and is tackled, creating Ruck 2. The locks (4 and 5) must now arrive as the clear-out wave. After Ruck 2 is secured, the ball goes wide to the centres (12 and 13) for Ruck 3. This progression tests fitness, communication, and the ability to maintain technique under fatigue.
Variation — Reduced Numbers (Easier)
For squads with fewer forwards available, run the drill with a single clear-out player (number 8 only) against a single passive defender. This isolates the individual technique before introducing the complexity of coordinated multi-player clear-outs.
Age Adaptations

Under 12 and Under 14: Remove live contact entirely. Use tackle tubes or shields held by coaches. Focus exclusively on body position, gate entry, and communication. Reduce the grid to 15m x 10m and allow unlimited time for each phase. The priority at this age is building safe, correct habits — not speed.
Under 16: Introduce passive live defenders who offer light resistance. Begin timing the ball-to-scrum-half delivery and set a target of sub-3 seconds. Introduce the gate cone markers to reinforce offside awareness. Players at this age can begin to understand the tactical purpose of quick ball.
Open Age (Senior): Run the full drill as described above with live, competitive defenders. Set a target of sub-2-second ball. Introduce the multi-phase progression and add a defensive line of three backs who must be beaten after the ruck is secured. Introduce consequence-based coaching: if the ruck is lost, the defending team gets possession and attacks.