Mastering the Wing Attack: Elite Feeding Patterns & Circle Edge Vision
Equip your Wing Attack with the vision, timing, and execution skills needed to deliver pinpoint feeds into the goal circle under pressure.
Equipment Needed
Overview
The Wing Attack (WA) is the primary playmaker in the attacking third, responsible for bridging the gap between the centre third and the goal shooters. This drill focuses on developing the WA's ability to read the movement of the Goal Attack (GA) and Goal Shooter (GS), position themselves effectively on the circle edge, and execute precise feeding patterns. By isolating these specific movements, coaches can help their attacking unit build chemistry, timing, and spatial awareness, ensuring a seamless transition from mid-court possession to high-percentage scoring opportunities.
Use this drill when your team is struggling with attacking flow, experiencing high turnover rates on the circle edge, or when the WA needs to improve their decision-making and pass selection under defensive pressure.
Setup
To run this drill effectively, you will need a standard netball court (30.5m x 15.25m) and the following setup:
- Equipment: 3–4 netballs, bibs for all active players, and optionally flat markers to designate starting positions or target zones.
- Players: Minimum of 6 players (C, WA, GA, GS, WD, GD). Additional players can rotate in or act as stationary feeders/defenders in early progressions.
- Court Setup: The drill utilises the centre third and one attacking third.
- Starting Positions:
- Centre (C): Starts in the centre third, slightly offset from the centre circle.
- Wing Attack (WA): Starts in the centre third, near the transverse line on the wing.
- Goal Attack (GA) & Goal Shooter (GS): Positioned inside or near the goal circle (4.9m radius).
- Wing Defence (WD) & Goal Defence (GD): Positioned to mark the WA and GA respectively.
Step-by-Step Instructions
This drill is broken into three progressive phases, allowing players to build skills from basic movement patterns to fully contested scenarios.
Phase 1: The Initial Drive and Receive
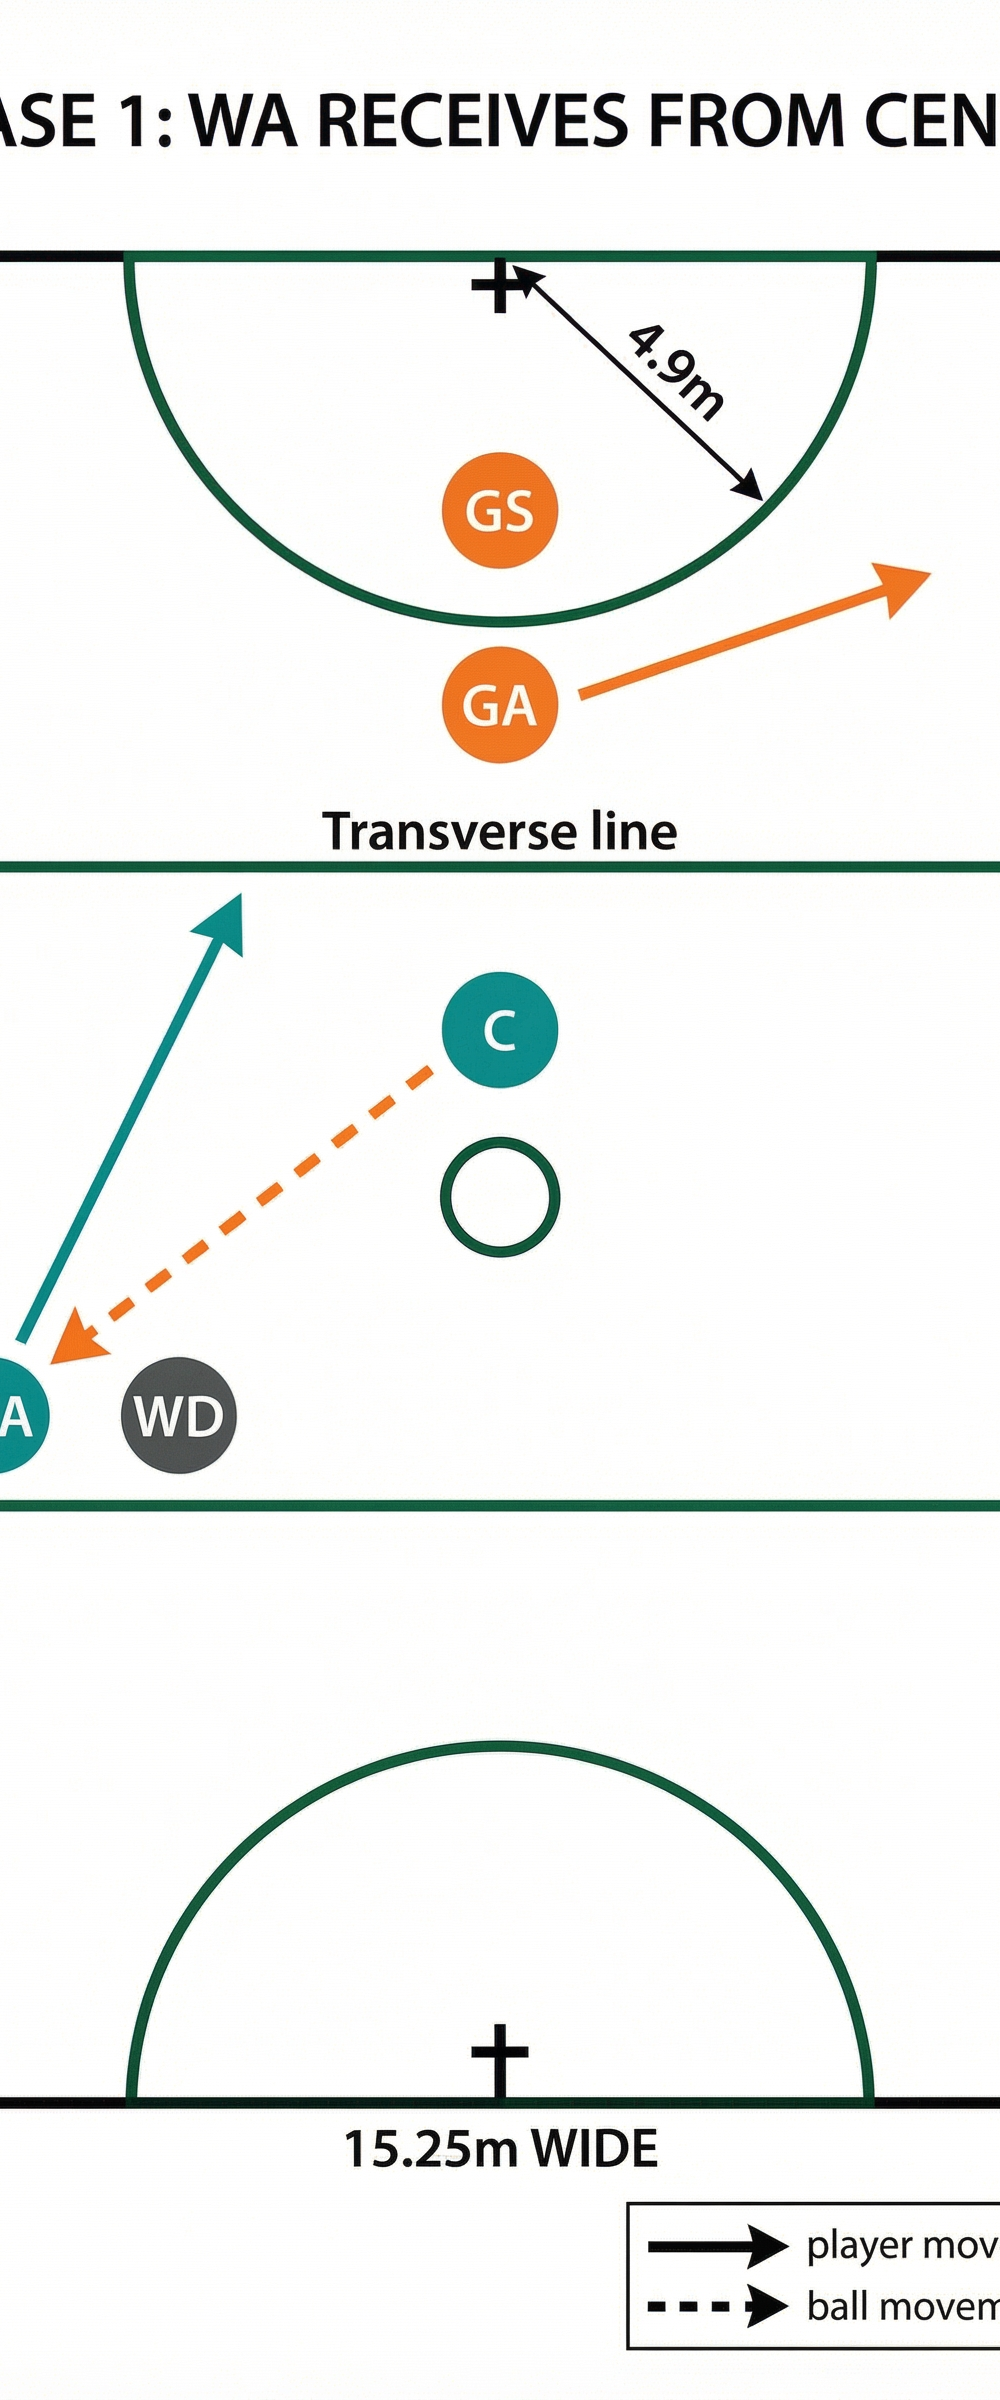
- The Setup: The C starts with the ball. The WA is positioned on the wing, marked by the WD (optional in early stages).
- The Drive: The WA executes a strong, angled drive toward the transverse line, aiming to receive the ball in a balanced position.
- The Pass: The C delivers a crisp, accurate pass to the WA.
- The Catch and Turn: The WA catches the ball, lands balanced (preferably on their outside foot to open up their vision), and immediately turns to face the goal circle.
Phase 2: Circle Edge Vision and the Feed
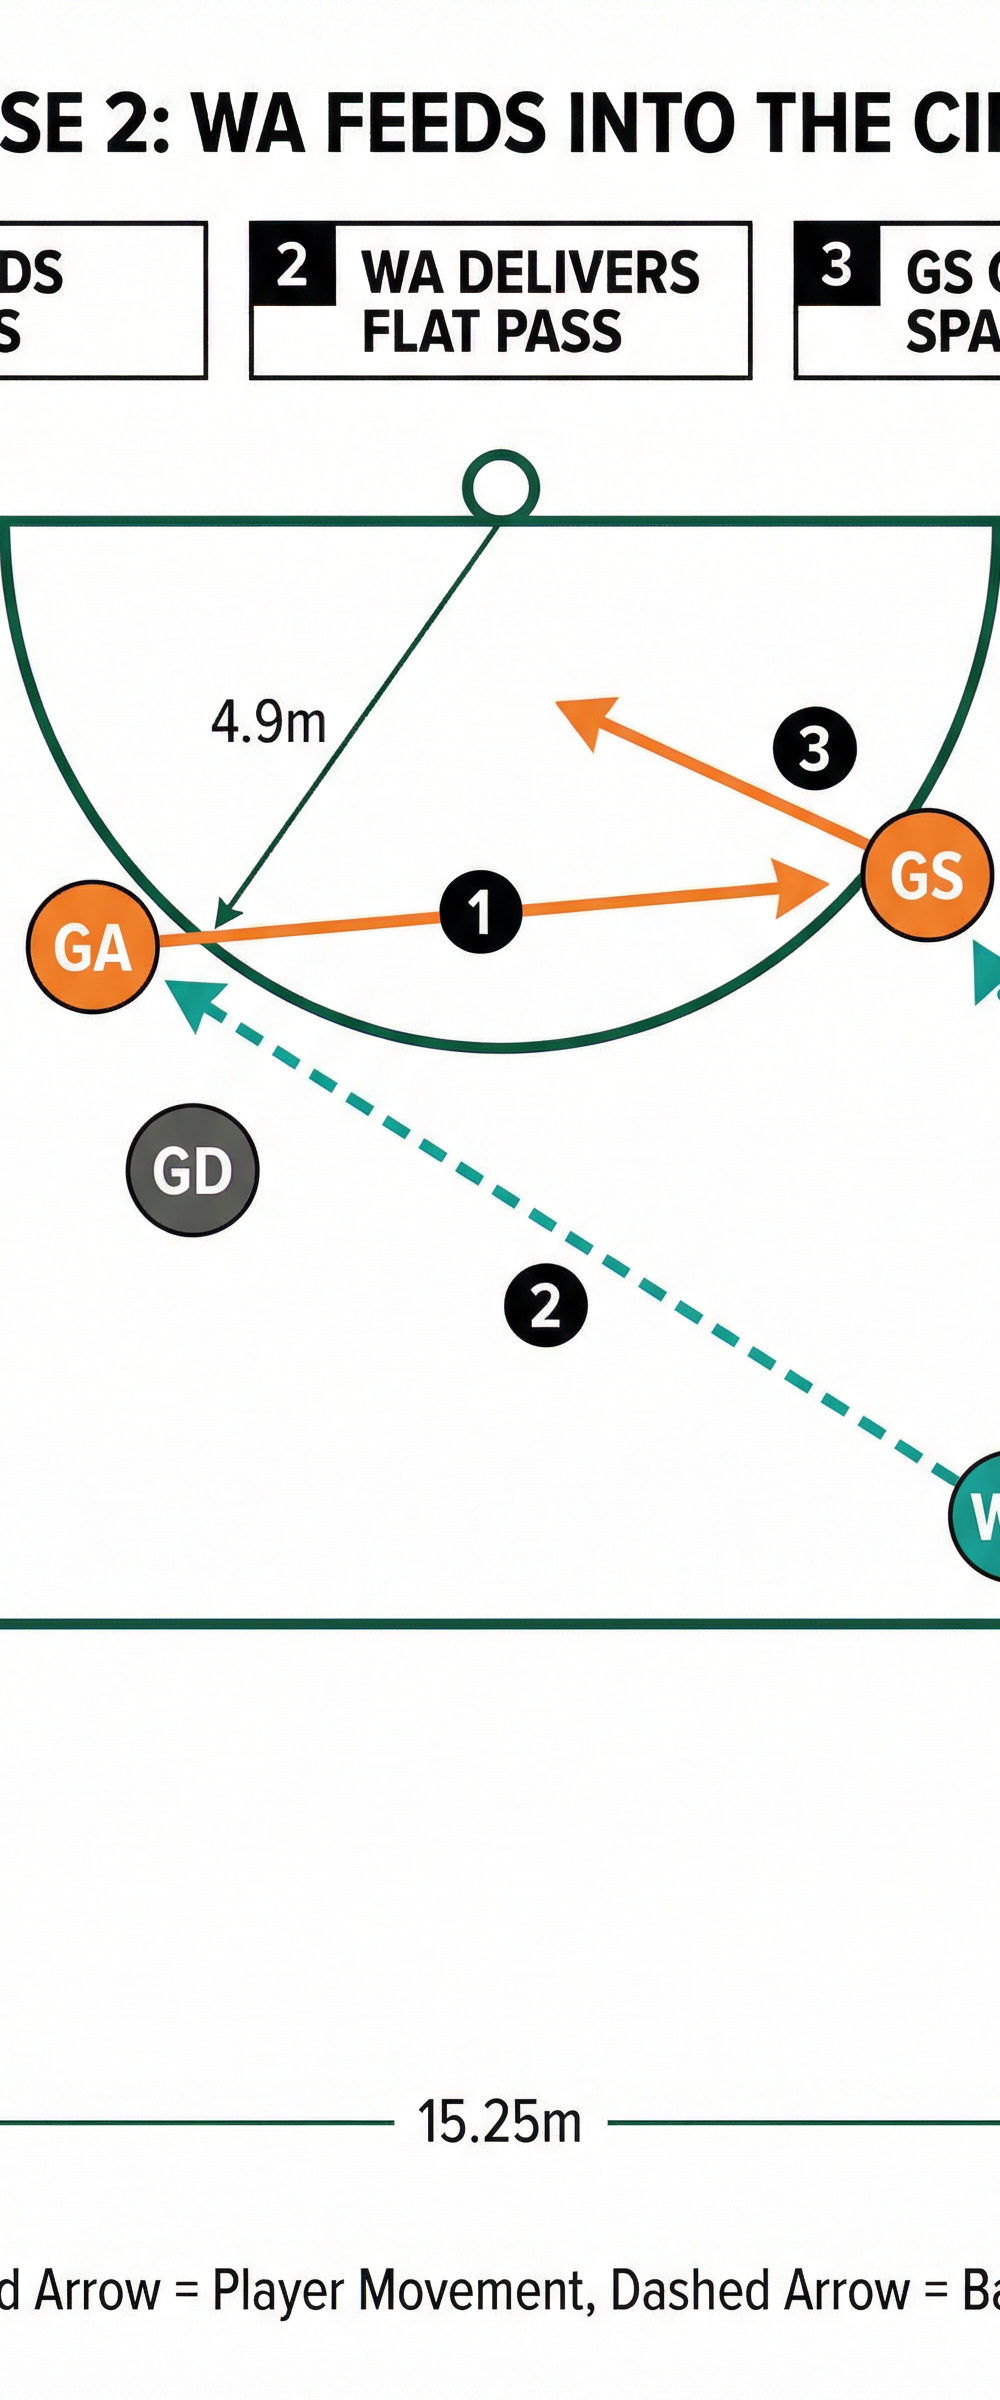
- Shooter Movement: As the WA turns, the GA initiates a strong lead across the top of the goal circle.
- Creating Space: Simultaneously, the GS clears space by moving to the opposite side of the circle, creating an isolation opportunity or drawing the defender.
- The Decision: The WA must assess the GA's movement, the GD's positioning, and the available space.
- The Execution: The WA delivers a flat, fast pass to the GA on the move, or, if the GA is covered, looks for the GS in the created space.
Phase 3: Full Sequence with Defensive Pressure
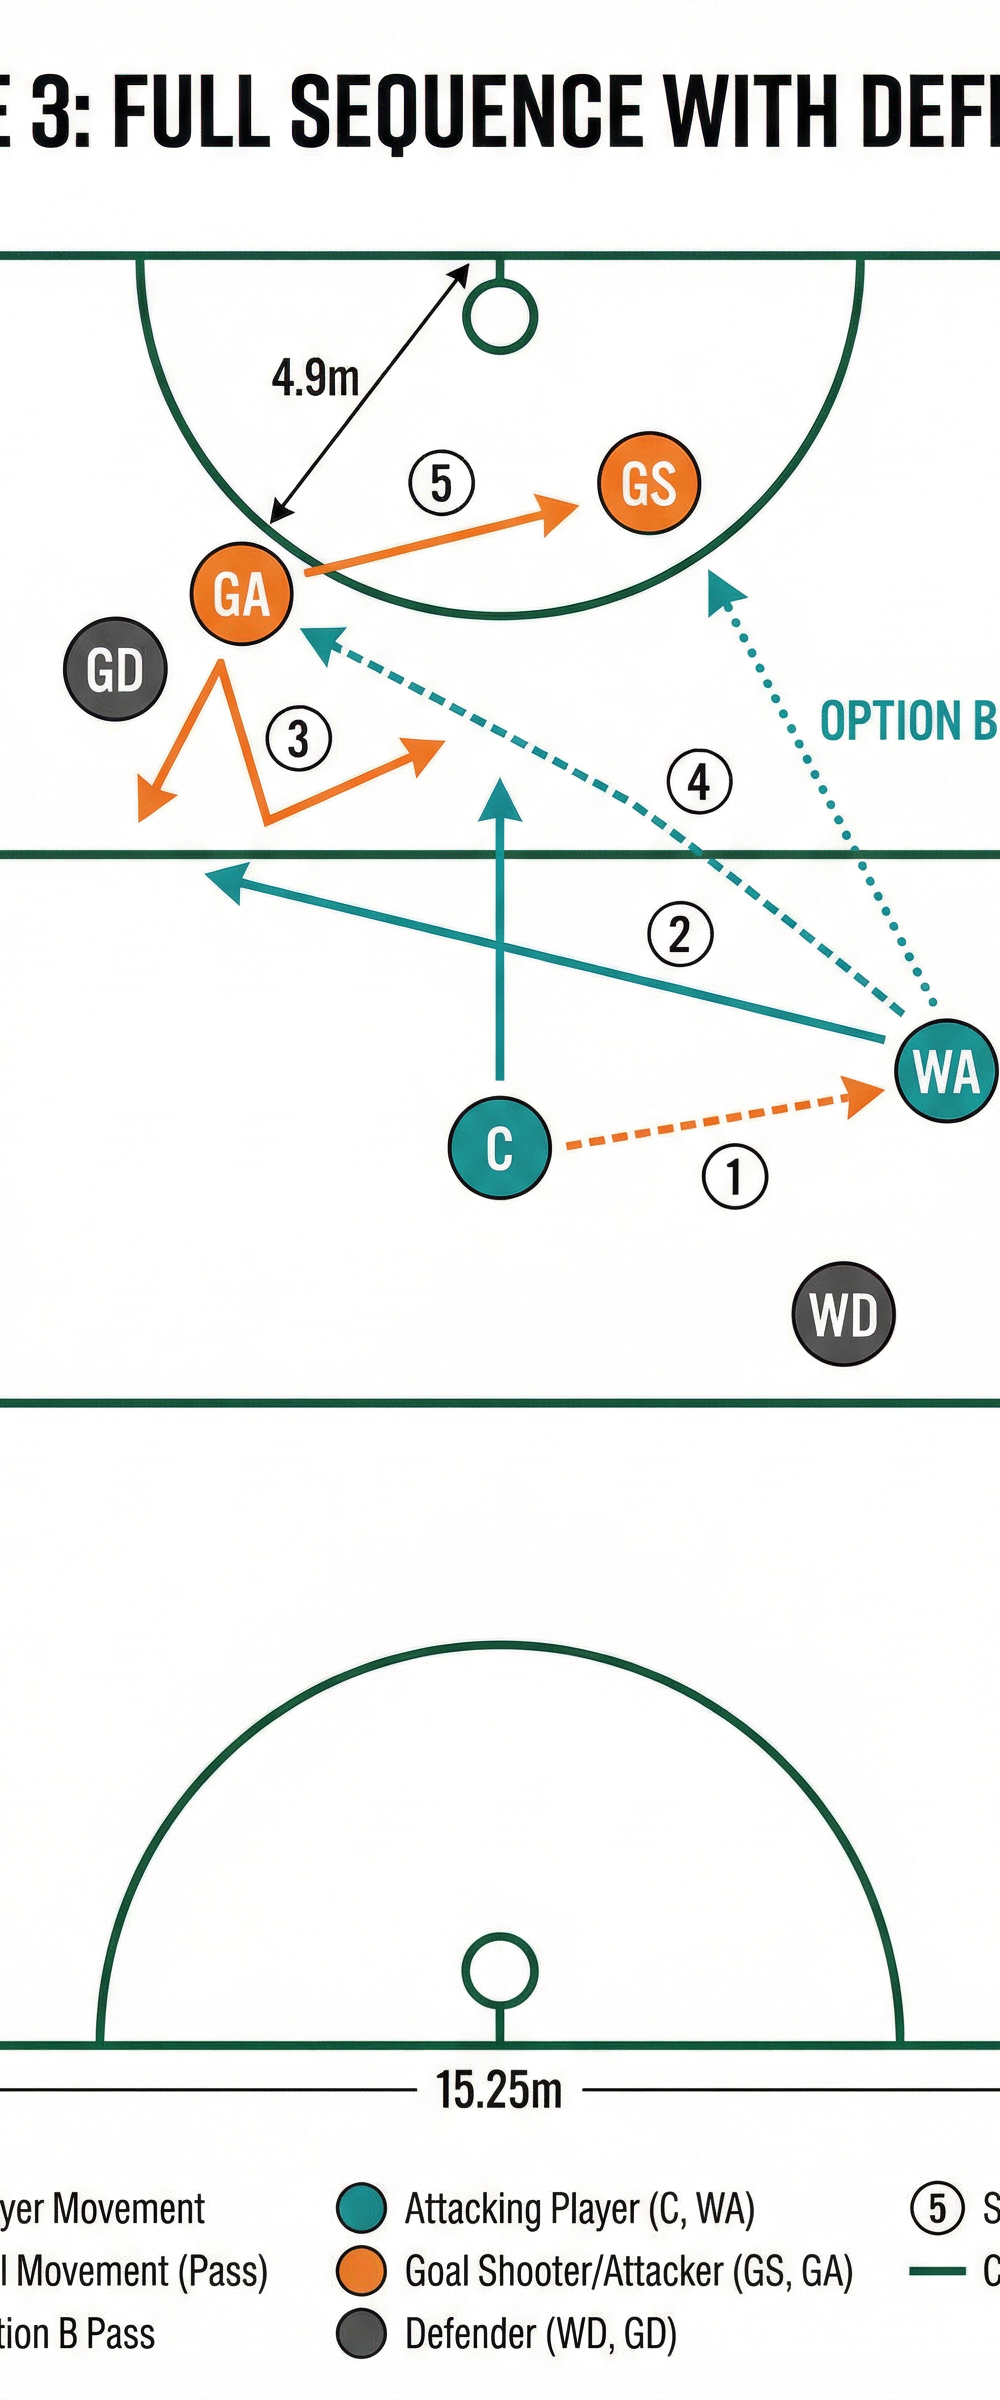
- The Initiation: The sequence begins with the C passing to the WA, who must work hard to get free from the WD.
- The Repositioning: After receiving, the WA drives along the transverse line or toward the circle edge to improve their feeding angle.
- The V-Cut: The GA executes a sharp V-cut — driving away from the circle to draw the GD, then cutting hard back toward the edge to receive the pass.
- The Feed: The WA delivers a perfectly timed lead pass to the GA.
- The Finish: The GA catches the ball, drives into the circle, and takes the shot. Alternatively, the WA can look for Option B: a direct feed to the GS if the GA's movement has opened up space.
Key Coaching Points
- Vision Before Passing: The WA must have their eyes up and scanning the circle before they even catch the ball from the C. This anticipation is crucial for quick decision-making.
- Strong, Decisive Movements: Both the WA and the shooters must commit to their drives. Half-hearted leads will easily be intercepted by the defence.
- Pass Selection: The WA must choose the right pass for the situation — a flat, hard pass for a leading GA, or a lob/bounce pass depending on the GS's positioning and the defender's reach.
- Balance on the Circle Edge: The WA must land balanced and strong on the circle edge, avoiding stepping in or losing control under pressure.
- Communication: Clear verbal and non-verbal communication between the WA and the shooters is essential for timing the leads and the feeds.
Common Mistakes
- Turning Blind: The WA catches the ball and turns without looking, resulting in a forced pass or a held ball.
- Crowding the Circle Edge: The WA drives too close to the shooters, reducing the space for the feed and making it easier for the defence to cover both players.
- Predictable Passing: The WA always looks for the same option (e.g., always passing to the GA), allowing the defence to anticipate and intercept.
- Poor Timing: The WA passes too early (before the shooter is ready) or too late (after the shooter has completed their lead and is covered).
Variations & Progressions
- Add a Goal Keeper (GK): Introduce a GK to defend the GS, increasing the complexity of the WA's decision-making and requiring more precise feeding.
- Time Limits: Introduce a 3-second rule for the WA to release the ball after catching it, forcing quicker decisions and faster execution.
- Constrained Passing: Restrict the WA to only using specific types of passes (e.g., only bounce passes or only lob passes) to develop their passing repertoire.
Age Adaptations
- Under 10s: Focus heavily on Phase 1 and the basic mechanics of the drive, catch, and turn. Use stationary defenders or no defenders initially. Emphasise chest passes and basic movement.
- Under 12s – Under 14s: Introduce Phase 2 and basic shooter movements. Start incorporating light defensive pressure. Focus on timing and basic pass selection.
- Under 16s – Open: Run the full Phase 3 sequence with intense, match-like defensive pressure. Emphasise advanced passing techniques, complex shooter interchanges, and rapid decision-making under fatigue.