Wide Overlap Play from Lineout: The 'Whip' Attack
A devastating attacking move from a lineout that manipulates the defense with hard decoy lines to create a numerical advantage on the far touchline.

Equipment Needed
1. Overview
The 'Whip' is a high-tempo, expansive set play designed to exploit space on the far side of the pitch following a secure lineout. By committing the opposition's midfield defense with hard, flat decoy lines from the centers, this play creates a crucial numerical advantage (overlap) out wide. It is most effective when executed between the two 22-meter lines, providing enough room for the backs to accelerate while keeping the defensive line guessing.
This move is an excellent weapon when you have a dominant lineout and quick ball delivery, allowing your fly-half to bypass the initial defensive rush and isolate the opposition's wingers and fullback.
2. Setup
Equipment Needed:
- 1 Rugby ball (plus spares for quick restarts during practice)
- 10-15 Cones (to mark the lineout 5m/15m lines and the 'Overlap Zone')
- Bibs for defensive players
Pitch Setup:
- Standard 100m x 70m rugby pitch.
- Set up a lineout on the right touchline, ideally around the halfway line.
- Mark a 15-meter wide 'Overlap Zone' on the far left touchline using cones.
Player Positions:
- Forwards (1-8): 4-man or 5-man lineout setup. The non-jumping forwards must be prepared to secure the ball quickly.
- Scrum-half (9): Positioned at the base of the lineout, ready for a rapid clearance pass.
- Fly-half (10): Standing 10 meters back and slightly wider than usual to increase the passing angle.
- Centers (12 & 13): Aligned relatively flat. 12 stands opposite the opposition's fly-half; 13 is positioned slightly wider.
- Wingers (11 & 14): 11 holds width on the blindside (or drops back for cover). 14 (Open-side winger) hugs the far touchline, staying as wide as possible.
- Fullback (15): Positioned deep, ready to inject pace into the backline at the critical moment.
3. Step-by-Step Instructions

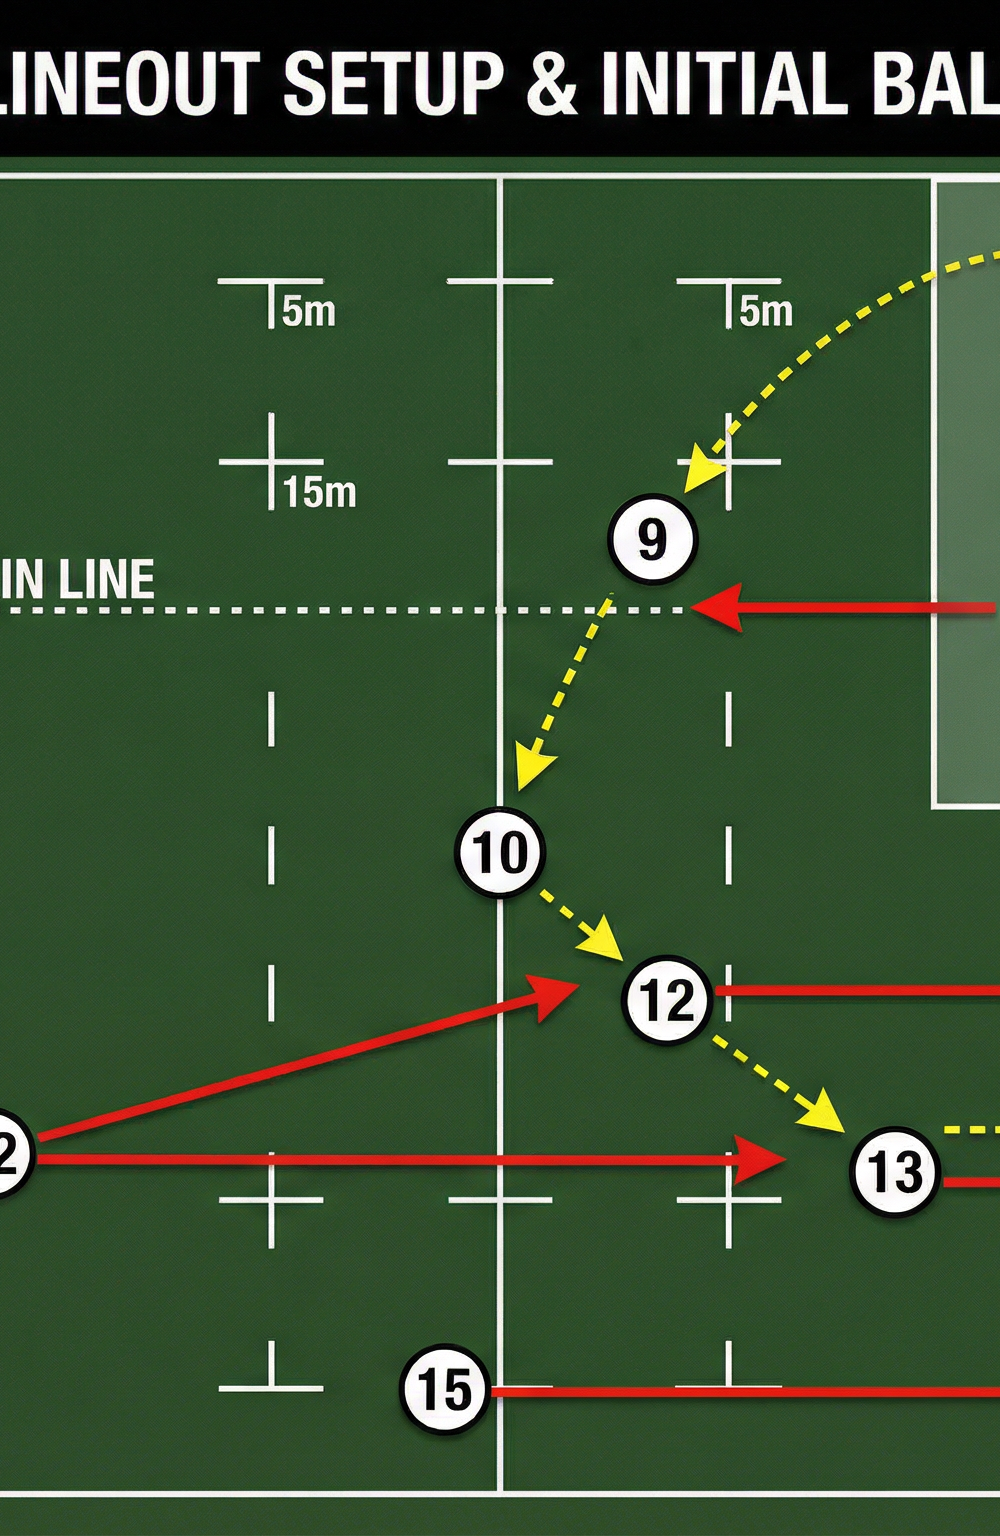
Phase 1: The Launch
- The hooker (2) throws to the middle jumper (4 or 5) in a quick, 4-man lineout.
- The jumper delivers clean, off-the-top ball to the scrum-half (9).
- The scrum-half (9) fires a fast, flat pass to the fly-half (10) who is moving forward onto the ball.
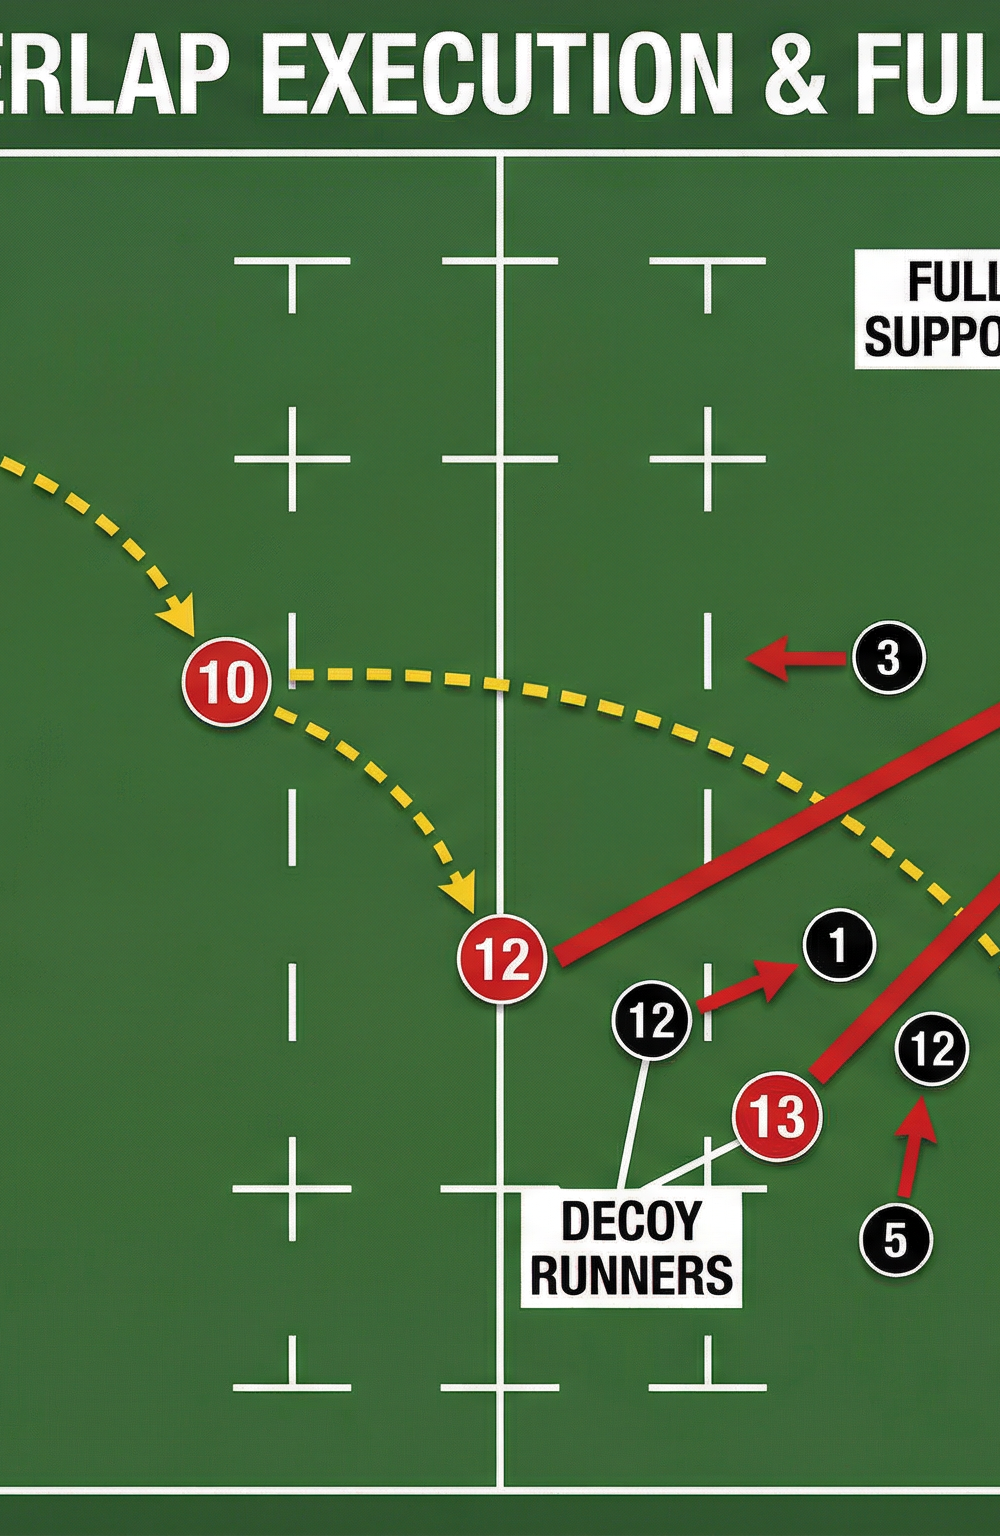
Phase 2: The Manipulation
4. As the fly-half (10) receives the ball, the inside center (12) runs a hard, crash-ball decoy line directly at the opposition's fly-half/inside center channel. This commits the inside defense.
5. The fly-half (10) throws a miss-pass behind 12, directly to the outside center (13).
6. The outside center (13) receives the ball and immediately straightens their run, fixing the opposition's outside center.
Phase 3: The Execution
7. As 13 straightens, the fullback (15) accelerates from deep, joining the attacking line on the outside shoulder of 13.
8. The outside center (13) draws the final defender and passes to the fullback (15).
9. The fullback (15) now has a 2v1 scenario against the opposition winger. They draw the winger and pass to the open-side winger (14), who is waiting in the 'Overlap Zone' near the touchline.
10. The winger (14) accelerates down the touchline to score or make significant ground.
4. Key Coaching Points
- Speed of Delivery: The success of this play hinges on lightning-fast ball from the lineout. The 9 must not take any steps before passing.
- Convincing Decoys: The inside center (12) must run their decoy line with absolute conviction, calling for the ball and bracing for impact. If they don't sell the dummy, the defense will drift wide.
- Depth and Timing: The fullback (15) must time their entry perfectly. If they arrive too early, the defense can adjust; if too late, the pass from 13 will be forced or intercepted. They must hit the line at full pace.
- Fixing the Defender: The outside center (13) must square their shoulders and run straight at the defender before passing. Drifting sideways will push the defense onto the winger and kill the overlap.
- Communication: Clear calls are essential, particularly between 10, 13, and 15, to ensure the timing of the passes and runs are synchronized.
5. Common Mistakes
- Slow Lineout Ball: A messy lineout or slow pass from the 9 allows the defense to rush up and shut down the space before the ball reaches the 10.
- Crabbing (Running Sideways): If the 10 or 13 run sideways instead of attacking the gain line, they consume the space meant for the wingers and allow the defense to drift easily.
- Fullback Overrunning: The fullback arriving ahead of the ball carrier, forcing a forward pass or causing the play to break down.
- Winger Coming Off the Touchline: The open-side winger (14) getting anxious and coming inside looking for the ball, thereby destroying the width and the overlap.
6. Variations & Progressions
- Progression 1: Live Defense. Start with passive defenders (touch only), then progress to full-contact defense to test decision-making under pressure.
- Progression 2: The 'Switch' Option. If the defense starts drifting early to cover the wide overlap, the 10 can play the short ball to the 12 crashing back on an inside angle.
- Variation: Blindside Strike. Use the same setup but have the 10 pass back inside to the blindside winger (11) running a hard line off their shoulder, exploiting the gap left by the drifting defense.
7. Age Adaptations
- Under 10s / Under 12s: Focus purely on the basic hands down the line. Remove the miss-pass and the fullback entry. Ensure players catch and pass while running forward.
- Under 14s: Introduce the fullback joining the line to create the extra man. Keep the passing simple (no miss-passes yet) but emphasize drawing the defender.
- Under 16s & Open: Implement the full play, including the hard decoy lines and miss-passes. Focus heavily on timing, depth, and reading the defensive alignment.