Batting Stance & Footwork Mastery Drill
Build the technical foundation every batsman needs — a balanced, repeatable stance and decisive footwork that puts them in position to play every delivery with confidence.

Equipment Needed
Overview
The Batting Stance & Footwork Mastery Drill is the cornerstone of any structured batting programme. Before a batsman can drive through the covers, pull through midwicket, or defend with a straight bat, they must first own their stance and understand how their feet create — or destroy — scoring opportunities. This drill isolates those two fundamentals and builds them through deliberate, repetitive practice.
Use this drill at the start of every batting session as a technical warm-up, or dedicate a full 30-minute block to it when working with players who are developing bad habits under match pressure. It is equally valuable for beginners learning the game for the first time and for intermediate players who have developed compensatory movements that limit their shot selection.
When to use it:
- Opening a batting-focused training session (10–15 minutes)
- Remedial work for a batsman losing their shape under pressure
- Pre-season technical reset for any age group
- Introducing a new player to the game's fundamentals
Setup


Equipment Required
| Item | Quantity | Notes |
|---|---|---|
| Cricket bat (age/size appropriate) | 1 per batsman | Size 3–6 for juniors; full size for 14+ |
| Batting helmet | 1 per batsman | Mandatory for all live-feed work |
| Batting gloves | 1 pair per batsman | — |
| Batting pads | 1 pair per batsman | — |
| Cricket balls (or Incrediball/Kwik Cricket ball) | 6–12 | Incrediball recommended for U12 and below |
| Stumps and bails (full set) | 1 set | Set at regulation height: 28 inches |
| Batting tee or cone | 2 | Mark guard positions and front foot target |
| Coloured cones | 4–6 | Define front foot and back foot zones |
| Measuring tape | 1 | Confirm 22-yard pitch length |
Pitch & Field Setup
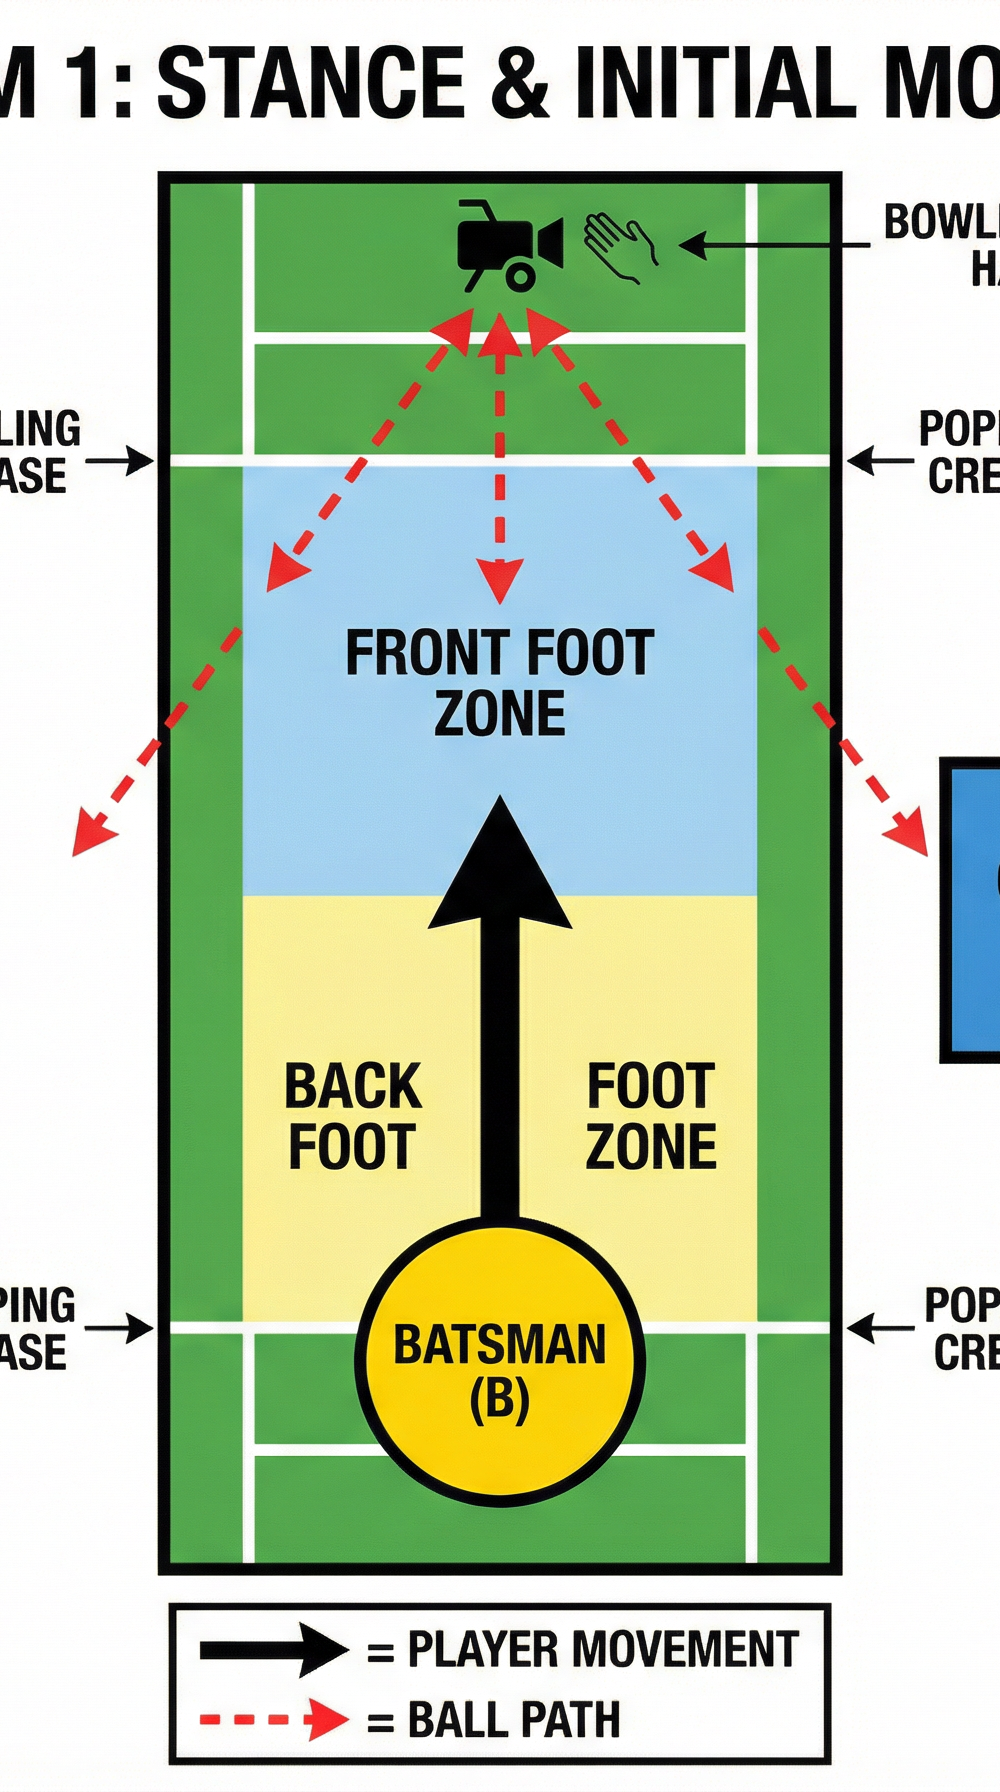
This drill takes place on a standard 22-yard (20.12 m) cricket pitch, either on a turf wicket, synthetic surface, or indoor net. Place stumps at both ends. Mark the popping crease clearly (4 feet / 1.22 m in front of the stumps). Use two coloured cones placed either side of the crease to define the front foot zone (forward of the popping crease) and the back foot zone (between the popping crease and the stumps).
The coach or feeder stands at the bowling end, approximately 18–22 yards from the batsman, delivering underarm or overarm feeds depending on the player's level. Position the coach slightly to the off-side (approximately 1–2 metres outside the return crease) to maintain a clear sightline to the batsman's feet and head position.
Player Positions
For this drill, only 1 batsman works at the crease at a time. All other players act as retrievers in the outfield or wait in a queue 5 metres behind the net/pitch boundary. Rotate batsmen every 6–10 deliveries to maintain intensity and focus.
Step-by-Step Instructions

Phase 1 — Establishing the Stance (5 minutes, no ball)
- Ask the batsman to stand at the crease and take their guard (middle stump recommended for beginners). Ensure the bat is grounded lightly on the popping crease, not dragged back behind the feet.
- Check foot alignment: both feet should be parallel to the crease, shoulder-width apart (approximately 40–50 cm). The front foot (left foot for a right-hander) should point toward mid-on, not square on.
- Instruct the batsman to bend both knees slightly — weight should be on the balls of the feet, not the heels. A simple test: ask them to lift their toes slightly; if they topple forward, weight is too far back.
- Check head position: eyes level, chin parallel to the ground, head turned to face the bowler over the left shoulder (for a right-hander). The eyes must be level — a tilted head is one of the most common causes of misjudging length.
- Bat grip: top hand (left for right-handers) provides control, bottom hand provides power. The 'V' formed by thumb and forefinger on both hands should point toward the outside edge of the bat. Hold the bat at the top of the grip, not the bottom.
- Have the batsman hold this position for 10 seconds, then relax and repeat three times. This builds muscle memory of the correct position.
Phase 2 — Shadow Footwork (5 minutes, no ball)
- Call out delivery types — "FULL", "GOOD LENGTH", or "SHORT" — and ask the batsman to respond with the correct footwork only (no bat swing required):
- FULL: Large stride forward with the front foot, landing alongside the pitch of the ball. The back foot drags slightly but remains grounded.
- GOOD LENGTH: Small initial trigger movement back-and-across (approximately 15–20 cm), then a decision to go forward or back.
- SHORT: Back foot moves back and across toward off stump, weight transfers onto the back foot, front shoulder stays high.
- Repeat 10–15 shadow movements per batsman, mixing the calls randomly.
Phase 3 — Hand-Fed Deliveries (10–15 minutes)
- The coach delivers underarm feeds from 8–10 metres, varying between full-length (landing 1–2 metres from the batsman), good length (landing 4–5 metres from the batsman), and short of a length (landing 6–7 metres from the batsman).
- The batsman focuses solely on footwork first — getting into position — before playing any shot. Encourage them to call out "FRONT" or "BACK" as they move, reinforcing the decision-making process.
- After each delivery, the coach gives immediate feedback on one specific element only (e.g., "Good — front foot was beside the ball" or "Head fell over to the off side — reset").
- Progress to overarm feeds from the bowling crease (22 yards) once the batsman demonstrates consistent footwork over 6 consecutive deliveries.
Phase 4 — Consolidation with Shot Execution (5–10 minutes)
- Repeat Phase 3 but now allow the batsman to play the full shot. The coach observes whether the footwork established in Phase 3 is maintained under the added complexity of bat swing.
- Rotate batsmen after every 8 deliveries.
Key Coaching Points

The following six coaching points represent the non-negotiables of this drill. Coaches should focus on one point per batsman per rotation rather than overwhelming players with multiple corrections simultaneously.
1. The Trigger Movement is the Foundation. Every elite batsman uses a small preliminary movement — typically a small back-and-across step — as the bowler enters their delivery stride. This "trigger" loads weight onto the back foot and primes the batsman to move either forward or backward decisively. Teach this early; it is the difference between reactive and proactive batting.
2. The Front Foot Must Land Beside the Ball, Not At It. A common coaching cue is "get your foot to the pitch of the ball," but more precisely, the front foot should land alongside the point of bounce, allowing the hands to drive through the line. If the foot lands too far across (toward off stump), the batsman cannot play straight.
3. Head Position Dictates Everything. The head is the heaviest part of the body. Where it goes, the body follows. A batsman whose head falls toward off stump will drag their weight across and play around the ball. Reinforce: eyes level, head still at the moment of impact.
4. Weight Transfer Must Be Complete. On front foot shots, 80–90% of body weight should transfer onto the front foot at the point of contact. On back foot shots, weight should be fully loaded onto the back foot. Half-committed weight transfer is the primary cause of mistimed shots.
5. The Back Foot Must Move Back AND Across. When going back, the back foot should move toward the off stump — not straight back. This opens up the leg side and positions the batsman to play both the pull shot and the cut shot from the same initial movement.
6. Stillness at the Point of Contact. Regardless of how explosive the footwork is, the head and hands must be still at the moment of impact. Encourage batsmen to "freeze" their head position through the shot.
Common Mistakes

The following errors are the most frequently observed in players at all levels. Coaches should identify which error is most prevalent in each individual and address it as a priority before moving to others.
Mistake 1 — Falling Onto the Back Foot ("Falling Away"). The batsman's weight drifts toward the leg side and backward as the ball arrives, causing them to play across the line on full deliveries. Correction: Place a cone 30 cm behind the batsman's back heel. If they touch it, they are falling away. Reinforce the trigger movement and ensure the front shoulder stays pointing toward the bowler.
Mistake 2 — Hard Hands at the Top of the Grip. Players grip the bat too tightly with the bottom hand, causing the bat to swing across the line rather than through it. Correction: Ask the batsman to rate their grip pressure from 1–10. It should be no more than 5 out of 10. A useful cue: "Hold the bat like you're holding a small bird — firm enough that it can't escape, gentle enough that you don't hurt it."
Mistake 3 — No Trigger Movement ("Rooted to the Spot"). The batsman stands completely still until the ball is released, then reacts late. This leads to rushed, unbalanced footwork. Correction: Introduce the trigger movement explicitly in Phase 2. Have the batsman practice the trigger 20 times in isolation before adding the ball.
Mistake 4 — Front Foot Stepping Across to Off Stump ("Planting Across"). The front foot steps toward the off side rather than down the pitch, closing the batsman off and preventing straight drives. Correction: Place a cone on the pitch 60 cm in front of the batsman's front foot, aligned with middle stump. The front foot should step toward or inside that cone, not outside it.
Mistake 5 — Eyes Not Level ("Tilting the Head"). The batsman tilts their head to one side, causing them to misjudge the ball's line and length. This is especially common in young players. Correction: Use a spirit level analogy — "your eyes are a spirit level; keep the bubble in the middle." Have the batsman consciously check their head position in the stance before every delivery.
Variations & Progressions

Variation 1 — Coloured Ball Length Zones (Easier). Divide the pitch into three coloured zones using coloured tape or cones: a yellow zone for full deliveries (1–3 metres from the batsman), a blue zone for good length (4–6 metres), and a red zone for short deliveries (7–9 metres). The coach calls the colour before delivering, giving the batsman advance notice of the length. This removes the decision-making element and allows the player to focus purely on executing the correct footwork pattern. Ideal for beginners and U10 players.
Variation 2 — Silent Drill (Intermediate). Remove all verbal cues. The coach delivers without calling the length, and the batsman must read the delivery and respond with correct footwork. After each delivery, the batsman must state aloud what footwork they used and why. This develops self-awareness and the habit of reading length early from the bowler's hand.
Progression — Live Bowling with Fielders (Advanced). Progress from hand-fed deliveries to live bowling at match pace. Add two fielders in catching positions (slip and gully) to introduce match pressure. The batsman must now execute correct footwork AND shot selection under realistic conditions. Introduce a scoring system: 1 point for correct footwork, 1 point for a clean contact, 1 point for a positive shot selection. First to 10 points wins the rotation.
Age Adaptations

| Age Group | Key Modifications |
|---|---|
| Under 8 (Kwik Cricket) | Use a batting tee instead of a feeder. Focus only on stance and one footwork movement (front foot drive). Use a soft Kwik Cricket ball. Reduce session to 10 minutes. |
| Under 10 | Use underarm feeds from 6–8 metres. Focus on stance and the front foot/back foot decision only. Introduce the trigger movement as a "little step" without technical detail. |
| Under 12 | Introduce overarm feeds from 14–16 metres. Begin teaching the back-and-across trigger movement explicitly. Introduce the concept of length zones. |
| Under 14–16 | Full 22-yard feeds. Introduce the silent drill (Variation 2). Begin discussing the relationship between footwork and shot selection. Video analysis recommended. |
| Open / Senior | Live bowling at match pace. Incorporate the progression with fielders. Use video analysis to review head position and weight transfer frame-by-frame. |
Coach's Note: Resist the temptation to rush younger players through the progressions. A 9-year-old who owns a balanced stance and can move their front foot to a full delivery has a stronger foundation than a 14-year-old with a technically complex but unreliable technique. Build slowly, build correctly.