Mastering the Death Overs: The Defensive Boundary Ring Plan
Equip your fast bowlers with a robust, defensively sound set play designed to restrict boundaries, build pressure, and execute pinpoint yorkers in the crucial final overs of T20 and ODI matches.

Equipment Needed
1. Overview
The "Death Overs" (typically overs 16-20 in a T20, or 41-50 in an ODI) are the most critical phase of a limited-overs match. Batsmen are looking to maximize their scoring rate, often throwing caution to the wind. As a coach, your goal is to equip your bowlers with a clear, repeatable set play that restricts boundaries and forces the batsmen to take high-risk options. This "Defensive Boundary Ring" plan is designed to protect the perimeter while challenging the bowler to execute their most difficult skill: the yorker. It provides a safety net for slight mis-executions while setting a clear tactical framework.
2. Setup
Equipment Needed
- Standard cricket ball (or target bowling balls for practice)
- Target cones or markers (for the yorker zone)
- Full set of stumps
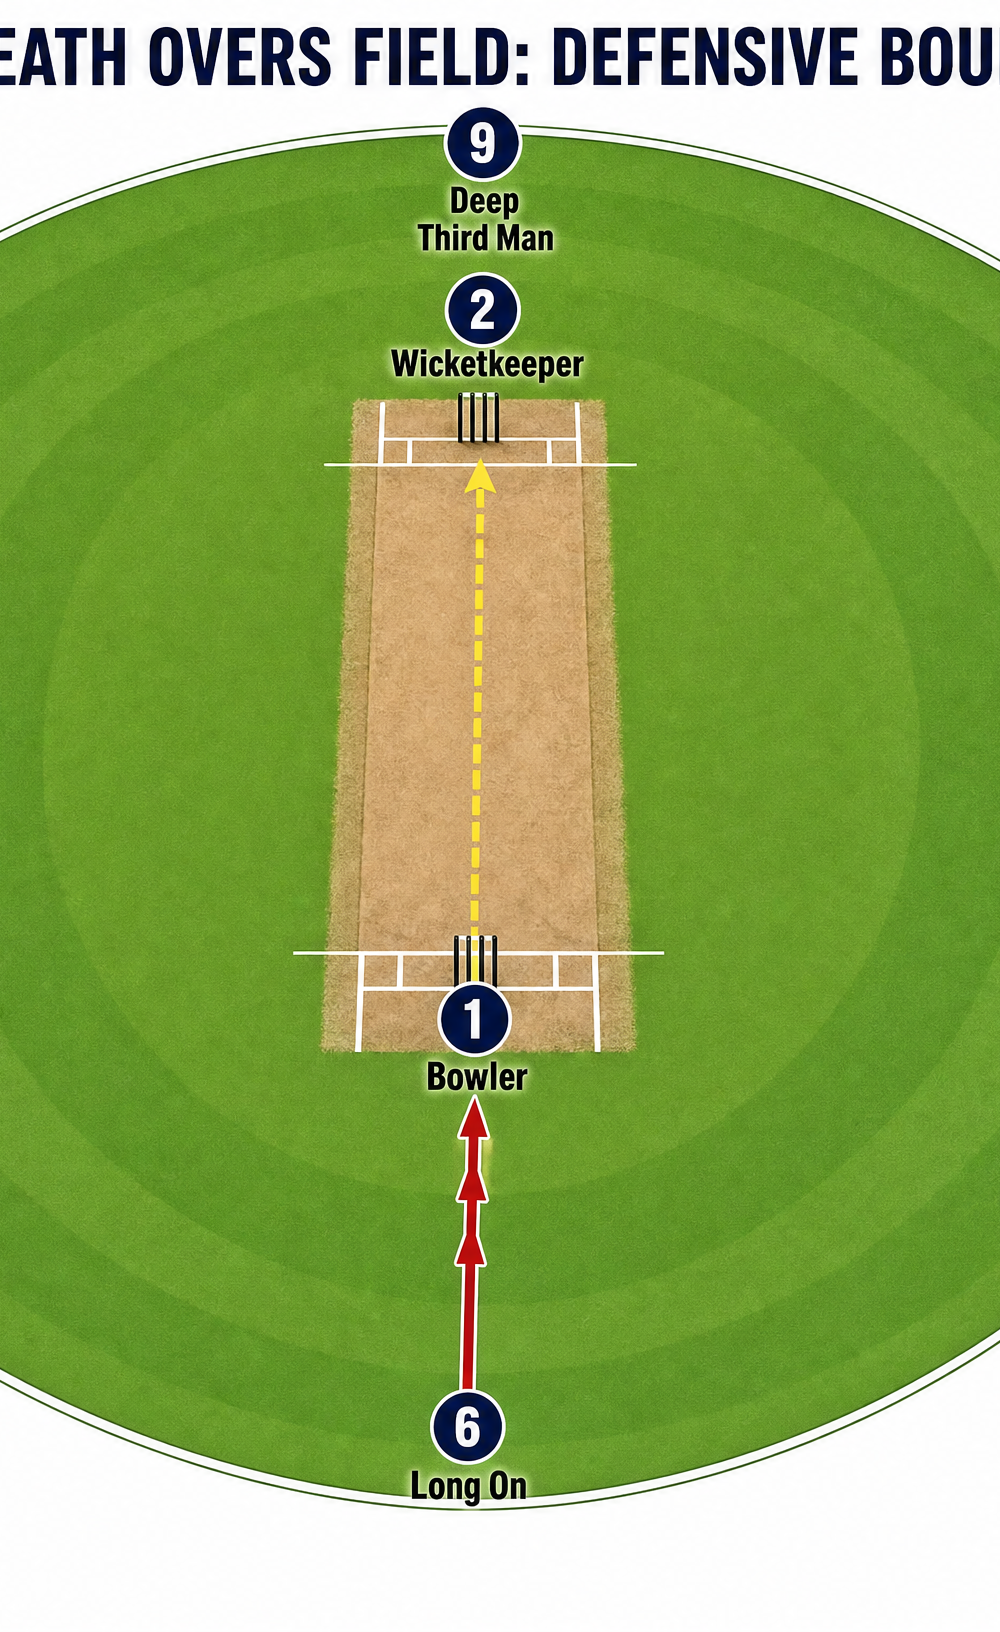
Field Setup
This set play utilizes a standard limited-overs defensive field, maximizing boundary riders.
Player Positions:
- Bowler: Operating from the bowling crease.
- Wicketkeeper: Positioned back for pace, or up to the stumps for medium-pace variations.
- Fine Leg: On the boundary, approximately 45 degrees behind square.
- Deep Square Leg: On the boundary, protecting the sweep and pull.
- Deep Midwicket: On the boundary, covering the slog sweep and traditional heave.
- Long On: On the boundary, straight down the ground.
- Long Off: On the boundary, straight down the ground on the off-side.
- Deep Cover: On the boundary, protecting the wide yorker slice.
- Deep Third Man: On the boundary, behind the wicketkeeper for the ramp or thick edge.
(Note: Depending on powerplay rules, you may need to bring 4 or 5 fielders inside the 30-yard circle. In those cases, bring Fine Leg and Deep Third Man inside the ring first).

3. Step-by-Step Instructions
- Set the Field: Ensure all boundary riders are exactly on the rope. Do not allow them to drift in 5-10 yards; they must maximize the distance the ball needs to travel to clear them.
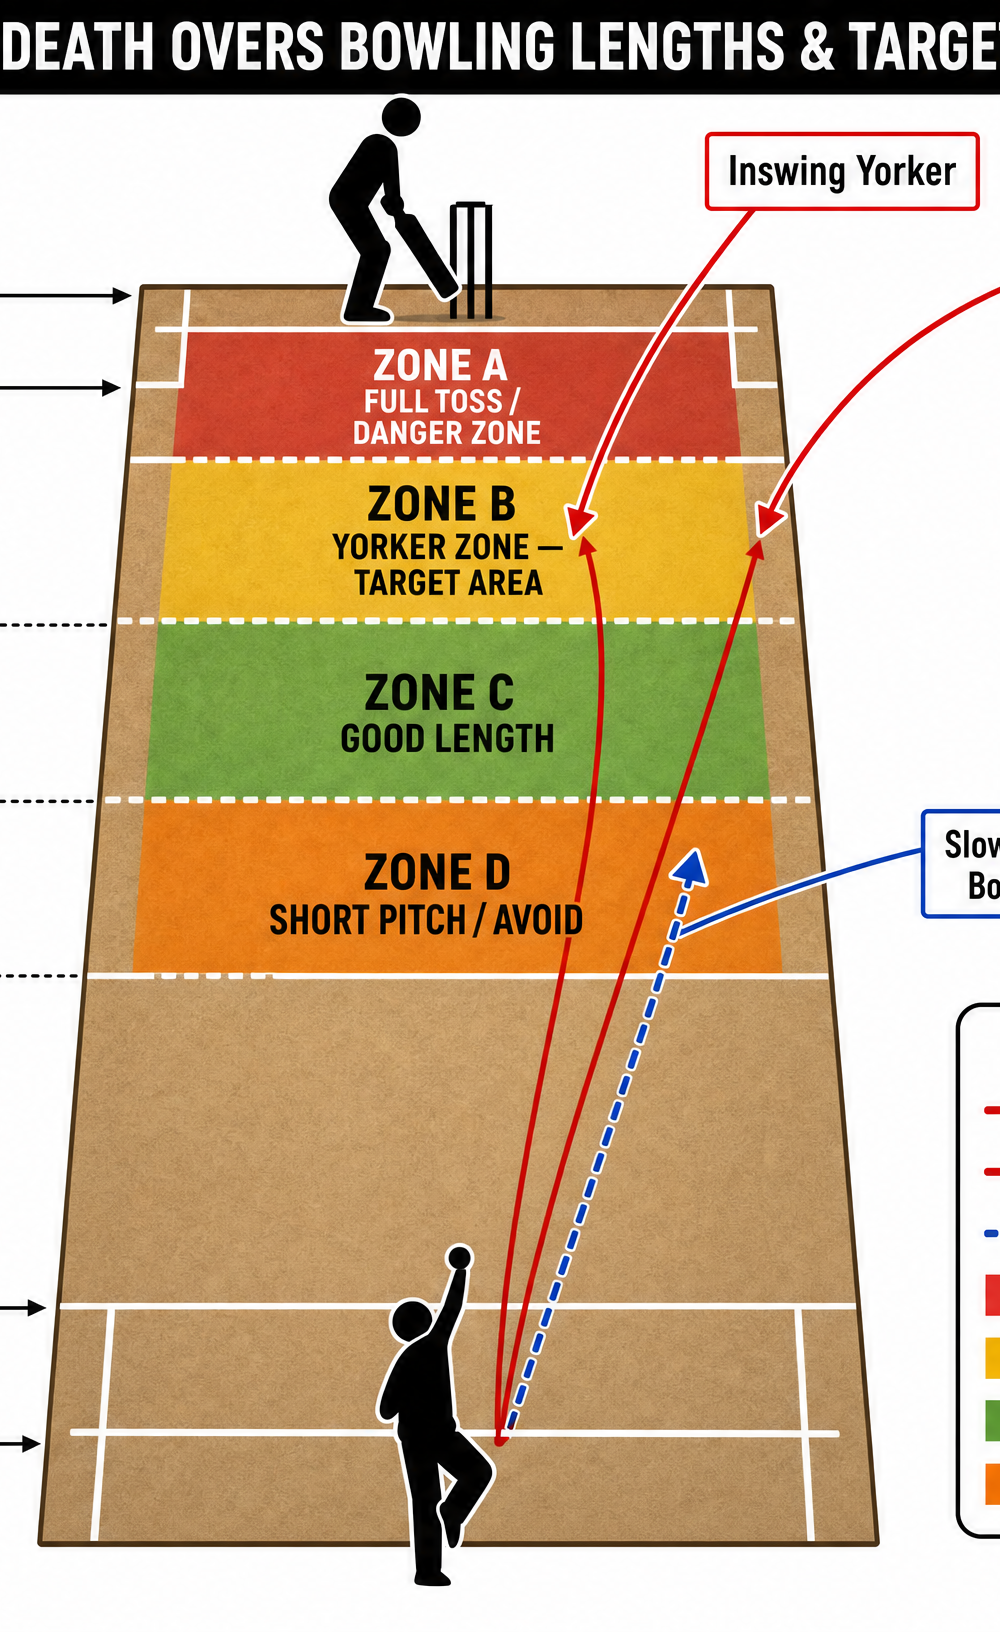
- Identify the Target Zone: The primary target is Zone B (The Yorker Zone). This is from the popping crease to roughly 1 foot in front of it.
- Commit to the Line: The bowler must decide between attacking the stumps (inswing yorker) or bowling wide of the off-stump (wide yorker) based on the batsman's movement.
- The Approach: The bowler executes their normal run-up, maintaining momentum through the crease. Do not slow down to "aim" the yorker.
- The Release: Focus the eyes firmly on the target area (the batsman's toes or the wide guideline). Release the ball late to ensure a full trajectory.
- Follow Through and Field: The bowler must follow through aggressively and be prepared to field straight drives.
4. Key Coaching Points
- Target the Toes, Not the Stumps: When aiming for a straight yorker, instruct bowlers to aim at the base of the batsman's front foot. Aiming at the stumps often results in a half-volley (Zone C).
- Pace is Your Friend: A yorker must be bowled with genuine pace. A slow yorker is just a full toss waiting to be hit.
- Use the Crease: Encourage bowlers to use the width of the crease. A wide yorker is much harder to hit if bowled from wide of the crease, creating a sharper angle.
- Clear Communication: The captain, bowler, and wicketkeeper must be completely aligned on the delivery intent before the bowler starts their run-up.
- Accept the Margin of Error: A slight miss (a low full toss or a very full half-volley) is still difficult to hit for six if the field is set correctly. Do not panic after one bad ball.
5. Common Mistakes
- Slowing Down the Run-Up: Bowlers often reduce their run-up speed to try and "guide" the yorker. This reduces pace and makes the ball easier to hit.
- Looking Up at the Batsman: If the bowler looks at the batsman's face during the delivery stride, the ball will likely drop short. Keep eyes locked on the target zone.
- Telegraphing the Wide Yorker: Moving too obviously to the side of the crease too early gives the batsman time to adjust and step across.
- Boundary Riders Drifting In: Fielders on the rope naturally want to walk in as the bowler runs in. In the death overs, they must stay anchored to the boundary to prevent sixes.
6. Variations & Progressions
- The Slower Ball Bouncer: If the batsman is consistently stepping deep in the crease to turn yorkers into half-volleys, introduce the slower ball bouncer (Zone D) to push them back.
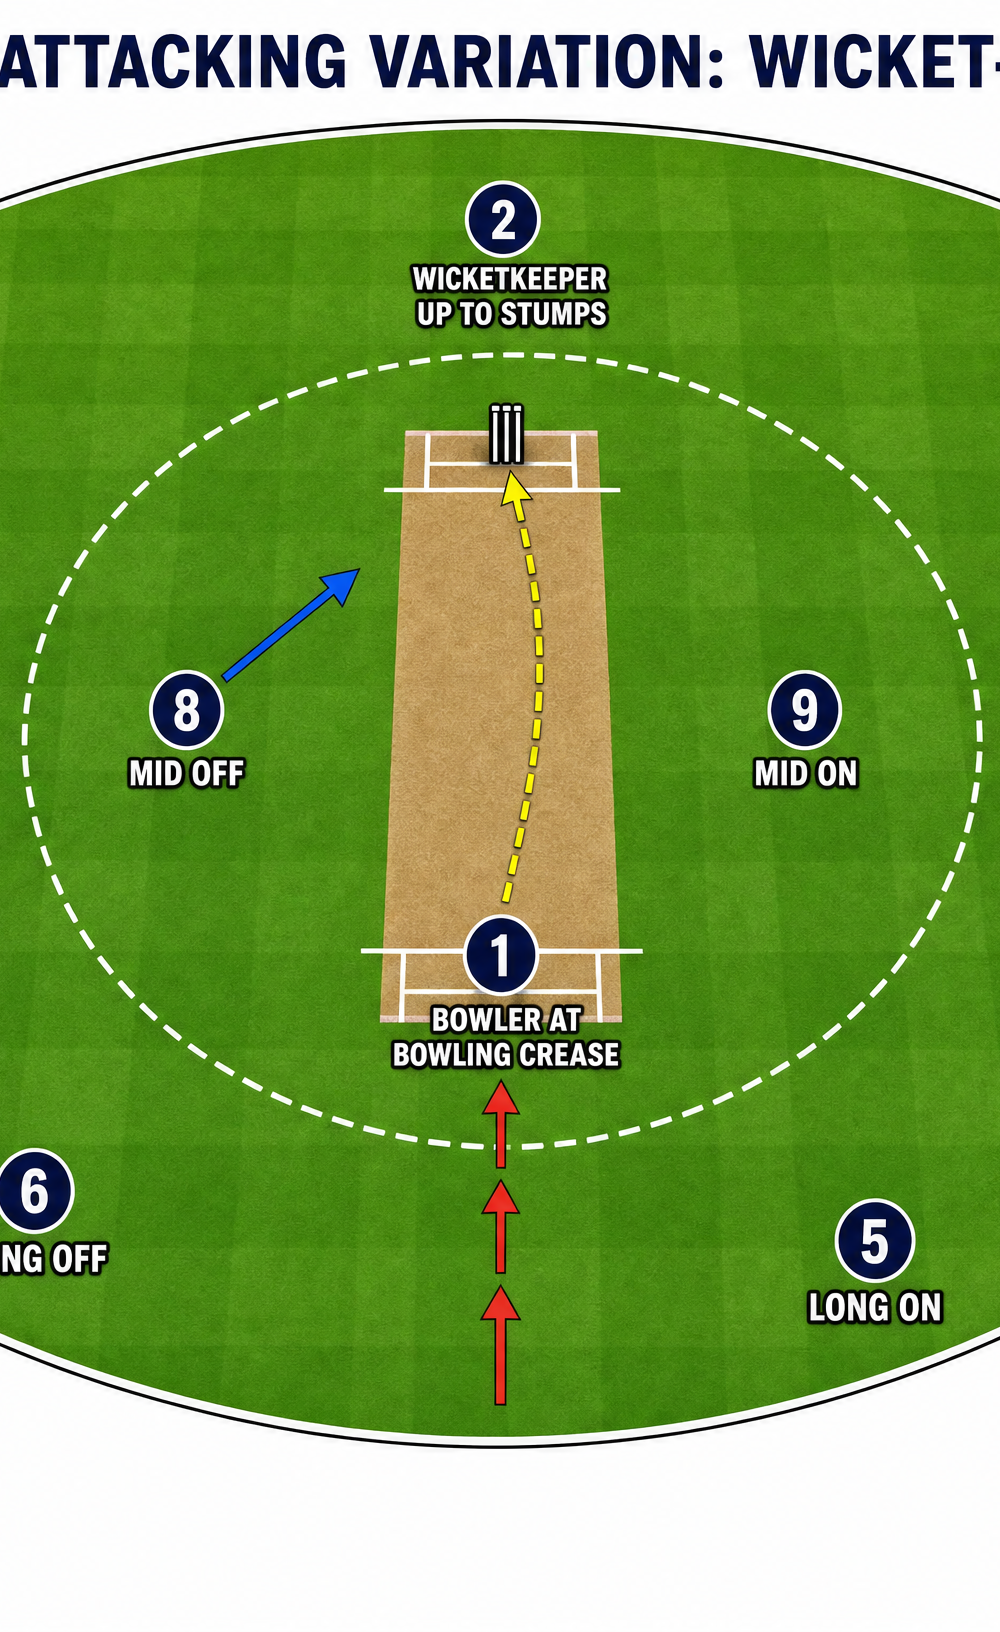
- The Attacking Shift: If a wicket falls or a new batsman arrives, shift to the "Wicket-Taking Field." Bring Mid Off and Mid On inside the 30-yard circle to cut off the single and invite the big shot, while keeping the deep square and cover boundaries protected.
7. Age Adaptations
- Under 12s: Focus heavily on the mechanics of bowling full. Don't worry too much about the specific field placements yet. Use target cones in the nets and reward hitting the yorker zone.
- Under 14s: Introduce the concept of the "wide yorker" and setting a field to protect one side of the wicket.
- Under 16s: Begin practicing the transition between the yorker and the slower ball bouncer. Introduce match-scenario pressure training (e.g., "You need to defend 10 runs off the last over").
- Open / Seniors: Full tactical implementation. Focus on reading the batsman's pre-meditated movements and adjusting the line (straight vs. wide) at the point of delivery.