T20 Innings Acceleration: 14–20 Over Set Play
A coach-ready 24-ball set play that teaches batting pairs to turn overs 14–20 into controlled boundaries, hard-run twos and smarter strike rotation.

Equipment Needed
T20 Innings Acceleration: 14–20 Over Set Play
Overview
This is a repeatable six-over acceleration set play for the middle-to-late phase of a T20 innings. It gives the batting pair a common language for turning a stable platform into a controlled finish: protect the wicket in the first two balls of an over, identify the bowler’s defensive option, then attack one pre-agreed scoring zone without freezing the non-striker. Run it when your side is 2–4 wickets down from overs 14–16, when a new pair needs a simple launch plan, or when experienced hitters are being pinned by wide yorkers and boundary riders.
The objective is not reckless hitting. The pair must manufacture a minimum of 9–11 runs per over through an agreed scorecard of boundary options, twos, and low-risk singles. Coaches should score this practice as a pair, not as two individual batters. A boundary that leaves the stronger batter stranded against the next ball is not automatically a winning outcome.
Setup
Use a full 22-yard/20.12 m pitch and mark both crease areas clearly; the formal pitch is 10 ft/3.05 m wide under MCC Law 6.1.[1] On a full oval, mark the 30-yard circle at approximately 27.4 m from the centre and use a boundary rope or cones 55–70 m from the striker, according to the ground and age group. For a reduced oval, keep the 22-yard pitch but bring the boundary in symmetrically and make the fielding restriction explicit before ball one.
| Item | Coaching setup |
|---|---|
| Players | 13: two batters and 11 fielders, including the bowler and wicketkeeper. Use two coaches as feeders if numbers are short. |
| Equipment | Two full stump sets, 12 white balls, 24 flat cones, two batting helmets, bibs, scorecard/whiteboard and a stopwatch. |
| Roles | Batter A starts on strike; Batter B is non-striker and running caller. Fielders 1–11 are shown in the diagrams. |
| Work block | Four blocks of six legal balls; 90 seconds coaching feedback between blocks. Allow 35–40 minutes including reset. |
| Scoring target | Par is 40–44 runs from 24 legal balls with no more than one dismissal; adjust after each block. |
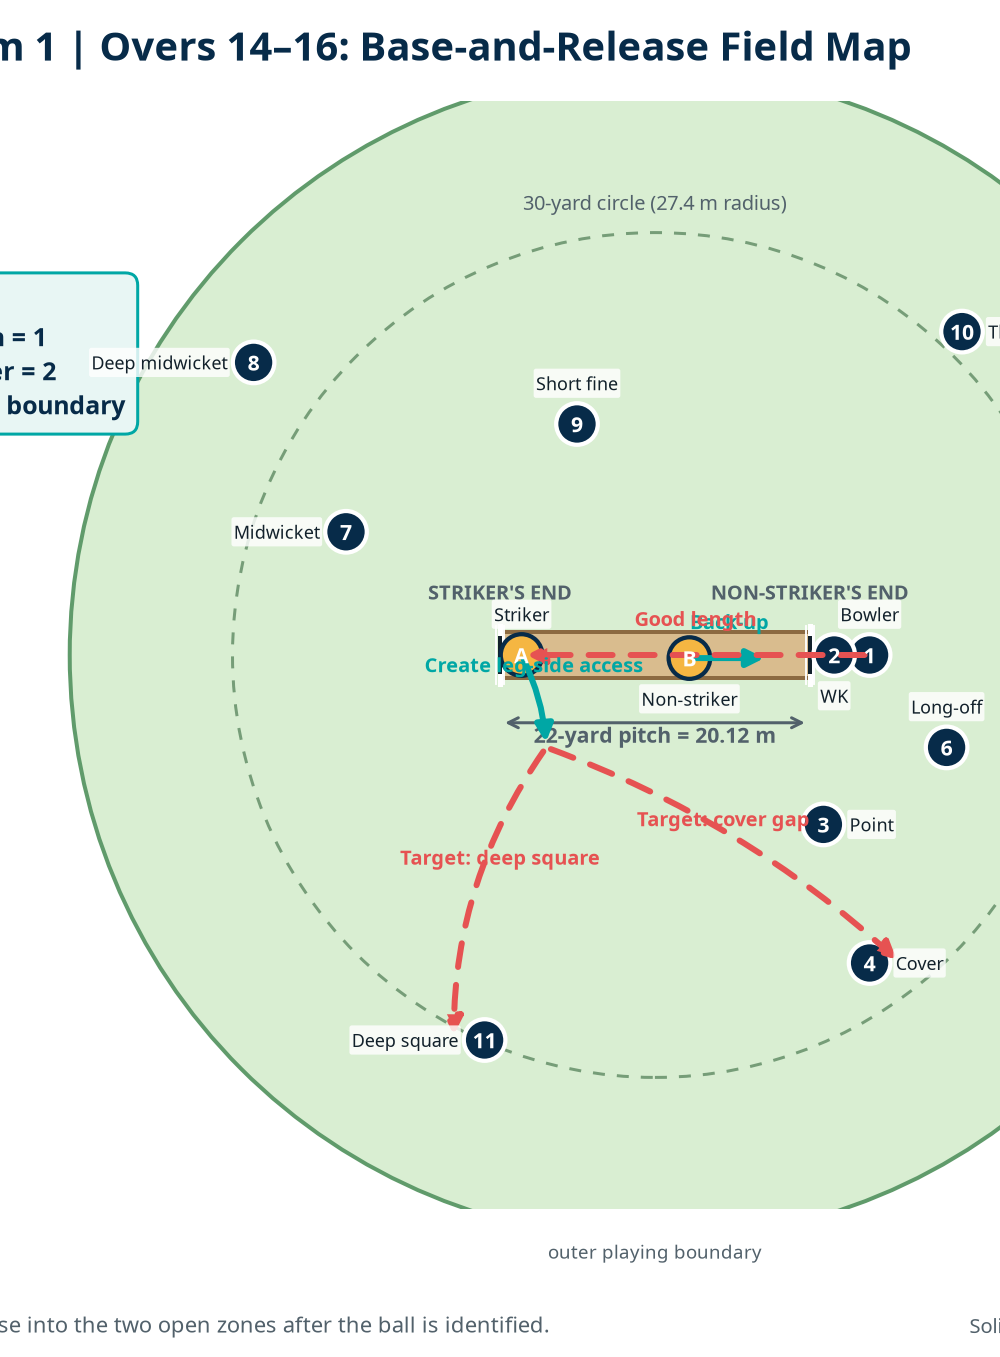
Set the defensive seam field shown in Diagram 1: 1 Bowler, 2 Wicketkeeper, 3 Point, 4 Cover, 5 Deep Point, 6 Long-off, 7 Midwicket, 8 Deep Midwicket, 9 Short Fine Leg, 10 Third, and 11 Deep Square. Batter A begins with a neutral base at the striker’s end. Batter B stands approximately 0.5 m inside the non-striker’s crease, then backs up 4–5 m at the bowler’s release. The calling vocabulary is fixed: Green means one, Amber means two, and Red means boundary/no run.

Step-by-Step Instructions
Brief the pair before the over. Give them one seam-bowler plan and one spin-bowler plan. Against seam, A owns the cover-to-long-off and deep-square zones; against spin, A owns long-on and backward-square. B repeats the target zones and confirms which batter should retain strike for the next over.
Ball one: establish length, not ego. The bowler starts on a good length or hard back-of-a-length. A plays late into the defined safe zone and the pair calls Green or Amber immediately on contact. If the ball is not in the selected zone, A defends or takes the single; no manufactured release shot on ball one.
Ball two: create the release option. A moves no more than 0.5–0.75 m across or away from leg stump before delivery, while remaining balanced enough to return to base. B backs up at release and calls early. The intent is to show the bowler a changed target, not to premeditate a sweep or scoop.
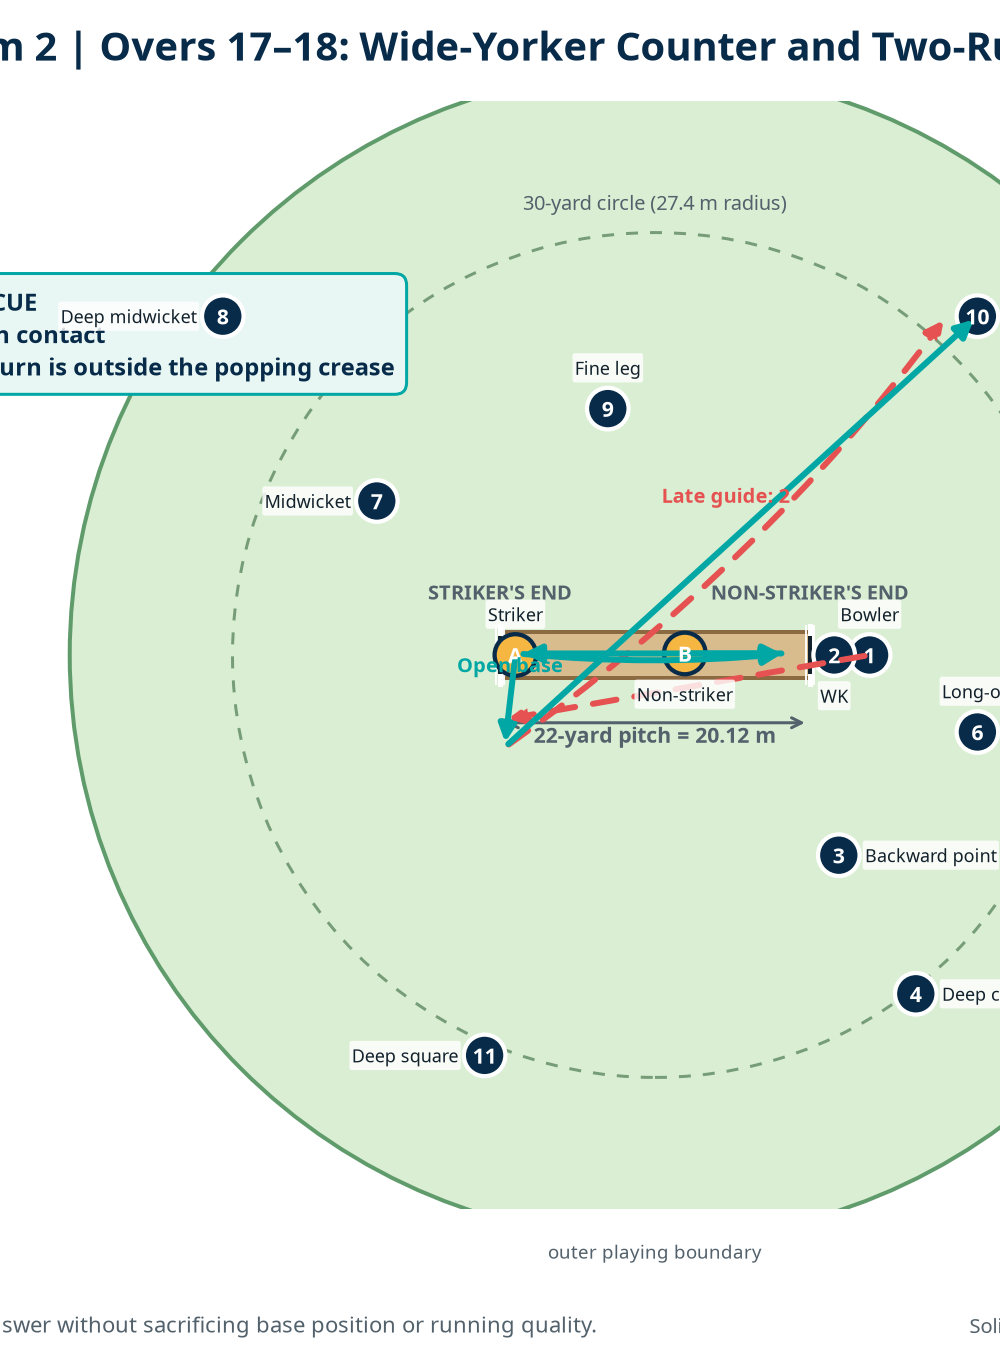
Balls three and four: attack the identified gap. The bowler now chooses a defensive length. A commits to one of the pre-called zones: full ball through/over extra cover, short ball behind square, or a wide ball guided to third. Fielders chase live balls and the pair must complete the second run by turning outside the popping crease.
Coach the wide-yorker answer. In Diagram 2, A opens the base only after reading the ball outside off stump, keeps the head over the ball, and uses a late open-faced guide. B reacts to contact, not to A’s initial movement. The purpose is a hard-run two to third/deep point, not a speculative boundary.
Run the 19th-over decision cycle. Before each ball, the coach calls either “full”, “short”, or “wide” only after the bowler has started the run-up. A has a 0.35–0.45 second recognition window and must commit to the corresponding shot zone. Any late change of mind is scored as a dot ball, even if contact is made.
Build the last-ball reset. After every contact, both batters reset their strike plan in under eight seconds: confirm score, ball remaining, likely next ball, and desired striker. In Diagram 3, long-off is the full-ball outlet, deep square is the short-ball outlet, and third is the wide-ball outlet. This prevents the common final-over habit of chasing every ball with the same swing.
Score, review, repeat. Award 1 point for a controlled single, 2 for a completed two, 4 for a boundary in the nominated zone, and minus 2 for a run-out or low-percentage dismissal. Between blocks, ask only three questions: “Which ball did we read earliest?”, “Where did the second run die?”, and “Who needs strike next over?”
Key Coaching Points
| Focus | What the coach should demand |
|---|---|
| Early information | Batter A watches release, seam and length before moving; pre-movement must never remove the ability to play straight. |
| Pair running | Batter B backs up at release, commits on contact, and turns beyond the popping crease with a low centre of mass. |
| Clear ownership | Each batter names one safe rotation zone and two boundary zones before the over begins. |
| Ball-by-ball intent | The pair use ball one to gather information, then increase risk only when length and field match the plan. |
| Strike management | With two balls left, the pair explicitly decide whether one run, two runs, or a boundary best serves the next over. |
Common Mistakes
| Error | Coach correction |
|---|---|
| Batter A moves too early and exposes the stumps. | Freeze the bowler at release in rehearsal; insist that A can return to a stable base before contact. |
| The non-striker watches instead of backing up. | Mark a 4–5 m backup cone and score a dot ball whenever B is still inside it at contact. |
| Both batters call late or use different calls. | Make Green/Amber/Red compulsory in the first two blocks; replay any ball with a silent call. |
| The pair chase a boundary after a dot ball. | Keep the scoring target visible and reward a hard-run two equally as a momentum ball. |
| The final ball leaves the wrong batter on strike. | Stop the drill after ball five and ask each player to state the strike plan before ball six. |
Variations & Progressions
Start easier by using side-arm feeds, two boundary riders, and a verbal call of length before release. Progress to a live bowler with four boundary riders, then to a captain-led field that can change after every two balls. For the advanced version, give the bowling team a bonus point for a yorker, slower-ball deception, or run-out chance; the batting pair must then solve the over rather than simply rehearse shots.
Age Adaptations
| Group | Adaptation |
|---|---|
| Under-8 / Under-10 | Use a shorter governing-body pitch length, soft balls, a 25–35 m cone boundary, side-arm feeds, and only Green/Red calls. Do not score risk shots. |
| Under-12 / Under-14 | Retain the pair-calling game, use a reduced outer boundary, and allow the coach to give the length cue one beat before release. Build toward twos before lofted hitting. |
| Under-16 | Use a full or locally prescribed pitch, live bowlers, a 30-yard circle, and the 24-ball score target. Require the last-ball strike decision. |
| Open / senior | Run full match fields, live pace and spin, tactical field changes, and individual batter plans based on match-ups and score state. |
Coach’s finish: A productive acceleration pair is calm, specific and hard to bowl at. They do not need six boundary options; they need two trustworthy zones, decisive running, and a shared answer to the next ball.
References
[1] Marylebone Cricket Club, Law 6: The Pitch — standard pitch dimensions and junior-cricket provision.

