Mastering the 4-4-2 Defensive Shape Transition Under Press
Learn how to drill your team to transition seamlessly from a compact mid-block to an aggressive high press, and recover shape effectively when beaten.
Equipment Needed
1. Overview
Transitioning defensively from a structured block into an aggressive press is one of the most complex tactical maneuvers in modern football. This session focuses on the mechanics of shifting from a compact 4-4-2 mid-block into a coordinated high press when specific triggers occur, and crucially, how to recover the defensive shape using cover shadows if the initial press is bypassed.
This play is designed to help coaches teach their teams how to dictate the opposition's build-up play, force turnovers in dangerous areas, and maintain structural integrity throughout the phases of defensive transition.
2. Setup
- Pitch Dimensions: Full width (64-75m), using the defensive half and middle third (approx. 70m length).
- Players: 11 vs 11 (or 11 vs 8 for focused defensive work).
- Equipment: 1 full-size goal, 3 mini-goals (placed on the halfway line for the defending team to score in upon winning possession), minimum 10 footballs, cones to mark zones.
- Formation: Defending team sets up in a classic 4-4-2. Attacking team sets up in a 4-3-3 or 4-2-3-1 to simulate standard opposition build-up.
3. Step-by-Step Instructions
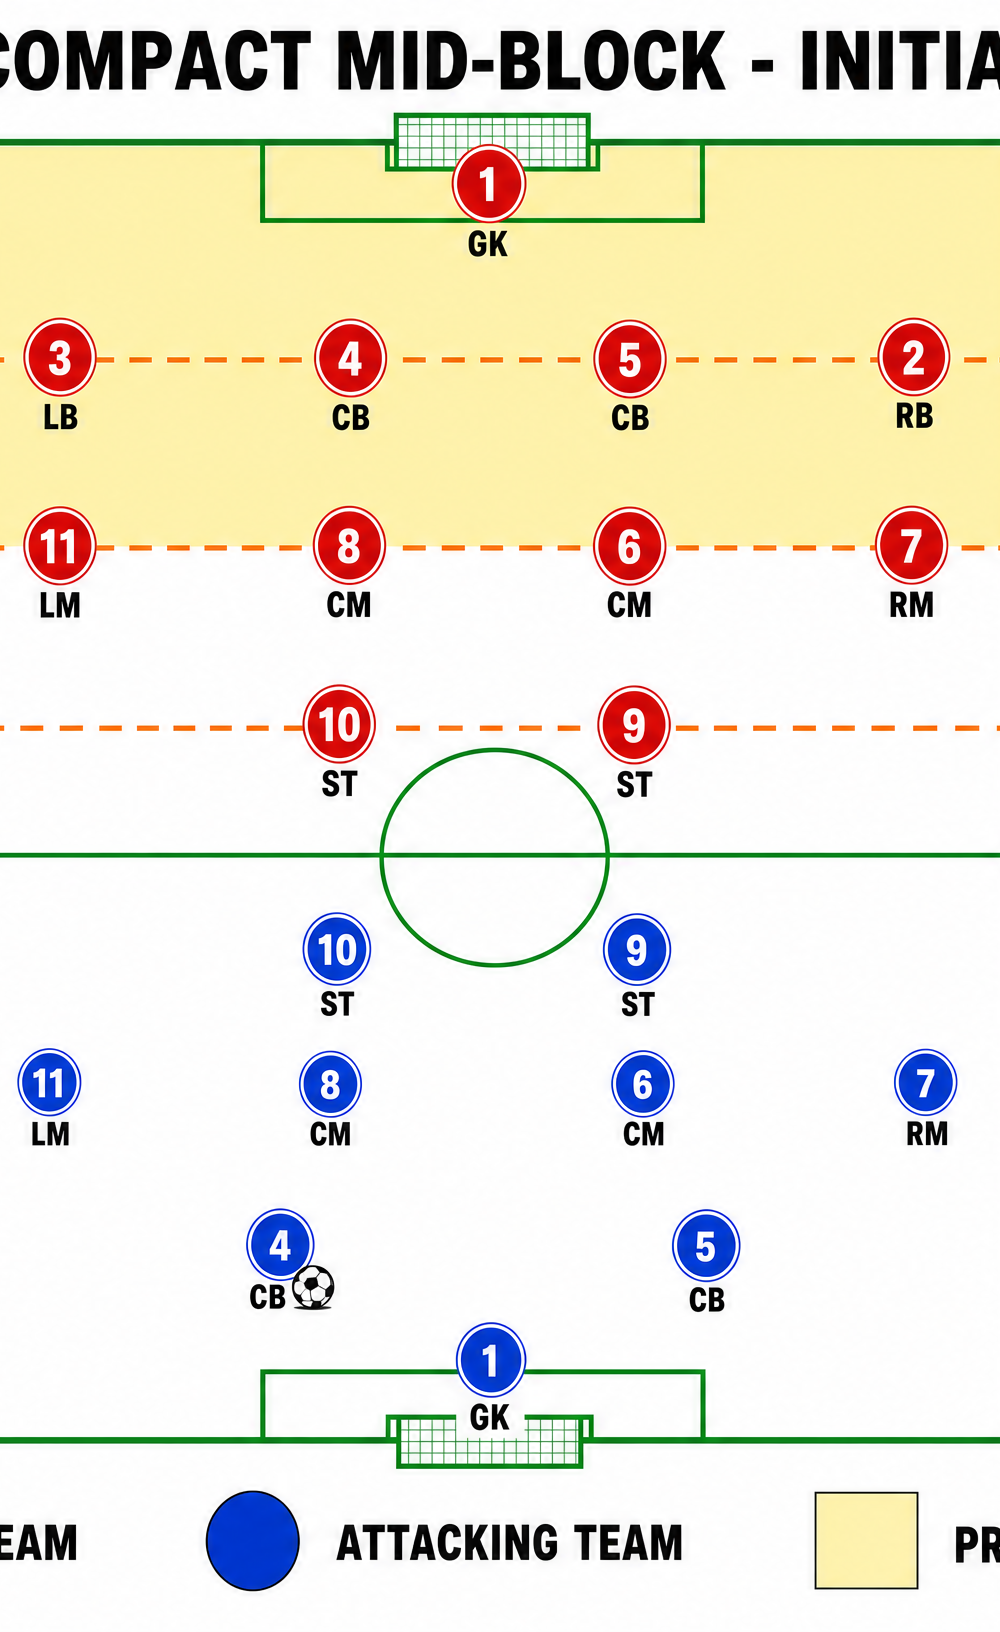
Phase 1: The Initial Mid-Block
- The defending team (Red) starts in a compact 4-4-2 mid-block.
- The defensive line (Back 4) positions themselves approximately 35m from their own goal.
- The midfield line of four sits tightly at 55m, leaving a maximum of 20m between the defensive and midfield lines.
- The two strikers (ST9 and ST10) position themselves around 70m, preventing easy passes through the center.
- The attacking team (Blue) begins build-up play from their center-backs deep in their own half.
- The defending team remains patient, shifting laterally as a unit, waiting for the ball to enter the designated 'Press Trigger Zone' (e.g., a pass to a full-back or a heavy touch by a center-back).
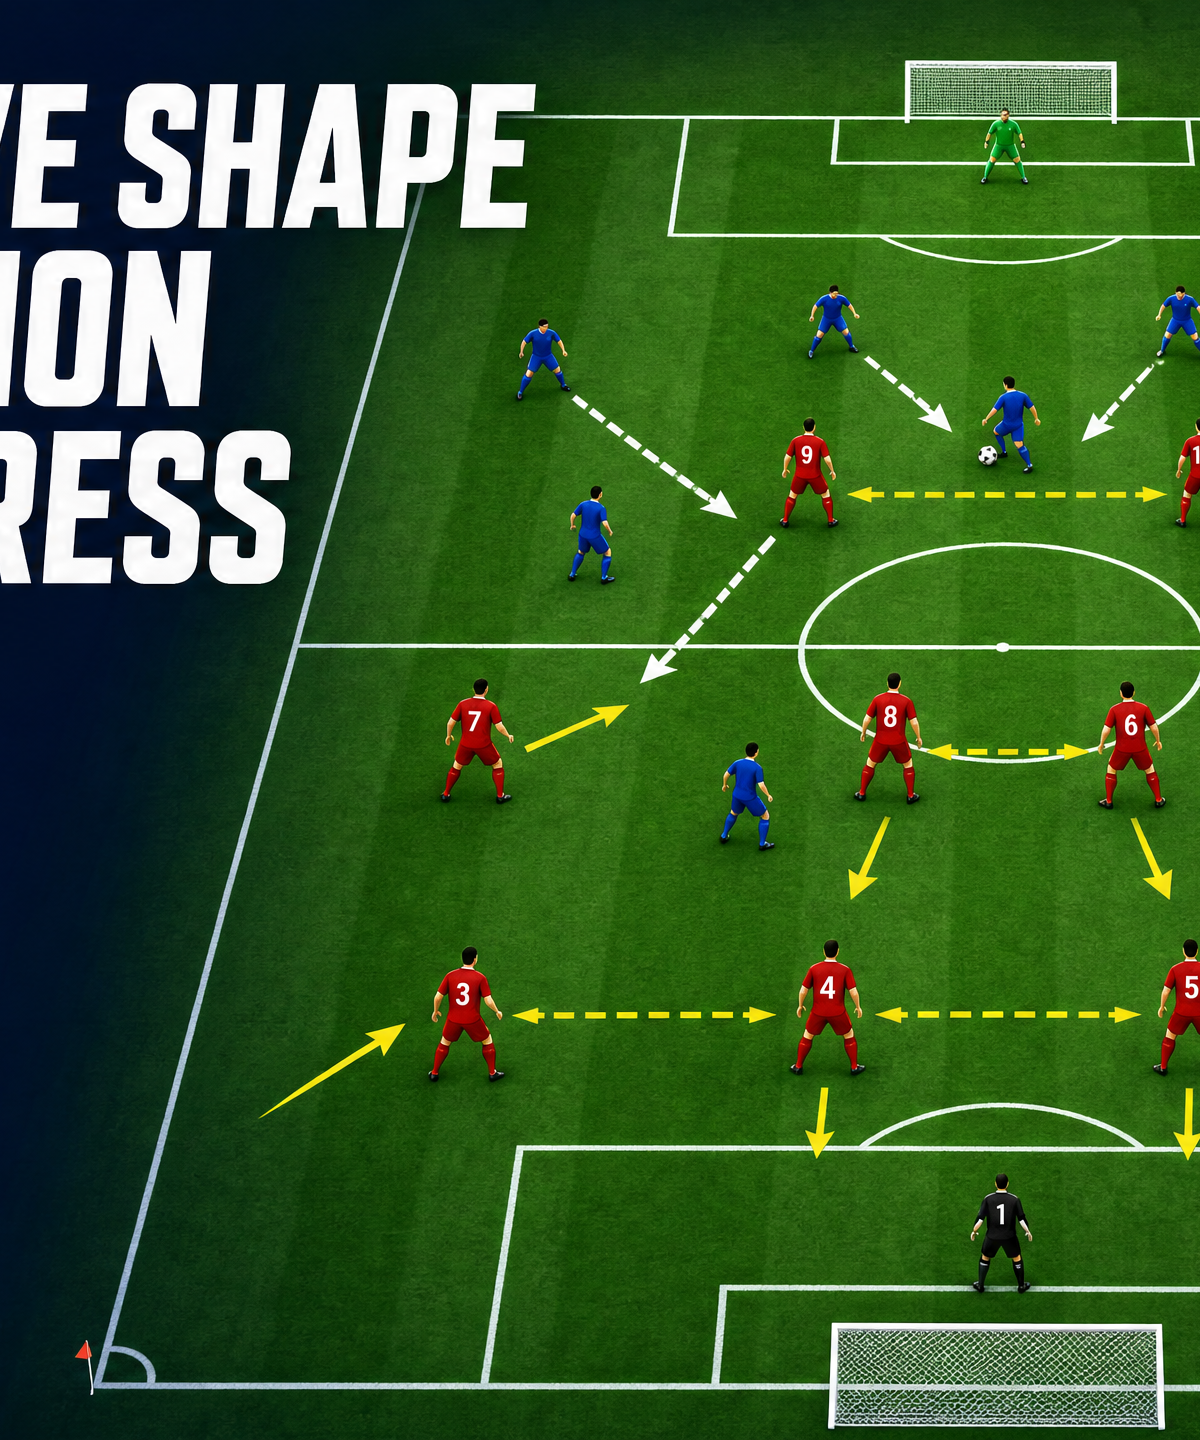
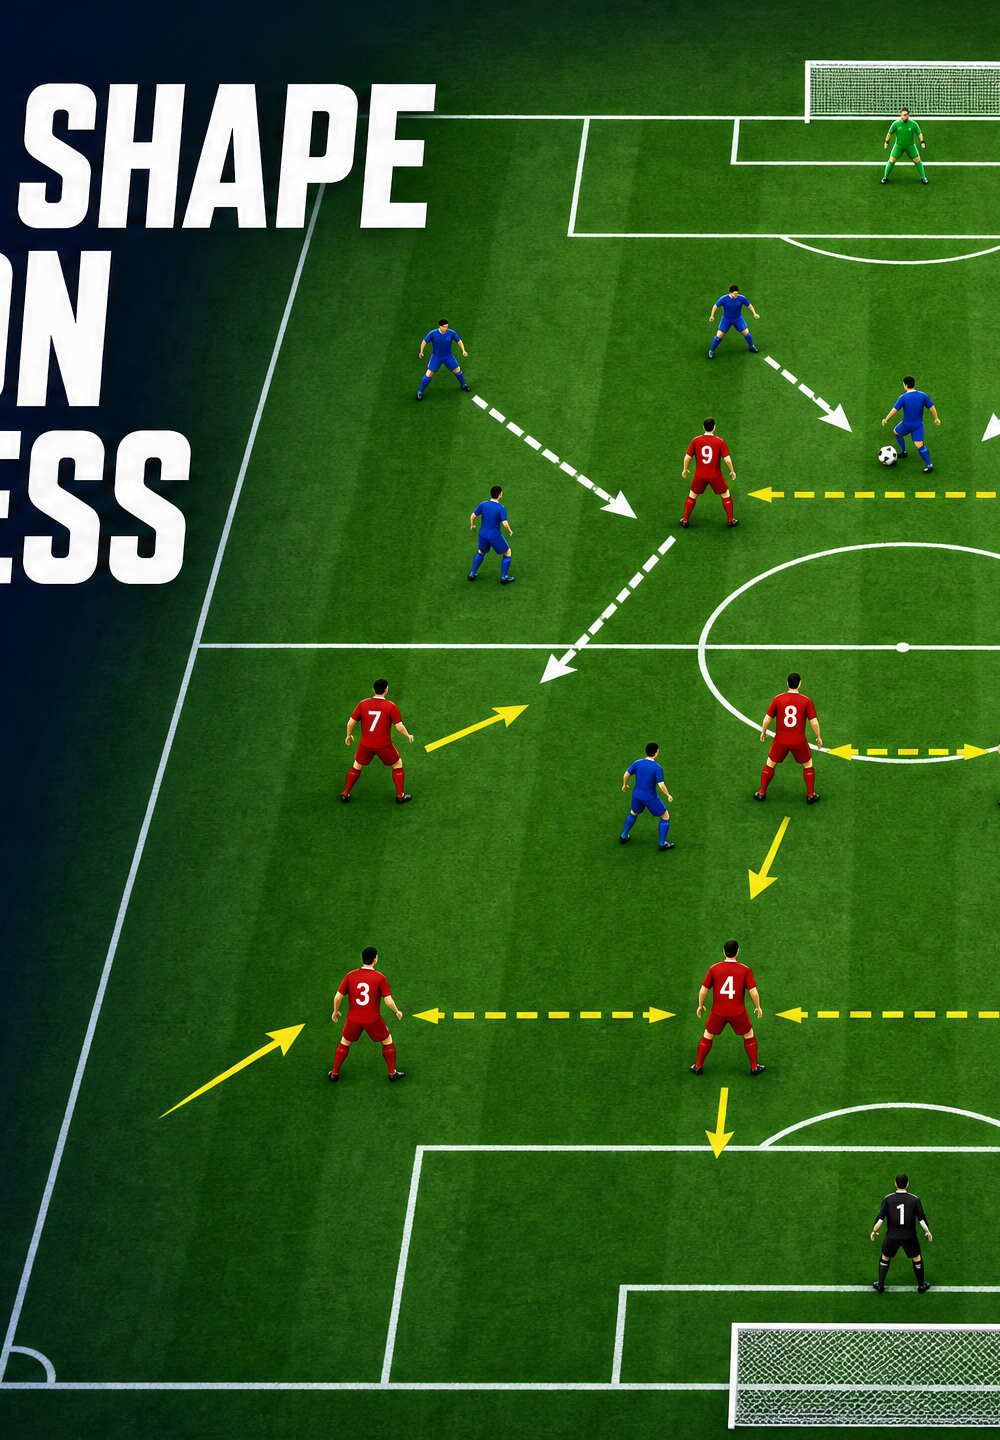
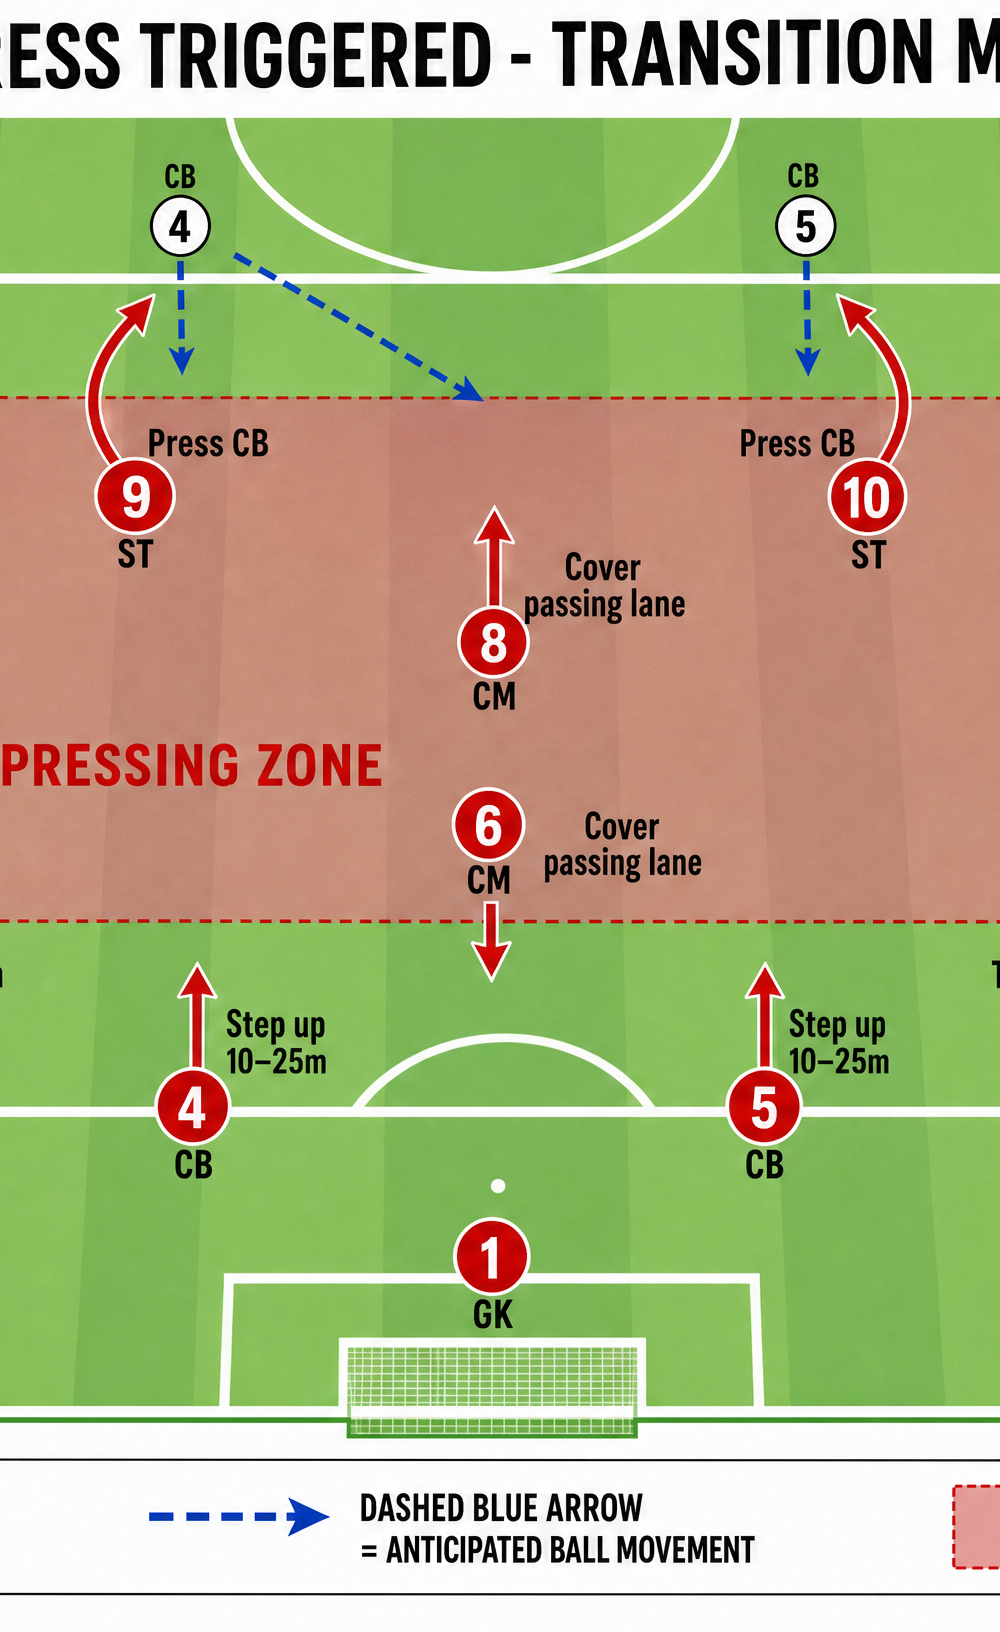
Phase 2: Triggering the Press
- The Trigger: A blue center-back plays a slightly under-hit pass to the blue right-back.
- The Initial Press: The Red Left Midfielder (LM11) sprints forward on a curved run to press the right-back, cutting off the passing lane down the line.
- Striker Support: ST9 presses the center-back to prevent a return pass, while ST10 shifts across to cover the opposite center-back.
- Midfield Shift: The central midfielders (CM8 and CM6) step up aggressively to lock on to the opposition's central midfielders, stepping into the 'Pressing Zone'.
- Defensive Line Squeeze: Crucially, the entire back four (LB3, CB4, CB5, RB2) must step up 10-15m simultaneously to compress the space and prevent the opposition from playing over the press. The full-backs tuck in 5m to remain compact.
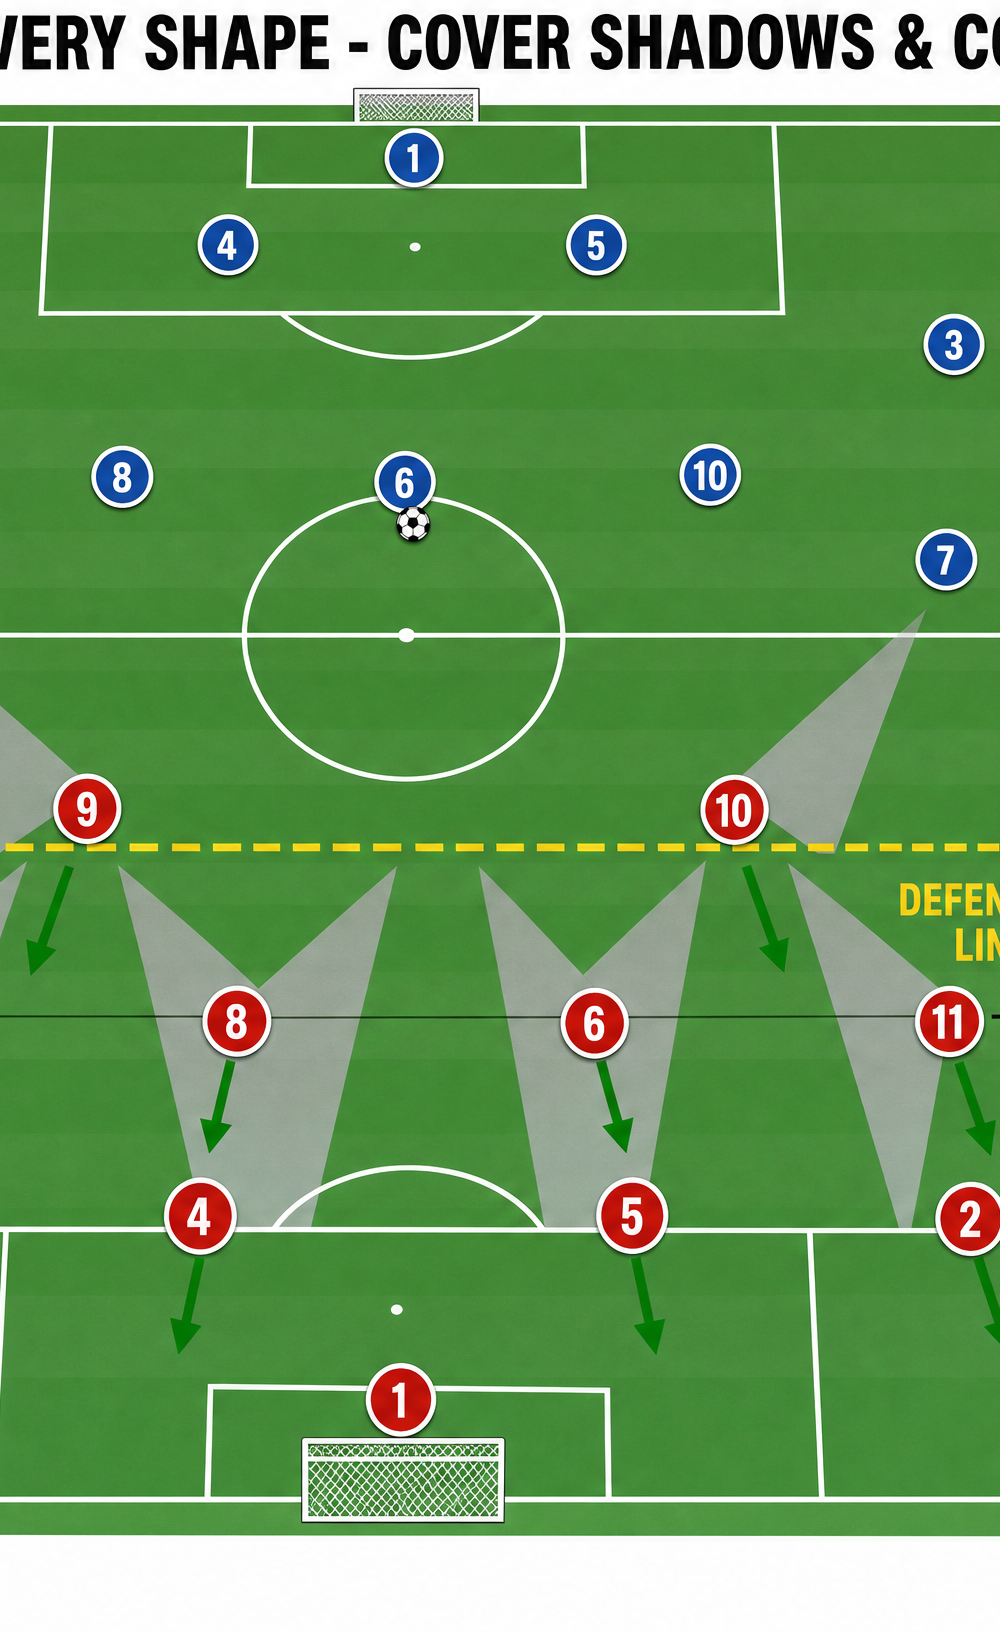
Phase 3: Recovery Shape
- The Scenario: The attacking team successfully bypasses the initial press with a long diagonal ball or quick combination play.
- Immediate Drop: The entire defending team must immediately drop and sprint back toward their own goal to re-establish the defensive line.
- Cover Shadows: As players recover, they must use 'cover shadows'—positioning their bodies between the ball carrier and potential passing options to slow down the attack.
- Reforming the Block: The back four drops quickly to the 15m line, while the midfield recovers to the 30m line, instantly recreating the compact 4-4-2 low block.
- Delaying Action: The closest player to the ball applies passive pressure to delay the attack while teammates recover into their structured positions.
4. Key Coaching Points
- Compactness is Non-Negotiable: Maintain a maximum of 15-20m between the defensive and midfield lines at all times. If the midfield presses, the defense MUST step up.
- Curved Pressing Runs: Attackers and wide midfielders must curve their pressing runs to cut off passing lanes (cover shadows) while applying pressure to the ball carrier.
- Communication on Triggers: The trigger to press must be recognized collectively. A vocal call (e.g., 'STEP!') from a center-back or central midfielder helps synchronize the movement.
- Aggressive Squeeze: The backline must be brave. Stepping up leaves space behind, but failing to step up creates massive gaps between the lines that good teams will exploit.
- Sprint to Recover: Recovery runs must be done at maximum intensity. Jogging back into shape will result in conceding high-quality chances.
5. Common Mistakes
- Disconnected Pressing: One or two players press while the rest of the team stays deep, creating huge gaps in the midfield.
- Straight-Line Pressing: Approaching the ball carrier in a straight line, allowing them to easily pass around the pressing player.
- Deep Defensive Line: The back four refusing to step up when the midfield presses, driven by a fear of balls over the top.
- Ball Watching on Recovery: Players jogging back and watching the ball rather than sprinting to their defensive zones and picking up runners.
6. Variations & Progressions
- Progression 1: Time Limit on Build-Up: Give the attacking team only 10 seconds to cross the halfway line, forcing the defending team to press higher and faster.
- Progression 2: Overload the Midfield: Add a neutral player ('Joker') who always plays for the attacking team, forcing the defending team to communicate better and pass on marking responsibilities.
- Variation 1: Change the Trigger: Instead of pressing on a wide pass, set the trigger as a pass back to the goalkeeper or a specific center-back receiving the ball.
7. Age Adaptations
- Under 10s/12s: Focus primarily on the basic shape (e.g., a 3-3-1 or 2-3-2 depending on format) and the concept of moving together as a unit like a block of ice.
- Under 14s: Introduce specific pressing triggers and the concept of cover shadows.
- Under 16s/Open: Demand high-intensity pressing, synchronized defensive line movements, and rapid recovery sprints. Introduce complex variations based on opposition formations.