Mastering the Double-Screen Shooting Circle Play
Equip your attacking unit with a structured double-screen set play designed to isolate your Goal Shooter and create high-percentage scoring opportunities inside the shooting circle.
Equipment Needed
1. Overview
The Double-Screen Shooting Circle Play is an advanced attacking set play designed to create isolation and high-percentage scoring opportunities for your primary shooter. By utilizing coordinated off-the-ball movement and two successive screens set by the Goal Attack (GA) and Wing Attack (WA), this play disrupts the defensive structure — particularly against tight one-on-one marking or a defensive zone setup. It is most effective when executed quickly from a centre pass or a free pass near the goal third transverse line, where the Centre has time to survey the circle before feeding.
The core principle is simple: force the Goal Keeper to navigate around two stationary obstacles in rapid succession, creating a split-second window of separation that your Goal Shooter can exploit for a clean, balanced shot.
2. Setup
Court Area: Attacking third — specifically the goal third and the 4.9m radius shooting circle.
Players Involved:
| Position | Role | Starting Location |
|---|---|---|
| GS (Goal Shooter) | Primary cutter and shooter | Deep left side of the shooting circle |
| GA (Goal Attack) | First screener (Screen 1) | Top-centre of the shooting circle edge |
| WA (Wing Attack) | Second screener (Screen 2) | Right wing, just outside the circle |
| C (Centre) | Ball carrier and feeder | Centre of the goal third, ~6m from circle edge |
Equipment Needed: 1 Netball, 1 Goal Post, training bibs (2 colours), cones (optional for marking screen positions during walk-throughs).

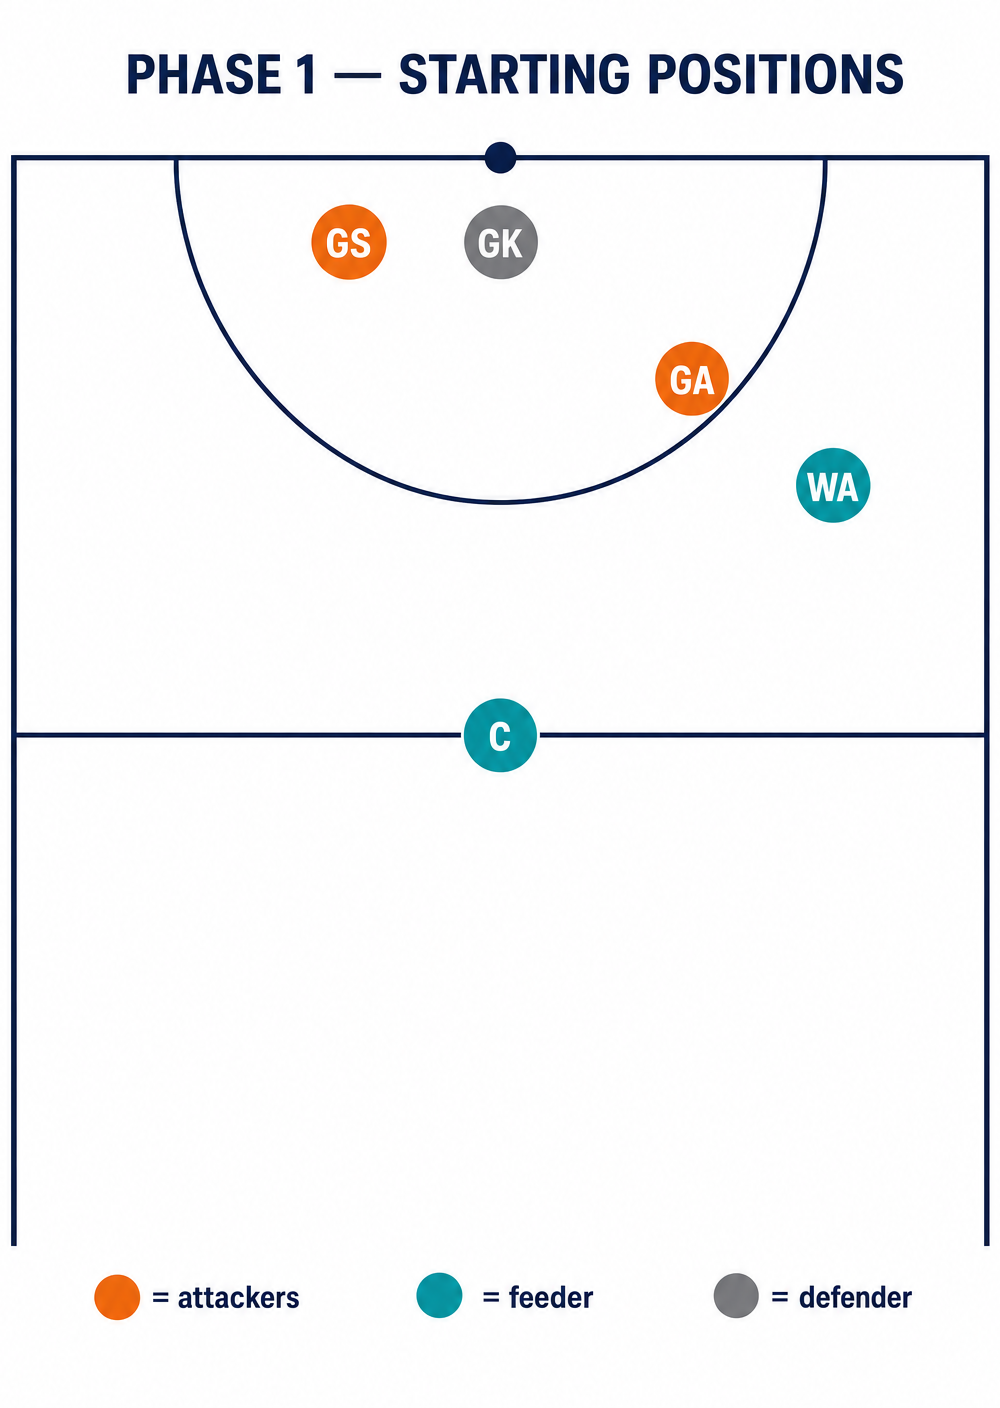
Diagram 1 — Starting positions. GS begins deep left, GA holds the circle edge centre, WA positions on the right wing, C holds the ball at the top of the goal third.
3. Step-by-Step Instructions
Set the Formation. Position players as described in the setup table above. The C holds the ball at the top of the goal third, approximately 6–8 metres from the shooting circle edge. The GS is deep left, the GA is at the circle edge centre, and the WA is on the right wing just outside the circle.
Initiate the Play. The C signals the play (a verbal call such as "Blue" or a raised fist). The GS makes a sharp, deliberate fake movement toward the baseline to draw the GK slightly out of their optimal defensive position.
Screen 1 is Set. The GA plants their feet in a wide, strong stance at the top of the circle — this is Screen 1. The GA must be stationary before the GS arrives. The GA's body should be square to the sideline, creating maximum width.
The First Cut. The GS cuts hard off the GA's screen, running shoulder-to-shoulder past the GA. The GK must now decide whether to go over the top or fight through the screen, creating the first moment of separation.
Screen 2 is Set. As the GS completes the first cut, the WA steps into a strong screening position on the right side of the circle edge — this is Screen 2. The WA must be set before the GS arrives.
The Second Cut. The GS cuts tightly around the WA's screen, arriving in open space on the right side of the shooting circle, approximately 2–3 metres from the post. This is the primary shooting position.

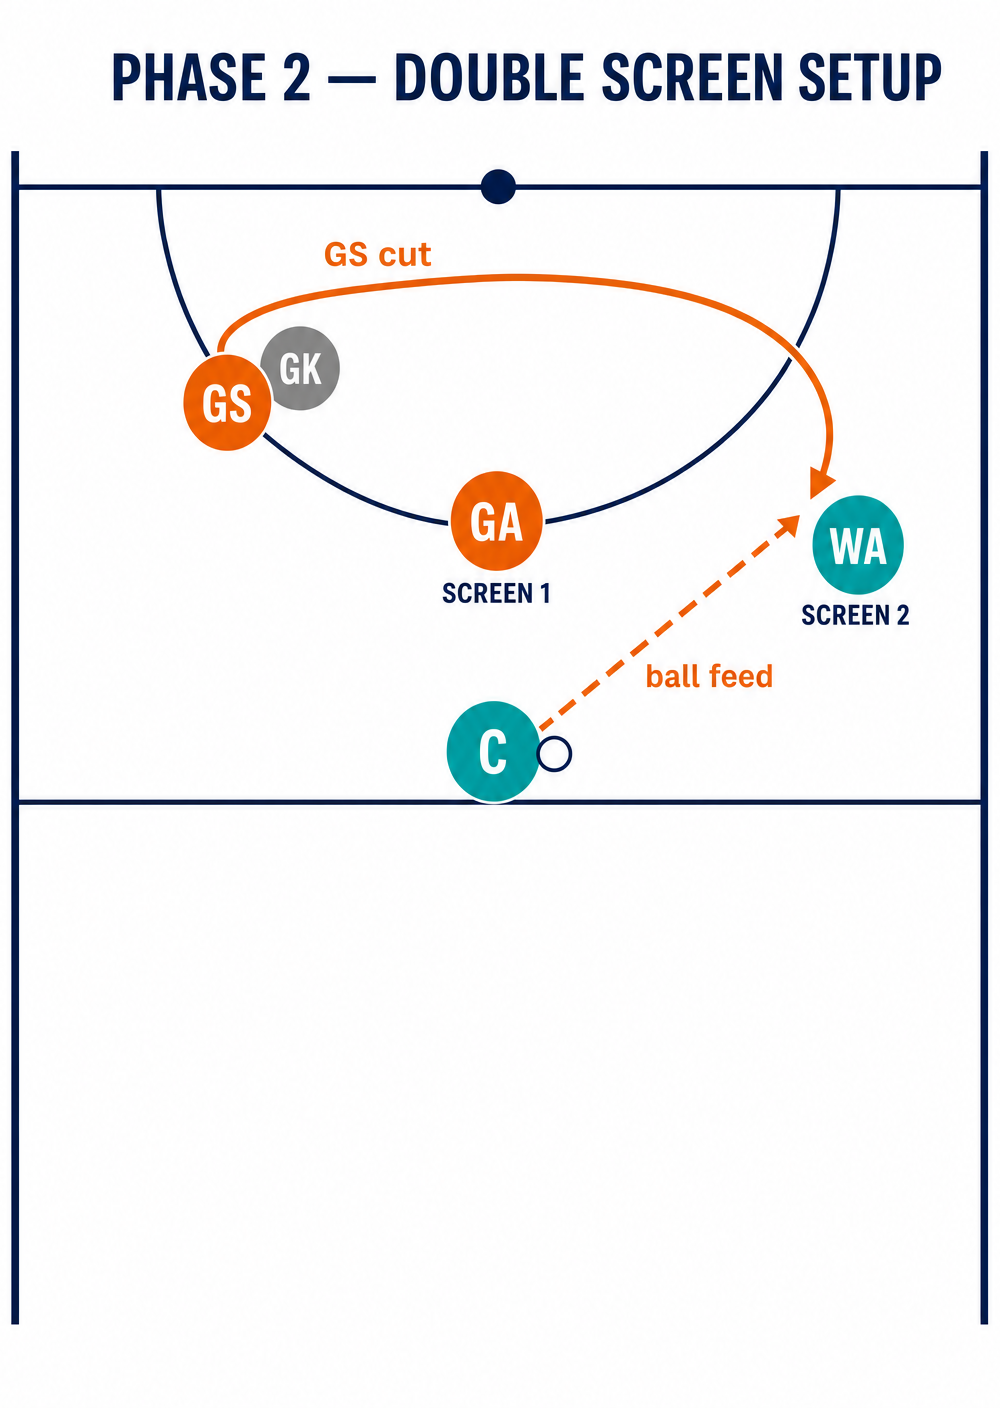
Diagram 2 — The double-screen movement. GS cuts from the left post, around Screen 1 (GA) and Screen 2 (WA), arriving in open space on the right. The C prepares to feed.
The Feed. The C delivers a sharp, accurate pass to the GS as they arrive in the open space. A chest pass is preferred for speed; a lob pass may be used if the GK recovers quickly. The pass should be to the GS's hands — never behind them.
The Shot. The GS receives the ball in a balanced stance, turns to face the post, and takes the shot. The GS should aim to shoot within 1–2 seconds of receiving the ball to prevent the GK from recovering.
Secondary Option — GA Peel. If the GS is covered after the second screen, the GA peels off Screen 1 and cuts into the space vacated by the GS on the left side of the circle. The C reads this and delivers the secondary feed to the GA, who can shoot or hold for the GS to reposition.

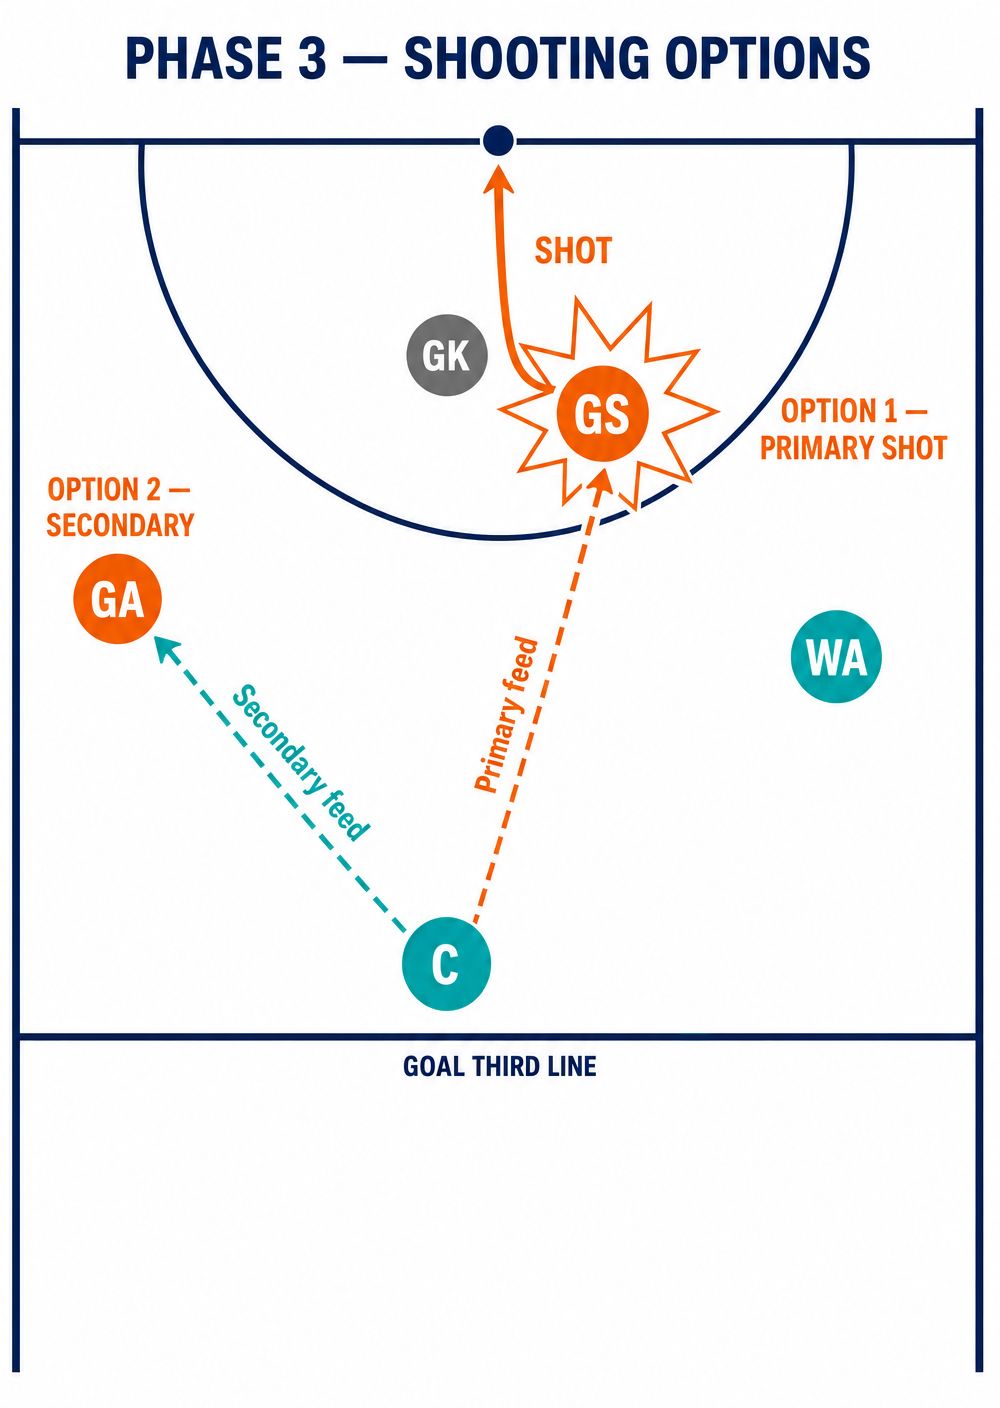
Diagram 3 — Shooting options. GS is the primary target (Option 1). If covered, GA peels to the left side of the circle as the secondary option (Option 2). The C reads and selects the feed.
4. Key Coaching Points

Timing is Everything. The single most common reason this play breaks down is the GS cutting before the screens are set. Drill the sequence: Screen 1 set → GS cuts → Screen 2 set → GS cuts. The GS must learn to read when each screener is planted before committing to the cut.
Strong, Legal Screens. The GA and WA must establish a wide base and hold their ground completely. Emphasise that screeners must not move into the path of the defender — this is an offensive contact penalty. The screener's job is to be an immovable obstacle, not to block the defender actively.
Shoulder-to-Shoulder Cuts. The GS must cut as close to each screener as possible. Even a half-metre gap is enough for an athletic GK to slip through. Drill this by placing a cone immediately beside each screener and requiring the GS to brush past it.
Feeder Vision and Patience. The C must resist the urge to pass early. Encourage the C to hold the ball until the GS clears the second screen and is visibly in open space. The C should also keep their eyes moving between the GS and the GA to disguise the primary target.
Balanced Shooting Stance. After two sharp cuts, the GS will arrive with momentum. Spend time drilling the GS's ability to receive the ball and settle into a balanced shooting stance quickly — feet shoulder-width apart, weight centred, eyes on the ring.
Communication. All three movement players (GS, GA, WA) must know the play call. Use a simple verbal or visual signal to ensure everyone initiates at the same moment.
5. Common Mistakes

Moving Screens. The most penalised error. Screeners shift their feet or lean into the defender as they approach. Correct this by walking through the play and having the coach stand in as the defender to test whether the screen is truly stationary.
Wide Cuts. The GS leaves too much space between themselves and the screener, allowing the GK to recover. Use a cone drill: place a cone 30cm from the screener and require the GS to cut between the cone and the screener.
Telegraphed Passes. The C locks their eyes on the GS throughout the play, alerting the defending GD or WD to the intended pass. Encourage the C to use head fakes and look-away passes to disguise the feed.
Premature Movement. The GS initiates the cut before the screener is set, collapsing the timing of the entire play. Introduce a "freeze" drill where screeners must call "set" before the GS is allowed to move.
Flat Cuts. The GS runs in a straight line across the circle rather than curving tightly around each screen. A flat cut reduces the effectiveness of the screen. Drill curved, tight cutting paths using cones laid in an arc.
6. Variations & Progressions

The Screen-and-Roll. After setting Screen 1, the GA does not hold position — instead, they immediately roll off the defender and cut toward the post along the baseline. This gives the C a third passing option and forces the defense to make a split-second decision between covering the GS and the rolling GA.
The Dummy Screen. The GS fakes using Screen 1 (runs toward it then cuts back door toward the baseline), drawing the GK in the wrong direction before the GA pivots to become a receiver rather than a screener. This variation is highly effective against defenders who anticipate the standard cut.
Full Defensive Pressure. Once the play is learned with passive defense, introduce an active GK, GD, and WD. The attacking unit must now execute the play against realistic defensive pressure, reading the defense and selecting the correct option (primary or secondary) in real time.
7. Age Adaptations
Under 10s and Under 12s. Simplify to a single-screen concept. Focus on the GS learning to read a screen and cut off it. Walk through the movement at half-speed without defenders. Use cones to mark positions and give clear verbal cues for each step.
Under 14s and Under 16s. Introduce the full double-screen sequence. Emphasise timing, strong screening technique, and sharp cuts. Add a passive defender (GK) who jogs at 50% pace to allow the GS to experience the timing without full defensive pressure.
Open and Advanced. Execute at full game speed with active, aggressive defense across all defensive positions. Focus on reading the defense in real time, executing the secondary option (GA peel) seamlessly, and maintaining composure under pressure for the final shot.