Elite Slip Cordon Reaction & Edge Catching Drill
Develop razor-sharp reflexes, soft hands, and perfect spacing in your slip cordon with this progressive reaction drill designed for match-scenario readiness.

Equipment Needed
1. Overview
Slip catching requires a unique combination of intense concentration, explosive lateral movement, and soft hands. In modern cricket, matches are frequently won or lost in the slip cordon. This drill is designed to train fielders to react instinctively to deflections rather than anticipating the ball's path. By using a rebound board or catching cradle, coaches can simulate the unpredictable nature of an edge off the bat.
This drill bridges the gap between basic catching practice and live match scenarios, forcing fielders to stay low, watch the ball closely, and move their feet decisively. It is highly effective for building confidence and establishing the correct spacing between the wicketkeeper and the slip fielders.
2. Setup
Proper setup is crucial for simulating match conditions. Ensure the spacing is accurate so fielders learn their exact zones of responsibility.
- Location: Outfield or practice nets (a flat, even surface is essential).
- Equipment: 6-8 cricket balls, a rebound board or catching cradle, a bat (for progressions), and cones for marking positions.
- Players: 1 Coach/Feeder, 1 Wicketkeeper (optional but recommended), 3-4 Slip Fielders.
Field Placement
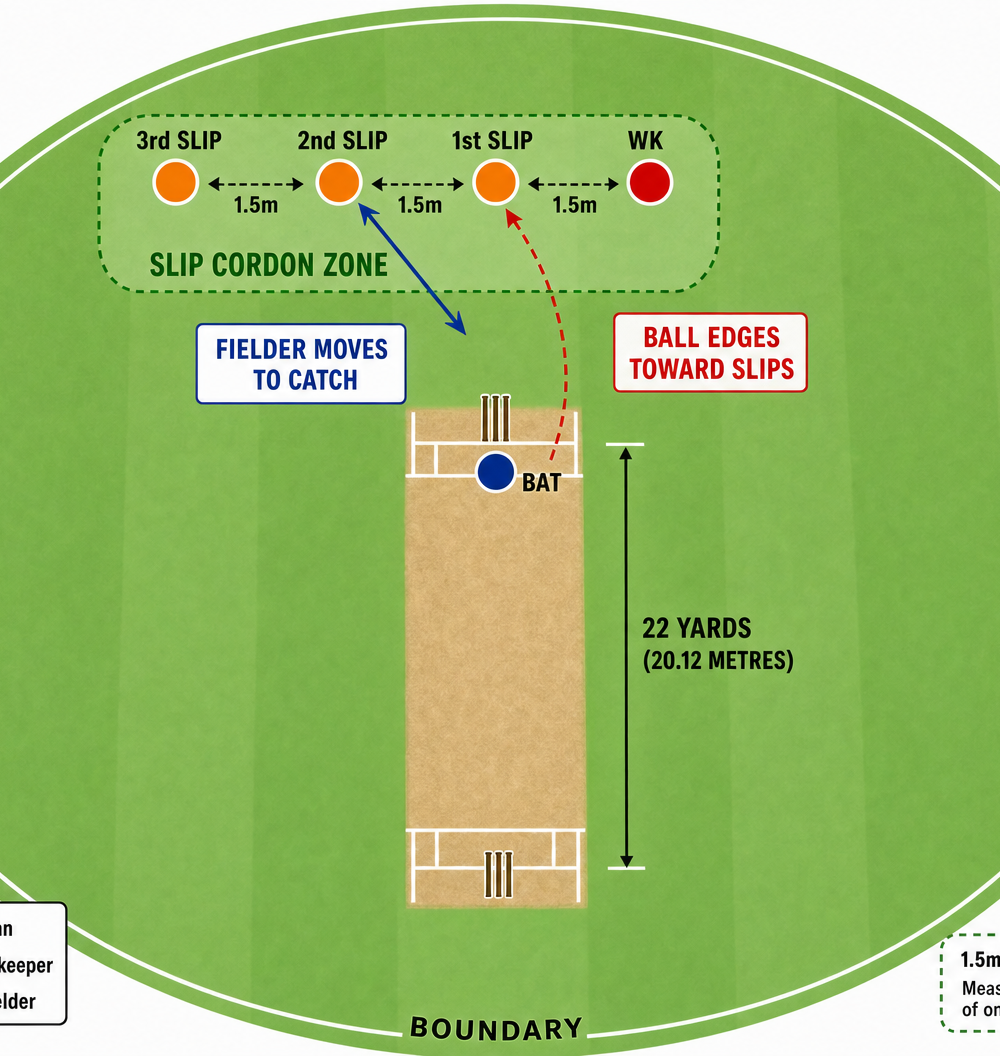
- Position the wicketkeeper at a standard depth for a pace bowler.
- Mark the 1st slip position approximately 1.5 metres to the left (for a right-handed batsman) of the wicketkeeper.
- Mark the 2nd and 3rd slip positions with exactly 1.5 metres of spacing between each fielder.
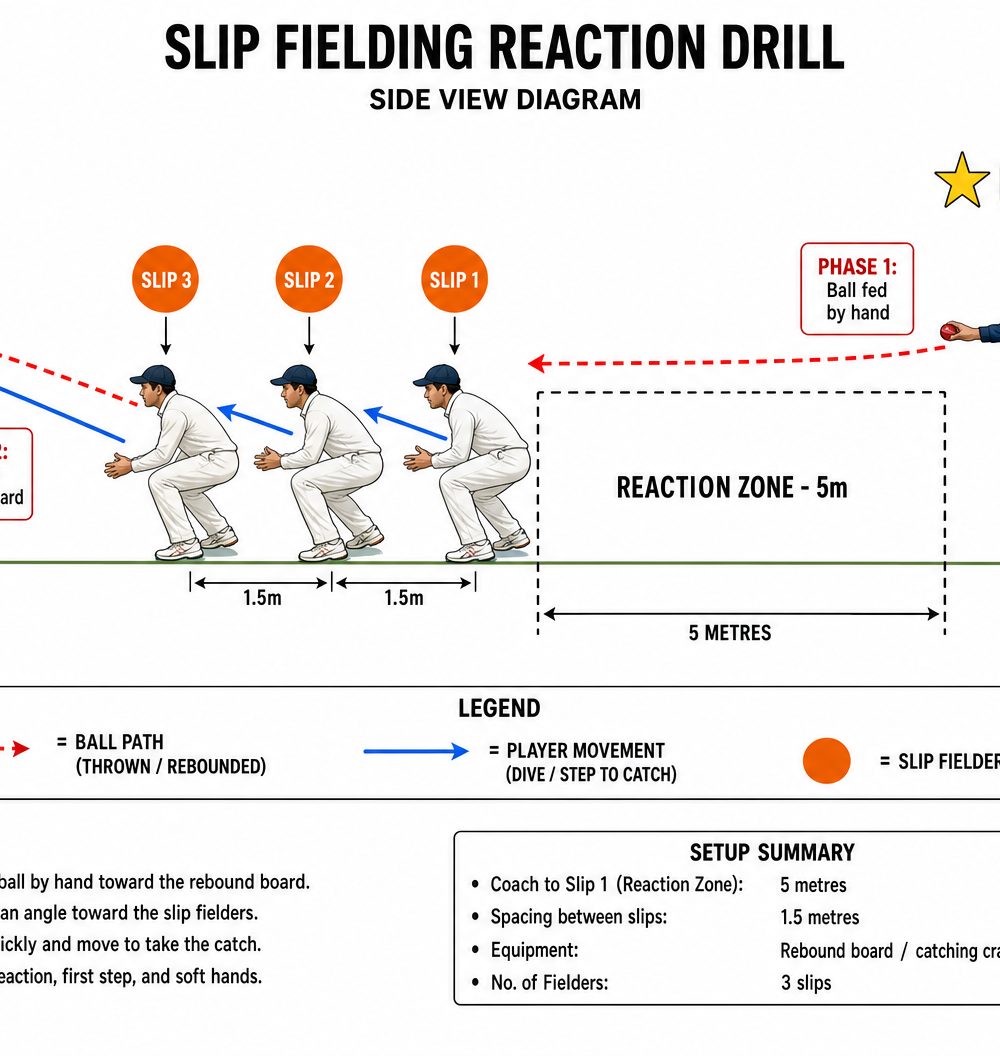
- Place the rebound board 5 metres in front of the slip cordon, angled slightly to simulate the trajectory of an edge.
3. Step-by-Step Instructions
Run this drill in focused, high-intensity sets to maintain concentration.
Phase 1: The Rebound Reaction
- Assume the Position: The slip fielders adopt their crouched, ready positions. Weight should be on the balls of the feet, knees bent, hands relaxed and resting near the knees or lightly on the ground.
- The Feed: The coach stands beside the fielders and throws the ball firmly at the rebound board. The throw should vary in pace and angle.
- The Reaction: The fielders must react to the unpredictable deflection off the board. The closest fielder must call "Mine!" to avoid collisions.
- The Catch: The fielder moves their feet towards the line of the ball, catching it with soft hands, giving with the momentum of the ball.
- Rotation: After 6 deliveries, fielders rotate positions.
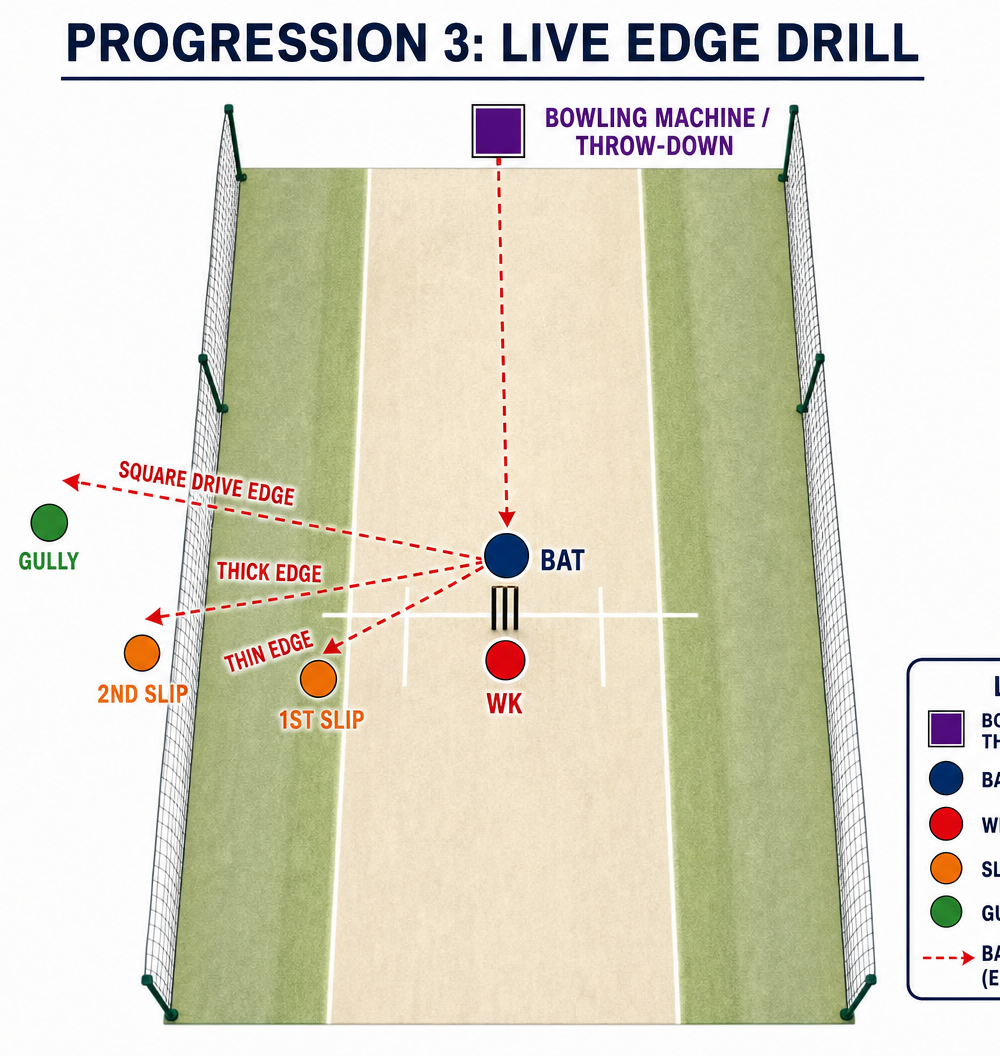
Phase 2: Live Edge Simulation
- Remove the Board: Take away the rebound board.
- Introduce the Bat: The coach stands 10-15 metres away with a bat.
- The Feed: A throw-down specialist feeds the ball to the coach, who intentionally edges towards the slip cordon.
- Match Intensity: Fielders must now read the angle of the bat and react to a true edge.
4. Key Coaching Points
- Stay Low: Fielders must stay in their crouch until they know the height of the ball.
- Soft Hands: The hands should absorb the pace of the ball, drawing it into the body.
- Watch the Ball, Not the Bat: Primary focus must be on the ball from the moment it leaves the feeder's hand.
- Weight Distribution: Weight slightly forward on the balls of the feet for explosive lateral movement.
- Clear Calling: Early and decisive calling is essential to prevent dropped catches.
5. Common Mistakes
- Snatching at the Ball: Pushing hands out hard, causing the ball to bounce out. Correction: Reinforce soft hands.
- Standing Up Too Early: Breaking posture before the ball is edged. Correction: Have fielders touch the ground until the ball is struck.
- Incorrect Spacing: Standing too close or too far apart. Correction: Use cones to enforce the 1.5m spacing rule.
- Flat-Footedness: Weight on the heels. Correction: Check posture before every feed.
6. Variations & Progressions
- Progression 1: Increase pace of feeds or use a bowling machine to decrease reaction time.
- Progression 2: Force fielders to take catches with their non-dominant hand.
- Variation 1: Add a batsman swinging and missing to create visual distraction.
7. Age Adaptations
- Under 10s / Under 12s: Use softer balls. Reduce distance to the rebound board. Focus on correct ready position and soft hands.
- Under 14s / Under 16s: Introduce standard cricket balls. Increase pace. Begin emphasizing lateral movement and diving.
- Open / Seniors: Full match intensity with bowling machines, varied bounce, and strict spacing enforcement.