Exit Strategy: The 22-Metre Clearance and Counter-Attack Play
Master the art of relieving pressure and turning defence into attack with this comprehensive exit strategy from your own 22-metre line.
Equipment Needed
1. Overview
Exiting your own 22-metre area effectively is one of the most critical aspects of modern Rugby. A poorly executed exit strategy invites sustained pressure, whereas a clinical exit not only relieves that pressure but can also immediately transition your team into a dangerous attacking position. This set play is designed to provide a structured, low-risk method for clearing your lines while simultaneously setting up a dynamic counter-attack should the opposition field the kick poorly. It relies on quick ball from the base, a precise territorial kick from the fly-half, and an aggressive, coordinated chase from the back three and loose forwards.
2. Setup
To run this set play effectively in a training environment, you will need the following setup:
- Pitch Area: A full-width pitch (70m) from the try line to the halfway line, focusing on the area between the try line and the 22-metre line.
- Equipment: 4-5 match balls, 10-15 cones to mark the desired kicking zones and defensive alignment, and bibs to differentiate the attacking and defending teams.
- Player Positions: A full starting XV for the attacking team. The defending team should have at least a front row for the scrum, a backline to simulate defensive pressure, and a back three to field the kick.
3. Step-by-Step Instructions
Phase 1: The Scrum Exit
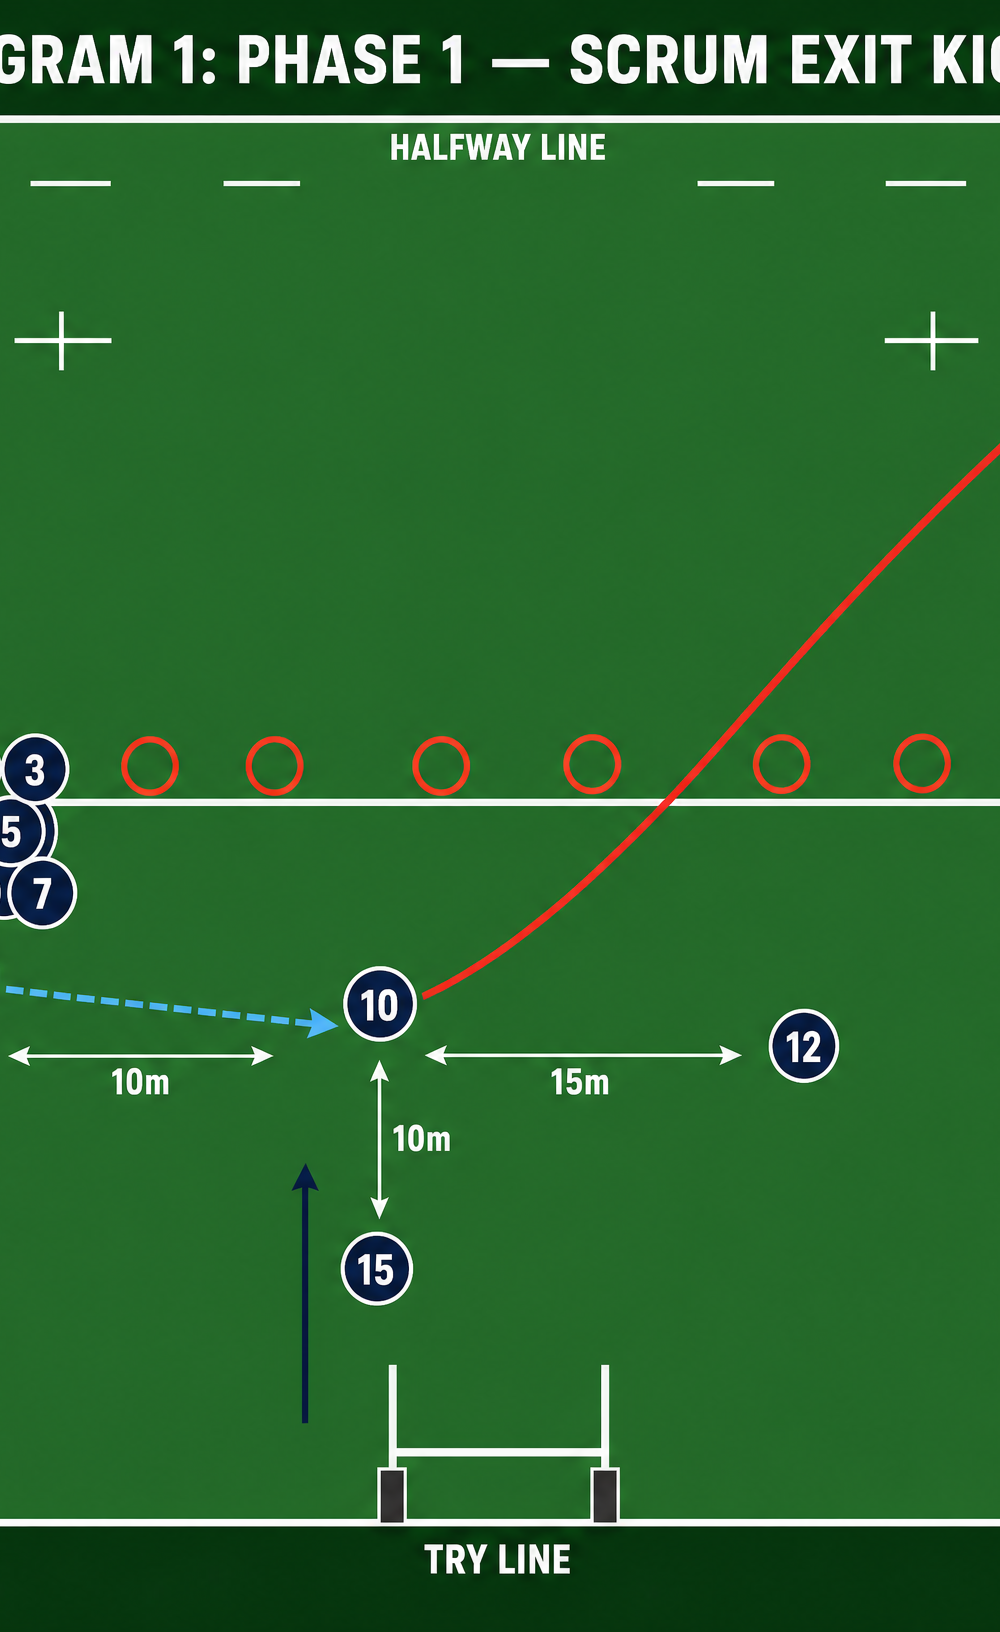
- Set the Platform: The forwards must provide a stable scrum platform on the left side of the pitch, inside the 22-metre line. The number 8 (8) controls the ball at the base.
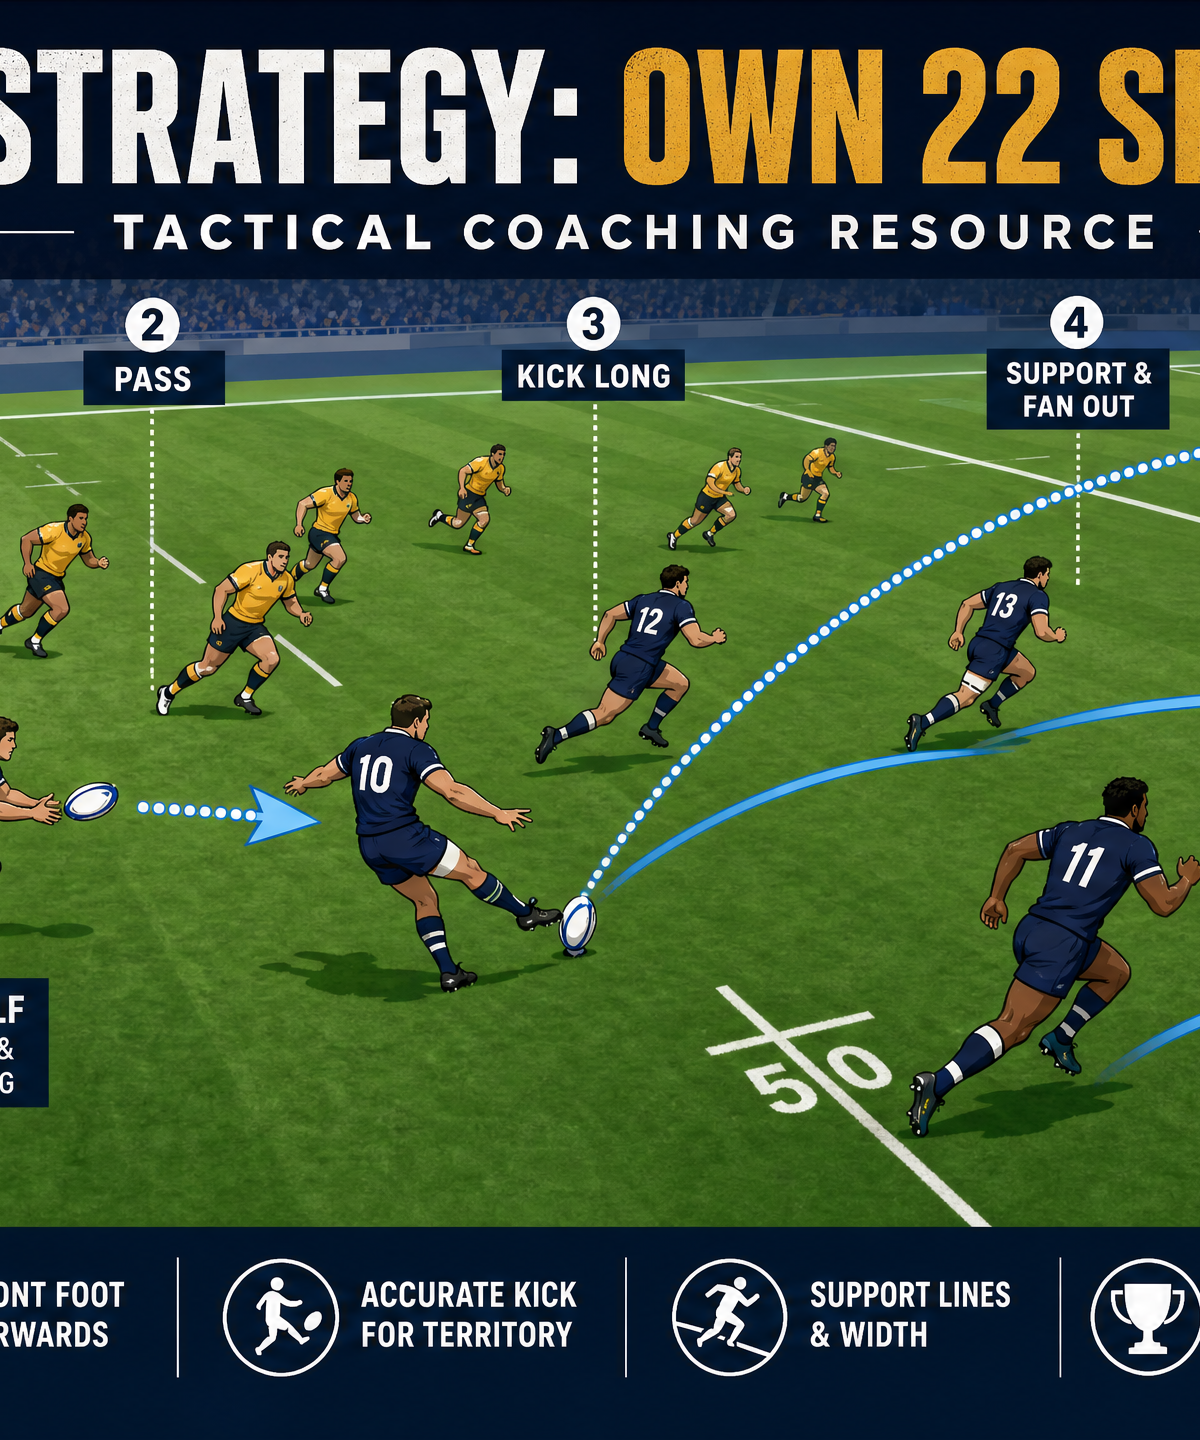
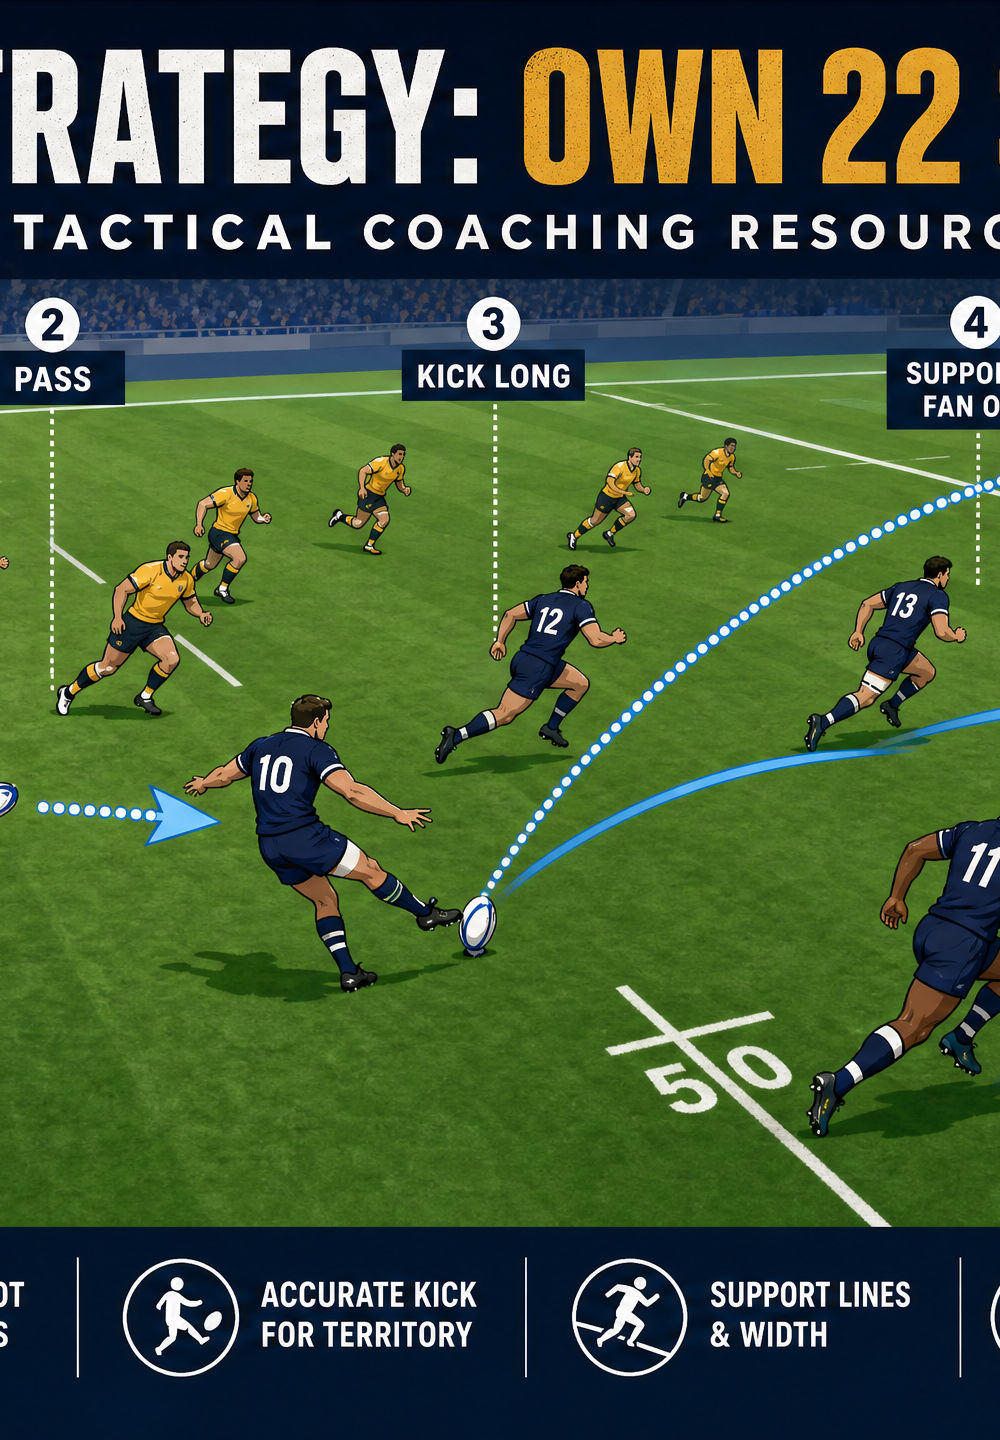
- The Quick Delivery: The scrum-half (9) must clear the ball rapidly and accurately to the fly-half (10), who is positioned approximately 10 metres deep to ensure sufficient time and space.
- The Clearance Kick: The fly-half (10) receives the ball and immediately executes a long, high diagonal kick towards the right touchline. The aim is to find touch as far upfield as possible, or to force the opposition back three to field the ball under immense pressure near the touchline.
- The Chase: As soon as the ball is kicked, the right wing (14), outside centre (13), and fullback (15) must sprint aggressively downfield to contest the ball or tackle the receiver immediately upon catching it.
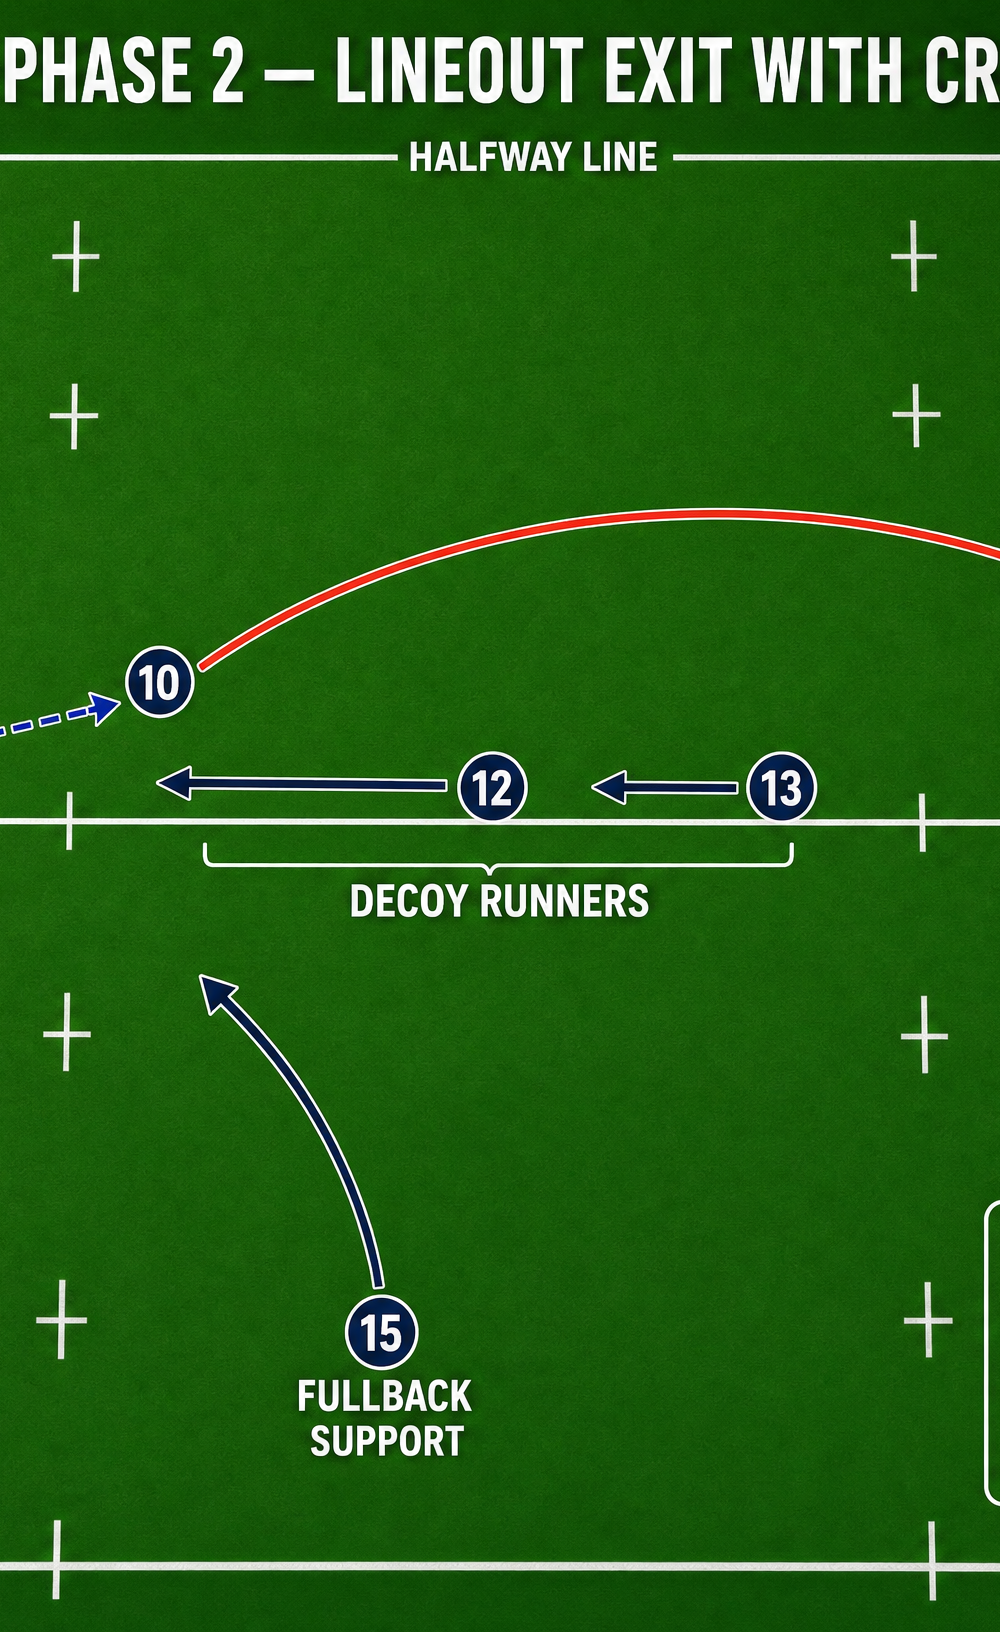
Phase 2: Lineout Exit Variation
- The Lineout Setup: If the exit originates from a lineout on the left touchline, the forwards execute a clean catch and deliver the ball quickly off the top to the scrum-half (9).
- Decoy Runners: As the ball is passed to the fly-half (10), the inside centre (12) and outside centre (13) run hard, flat decoy lines to the left, drawing the defensive line's attention and holding them in place.
- The Cross-Kick: The fly-half (10) spots the space on the right wing and executes a precise cross-field kick targeting the right wing (14), who has held their width on the touchline.
- Support Play: The fullback (15) tracks across to support the right wing (14) in case the ball is gathered, providing an immediate offload option to break the defensive line.
Phase 3: The Counter-Attack
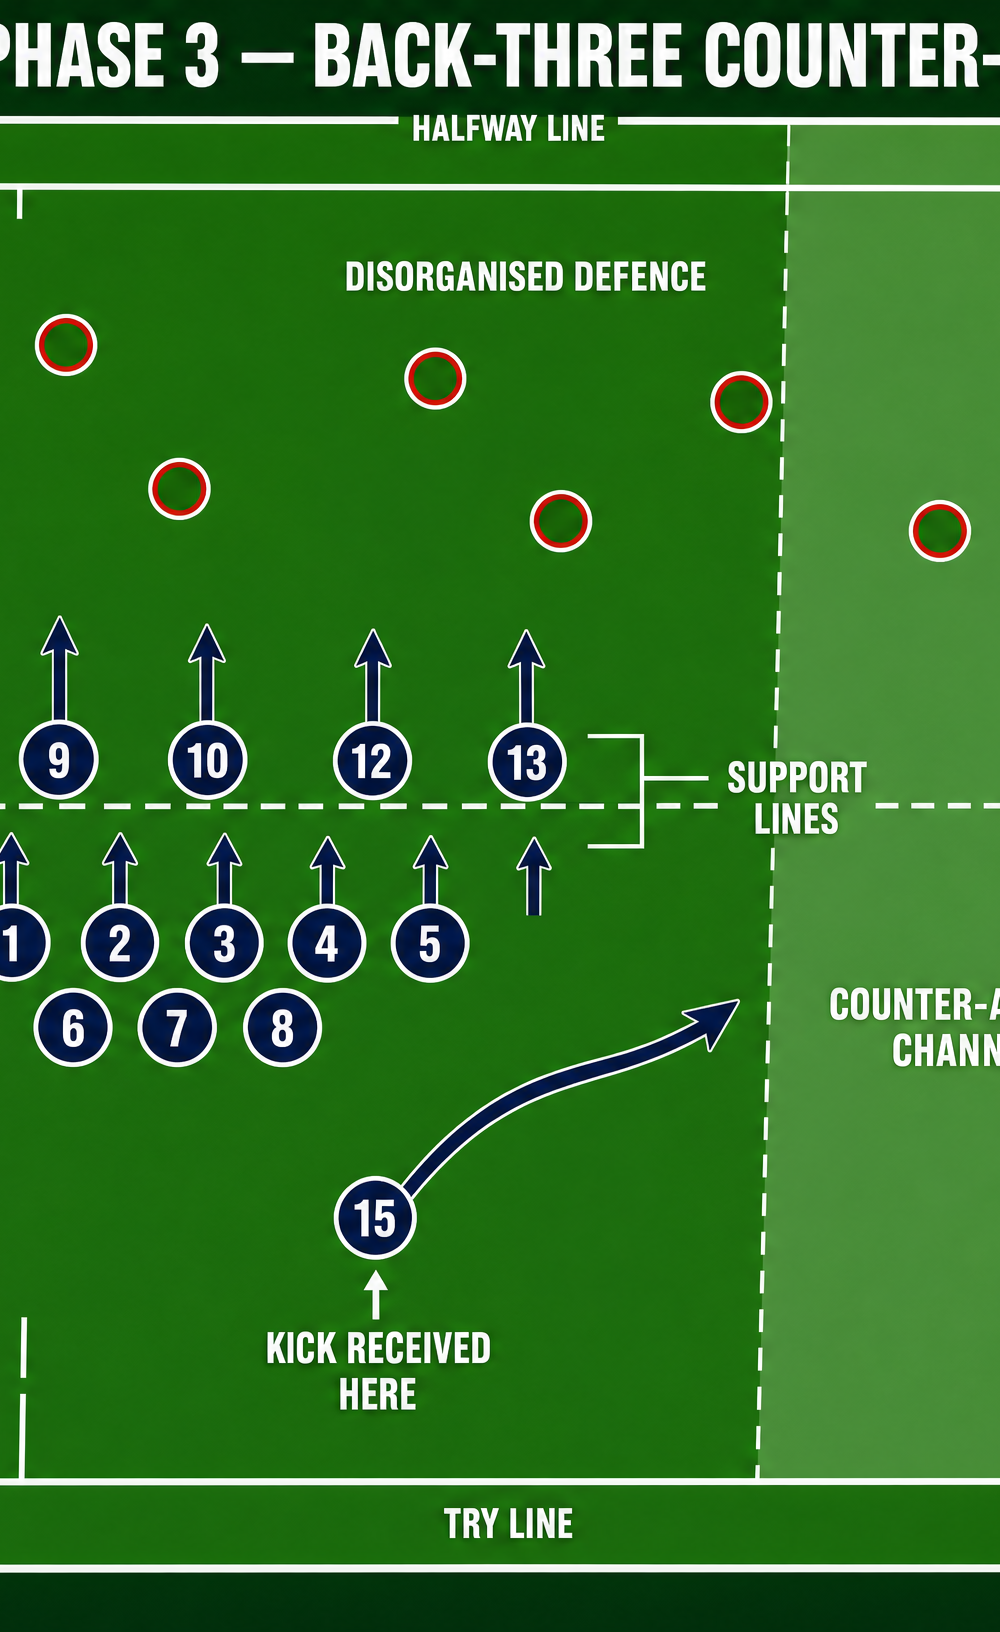
- Fielding the Return Kick: If the initial exit kick does not find touch and is returned by the opposition, the fullback (15) must field the ball cleanly, ideally deep in their own half.
- Assessing the Defence: The fullback (15) quickly scans the field to identify the disorganised chasing defensive line.
- The Counter-Attack: The fullback (15) initiates the counter-attack by running hard into the identified space, usually towards the wider channels.
- Support Lines: The left wing (11) and right wing (14) immediately pinch in to offer close support lines, creating a three-on-two or three-on-three scenario against the fragmented defence. The forwards and inside backs work tirelessly to provide a second wave of support.
4. Key Coaching Points
- Speed of Service: The success of the exit play hinges entirely on the speed and accuracy of the pass from the scrum-half (9). Any delay allows the defensive line to advance and charge down the kick.
- Kicking Accuracy: The fly-half (10) must prioritize distance and hang time. A low, flat kick will be easily fielded and returned with interest. The kick must allow the chasers time to compete.
- The Chase Line: The chasing players must form a cohesive line. A staggered chase creates doglegs that the opposition can easily exploit. Communication during the chase is vital.
- Decision Making: The fullback (15) must make split-second decisions on whether to counter-attack or return the kick based on the defensive alignment.
5. Common Mistakes
- Slow Ball from the Base: Forwards failing to secure the ball quickly or the scrum-half taking too many steps before passing, resulting in the fly-half being caught in possession.
- Poor Kicking Technique: Slicing the kick or failing to achieve sufficient height, allowing the opposition to counter-attack easily.
- Disconnected Chase: Chasers running at different speeds, creating gaps in the defensive line that the opposition can run through.
- Isolating the Fullback: The back three failing to support the fullback quickly enough during a counter-attack, leading to a turnover.
6. Variations & Progressions
- The Box Kick: Instead of passing to the fly-half, the scrum-half (9) can execute a high box kick directly from the base of the ruck or scrum, allowing the wingers to compete in the air.
- The Grubber Kick: If the defensive line rushes up aggressively, the fly-half (10) can slip a grubber kick in behind them for the centres to chase.
- Adding Defensive Pressure: Progress the drill by introducing active defenders who attempt to charge down the kick and disrupt the chase.
7. Age Adaptations
- Under 10s / Under 12s: Focus primarily on the speed of the pass and the basic mechanics of kicking the ball out of hand. Do not overcomplicate the chase patterns. Emphasize finding touch safely.
- Under 14s / Under 16s: Introduce the coordinated chase and the concept of the counter-attack. Encourage the fullback to scan the field and make decisions on whether to run or kick.
- Open Age / Senior: Implement the full set play with decoy runners and complex variations. Focus on the precision of the kick and the aggression of the chase line.