Counter-Attack Transition Drill: Win It, Run It, Finish It
Train your team to instantly shift from defensive shape to devastating counter-attack, exploiting the critical 3–5 seconds after ball recovery to create and convert high-quality chances.
Equipment Needed
Overview
The counter-attack transition is one of the most decisive moments in modern football. The instant your team wins the ball — whether through a tackle, interception, or goalkeeper distribution — the opposition is at its most vulnerable. Defensive lines are disorganised, midfielders are caught in no-man's land, and space opens up behind the retreating defence. This drill trains your players to recognise that moment, react with explosive intent, and execute a clinical counter-attack before the opposition can reset.
Use this drill when your team is preparing to face a possession-dominant opponent, when you want to sharpen transition speed after a period of sustained defending, or as a high-intensity unit to close a session. It is equally effective as a pre-match primer for teams that rely on a low-block, counter-attacking game model.
Setup
Pitch Area: Use a full-length pitch or a minimum 70m × 50m zone. The drill works best when the full 100–110m pitch length is available to replicate the true distances involved in a counter-attack.
Players Required: 14 outfield players + 2 goalkeepers (18 total). Can be adapted for 12–16 outfield players.
Equipment Needed:
- 1 full-size goal at each end
- 8–10 footballs (multiple balls keep intensity high)
- 8 cones (to mark trigger zones and wide channels)
- 4 coloured bibs (2 sets)
- 1 coaching board
Player Positions and Starting Roles:
| Position | Number | Starting Zone | Role in Drill |
|---|---|---|---|
| Goalkeeper | 1 | Own goal | Triggers counter with distribution |
| Right Back | 2 | Defensive third | Overlapping support run |
| Left Back | 3 | Defensive third | Overlapping support run |
| Centre Back | 4 | Defensive third | First pass out of pressure |
| Centre Back | 5 | Defensive third | Cover and secondary pass option |
| Defensive Mid | 6 | Central zone | Ball-winner; initiates counter |
| Central Mid | 8 | Central zone | Link player; drives forward |
| Attacking Mid | 10 | Between lines | Connects defence to attack |
| Left Winger | 11 | Wide left channel | Primary counter-attack runner |
| Right Winger | 7 | Wide right channel | Secondary counter-attack runner |
| Centre Forward | 9 | Attacking half | Target runner; near-post threat |

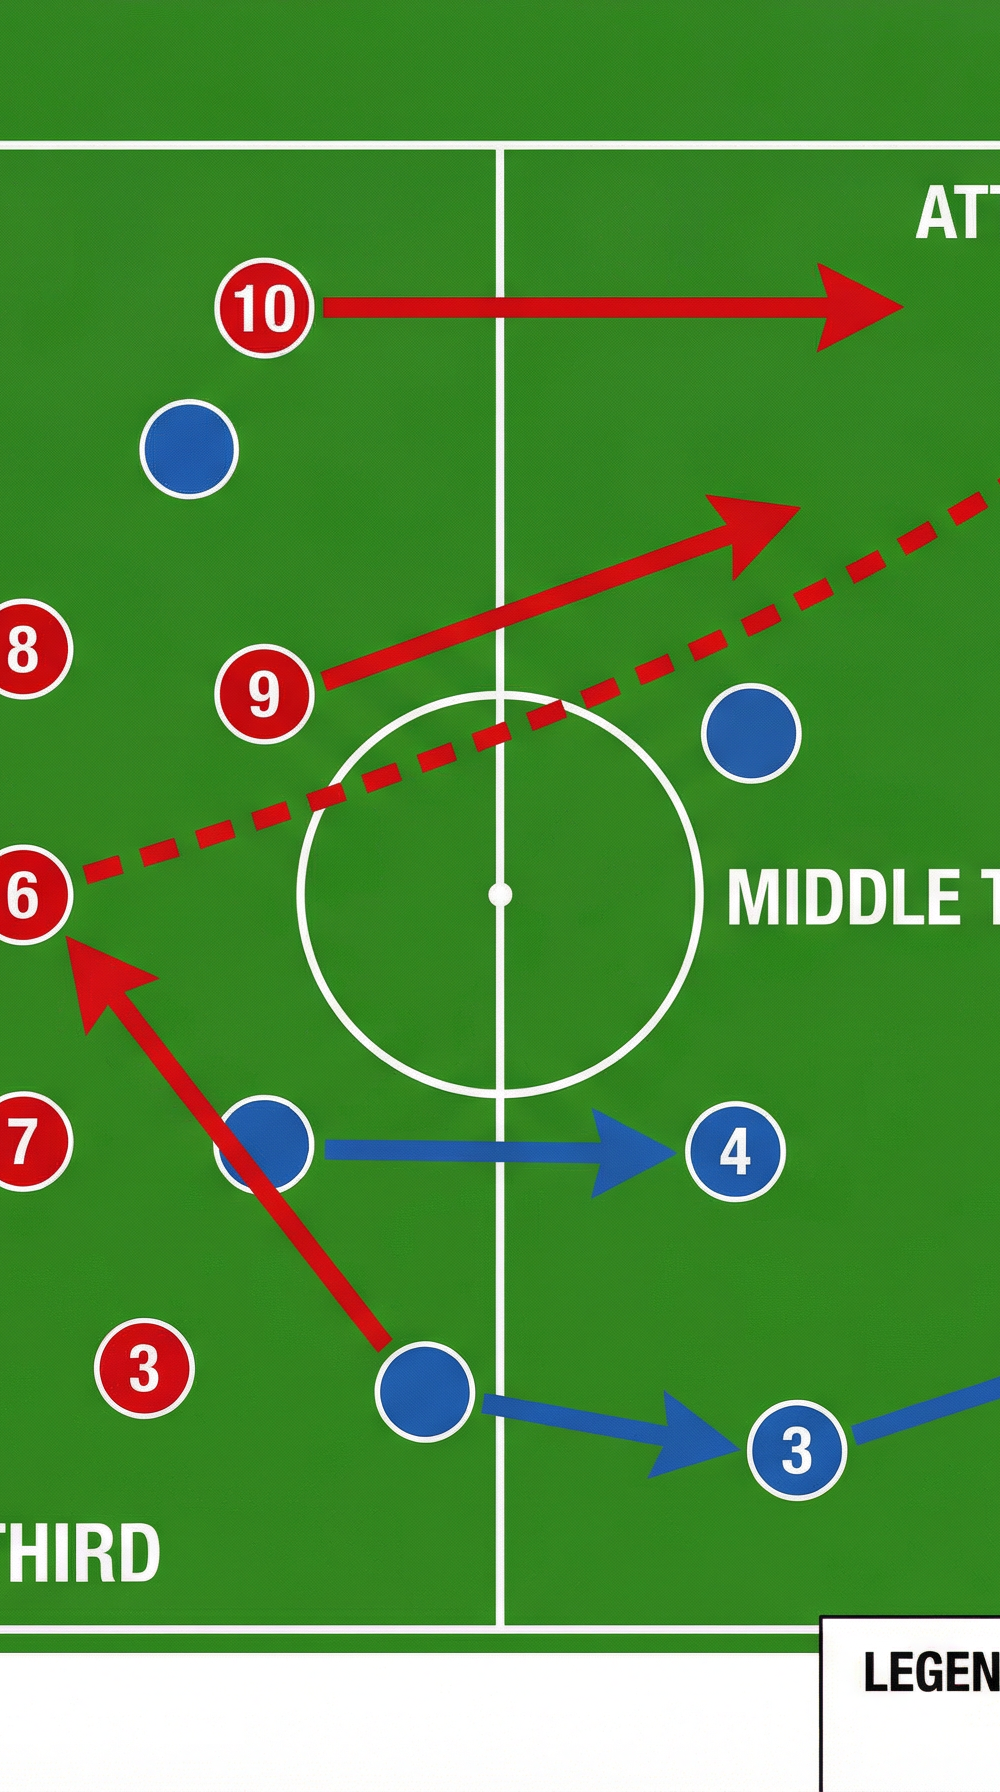
Diagram 1: The moment of ball recovery. Player 6 (Defensive Mid) wins the ball centrally. Solid red arrows show immediate forward runs by 9, 10, and 11. The dashed red arrow shows the diagonal switch pass to 11 in the wide channel. Blue arrows show the opposition's full-backs (2, 3) and central midfielder (4) caught high and scrambling to recover.
Step-by-Step Instructions

Phase 1 — Defensive Trigger (0:00–0:05)
- The coach or a server plays a ball into the defensive third, simulating an opposition attack. The defending team (red) sets up in a compact mid-low block: a back four (2, 3, 4, 5) across the 18-yard box, with 6 and 8 screening in front.
- Player 6 (Defensive Mid) wins the ball — either through a tackle on the server or by intercepting a played pass. This is the trigger moment. Shout a cue word as a team: 'COUNTER!' or 'GO!' to signal the transition has begun.
- Players 9, 10, and 11 must begin their forward runs the instant the ball is won — not after the first pass. Emphasise this timing relentlessly.
Phase 2 — First Pass Out (0:05–0:08)
- Player 6 takes one touch to control and immediately plays a forward pass — ideally a diagonal switch to 11 on the wide left, or a direct vertical pass into 10's feet if 10 has already turned and is running.
- Player 4 (Centre Back) provides a short reset option if 6 is under immediate pressure. However, the default is always to play forward first.
- Players 2 and 3 (Full Backs) begin their overlap runs along the touchlines, staying 10–15m behind the ball to provide width and avoid an offside trap.
Phase 3 — Transition Through the Middle Third (0:08–0:14)
- Player 11 receives wide left and drives at pace toward the opposition's penalty area. Player 9 makes a diagonal run toward the near post. Player 10 arrives late at the far post or penalty spot.
- Player 8 (Central Mid) pushes forward to the edge of the penalty area as the support runner — the 'late arrival' who can shoot if the ball is cut back.
- Player 6 holds a central position 25–30m from goal, providing a reset option if the attack breaks down and to cover against a counter-counter.
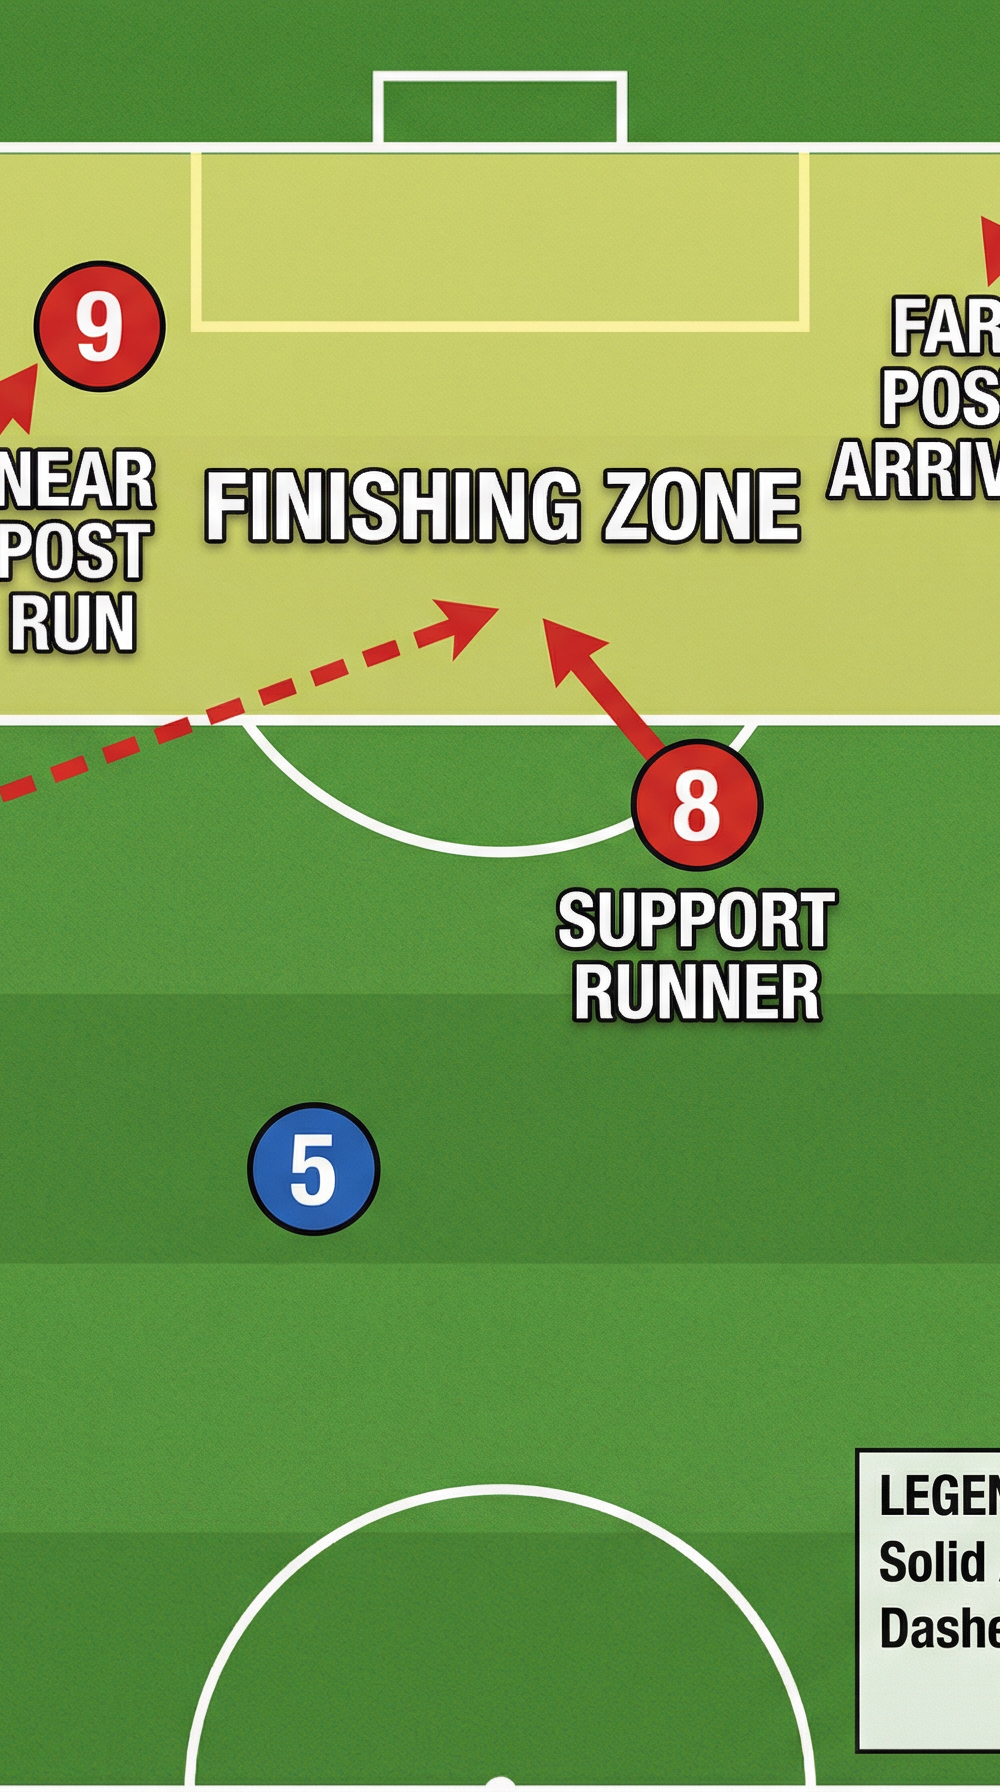
Phase 4 — Finishing (0:14–0:20)
- Player 11 delivers a low, driven cross or plays a through-ball to 9 at the near post. Player 10 attacks the far post. Player 8 arrives at the penalty spot.
- The drill ends with a shot on goal. Rotate roles after each repetition so all players experience both the defensive trigger and the attacking execution.

Diagram 2: The finishing phase. Player 11 has received wide left and drives toward the byline. The dashed red arrow shows the low cross option to player 9 (near post run). Player 10 attacks the far post (far post arrival). Player 8 provides the support runner option at the penalty spot. Blue defenders 5 and 6 are caught out of position in the finishing zone.
Key Coaching Points

1. The First Three Seconds Define the Counter. The quality of a counter-attack is almost entirely determined in the first three seconds after ball recovery. If your players take an extra touch, look around, or hesitate, the space closes. Demand that runners begin their movement before the ball is won — reading the situation, not reacting to it.
2. Play Forward Unless It Is Impossible. Instil a 'forward-first' mentality. The player in possession should always look for the forward pass before the sideways or backward option. A counter-attack that goes sideways is a counter-attack that dies.
3. Width Creates Depth. Wingers (7 and 11) must hug the touchlines during the transition phase. Wide positioning stretches the recovering defence, creates the diagonal pass option, and opens the central channel for 9 and 10 to exploit.
4. The Centre Forward's Run Must Be Timed, Not Early. Player 9 must resist the urge to sprint immediately — an early run allows the last defender to track and stay goal-side. The run should be triggered when the ball reaches the wide player, angling toward the near post to create a genuine threat.
5. The Support Runner Is Not Optional. Player 8's late run to the penalty spot is the counter-attack's safety valve. If the cross is cleared, 8 is in position to shoot. If the first-time finish is missed, 8 can convert a second ball. Never allow 8 to stop at the halfway line.
6. Communicate the Trigger Word Every Time. Team-wide verbal communication at the moment of ball recovery is a habit that must be trained. In match conditions, noise from the crowd and physical exertion make silent transitions dangerous. The trigger word keeps everyone synchronised.
Common Mistakes

Mistake 1 — Runners Waiting for the Pass Before Moving. The single most common error. Players wait to see where the ball goes before starting their run, meaning they arrive at the finishing zone 2–3 seconds too late and the defence has recovered. Correction: Freeze the drill at the moment of ball recovery and check runner positions. If they haven't moved, reset and repeat. Use a 'ghost run' exercise where players practice the movement pattern without the ball first.
Mistake 2 — The Ball-Winner Holding Possession Too Long. Player 6 takes two or three touches to settle the ball before looking up, allowing the opposition to recover shape. Correction: Impose a maximum two-touch rule on the player winning the ball during the drill. One touch to control, one touch to pass forward.
Mistake 3 — Wingers Cutting Inside Too Early. Player 11 receives the ball and immediately cuts inside, collapsing the space that 9 and 10 are running into. Correction: Place a cone 5m from the touchline in the wide channel. 11 must carry the ball past the cone before making any inside cut, ensuring the width is maintained.
Mistake 4 — Full Backs Bombing Forward and Leaving the Team Exposed. Players 2 and 3 sprint forward at the same time, leaving no defensive cover if the counter-attack breaks down. Correction: Only one full back should join the attack. The other holds a position 10m inside the halfway line. Assign this role clearly before the drill begins.
Mistake 5 — Shooting Too Early From Distance. Player 8 or 10 arrives at the edge of the area and shoots from 25m when a better option exists inside. Correction: Designate a 'shooting zone' (inside the 18-yard box) and award bonus points only for goals scored from within it during the drill. This reinforces patient, quality finishing over speculative long-range efforts.
Variations and Progressions

Progression 1 — Add Recovering Defenders (Intermediate). After the trigger moment, release two opposition defenders from a cone 30m away. They sprint to recover and defend. This adds a realistic time pressure and forces attackers to make faster decisions. Increase to three recovering defenders as the team improves.
Progression 2 — Goalkeeper Distribution Trigger (Advanced). Instead of the coach serving the ball into the defensive block, the goalkeeper (1) catches a cross or saves a shot and immediately distributes — either a long kick to 11's channel or a short throw to 4 or 6. This trains the full transition sequence from goalkeeper to finish and is the closest replication of a real match scenario.
Variation 1 — Overload Counter (Easier). Run the drill as a 4v2 in the attacking half only. Four attackers (9, 10, 11, 8) start at the halfway line. Two defenders start on the edge of the penalty area. A server plays the ball to 10 to trigger the attack. This isolates the finishing phase and builds confidence before adding the full transition sequence.
Age Adaptations
Under 12 and Below: Reduce the pitch to 60m × 40m. Use a 3v1 counter-attack format (three attackers versus one recovering defender). Focus exclusively on the trigger moment and the first forward pass — do not introduce the full finishing sequence until players are comfortable with the transition concept. Use size 4 balls and full-size or 7v7 goals.
Under 14 to Under 16: Use the full drill as written on a 70m × 50m pitch. Introduce the recovering defenders progression after four to five successful repetitions. At this age, the emphasis should shift toward decision-making: when to play wide, when to play centrally, and when to shoot versus when to pass. Encourage players to self-correct using the trigger word.
Open Age and Senior: Run the full drill on a full-size pitch (100–110m × 64–75m). Introduce the goalkeeper distribution trigger and add a defensive press from the opposition's midfield line to simulate high-press recovery. Increase the number of repetitions and reduce rest periods to build the physical conditioning required to execute a counter-attack in the 80th minute of a match.