Quick Advantage Throw-In: The 3-Option Release Play
Master the art of turning a routine touchline throw-in into a dangerous attacking opportunity using a structured three-option release pattern that exploits defensive disorganisation.
Equipment Needed
Overview
The Quick Advantage Throw-In is a structured set play designed to convert what many teams treat as a passive restart into an immediate attacking threat. When your team wins a throw-in — particularly in the middle and attacking thirds of the pitch — the opposition defence is momentarily disorganised. Players are repositioning, marking assignments are unclear, and the defensive shape has not yet settled. This play exploits precisely that window.
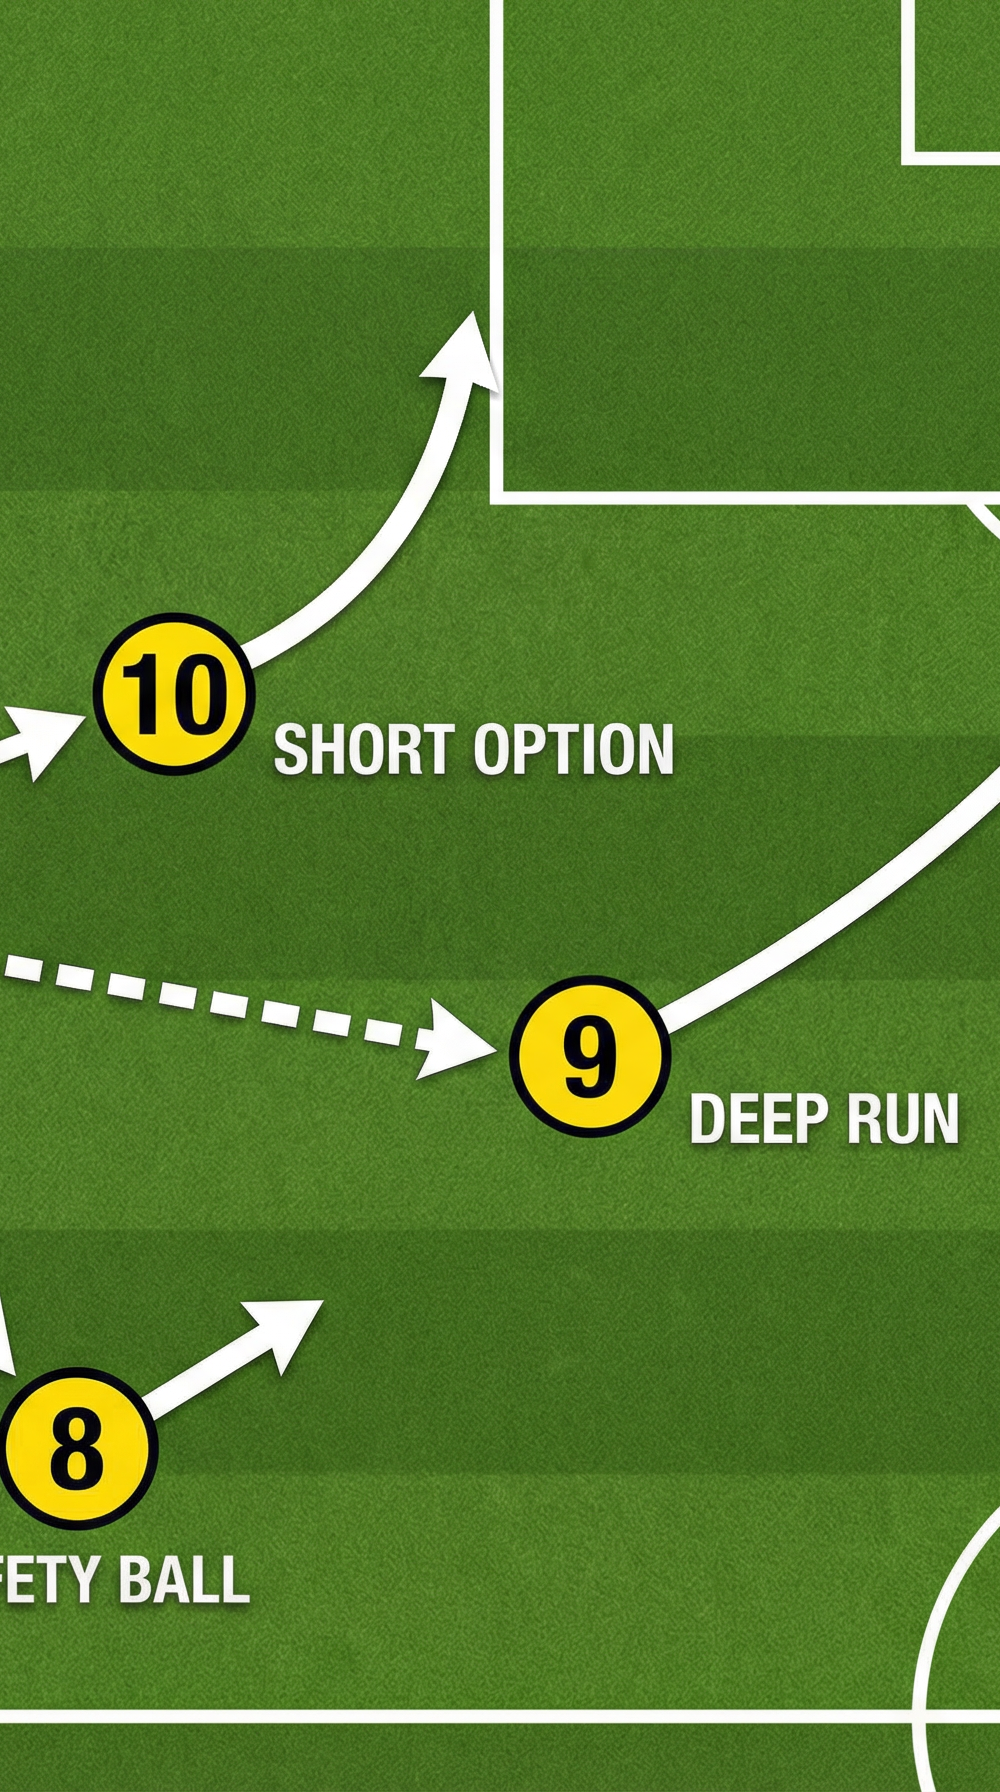
The core principle is speed of execution combined with pre-planned movement. Rather than the thrower waiting for teammates to settle, all three receiving players begin their runs the instant possession is lost and the throw-in is awarded. The thrower reads which option has opened up and delivers immediately. The play is built around three options: a short diagonal (Short Option), a direct ball into depth (Deep Run), and a back-pass safety valve (Safety Ball). This gives the thrower a decision tree rather than a single prescribed pass, making the play adaptable to whatever the defence presents.
Use this play primarily in the middle third (between 30m and 60m from the opponent's goal) and in the attacking third (inside the final 30m), where winning the second phase can directly create a shooting opportunity. It is less effective in the defensive third, where the risk of a turnover outweighs the reward.
Setup
Equipment
- 1 standard football (size 5 for U12 and above; size 4 for U10 and below)
- Pitch with marked touchlines and standard dimensions (100–110m × 64–75m)
- 4 training bibs (to distinguish attacking unit from defenders in practice)
- 4 flat cones (to mark starting positions during drilling phase)
- Optional: 2–3 passive defenders to simulate a defensive line during rehearsal
Pitch Zone
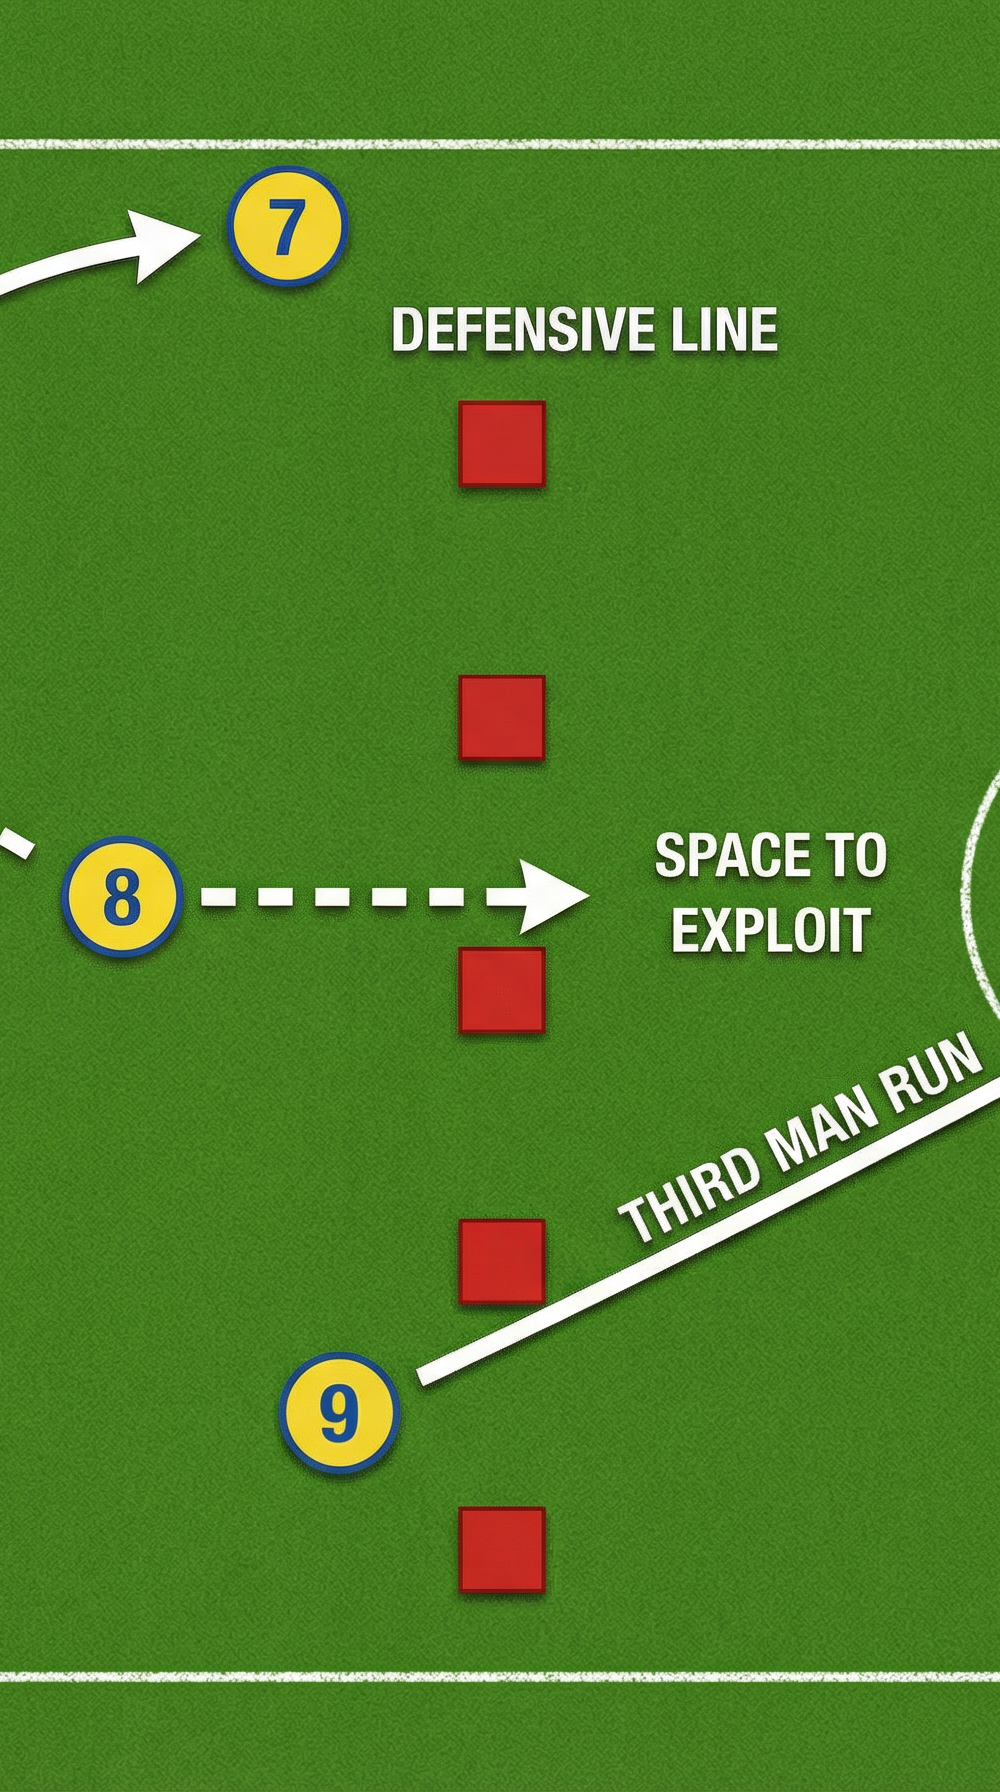
This play is designed for throw-ins taken anywhere along the left or right touchline between the opponent's penalty area and the halfway line. The diagrams below illustrate the left-flank variant; mirror all positions for a right-flank throw.
Player Positions at the Moment of Award
| Player | Position | Role | Starting Distance from Thrower |
|---|---|---|---|
| No. 7 (Right Winger / Wide Midfielder) | On the touchline | Thrower | 0m — on the line |
| No. 10 (Attacking Midfielder) | 4–6m inside the pitch, slightly ahead | Short Option | 5m diagonal |
| No. 9 (Centre Forward) | 12–18m ahead, central channel | Deep Run | 15m ahead |
| No. 8 (Central Midfielder) | 3–5m behind and inside | Safety Ball | 4m behind |
Step-by-Step Instructions


Phase 1 — Winning the Throw-In
The moment the ball crosses the touchline and the referee signals your throw-in, No. 7 retrieves the ball immediately and moves to the exact spot on the touchline. Do not allow time to be wasted — the defensive disorganisation window is typically 3–5 seconds.
As No. 7 picks up the ball, No. 10 begins a sharp diagonal run at a 45-degree angle, moving away from their marker and into the half-space between the touchline and the centre of the pitch. The run should be 5–7m and timed to arrive just as the throw is released.
Simultaneously, No. 9 makes a curved run — first checking away from goal (2–3 steps backward to lose their marker), then accelerating forward and diagonally into the channel between the last defender and the touchline. This run should cover 12–18m.
No. 8 drops 3–5m into a slightly deeper position, angling their body to be available as a back-pass option. This player must be positioned so that receiving the ball allows an immediate forward pass or turn.
No. 7 scans all three options before releasing the ball. The decision hierarchy is: (a) if No. 9's run has beaten the defensive line — play the deep ball; (b) if No. 10 is free in the half-space — play the short diagonal; (c) if both are marked — play back to No. 8 and reset.
The throw is executed with correct technique: both feet on or behind the touchline, ball delivered from behind and over the head using both hands, no spin. A flat, firm throw is preferred for the short and deep options.
Phase 2 — Second Ball and Overlap

If the Short Option is played to No. 10, No. 7 immediately enters the pitch and makes an overlap run down the touchline, creating a 2v1 against the nearest defender.
No. 10 has three immediate options upon receiving: (a) turn and drive forward; (b) play the overlap to No. 7; (c) play a first-time pass inside to No. 8, who then plays a through ball into the space behind the defensive line for No. 9's continuing run.
The third-man combination — No. 10 receives, lays off to No. 8, No. 8 plays through for No. 9 — is the highest-value outcome and should be the primary target when the defensive line is high.
If the Deep Run option is played directly to No. 9, No. 7 and No. 10 both push forward to support, creating a 3v2 or 3v3 in the attacking third within 4–6 seconds of the throw.
Key Coaching Points

Speed of execution is the weapon. The entire value of this play depends on taking the throw before the opposition can reorganise. Coaches should time the gap between the ball going out and the throw being taken in training. Target: under 4 seconds.
Runs must begin before the throw, not after. A common error is players waiting to see where the ball goes before moving. Emphasise that all three receivers must be in motion as No. 7 is picking up the ball. The run creates the space; the ball follows the run.
The thrower is a decision-maker, not just a deliverer. No. 7 must be coached to read the defensive shape and commit to a decision quickly. Use the phrase "scan, decide, deliver" — all within 2 seconds of reaching the touchline.
No. 10's diagonal run must be angled away from the marker. If No. 10 runs straight toward the thrower, they are easy to track. The diagonal into the half-space creates separation and opens a passing lane.
No. 9's check-run is critical. The forward must resist the instinct to simply run forward. The initial 2–3 step check away from goal draws the defender with them, creating the space to then accelerate into. Without the check, the defender can simply track the run.
No. 8 must be on the half-turn. The safety-ball option only has value if No. 8 can play forward immediately upon receiving. If No. 8 receives with their back to goal and no forward options, possession is lost. Coach them to position their body so they can see both the thrower and the forward options simultaneously.
Common Mistakes
1. The thrower waits for players to get into position.
This is the most damaging error. Waiting 8–10 seconds to take a throw-in allows the defence to reset completely, eliminating the entire advantage the play is designed to exploit. Correct this by making "quick throw" a non-negotiable habit. In training, use a 5-second countdown rule: if the throw is not taken within 5 seconds, the drill resets.
2. Receivers bunch together near the thrower.
When all three receiving players cluster within 5m of the thrower, they are easy to mark and there is no depth to the play. Emphasise the principle of spreading the defensive shape — No. 9 must be at least 12m ahead to stretch the line.
3. No. 7 does not enter the pitch after throwing.
Once the ball is released, the thrower becomes a free player and should immediately enter the pitch as an overlapping option. Coaches frequently see No. 7 standing on the touchline watching the play develop. This removes a numerical advantage.
4. The play is over-rehearsed into rigidity.
Some teams drill the play so that players follow a fixed script regardless of what the defence does. If No. 10 is tightly marked but players still force the short pass, the play breaks down. Reinforce that the decision tree exists precisely to adapt to defensive positioning — the play has three options for a reason.
5. Poor throw-in technique under pressure.
In match conditions, players often rush the throw and produce a spinning or one-handed delivery, which is an illegal throw-in. Dedicate 5–10 minutes per session to throw-in technique under time pressure, ensuring the technique holds when the player is rushing.
Variations & Progressions

Variation 1 — The Dummy Short (Intermediate)
No. 10 makes the short diagonal run as normal, but instead of receiving the ball, they dummy the run and continue past the ball's landing zone. No. 7 throws directly to No. 9, who has used No. 10's run as a decoy to create space. This is effective against a defence that has learned to track No. 10's diagonal.
Variation 2 — The Reverse Throw (Advanced)
Instead of No. 7 taking the throw, a designated long-throw specialist (e.g., No. 5, a central defender who has pushed forward) takes the throw while No. 7 becomes a receiver. The specialist delivers a long throw directly into the penalty area for a flick-on, converting the set play into a near-post delivery. Use this variant in the attacking third when the opposition defence is deep and compact.
Progression — Adding Live Defenders (All Levels)
Begin the drill with passive defenders (walking pace only), then progress to semi-active (defenders can intercept but not tackle), then fully live. This graduated approach allows players to understand the movement patterns before being tested against real defensive pressure. Introduce one defender at a time, starting with the marker on No. 10, then adding the marker on No. 9.
Age Adaptations

| Age Group | Key Modifications |
|---|---|
| U8–U10 | Simplify to a single option: No. 10 makes the short diagonal run only. Remove the deep run and safety ball. Focus entirely on quick execution and correct throw-in technique. Use size 4 ball. Reduce distances — No. 10 starts 3m away rather than 5m. |
| U12–U14 | Introduce the two-option version (Short + Safety Ball). Do not introduce the deep run until players can reliably execute the short combination. Begin coaching the overlap from No. 7 once the short option is mastered. |
| U16–Open | Use the full three-option play as described. Add the Dummy Short variation once the base play is automatic. Introduce the third-man combination (No. 10 → No. 8 → No. 9) as the primary target outcome. Time throw-in execution in training and set a 4-second benchmark. |
Head Coach's Note: The throw-in is the most frequent set piece in football — occurring 40–50 times per match at the elite level — yet it receives a fraction of the coaching attention given to corners and free kicks. Teams that develop a structured, rehearsed throw-in system gain a genuine competitive edge. Run this play 10–15 minutes per week in training, and within four weeks your players will execute it automatically under match pressure.