Forward Pod Play with Offload Option
Master the forward pod structure to consistently break the gain line and unleash devastating offloads in the middle third of the pitch.

Equipment Needed
1. Overview
The Forward Pod Play with Offload Option is a high-impact attacking structure designed to punch through the defensive line and maintain momentum. By organizing forwards into tight "pods" of three, the attacking team forces the defense to commit multiple tacklers to the breakdown. This creates isolated defenders and opens up space either on the fringes or out wide.
The primary goal of this set play is to get over the gain line quickly and efficiently. When the ball carrier (typically the number 8 or a strong carrying forward) takes the ball into contact, the two supporting forwards secure the breakdown. However, the true weapon of this play is the pre-called offload option. By having a designated runner (often the blindside flanker or a dynamic forward) running a hard line just off the shoulder of the ball carrier, the attack can exploit the defense before they have time to set.
This play is best utilized in the middle third of the pitch (between the 22-metre lines) when you need to generate quick, front-foot ball or break down a well-organized defensive line.
2. Setup
Before running this play in a match or training session, ensure your players understand their roles and the spatial requirements.
- Equipment Needed: 1 Rugby ball, 10-15 cones for marking channels and the gain line, tackle shields (optional for training).
- Pitch Setup: Use a standard 100m x 70m pitch. For training, mark out a 15-metre channel to simulate the playing area and a distinct gain line using cones.
- Player Positions:
- 9 (Scrum-half): Initiates the play from the base of the ruck.
- 8 (Number 8 / Primary Carrier): Positioned 1-2 metres ahead of the pod, ready to take the ball flat and hard.
- 2, 4, 6 (Supporting Forwards): Form a tight triangle (the pod) 3 metres from the breakdown.
- 10 (Fly-half): Positioned 7 metres deep as a secondary option.
- 12 (Inside Centre): Positioned 5 metres wide as a decoy runner to hold the outside defense.
3. Step-by-Step Instructions
Follow these exact steps to execute the forward pod play with the offload option effectively.
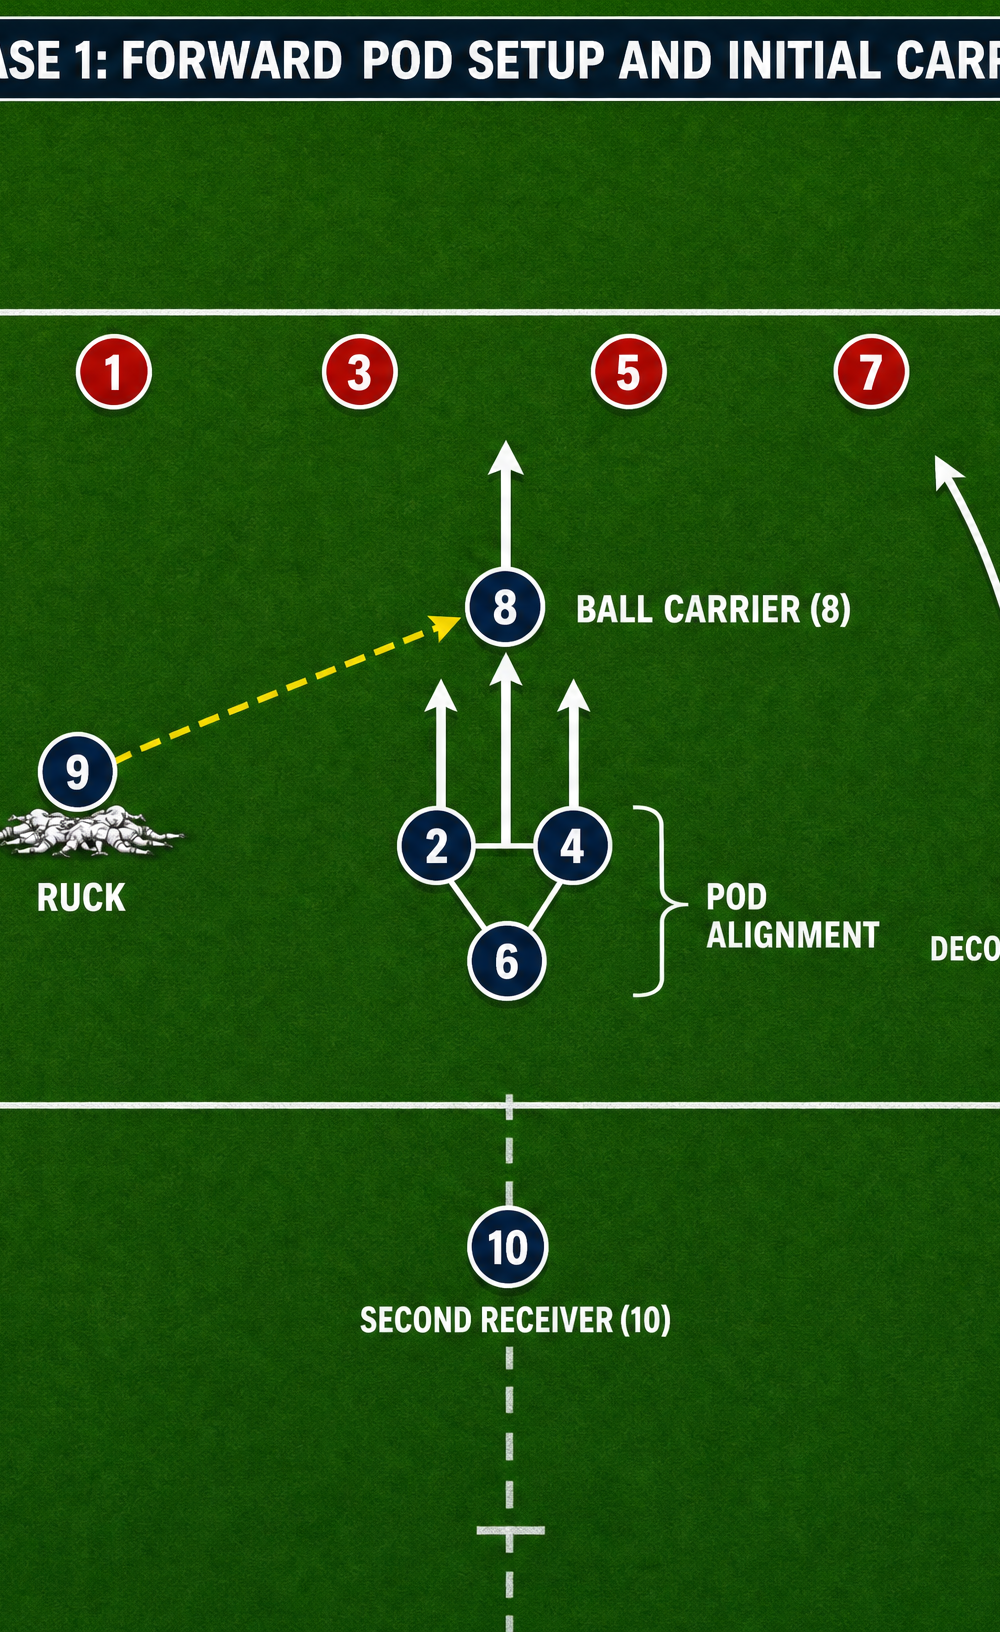
Phase 1: Setup and Initial Carry

- Establish the Pod: The scrum-half (9) identifies the breakdown. The three supporting forwards (2, 4, 6) align in a tight triangular pod formation, 3 metres away from the breakdown and slightly offset to the right.
- Position the Carrier: The primary ball carrier (8) positions themselves 1 metre ahead of the pod, creating a flat target for the scrum-half.
- Deploy the Decoys: The fly-half (10) drops 7 metres deep, while the inside centre (12) positions 5 metres wide. Both must communicate loudly to freeze the outside defenders.
- The Pass: The scrum-half delivers a swift, flat pass directly to the ball carrier (8).
- The Carry: The ball carrier attacks the defensive line aggressively, aiming to cross the gain line before making contact.
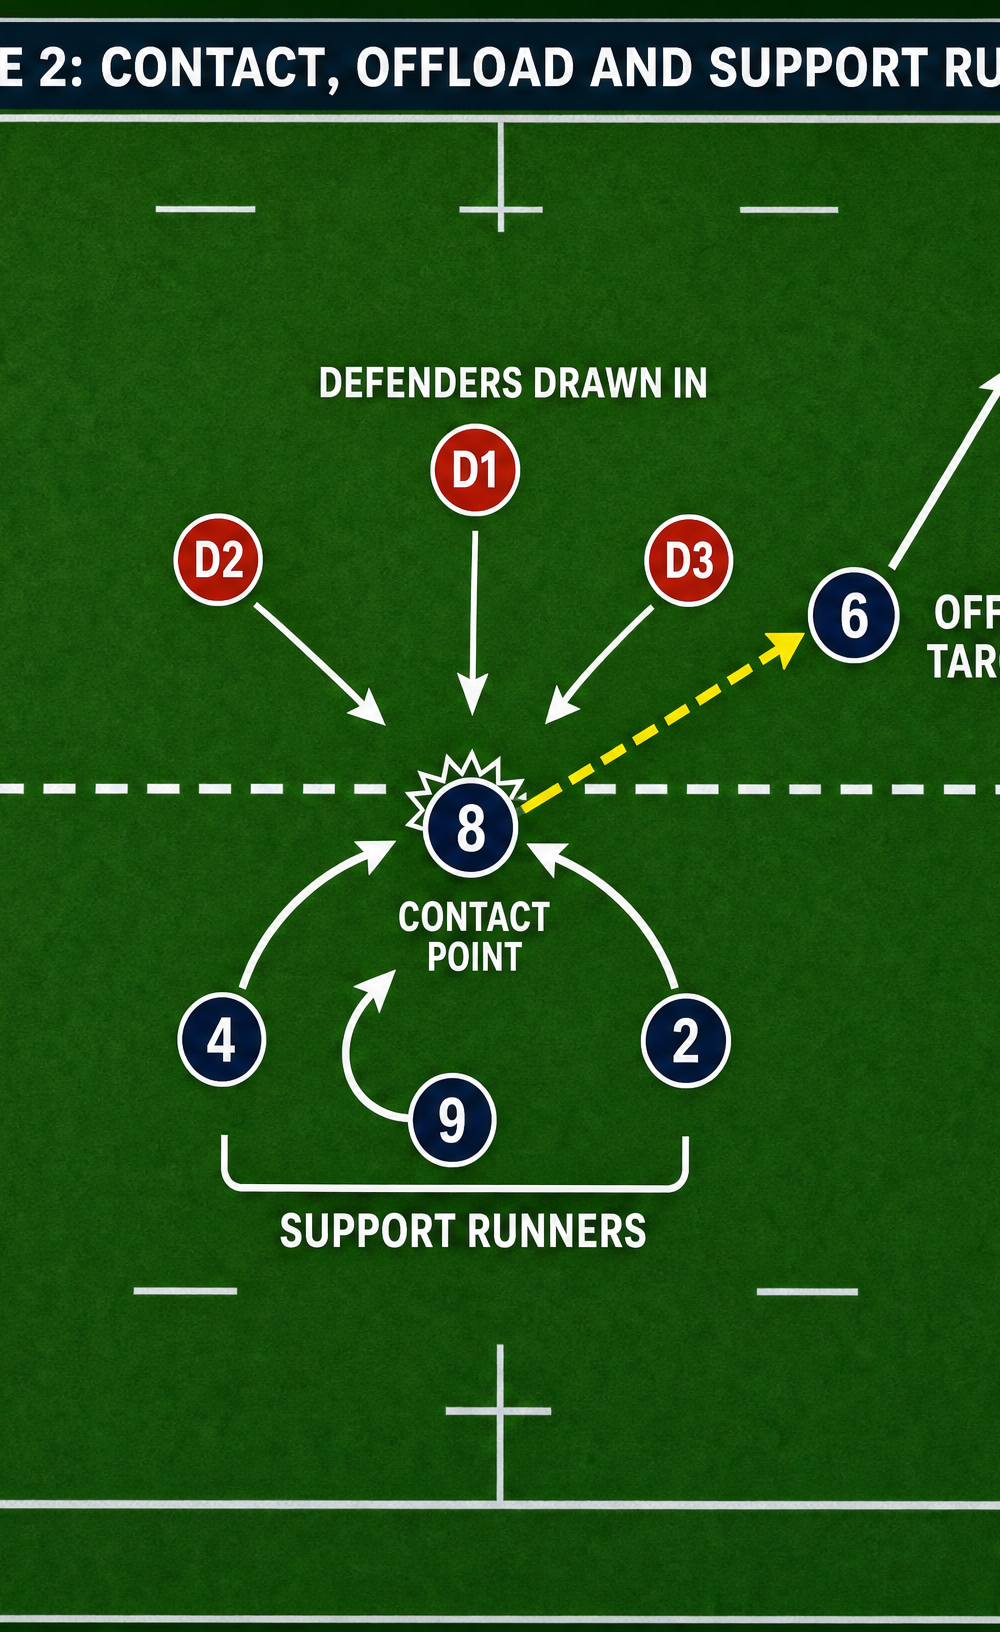
Phase 2: Contact, Offload, and Support
- Initiate Contact: As the ball carrier (8) engages the defense, they must stay square and drive their legs to maintain forward momentum.
- Draw the Defense: The impact should draw in 2-3 defenders (D1, D2, D3), compressing the defensive line.
- The Support Lines: The two primary support forwards (2 and 4) latch onto the carrier or prepare to clear the ruck if the offload is not viable.
- The Offload Target: The designated offload receiver (6) runs a hard, angled line 3 metres to the right and 2 metres ahead of the initial contact point, targeting the space vacated by the committed defenders.
- The Offload: The ball carrier (8) executes a short, sympathetic pop pass or offload to the receiver (6) just before or during the tackle.
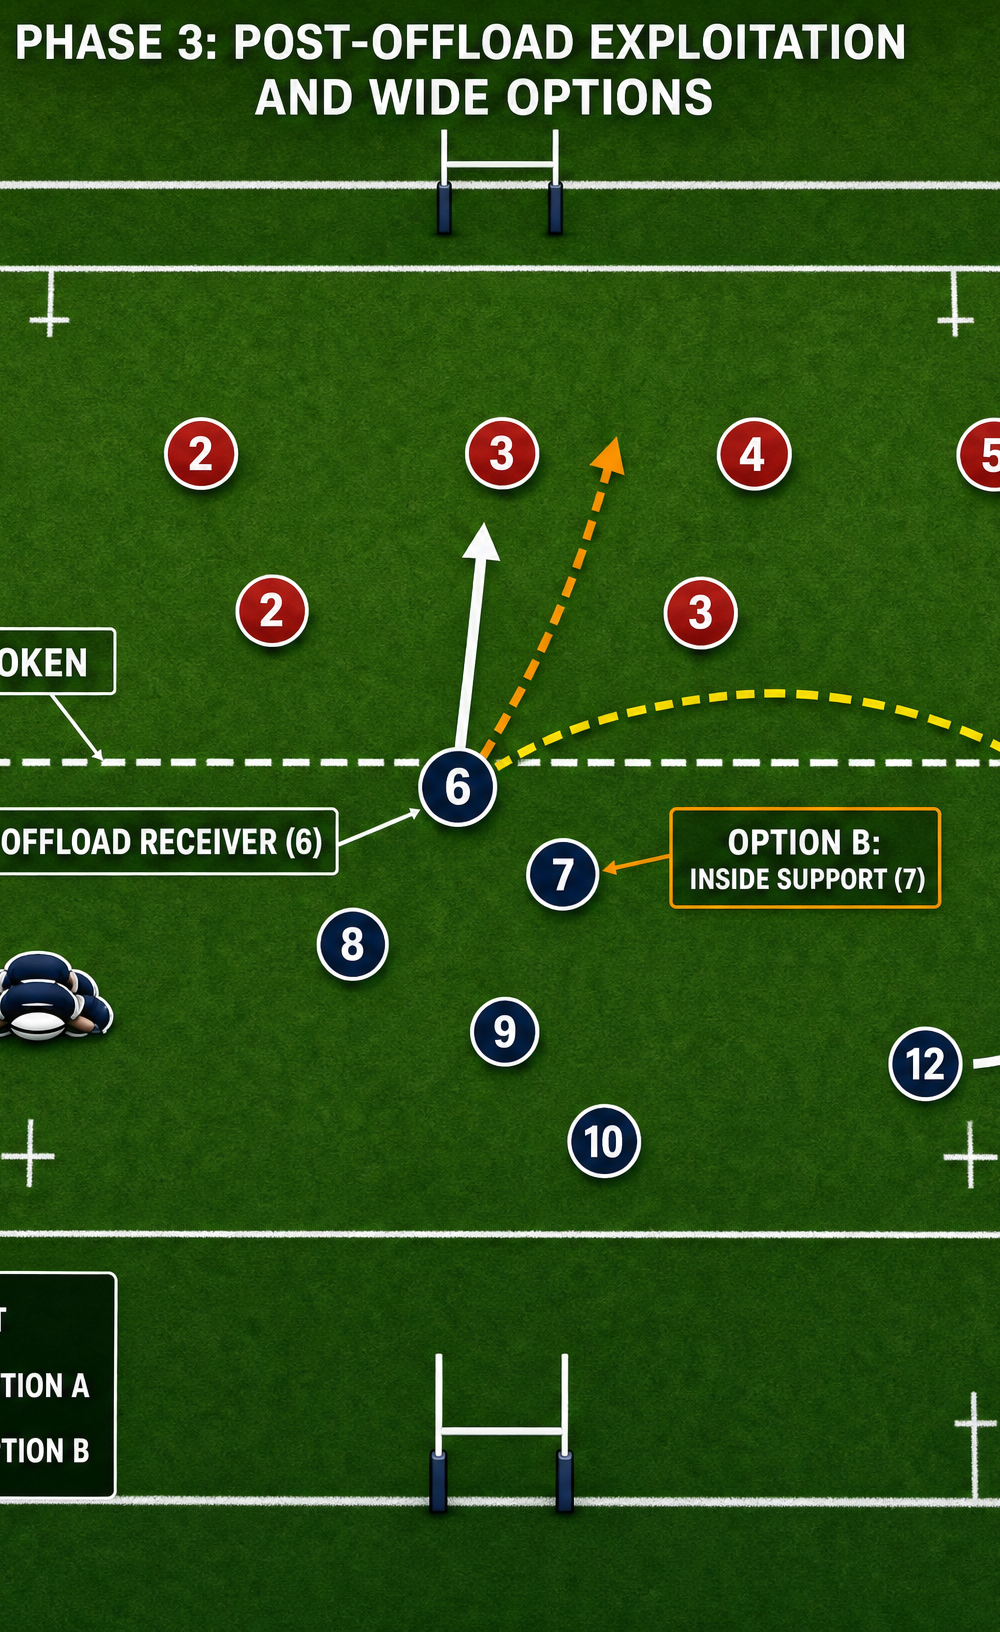
Phase 3: Post-Offload Exploitation
- Break the Line: The receiver (6) bursts through the defensive line, exploiting the space created by the initial carry.
- Assess Options: Once through the line, the receiver (6) has two primary options based on the full-back's positioning:
- Option A (Wide Ball): Pass wide to the outside centre (13) or winger (11) who are running wide arcs to exploit the disorganized edge defense.
- Option B (Inside Support): Link up with the openside flanker (7) running a short support line on the inside.
4. Key Coaching Points
To ensure this play is executed flawlessly, focus on these critical coaching points during training:
- Depth and Pace: The ball carrier must hit the ball at pace. If they are static when receiving the pass, the defense will easily dominate the collision.
- Body Height: The ball carrier must drop their body height just before contact to win the collision and keep their arms free for the offload.
- Timing of the Run: The offload receiver (6) must time their run perfectly. If they arrive too early, they overrun the pass; if too late, the defense will have recovered.
- Communication: The decoy runners (10 and 12) must be vocal and convincing. If they don't look like genuine options, the defense will slide and shut down the offload.
- Decision Making: The ball carrier must recognize when the offload is on. If the tackle is dominant or the arms are wrapped, they must go to ground and present the ball for the support players (2 and 4) to secure the ruck.
5. Common Mistakes
Watch out for these frequent errors and correct them immediately:
- Flat Alignment: The pod aligning too flat, resulting in the ball carrier having to slow down to receive the pass.
- Forced Offloads: The ball carrier attempting a low-percentage offload when the tackle is secure, leading to turnovers or knock-ons.
- Lazy Support: The offload receiver or the primary support players (2 and 4) reacting too slowly, leaving the ball carrier isolated.
- Telegraphing the Play: The scrum-half looking directly at the ball carrier for too long, allowing the defense to drift and anticipate the play.
6. Variations & Progressions
Once your team has mastered the basic structure, introduce these variations to keep the defense guessing:
- Progression 1: The Pull-Back Pass. Instead of the 8 carrying into contact, they receive the ball and immediately throw a pull-back pass to the 10 standing deep. This bypasses the rush defense and exploits the wider channels.
- Progression 2: The Tip Pass. The 8 receives the ball but, instead of taking the contact, tips the ball inside to a hard-running forward (e.g., the 2) who targets the seam between two defenders.
- Variation 1: The Blindside Strike. Run the pod play near the touchline. The offload target (6) receives the ball and immediately feeds the blindside winger, exploiting the narrow short side.
7. Age Adaptations
This play can be adapted for various age groups and skill levels:
- Under 10s: Focus purely on the pod formation and the initial carry. Remove the offload option and emphasize strong body position in contact and securing the ruck.
- Under 12s: Introduce the offload, but only in low-pressure, controlled training scenarios (e.g., using tackle shields). Focus on the timing of the support runner.
- Under 14s and Above: Implement the full play, including the decoy runners and post-offload decision-making. Encourage players to read the defense and choose the correct option (A or B) dynamically.