Defensive Marking Pressure Drill: Close Out, Shadow & Intercept
A progressive 3-phase drill that teaches defenders to close the 0.9m gap at pace, maintain legal body position under pressure, and read the play to generate turnovers.

Equipment Needed
Overview
The Defensive Marking Pressure Drill is one of the most transferable drills in a netball coach's toolkit. It directly replicates the game-day demands placed on defenders across all positions — from the Wing Defence reading a lead, to the Goal Keeper holding a shooter in the circle. The drill trains three interconnected skills in a single, scalable activity: closing the 0.9m legal distance at pace, maintaining a strong shadow position that denies the pass, and reading the play to generate an intercept opportunity.
Use this drill in the middle block of any training session once players have completed a thorough warm-up. It is equally effective as a standalone defensive skill session or as the defensive component of a paired attack-vs-defence block. The drill scales from beginner (stationary marking) through to advanced (live 3v3 with sideline trap), making it suitable for teams from Under 12 through to Open grade.
Setup
Court Area: Upper third of a standard netball court (30.5m × 15.25m). The active zone runs from the transverse line at the 20.333m mark to the back line. For the introductory phase, a 10m × 10m grid within this third is sufficient.
Equipment Required:
- 6–8 netballs
- 8 flat marker cones (to define grid boundaries and rotation spots)
- 1 set of coloured bibs (two colours: attackers and defenders)
- Whistle
- Optional: stopwatch for timed intervals
Player Numbers: Minimum 6 players (3 attackers, 3 defenders) plus 1 feeder. Ideal group size is 8–12 players to allow rotation without long rest periods.
Positions Used: Wing Attack (WA), Goal Attack (GA), Centre (C) as the attacking unit; Wing Defence (WD), Goal Defence (GD), Goal Keeper (GK) as the defensive unit. The feeder role is taken by the coach or a spare player.

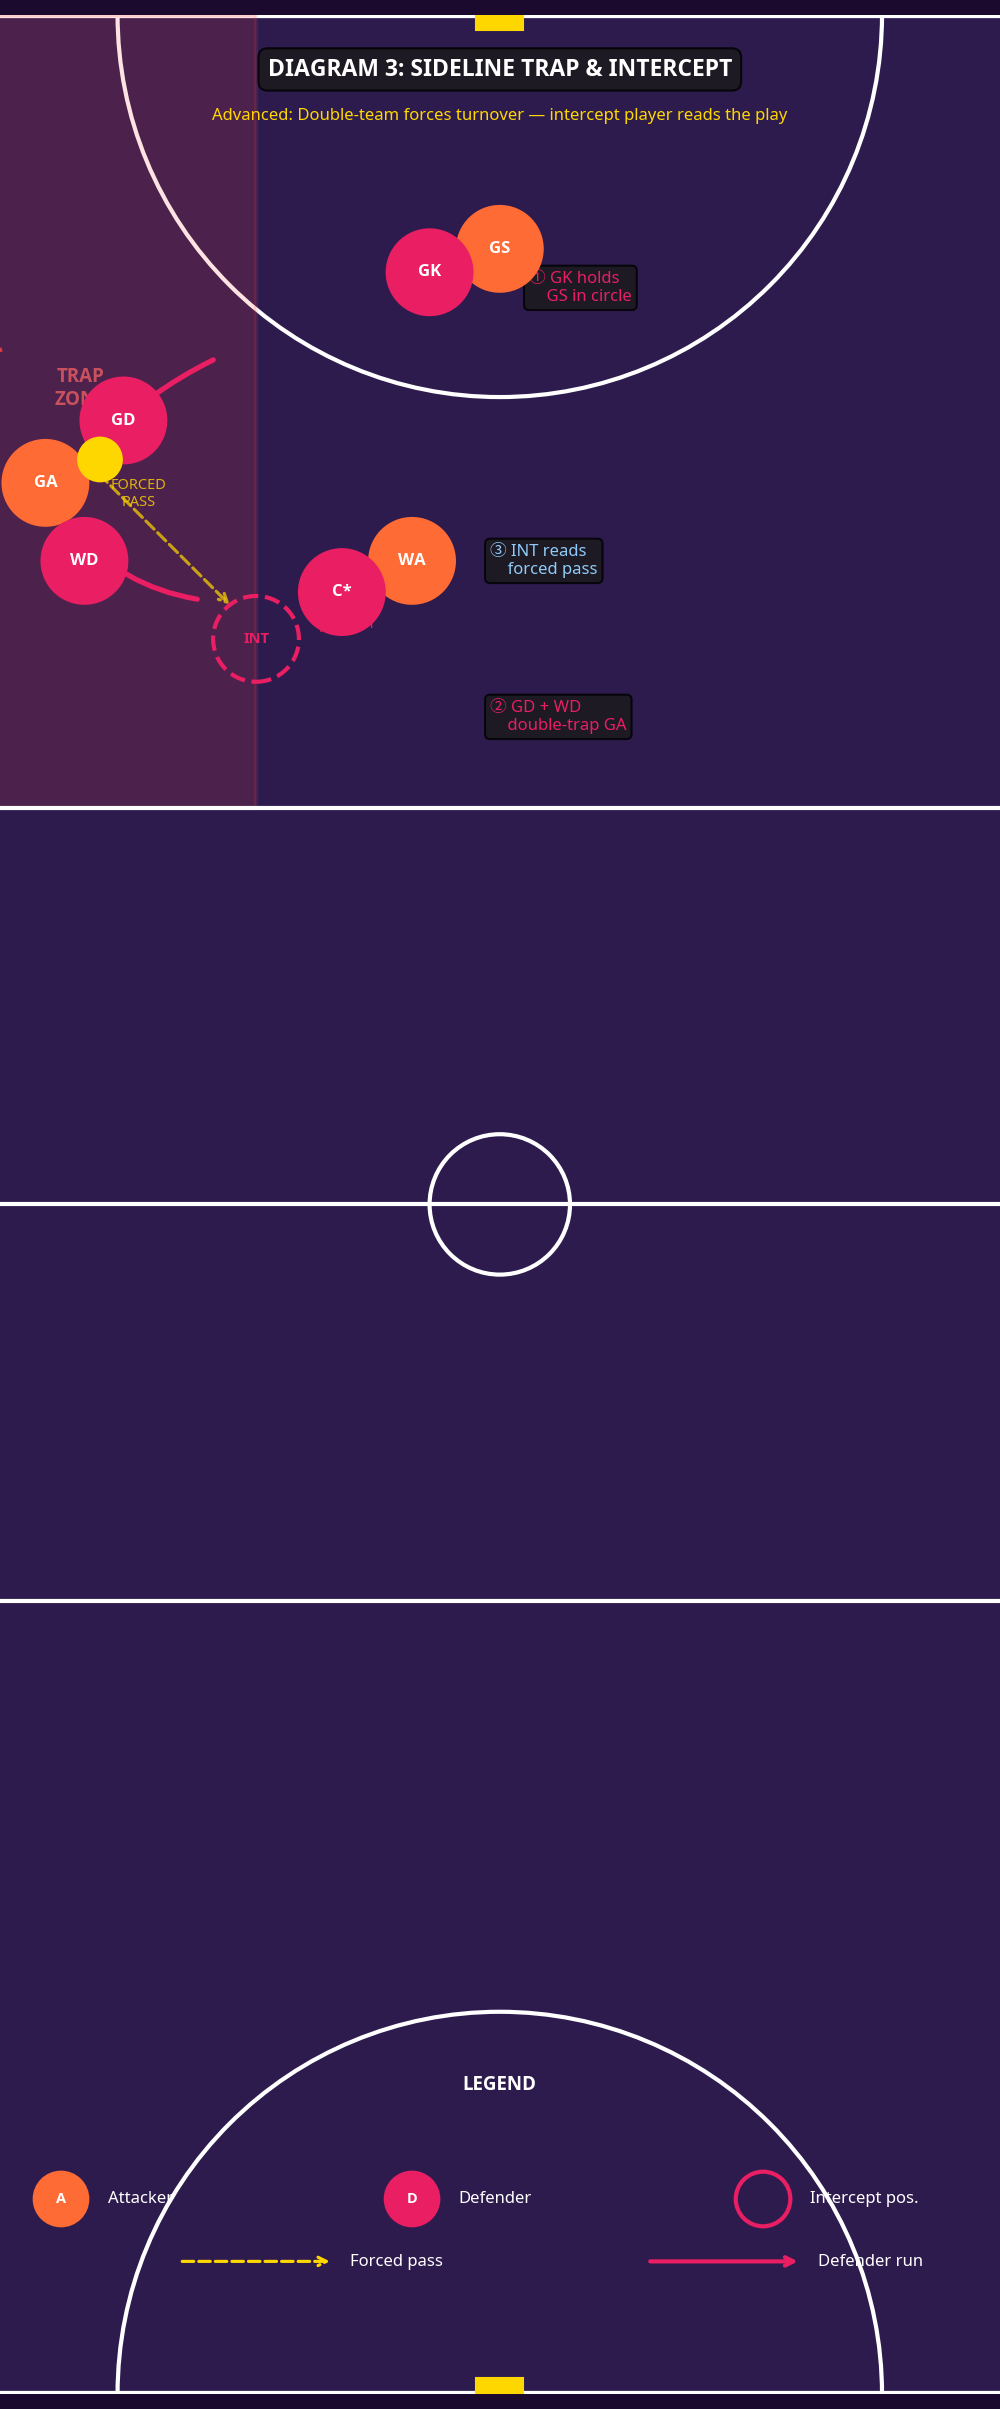
Diagram 1 shows the foundational 1-on-1 marking setup. Defenders (blue) position themselves within 0.9m of their attacker (orange), body angled to deny the most dangerous passing lane. The yellow ball indicator marks the ball-carrier (A1), while dashed yellow arrows show the two potential passes defenders must cover.
Step-by-Step Instructions

Phase 1 — Stationary Marking (5 minutes)
- Pair each defender with an attacker in the upper third. Place them 2m apart to begin.
- On the coach's whistle, the attacker moves to a stationary lead position — no more than 3 steps in any direction.
- The defender must close to within 0.9m, adopting a split stance: feet shoulder-width apart, knees bent, weight forward on the balls of the feet.
- The defender raises the nearest arm (closest to the ball-carrier) to contest the pass, keeping the other arm low for balance.
- Hold for 3 seconds. Coach checks: Is the distance legal? Is the body between the ball and the goal? Is the defender's head up, reading the play?
- Rotate roles every 4 repetitions.
Phase 2 — Dynamic Closing (8 minutes)
- Set up a feeder at the transverse line with a ball. Three attackers spread across the upper third — WA on the left channel, GA in the goal circle, C in the middle.
- Three defenders take their matched positions, starting 1.5m off their attacker.
- The feeder calls a position name (e.g., "WA!") and delivers a flat, chest-height pass.
- The named attacker drives to a lead to receive. Their defender must sprint to close the 0.9m gap before the ball arrives, arriving in a legal marking position.
- The attacker holds the ball for 3 seconds while the defender maintains pressure — no contact, no reaching in.
- The feeder calls the next position. The attacker with the ball passes back to the feeder, and the cycle continues.
- Run for 90-second blocks, then rotate attackers and defenders.
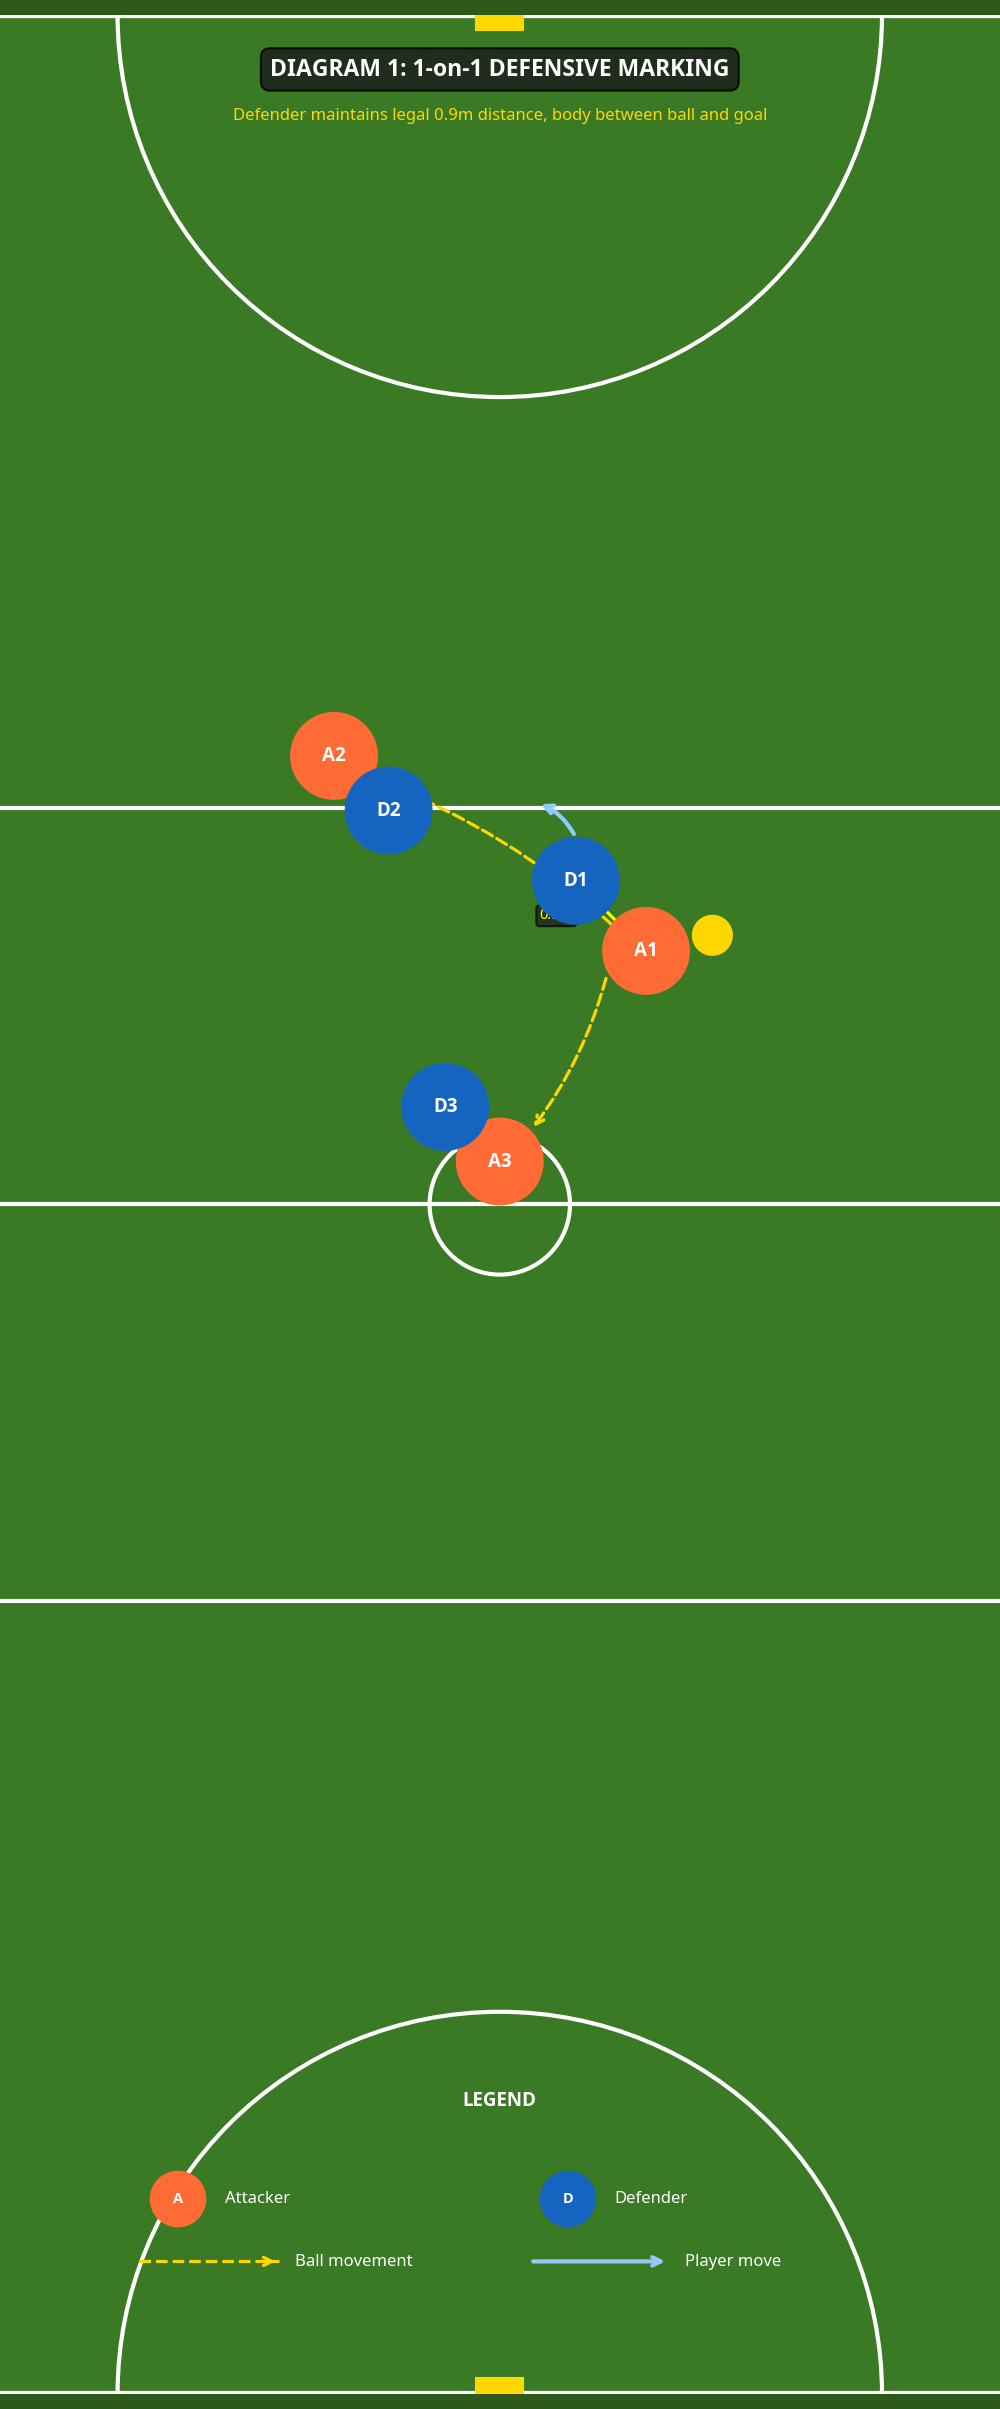
Diagram 2 illustrates the full 3v3 rotation pattern. The Feeder (green, F) triggers movement by calling a position and delivering the ball. WA drives to a lead (solid orange arrow), WD reacts and closes (solid blue arrow). Dashed yellow lines show the primary pass to WA and the secondary option to GA. Step labels ①②③ guide the sequence.
Phase 3 — Live Pressure with Intercept Read (10 minutes)
- Maintain the 3v3 structure. Now the feeder delivers the ball and the drill becomes semi-live: attackers may pass to each other (one pass only), defenders must react.
- Introduce the intercept position: when two defenders converge on the ball-carrier (the sideline trap), a third defender must read the forced pass and position to intercept.
- Defenders score a point for each legal intercept or forced turnover (out of court). Attackers score a point for each clean catch under pressure.
- Play 3-minute rounds. The team with the most points at the end of the round wins.

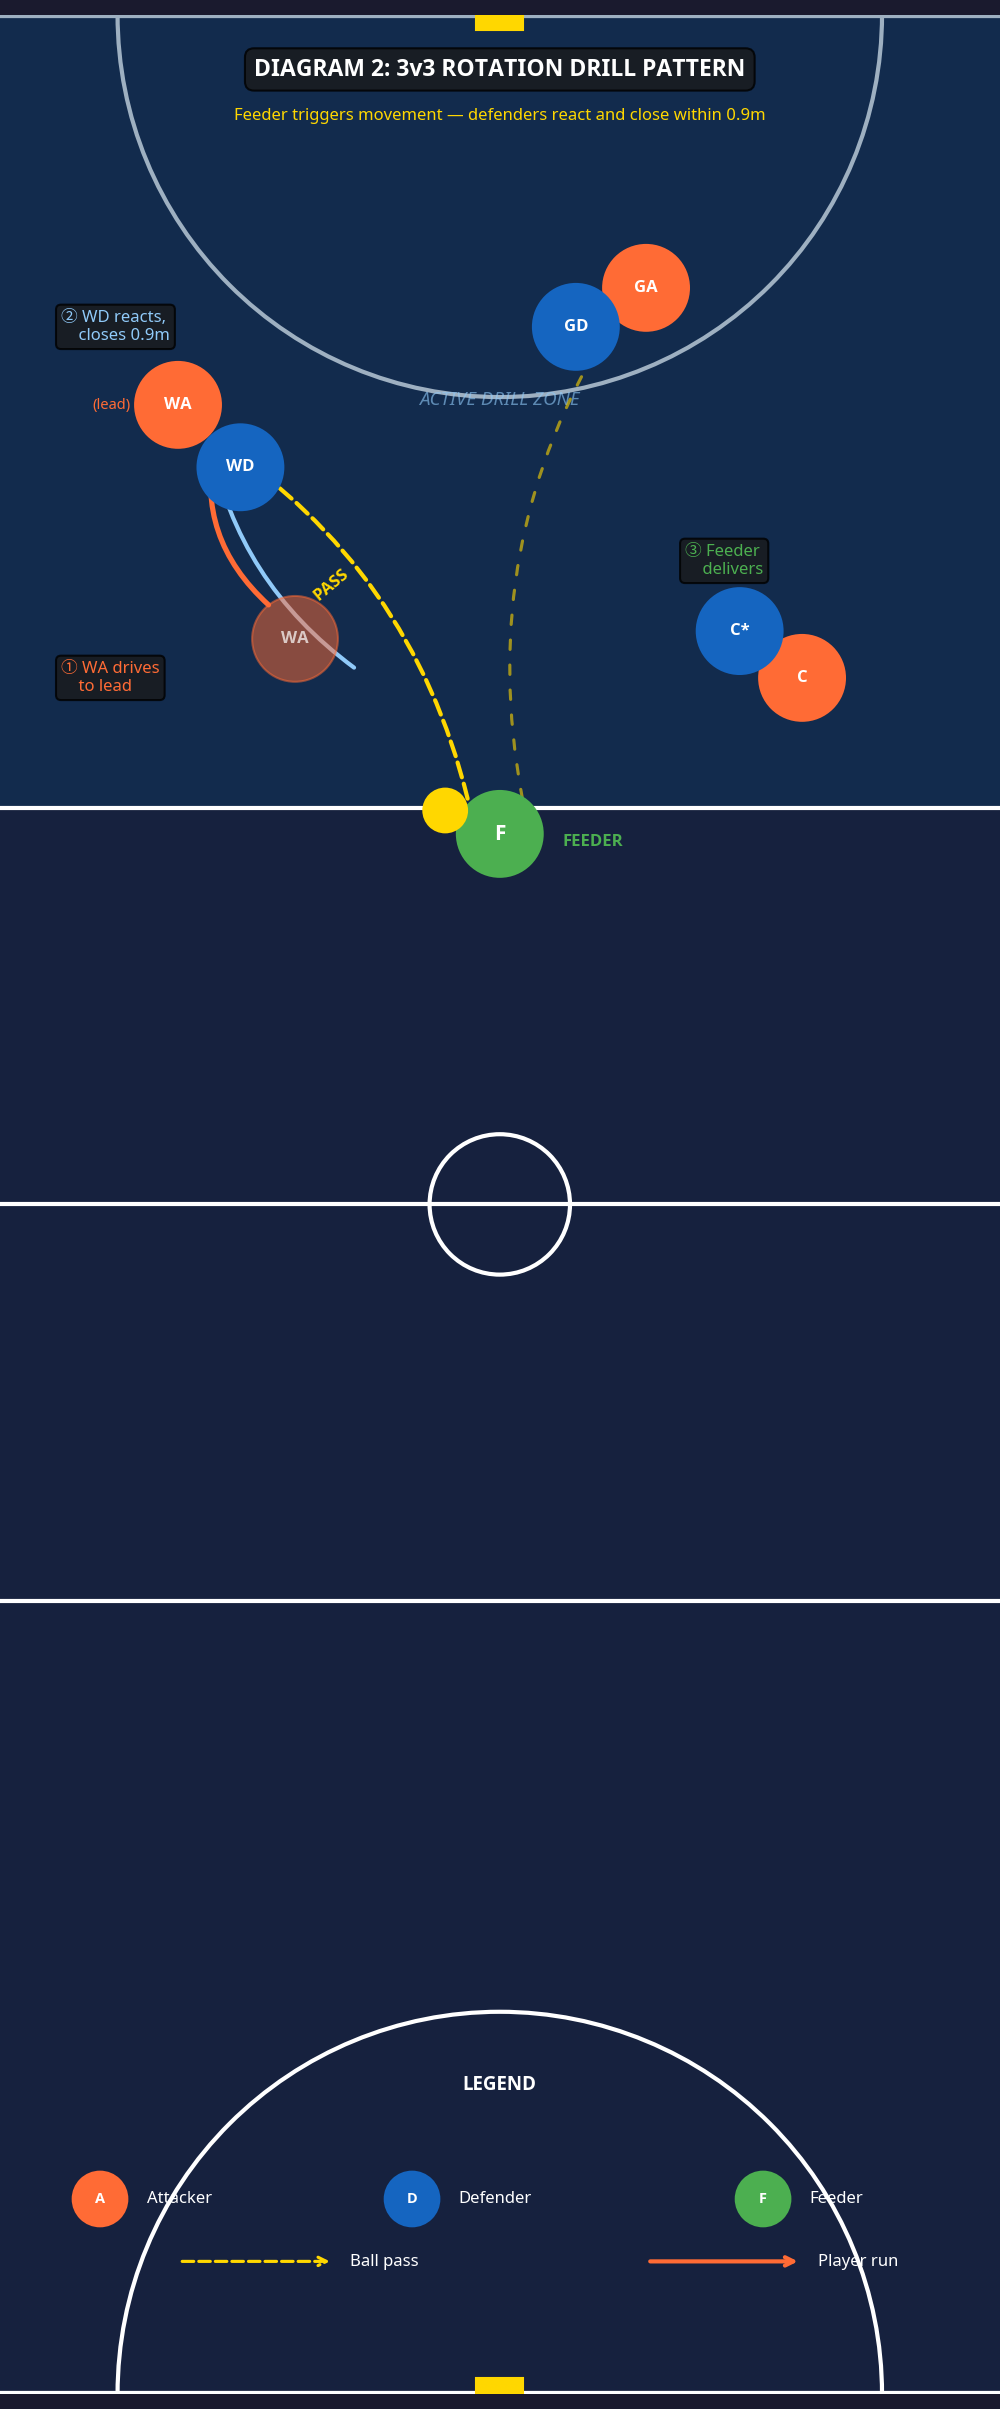
Diagram 3 shows the advanced sideline trap progression. GA (orange) is caught in the trap zone near the sideline with GD and WD closing from two angles (pink arrows). The dashed yellow arrow shows the forced pass toward the intercept position (INT, dashed circle). GK holds GS in the goal circle. C cuts off the WA support option.*
Key Coaching Points

1. Arrive before the ball, not with it. The single most common error in junior and intermediate netball is the defender arriving at the 0.9m mark at the same time as the ball — or worse, after it. Defenders must read the feeder's body language and begin their close-out movement a half-second before the pass is released. Cue: "Move on the feeder's elbow, not on the ball."
2. Legal distance is a competitive weapon, not a restriction. Coaches must reframe the 0.9m rule as an advantage. A defender who is consistently at exactly 0.9m — arms up, body balanced — is far more effective than one who is 1.5m away trying to reach in and conceding contact calls. Cue: "Own your space. The closer you are legally, the harder every pass becomes."
3. Shadow the ball, not the player. The defender's primary job is to deny the passing lane between the feeder and the attacker, not simply to stand in front of the attacker. Defenders should angle their body so that one arm covers the high pass and their body covers the flat pass. Cue: "You're a wall between the ball and the goal — not a mirror."
4. Footwork is the foundation. Defenders who lunge or reach with their upper body almost always concede contact. Emphasise short, sharp shuffle steps to maintain position as the attacker moves. Cue: "Feet first, hands second."
5. Communicate constantly. In the 3v3 phase, defenders must call "ball!" when they are on the ball-carrier and "help!" when they need support. This communication habit, built in training, directly transfers to game-day defensive cohesion.
6. Reset after every pass. Defenders must immediately reset their position after the ball moves — a defender who ball-watches for even one second gives their attacker a free lead. Cue: "Ball moves, you move."
Common Mistakes

Mistake 1 — Reaching in and conceding contact. Defenders extend their arms beyond the 0.9m boundary in an attempt to deflect the ball, resulting in a contact penalty. Correction: Remind defenders that arms must be raised vertically from the shoulder, not extended toward the ball-carrier. Use a cone placed at 0.9m as a visual boundary marker during early phases.
Mistake 2 — Flat-footed closing. Defenders jog to the close-out position rather than sprinting, arriving too late or off-balance. Correction: Insist on a full sprint to close-out. Time defenders from the moment the feeder calls the position to when they reach 0.9m — target time should be under 2 seconds for intermediate players.
Mistake 3 — Over-committing to the ball-carrier. In the 3v3 phase, all three defenders collapse onto the ball-carrier, leaving other attackers completely free. Correction: Assign clear marking responsibilities before each round. Only the matched defender closes the ball-carrier; the other two hold their attacker and read the play.
Mistake 4 — Dropping the arms during sustained pressure. After 2–3 seconds of marking, defenders lower their arms due to fatigue or complacency. Correction: Introduce a rule that the feeder can pass at any time during the 3-second hold — defenders who drop their arms will immediately concede a clean catch. This creates the habit of sustained arm position.
Mistake 5 — Poor body angle. Defenders face the attacker directly (square-on) rather than angling to deny the primary passing lane. Correction: Use cones to mark the passing lane between the feeder and the attacker. Ask defenders to position so their body blocks the direct line between the two cones.
Variations & Progressions

Progression 1 — Timed Close-Out Challenge (Intermediate → Advanced). Add a stopwatch. The feeder delivers the ball and the defender has exactly 1.5 seconds to reach legal marking distance. If they fail, the attacker earns a free pass. This replicates the urgency of game-speed defending and builds the habit of explosive close-out footwork. As players improve, reduce the target time to 1.2 seconds.
Progression 2 — Full Court 5v5 Transfer (Advanced). Once players have mastered the 3v3 drill, transfer the skills into a full-court 5v5 conditioned game. Rule: defenders must be within 0.9m within 2 seconds of the ball being caught, or the attacking team earns a free pass. This bridges the gap between the drill environment and match conditions, and allows coaches to assess whether defensive marking habits are holding up under full-game pressure.
Variation 1 — Easier: Stationary Attacker. For beginners or younger players, remove the lead movement entirely. The attacker stands still and the defender practises the close-out and body position in isolation. This allows players to focus purely on footwork and legal distance without the cognitive load of tracking movement.
Variation 2 — Harder: Two-Ball Pressure. The feeder holds two balls and can deliver to either the primary attacker or a second attacker simultaneously. Defenders must communicate instantly to decide who covers which ball. This variation trains decision-making speed and defensive communication under high cognitive load.
Age Adaptations
| Age Group | Key Modifications |
|---|---|
| Under 10 | Use a reduced court area (half the upper third). Reduce the close-out distance requirement to 1.2m. Focus only on Phase 1 (stationary marking). Use a soft foam ball. Limit sessions to 5-minute blocks with frequent water breaks. |
| Under 12 | Introduce Phase 2 (dynamic closing) but keep the feeder's pass slow and predictable. Allow defenders to practise the close-out without the timed element. Emphasise the verbal cue "feet first" to build good habits before speed is introduced. |
| Under 14 | Run all three phases. Introduce the timed close-out (2-second target). Begin teaching the intercept read in Phase 3 but allow defenders to nominate the intercept player before each round rather than reading it live. |
| Under 16 / Open | Full drill as described, including the sideline trap and live intercept read. Add the two-ball pressure variation. Introduce video review of the drill to allow players to self-assess their body angle and close-out speed. |
Coach's Note: Regardless of age group, always prioritise legal technique over speed. A defender who closes out at 80% pace with perfect body position will always outperform one who sprints in and concedes a contact call. Build the technique first; the speed will come with repetition.