The Centre Pass Defensive Press: Win the Ball Before They've Started
Master the Centre Pass Defensive Press to disrupt your opposition from the opening whistle, force turnovers in the centre third, and launch devastating counter-attacks before your opponents can reset.
Equipment Needed
Overview
The Centre Pass Defensive Press is a high-risk, high-reward strategy designed to disrupt the opposition's attacking flow from the very first pass. By applying immediate, coordinated pressure in the centre third, the goal is to force a turnover, win possession, and launch a swift counter-attack. This play is most effective when your team has a quick and agile midcourt — Centre (C), Wing Defence (WD), and Goal Defence (GD) — capable of reading the play, anticipating passes, and communicating effectively under pressure. It is an excellent tactic to deploy against teams that rely on a slow, structured build-up from their centre pass, or that have a dominant but predictable Wing Attack.
Setup

Equipment required: A full-sized netball court (30.5m x 15.25m), one netball, and bibs for two teams of at least seven players each.
Court setup: The play begins from a standard centre pass setup. The attacking team lines up for their centre pass while your defending team sets up in their standard starting positions, but with a deliberate defensive focus on the centre third.
Defending team positions:
| Position | Starting Role |
|---|---|
| Centre (C) | Positions behind and slightly to the side of the attacking C, forcing them to look away from their primary target |
| Wing Defence (WD) | Plays tight and ball-side on the attacking WA, denying the easy straight pass |
| Goal Defence (GD) | Sets up tight on the attacking GA, initially denying the pass but ready to rotate and cover space |
| Goal Keeper (GK) | Holds position in the goal circle, ready for a long ball or to anchor the counter-attack |
| Goal Shooter (GS) | Holds position in the attacking goal third, ready to receive the counter-attack ball |
| Wing Attack (WA) | Holds position, ready to provide a secondary outlet on the counter-attack |

Diagram 1 — Initial setup at centre pass: Defending team (navy) applies tight pressure on attacking team (orange) primary outlets.
Step-by-Step Instructions

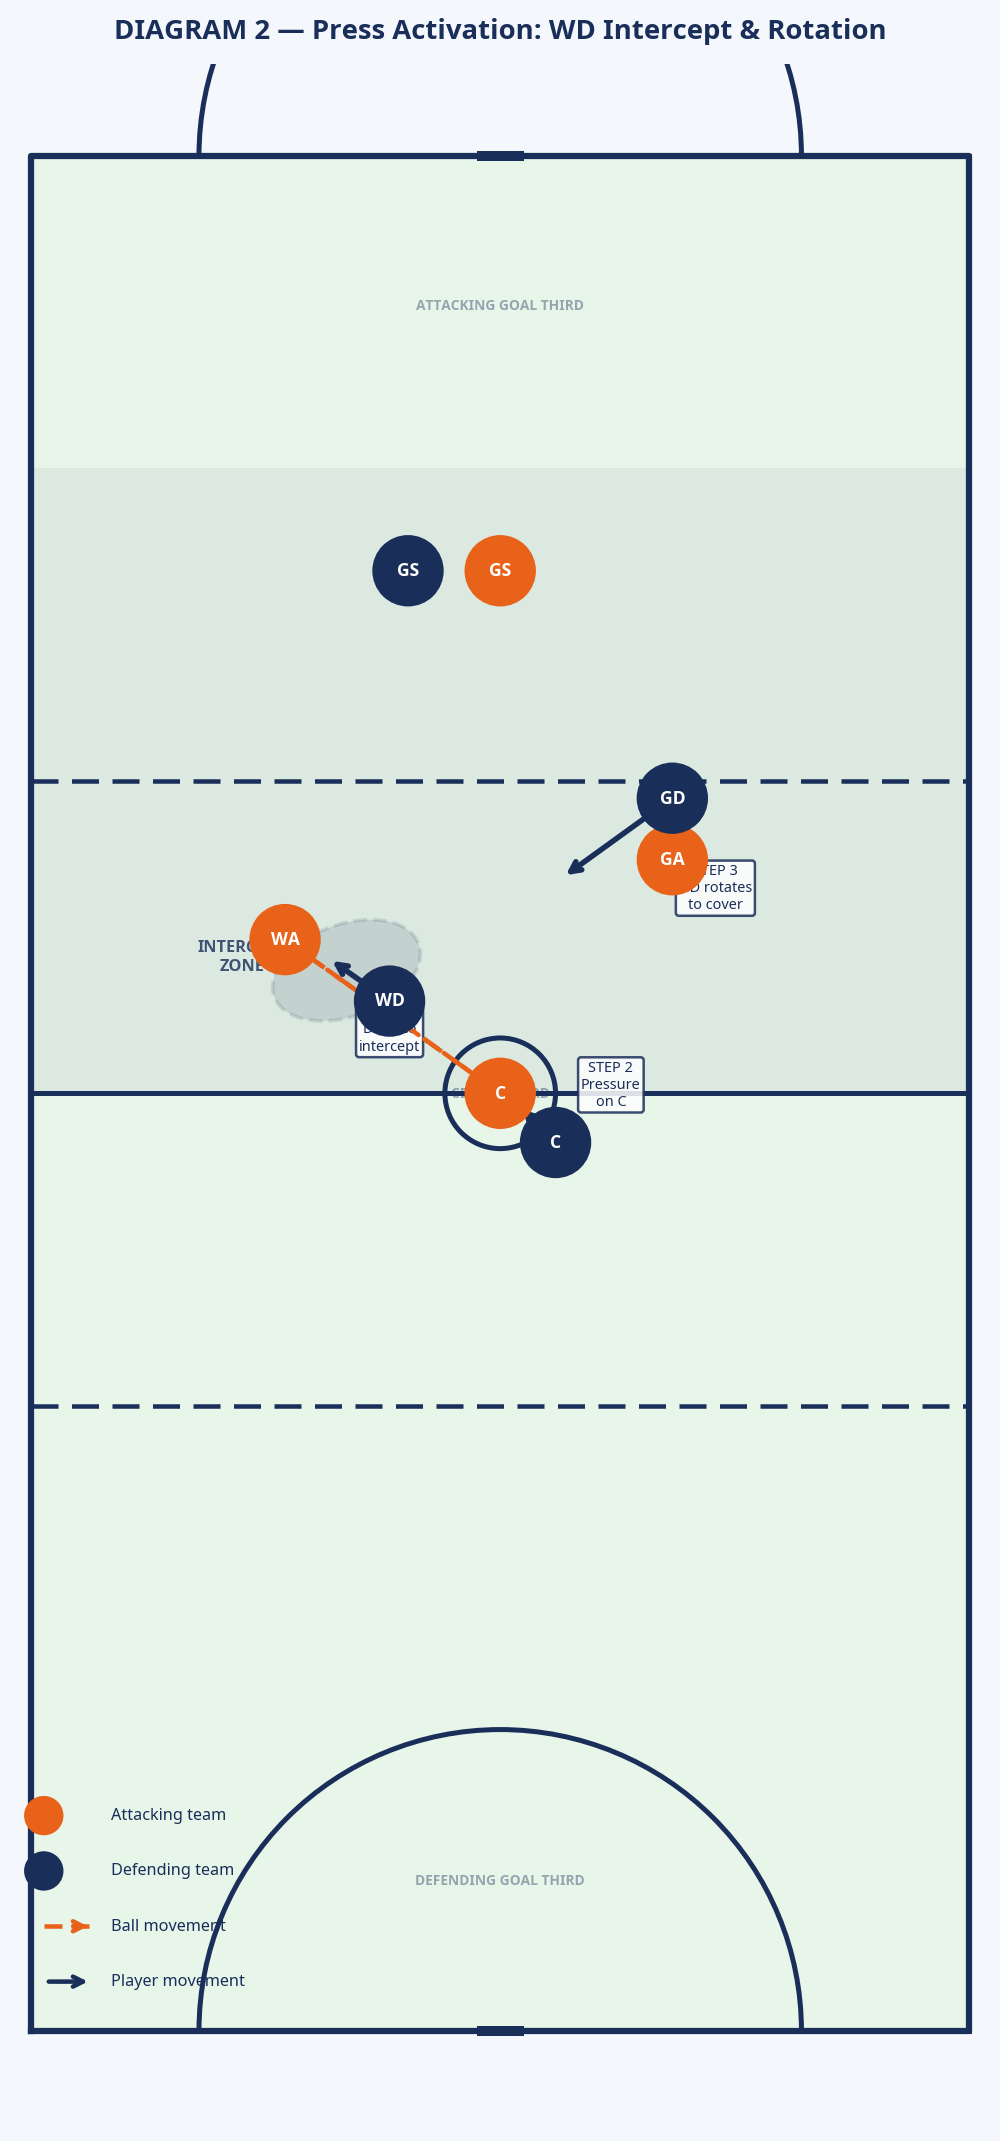
Step 1 — The Bait. As the umpire blows the whistle, the defending C applies immediate pressure on the attacking C, forcing them to look towards the sideline and pass to their WA. The defending WD initially holds a tight, ball-side position, making the pass to the WA look available but contested. The key here is deception — the WD must not telegraph their intention to intercept.
Step 2 — The Intercept. As the ball is released by the attacking C, the WD makes a decisive, explosive move to drive into the passing lane and intercept the ball. This requires perfect timing and a full commitment to winning the ball cleanly. Half-hearted attempts will result in contact calls or a free pass to the opposition.
Step 3 — The Rotation. Simultaneously, the defending GD reads the play and immediately rotates into the space vacated by the committed WD. This movement covers the attacking GA who may be driving into the now-vacant area, preventing an easy recovery pass for the opposition. The GD must communicate loudly — calling 'covering!' — to give the WD the confidence to go for the intercept.
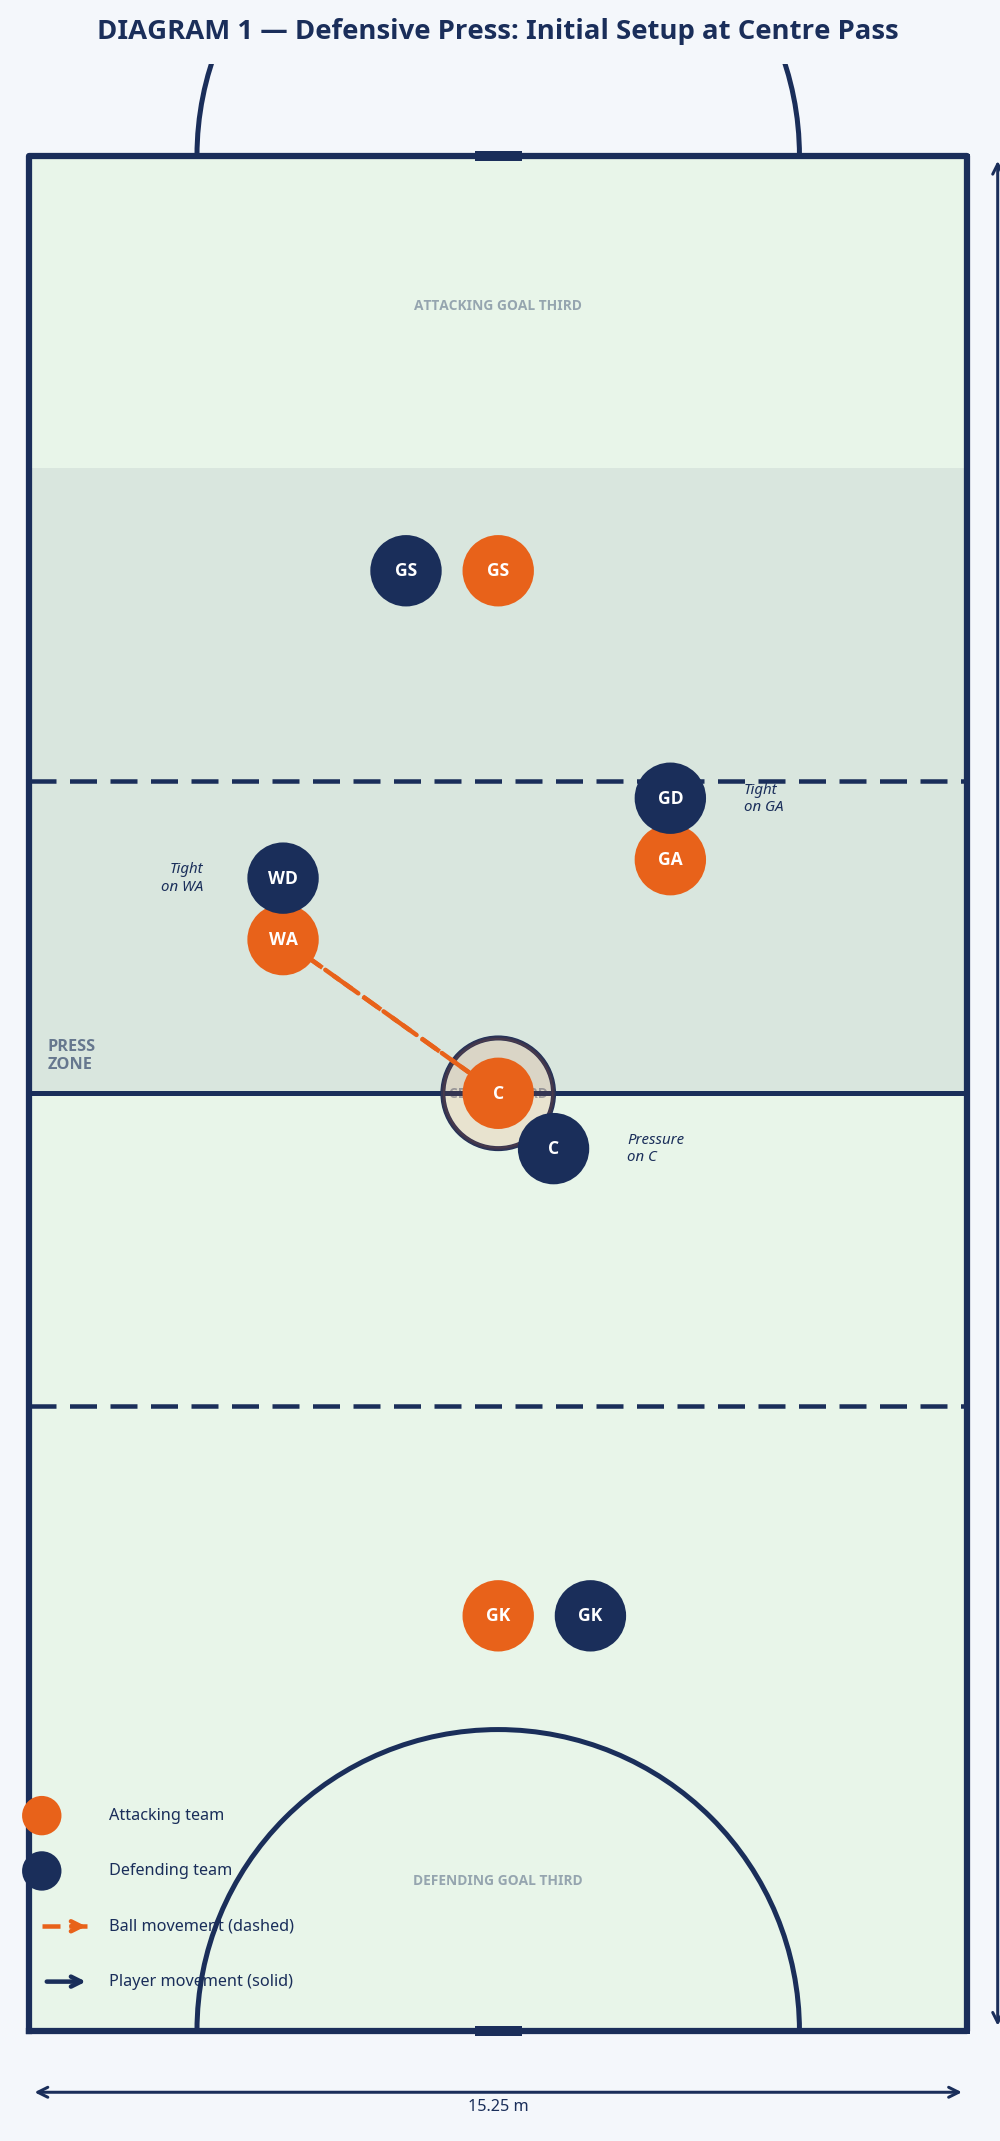
Diagram 2 — Press activation: WD drives to intercept the first pass while GD rotates to cover space.
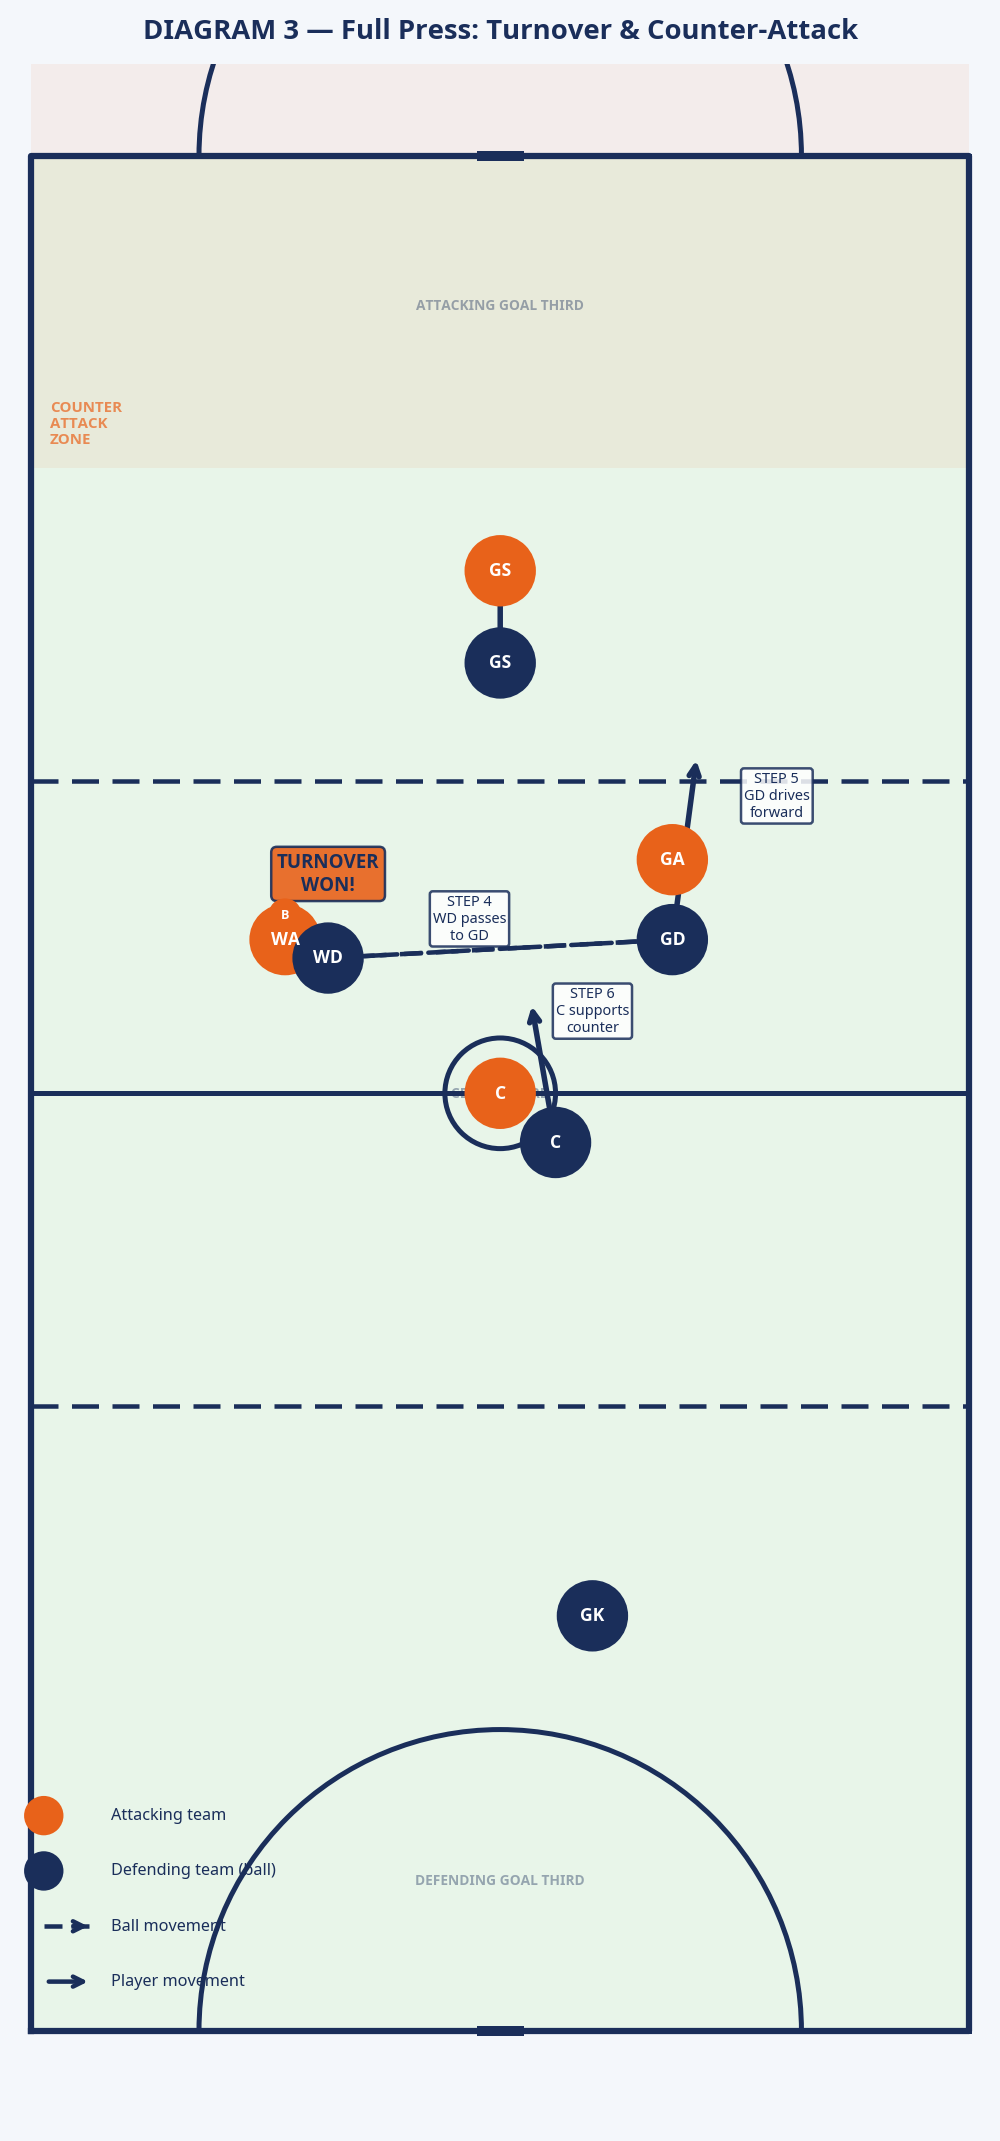
Step 4 — The Turnover and Transition. Having secured the turnover, the WD immediately looks to transition from defence to attack. Their first look should be to the now-advancing GD or the supporting C. The WD must get their head up within one second of landing — hesitation allows the opposition to recover their defensive structure.
Step 5 — The Counter-Attack. The WD releases the ball to the best available option. The defending C and GD drive forward into the attacking third, creating a numerical advantage — ideally 2-on-1 or 3-on-2. The objective is to move the ball quickly and directly to the GS for a shot before the opposition can reset. Every extra second gives the defence time to recover.
Step 6 — The Finish. The GS, who has been holding their position in the attacking goal third, drives to receive the final pass and takes the shot. The WA provides a secondary option if the direct route to the GS is blocked.

Diagram 3 — Turnover won: WD distributes to GD who drives into the attacking third, launching the counter-attack.
Key Coaching Points
Pressure on the passer is the foundation. The press starts and ends with the defending C. Their job is to harass the attacking C, obscure their vision, and force a predictable, pressured pass to the sideline. If the C is passive, the attacking C will have a clear view of the court and the entire press is nullified before it begins.
Timing of the intercept is a skill, not a gamble. The WD must wait for the ball to leave the attacking C's hands before committing to the intercept. Leaving early results in a contact call; leaving late means the WA receives the ball comfortably. Drill this timing relentlessly in training until it becomes instinctive.
Communication is non-negotiable. The WD and GD must be in constant verbal communication throughout the play. The GD must call 'covering!' loudly and clearly before the WD commits to the intercept. Without this confirmation, the WD risks leaving a dangerous gap in the defence.
Transition must be instant. Once the turnover is won, there is no time to celebrate. Players must switch their mental state from defence to attack within a heartbeat. Coaches should use the cue phrase 'win it, go!' to trigger this immediate transition in training.
Head up, first option. The player in possession after the turnover — typically the WD — must get their head up and hit the first available option. Holding the ball for more than a second allows the opposition to recover. Encourage players to look before they land.
Work rate off the ball wins games. The success of the counter-attack depends entirely on the work rate of players without the ball. The C and GD must sprint to create options and overload the space. If they jog, the counter-attack stalls.
Common Mistakes
The WD gambles too often. When the WD goes for the intercept on every centre pass, the opposition quickly identifies the pattern and exploits the space behind. The press must be used selectively and strategically — perhaps once or twice per quarter — to maintain its element of surprise.
The GD fails to rotate. This is the most common and most costly error. The GD stays with their player (GA) and does not cover the space vacated by the WD. If the intercept attempt fails, the attacking C has a clear pass to the GA driving into open court, resulting in a fast break against a disorganised defence.
No pressure on the centre pass. The defending C is passive or slow to apply pressure, giving the attacking C a clear, uncontested view of the court. Without pressure on the passer, the WD's intercept attempt is based on guesswork rather than a forced, predictable pass.
Slow transition after the turnover. The team wins the turnover but takes two to three seconds to make a decision, allowing the opposition to recover their defensive shape. The advantage is lost before it can be exploited.
Forcing the counter-attack. After the turnover, players attempt a long, speculative pass to the GS instead of taking the short, safe option to the C or GD. This results in a second turnover, leaving the team in a worse position than before the press was attempted.
Variations and Progressions

Progression 1 — Live Goal Attack. Initially, have the attacking GA run a set, predictable path so the GD can practise their rotation in a controlled environment. To progress, allow the GA to react freely to the play, forcing the GD to make real-time decisions under pressure.
Progression 2 — Full-Court Pressure. After the counter-attack shot, the play does not stop. The team must immediately transition back to a defensive press, applying full-court pressure on the opposition's next centre pass. This builds the fitness, mental resilience, and transition speed required to sustain the press across a full game.
Progression 3 — Time Constraint. Give the counter-attacking team a five-second limit to get a shot off after the turnover. This encourages speed, decisiveness, and efficiency in the transition phase, and replicates the pressure of a real game situation.
Variation 1 — The Second-Pass Press. Instead of targeting the first pass, the defending team allows the initial pass to the WA but immediately applies intense pressure, forcing a sideways or backward pass. The press is then activated on the second phase of the attack, catching the opposition when they are already under pressure and moving laterally.
Variation 2 — Zonal Press. Instead of man-to-man marking, the WD and GD defend a specific zone in the centre third — approximately 3 to 5 metres either side of the centre circle — aiming to intercept any ball that enters their area. This is a more conservative approach that reduces the risk of leaving gaps, and is particularly effective against teams with multiple attacking options.
Age Adaptations

Under 12 and Under 14. At these ages, focus on the individual skills that underpin the press rather than the full system. Work on the WD's timing for the intercept in a 1-on-1 drill, then introduce the GD rotation as a separate 2-player exercise. The concept of a coordinated full press may be too complex for this age group, so begin by focusing on ball-side positioning, denying the first pass, and creating pressure through good footwork and body position.
Under 16. Players at this level should be capable of executing the full press. The coaching focus shifts to the decision-making layer: when is the right time to use the press? What cues from the opposition trigger the activation? Introduce the variations and progressions at this level, and begin to discuss the tactical context — for example, using the press when trailing by two goals in the final quarter.
Open and Advanced. At the elite level, the press should be seamless, adaptable, and difficult to read. Coaches should focus on the tactical nuances, such as identifying a specific opposition player to target (for example, a WA who tends to receive the ball in the same position every centre pass), or using the press to control the tempo and tire the opposition midcourt. The counter-attack should be a polished, multi-option system with two or three set plays flowing from the initial turnover, depending on where the ball is won.