The Diamond Zone Defence: Controlling the Goal Third
Master the art of space denial with this structured zone defence setup, designed to force attacking errors and create interception opportunities in the goal third.

Equipment Needed
1. Overview
The Diamond Zone Defence is a structured defensive set play utilized primarily in the goal third to disrupt the opposition's attacking flow. Unlike traditional one-on-one (man-to-man) defence where players track specific opponents, a zone defence requires players to guard designated areas of the court. The primary objective is to clog the central channel, deny easy access to the goal circle edge, and force the attacking team into making high-risk, cross-court passes.
This setup is particularly effective against teams with a dominant holding Goal Shooter (GS) or a highly mobile Goal Attack (GA) who relies on quick give-and-go passes. By setting up a unified defensive wall, you force the opposition to slow down, rethink their strategy, and ultimately increase the likelihood of held balls or intercepted passes.
2. Setup
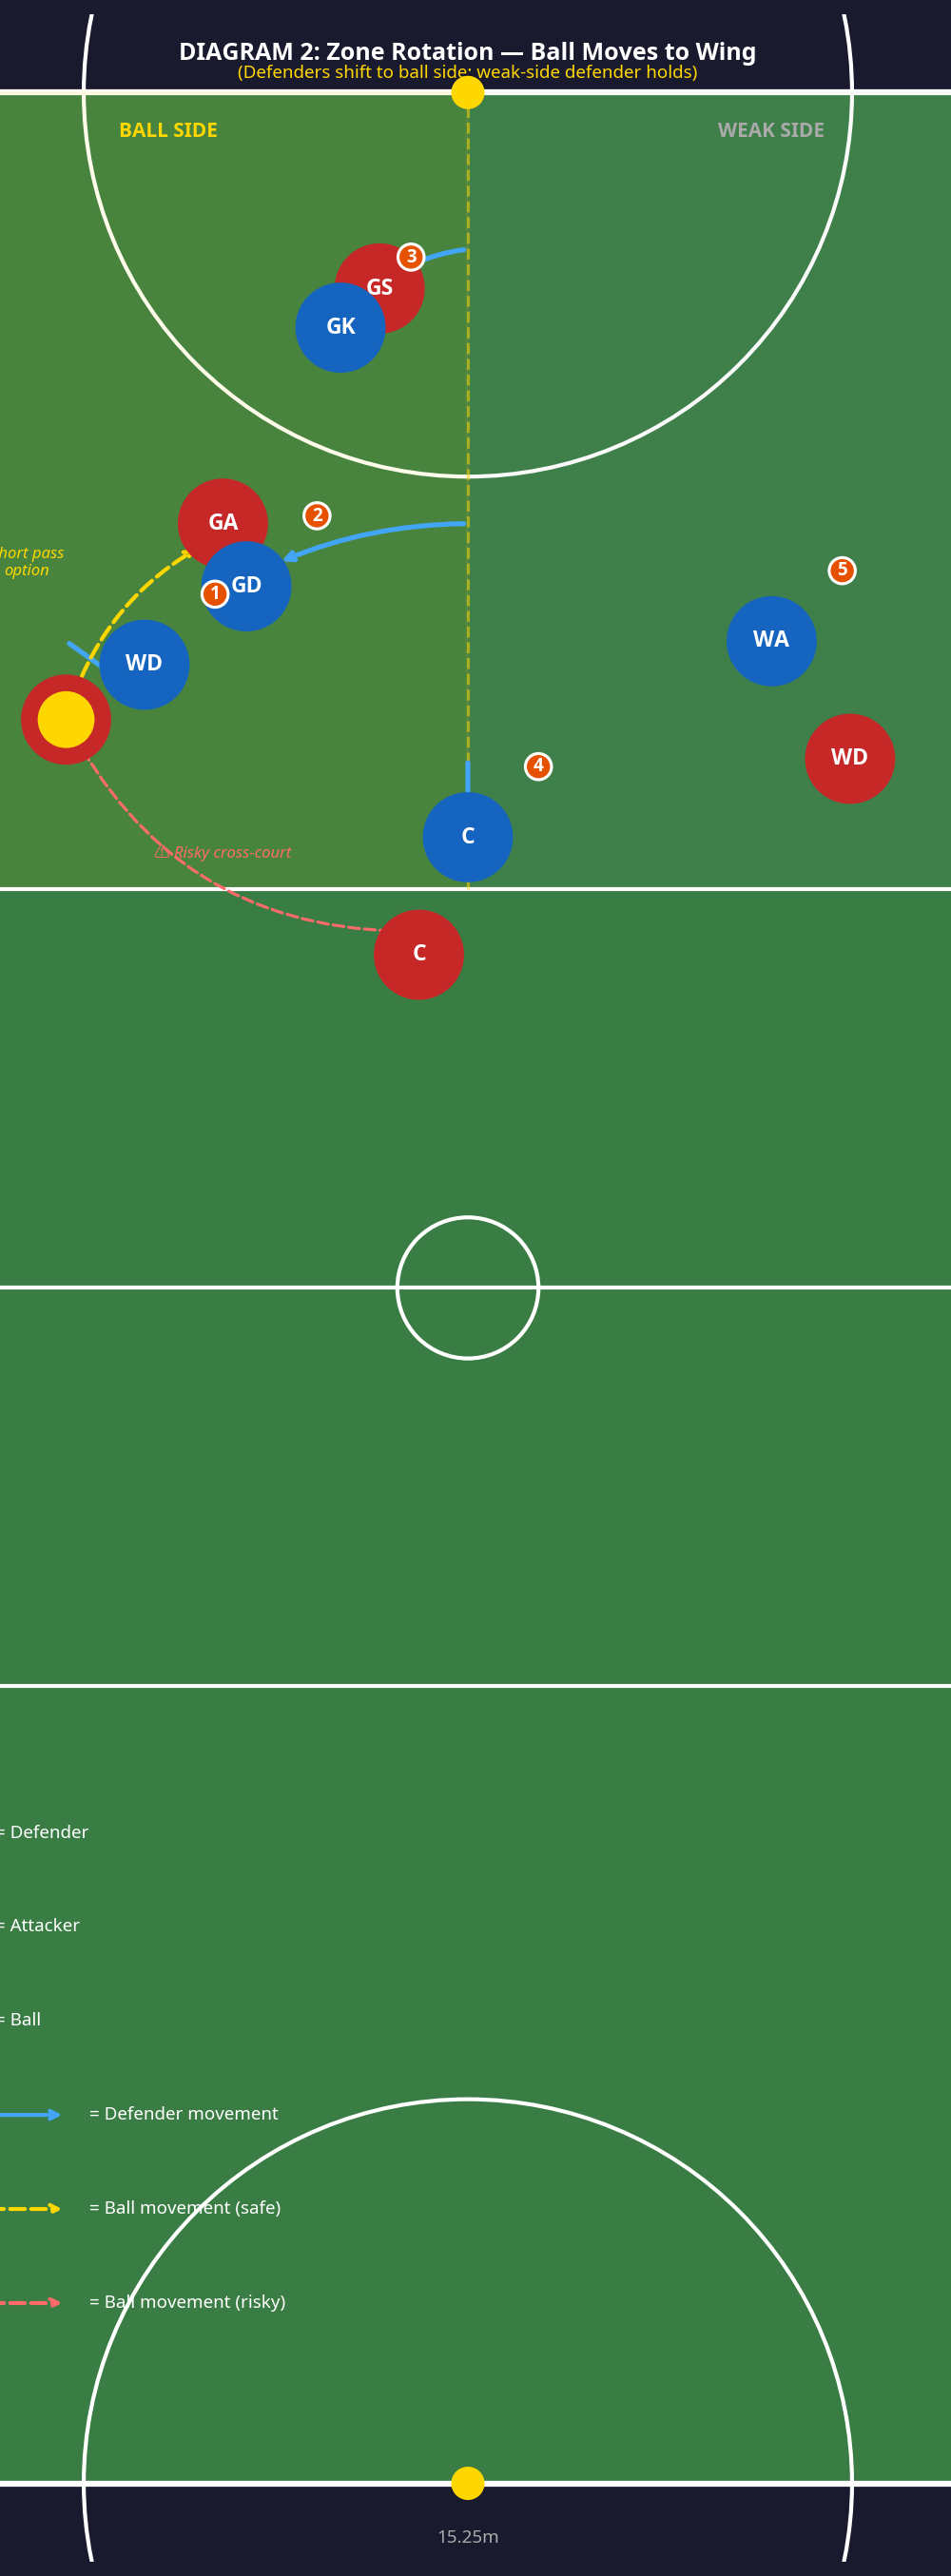
Court Area: Goal Third (defending the top goal)
Player Positions Involved: GK, GD, WD, C, WA
Equipment Needed: 1 netball, bibs (two contrasting colours for practice), optional cones to mark zone boundaries during initial walk-throughs.
Initial Positioning
- Goal Keeper (GK): Positioned deep in the goal circle, slightly in front of the Goal Shooter to deny the direct lob pass.
- Goal Defence (GD): Positioned at the top centre of the goal circle edge, acting as the point of the diamond.
- Wing Defence (WD) & Wing Attack (WA): Positioned in the left and right channels respectively, approximately halfway between the transverse line and the goal circle.
- Centre (C): Dropped back into the goal third, sitting centrally between the WD and WA to block the middle passing lane.

3. Step-by-Step Instructions
Executing the zone requires discipline, communication, and synchronized movement. Here is how the play unfolds when the opposition brings the ball down the court:
- Establish the Initial Wall: As the ball crosses the transverse line into your defensive goal third, all five defensive players must immediately drop into their designated zones. Do not get drawn into chasing individual attackers.
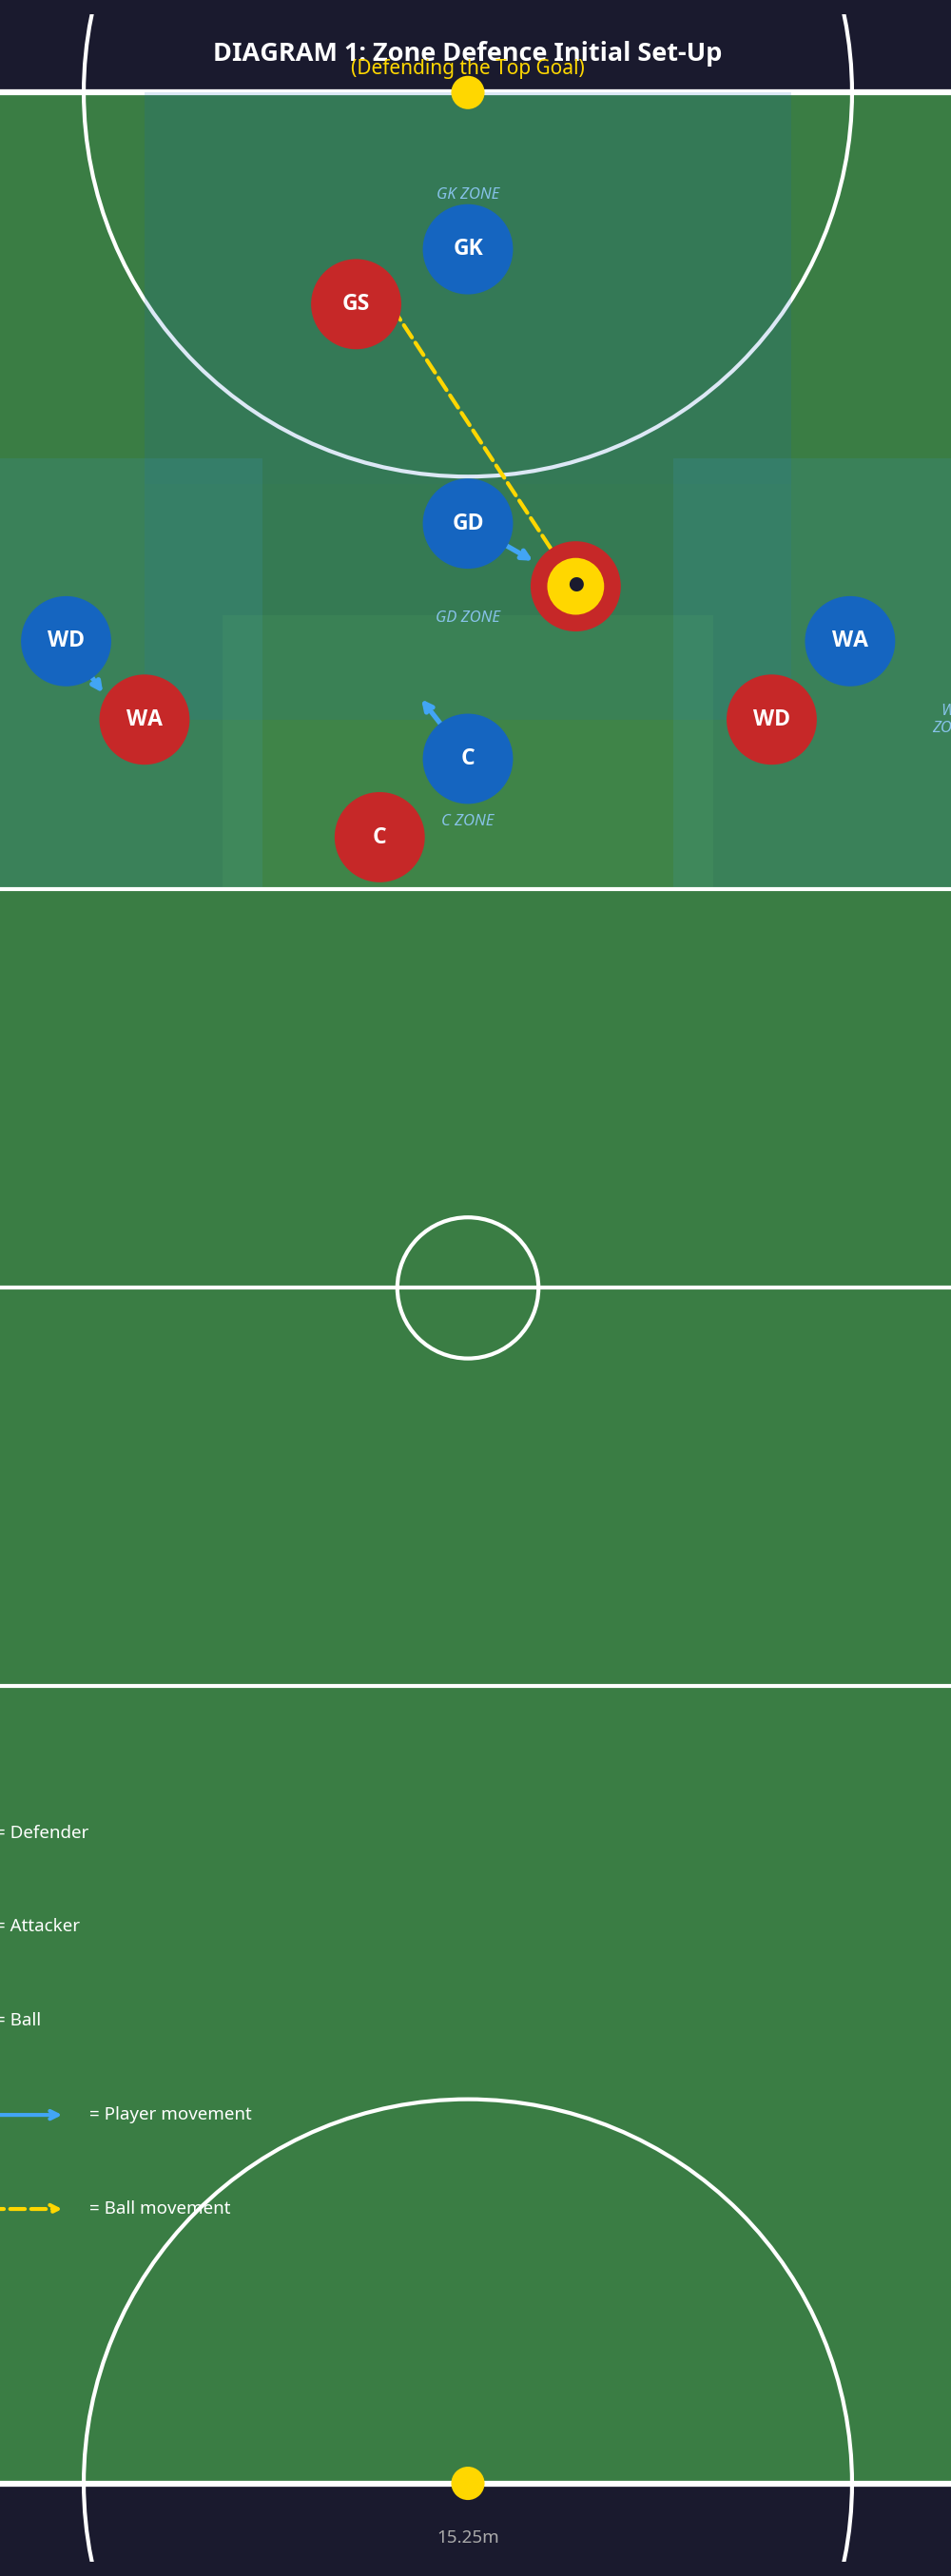
- React to the Ball Placement: If the ball is passed to the attacking Wing Attack (WA) on the left wing, the defensive structure must rotate as a single unit toward the ball side.
- Apply Ball-Side Pressure: The Wing Defence (WD) steps up to apply immediate, legal three-foot pressure over the ball carrier. The Goal Defence (GD) shifts slightly left to deny the easy pass to the Goal Attack (GA).
- Shift the Backline: The Goal Keeper (GK) shifts to the ball side of the Goal Shooter (GS), maintaining a front position to intercept any attempted feed into the circle.
- Hold the Weak Side: The Centre (C) shifts slightly left to block the central channel, while the defensive Wing Attack (WA) holds their position on the weak side (right channel). This weak-side positioning is crucial to intercept any desperate, looping cross-court passes.
- Spring the Trap: As the attacker runs out of time (the 3-second rule), they are forced into a high-risk pass. The nearest defender attacks the ball at its highest point to secure the interception.
4. Key Coaching Points
- Eyes on the Ball: Defenders must maintain an open body stance, allowing them to see both the player in their zone and the ball carrier simultaneously.
- Move as a Unit: The zone is only as strong as its weakest link. If one player shifts to the ball side, the entire unit must slide on an invisible string to maintain the structure.
- Communication is Non-Negotiable: The Goal Keeper (GK) has the best view of the court and must act as the defensive director, calling out attacker movements (e.g., "GA driving left!").
- Dictate, Don't React: The goal of the zone is to force the attackers into the pockets you want them to use. By clogging the middle, you dictate that the ball must go wide.
- Attack the Interception: When the cross-court pass is forced, the weak-side defender must commit fully to the interception. Hesitation will result in a clean catch for the attacker.
5. Common Mistakes
- Reverting to Man-to-Man: The most frequent error is a defender getting "sucked in" by a driving attacker and following them out of their designated zone, thereby opening up a massive hole in the defensive wall.
- Flat-Footed Defending: Players standing flat-footed cannot react quickly enough to intercept. Defenders must stay on the balls of their feet, ready to explode toward the pass.
- Ignoring the Weak Side: If the weak-side defender (often the WA or WD depending on ball placement) drifts too far toward the middle, they leave the opposite wing completely exposed for an easy switch pass.
- Silent Defence: A quiet zone is a failing zone. Lack of talk leads to confusion over who is picking up an attacker cutting through the seams of the zones.
6. Variations & Progressions
- Progression 1: Overload the Zone: During practice, add an extra attacker (e.g., 6 attackers vs 5 defenders) to force the defensive unit to work harder on their communication and shifting speeds.
- Progression 2: The Trap: Instruct the GD to intentionally leave a slight gap for the GA to drive into. As the pass is released, the C and GD collapse on the space simultaneously to force the turnover.
- Variation: The Box Zone: If the opposition is exploiting the wings, shift from a diamond shape to a flatter "box" structure (four players across the transverse line) to deny entry into the goal third entirely.
7. Age Adaptations
- Under 10s / Under 12s: True zone defence is conceptually difficult for young players. Focus instead on "shadowing" and basic spatial awareness. Use cones to visually map out where players are allowed to stand.
- Under 14s: Introduce the concept of "ball-side" and "weak-side." Practice shifting as a unit without attackers first, then slowly introduce offensive pressure.
- Under 16s / Open: Implement the full Diamond Zone. Focus heavily on the speed of the shift, the quality of communication, and setting deliberate traps for specific opposition players.