Lightning Strike: Fast Break Centre Pass Play
Master the Lightning Strike — a three-touch fast break from the centre pass that moves the ball from the centre circle to the shooting circle in under four seconds, exploiting defensive reset time before opponents can organise.
Equipment Needed
Overview
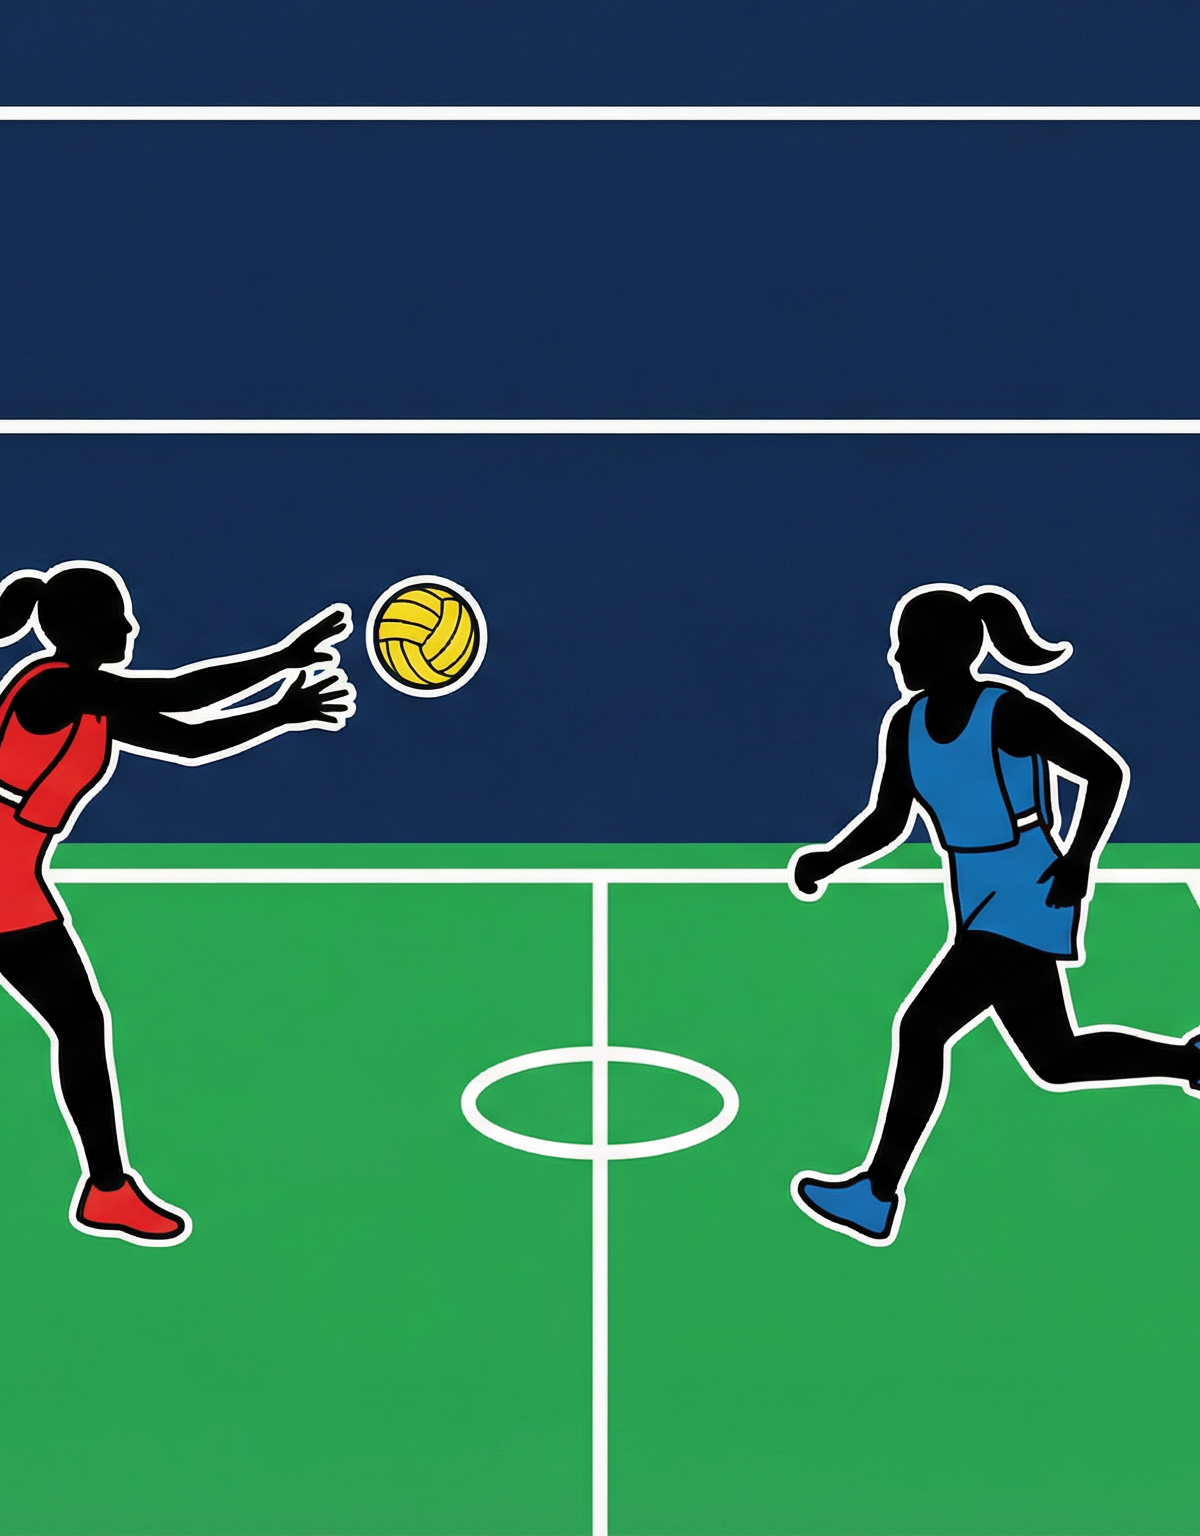
The Lightning Strike is a structured fast break centre pass play designed to move the ball from the centre circle to the shooting circle in three passes and under four seconds. It exploits the brief window immediately after the whistle when the defending team is still transitioning from their own centre pass mindset into a defensive set. When executed with precision, this play generates a high-percentage shot for the Goal Shooter before the opposing Goal Keeper and Goal Defence can establish an organised defensive shape inside the goal circle.
This play is most effective when your Centre is quick and decisive, your Wing Attack has strong lead timing, and your Goal Attack can execute a flat, explosive lead across the transverse line. Use it consistently in the first quarter to establish tempo, and return to it after any opposition turnover when defenders are mentally disorganised.
When to use it: At every centre pass where your team has the ball, as the primary structured play. It is particularly potent in the final two minutes of a quarter when a quick goal can shift momentum.
Setup
Equipment Required
| Item | Quantity | Notes |
|---|---|---|
| Netball (match ball) | 1 | Size 5 for U14 and above |
| Netball court (full) | 1 | 30.5m × 15.25m, all lines marked |
| Bibs (2 colours) | 14 | 7 per team |
| Cones | 6 | For marking lead zones in training |
| Whistle | 1 | Coach or designated umpire |
Court Setup
Use a full-size court with all standard Netball markings. During training, place two cones on the left side of the centre third approximately 2–3 metres inside the transverse line to mark the WA's target lead zone, and two cones on the right side near the transverse line to mark the GA's acceleration corridor into the attacking third. Remove cones once players understand the spatial targets.
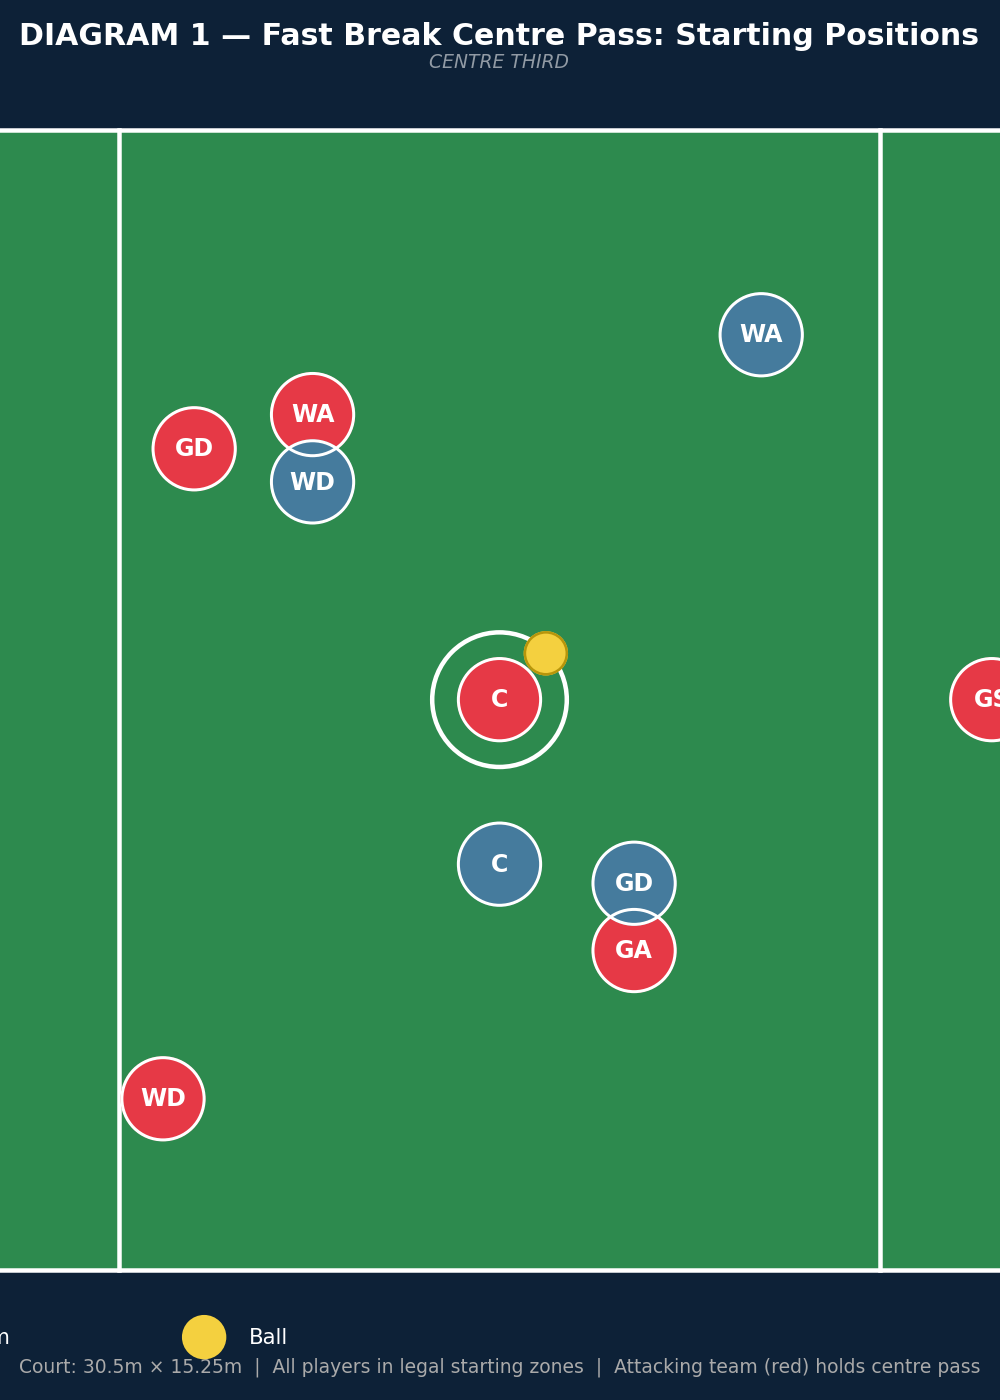
Starting Positions
Refer to Diagram 1 below for the precise starting layout.

| Position | Zone | Starting Location | Role in Play |
|---|---|---|---|
| C (Centre) | Centre circle | Exact centre of court | Ball carrier; initiates play |
| WA (Wing Attack) | Centre third | Left side, ~2.5m from centre | Primary first-pass receiver |
| GA (Goal Attack) | Centre third | Right side, near transverse | Secondary receiver; feeds circle |
| GS (Goal Shooter) | Attacking third | Inside goal circle edge | Final receiver; takes shot |
| WD (Wing Defence) | Centre third | Left side, own half | Provides reset option if play breaks |
| GD (Goal Defence) | Defensive third | Right side, near centre | Holds position; does not contribute to attack |
| GK (Goal Keeper) | Defensive third | Own goal circle | Holds position |
Step-by-Step Instructions
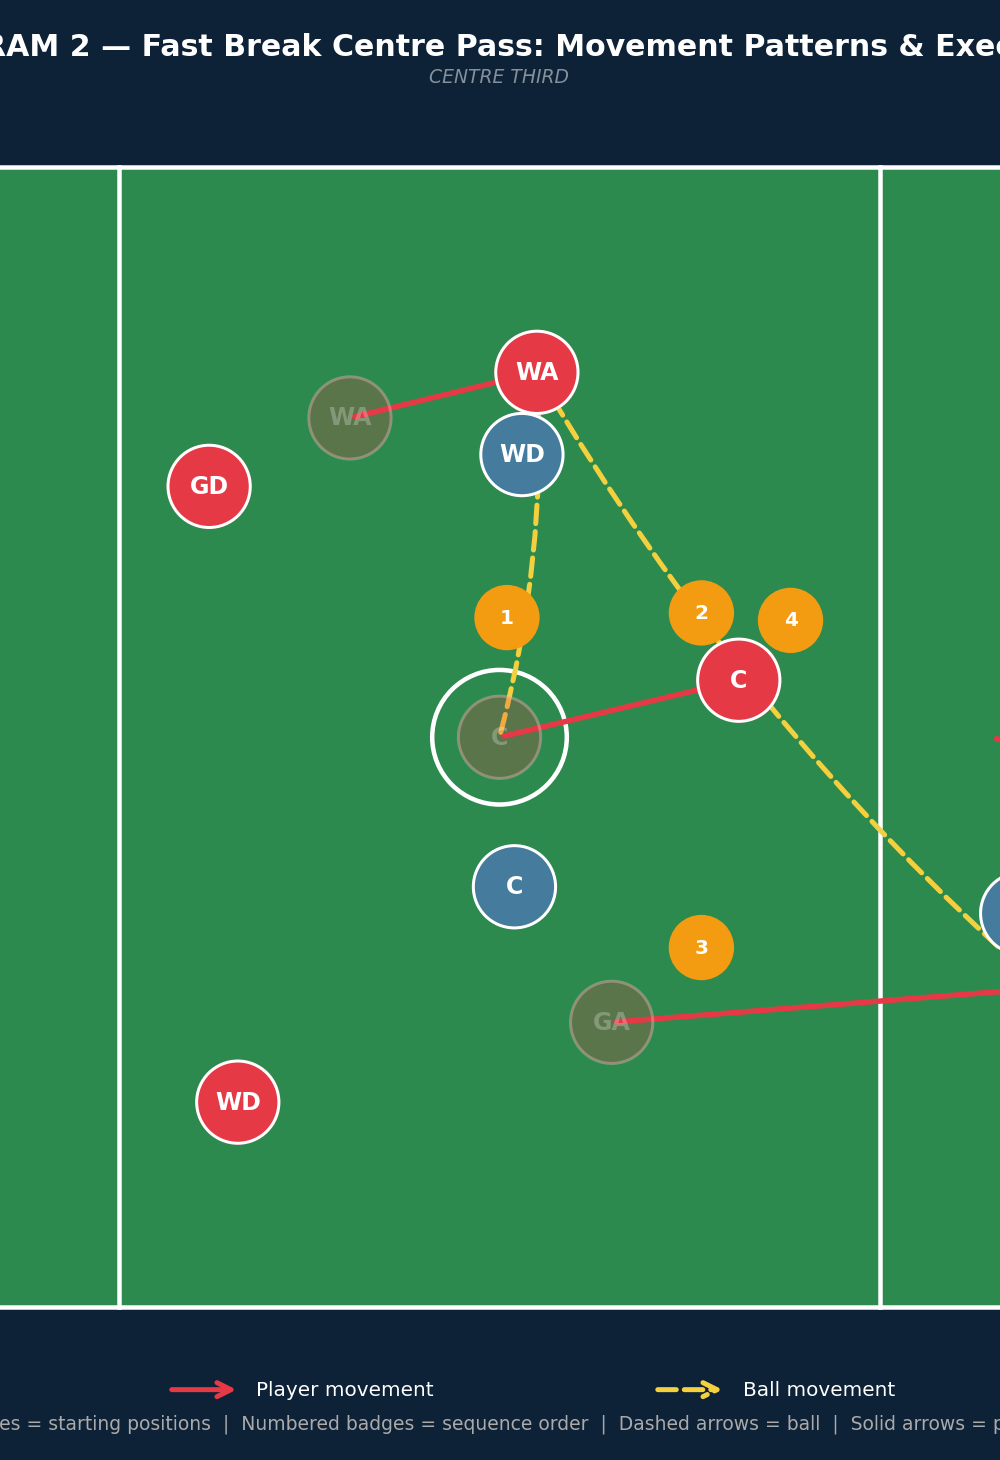

The play unfolds in five numbered movements shown in Diagram 2. Coaches should teach each step in isolation before combining them at full speed.
Step 1 — The Whistle Trigger (0.0–0.5 sec): At the umpire's whistle, the Centre (C) immediately looks to the Wing Attack (WA) on the left side. The WA executes a sharp two-step fake toward the centre circle (drawing the opposing WD toward them), then plants and drives hard toward the left transverse line. The C delivers a flat, chest-height pass directly into the WA's leading hands. The pass must travel no more than 3–4 metres and be released within 1.5 seconds of the whistle.
Step 2 — C Drives to Support (0.5–1.5 sec): The moment the C releases the ball, they immediately drive forward and to the right, clearing the centre circle and positioning themselves in the right-centre corridor of the centre third. This is a critical support run — if the primary play breaks down, the C becomes the reset option.
Step 3 — GA's Explosive Lead (0.5–1.5 sec, simultaneous with Step 2): While the WA is receiving the ball, the Goal Attack (GA) executes a hard, diagonal lead from the right side of the centre third across the transverse line into the attacking third. The GA must time this run so they arrive at their target zone — approximately 2 metres inside the attacking third on the right channel — at the same moment the WA catches the ball. The lead must be at full sprint pace to create genuine separation from the opposing GD.
Step 4 — WA Passes to GA (1.5–2.5 sec): The WA catches and immediately releases a long, flat pass to the leading GA. The WA should take no more than one step to balance before delivering. The pass is directed into the space ahead of the GA's lead — not to where the GA is, but to where they are going. This is a 6–8 metre pass and must be accurate to the GA's outside hand to protect against the GD.
Step 5 — GA Feeds GS in the Circle (2.5–4.0 sec): The GA receives the ball at pace, pivots to face the goal circle, and immediately identifies the GS's lead. The GS should have timed a sharp lead from the edge of the goal circle toward the near post. The GA delivers a quick, low feed — a bounce pass or a flat chest pass — into the GS's leading hands inside the circle. The GS catches, lands, and shoots within one second of receiving.
Key Coaching Points
1. The WA's fake must be convincing. A half-hearted fake does not move the opposing WD and the passing lane closes. Insist on two full steps toward the centre before the plant-and-drive. Drill this in isolation using a shadow defender.
2. The C must release the ball within 1.5 seconds. Hesitation kills the play. The entire timing chain depends on the C making a fast, committed decision. If the WA is not open, the C must immediately look to the WD as a reset — never hold the ball.
3. The GA's lead is diagonal, not straight. A straight lead is easy for the GD to track. The diagonal angle across the transverse line creates a decision problem for the defender — they must choose between tracking the ball or tracking the player. Emphasise the angle of the run in training.
4. The WA passes into space, not to the player. This is the most technically demanding pass in the play. The WA must read the GA's pace and project where the GA will be in 0.8 seconds. Use target cone drills where the WA must land the ball on a cone 1 metre ahead of a jogging GA before progressing to full speed.
5. The GS must time the lead, not pre-empt it. A GS who leads too early gives the GK time to recover. The GS should hold their position until the GA catches the ball, then explode into their lead. A late, sharp lead is far more effective than an early, predictable one.
6. The whole sequence must take under four seconds. Use a stopwatch in training. If the play is taking longer than four seconds from whistle to shot, the defenders have had time to organise and the advantage is lost. Time every repetition and display the result to players.
Common Mistakes
Mistake 1 — The WA leads too early. If the WA starts their lead before the whistle, they arrive in the target zone too soon, the defender recovers, and the passing lane closes. Correction: Use a whistle-triggered drill where the WA is penalised (must return to start) if they move before the sound.
Mistake 2 — The C telegraphs the pass. Looking directly at the WA before the whistle alerts the opposing WD. Correction: Teach the C to use peripheral vision and to look in the opposite direction of the intended pass for the first half-second after the whistle.
Mistake 3 — The GA leads before the WA catches. This is the most common timing error. The GA sees the C pass and immediately sprints, arriving at the transverse line before the WA is ready to release. Correction: Use a visual cue drill — the GA must not begin their lead until they see the WA's hands close around the ball.
Mistake 4 — The WA holds the ball. After receiving from C, some WAs instinctively look to pass back to C or hold the ball while they assess options. This collapses the timing chain. Correction: In training, make the WA's only legal pass the forward ball to GA. Remove all other options until the habit is established.
Mistake 5 — The GS leads to the wrong side of the circle. If the GA receives on the right channel and the GS leads to the left post, the feed requires a cross-body pass that is easy to intercept. Correction: Establish a rule — the GS always leads to the same side as the GA's receiving position. Right channel GA = right post GS lead.
Variations & Progressions
Variation 1 — The Mirror (Left-to-Right Flip)
Run the identical play with WA and GA roles reversed: the C passes right to the GA first, the WA leads diagonally into the attacking third, and the GA feeds the GS from the left channel. This is essential to prevent the opposition from overloading the left side after scouting your primary play. Introduce this once the primary play is automatic.
Variation 2 — The Delayed Strike (C as Second Receiver)
In this variation, the C passes to WA as normal, but instead of GA leading, the C continues their forward drive and becomes the second receiver in the centre third. The WA then passes back to the now-advanced C, who delivers the long ball into the attacking third to a GA who has held their lead slightly longer. This variation is effective against a GD who has learned to anticipate the GA's diagonal lead.
Progression 1 — Add a Passive Defender
Once the play runs cleanly at full speed without defenders, add a passive (non-contesting) WD and GD who simply stand in the passing lanes. Players must adjust their lead angles and pass trajectories to work around the defenders without the pressure of a full contest. Progress to semi-active defenders who can intercept but not body-check.
Progression 2 — Full Opposition
Run the play against a full defending seven. Introduce a rule that the defending team scores a point for every successful interception or forced error, and the attacking team scores a point for every shot taken within five seconds. This gamifies the drill and creates authentic pressure.
Age Adaptations
| Age Group | Key Modifications |
|---|---|
| Under 8 / Under 10 | Reduce to a two-pass play: C passes directly to GA who feeds GS. Remove the WA link pass. Use a size 4 ball. Allow up to 6 seconds for completion. Focus on the concept of leading into space rather than precise timing. |
| Under 12 | Introduce the three-pass sequence but allow the WA to hold the ball for up to 3 seconds before passing. Use cones to mark lead zones. Defenders are passive. Focus on the GA's diagonal lead angle. |
| Under 14 | Run the full play with semi-active defenders. Introduce the Mirror variation once the primary play is consistent. Begin timing repetitions with a stopwatch. |
| Under 16 / Open | Full play with full opposition. Introduce the Delayed Strike variation. Add a post-play debrief where players self-analyse their timing decisions. Introduce video review of one training session per fortnight. |