Netball
Drill
intermediate
under 14
The Iron Wall: High-Pressure Defensive Marking Drill
Master the art of 0.9m marking pressure, body angling, and defensive rotations to suffocate the opposition's attack.
Jun 6, 20265 min read15 min drill8 players

Equipment Needed
1 netball
Bibs (2 contrasting colours)
4-6 marker cones
The Iron Wall: High-Pressure Defensive Marking Drill
1. Overview
The "Iron Wall" defensive marking pressure drill is designed to train defenders to maintain a relentless, legal 0.9m (3ft) distance while applying intense physical and psychological pressure on the ball-carrier. This drill simulates high-intensity match scenarios where attackers are attempting to transition the ball through the mid-court. It teaches defenders how to angle their bodies to dictate the attacker's passing options, intercept passing lanes, and execute synchronized team defensive rotations. Use this drill during the tactical phase of your training session to sharpen defensive communication and spatial awareness.
2. Setup
- Equipment Needed: 1 netball, bibs (2 contrasting colours), 4-6 marker cones.
- Court Area: The drill utilizes the middle third and one attacking third of a standard 30.5m x 15.25m netball court.
- Player Positions:
- Attackers: Wing Attack (WA), Centre (C), Goal Attack (GA), Goal Shooter (GS).
- Defenders: Wing Defence (WD), Centre Defend (CD), Goal Defence (GD), Goal Keeper (GK).
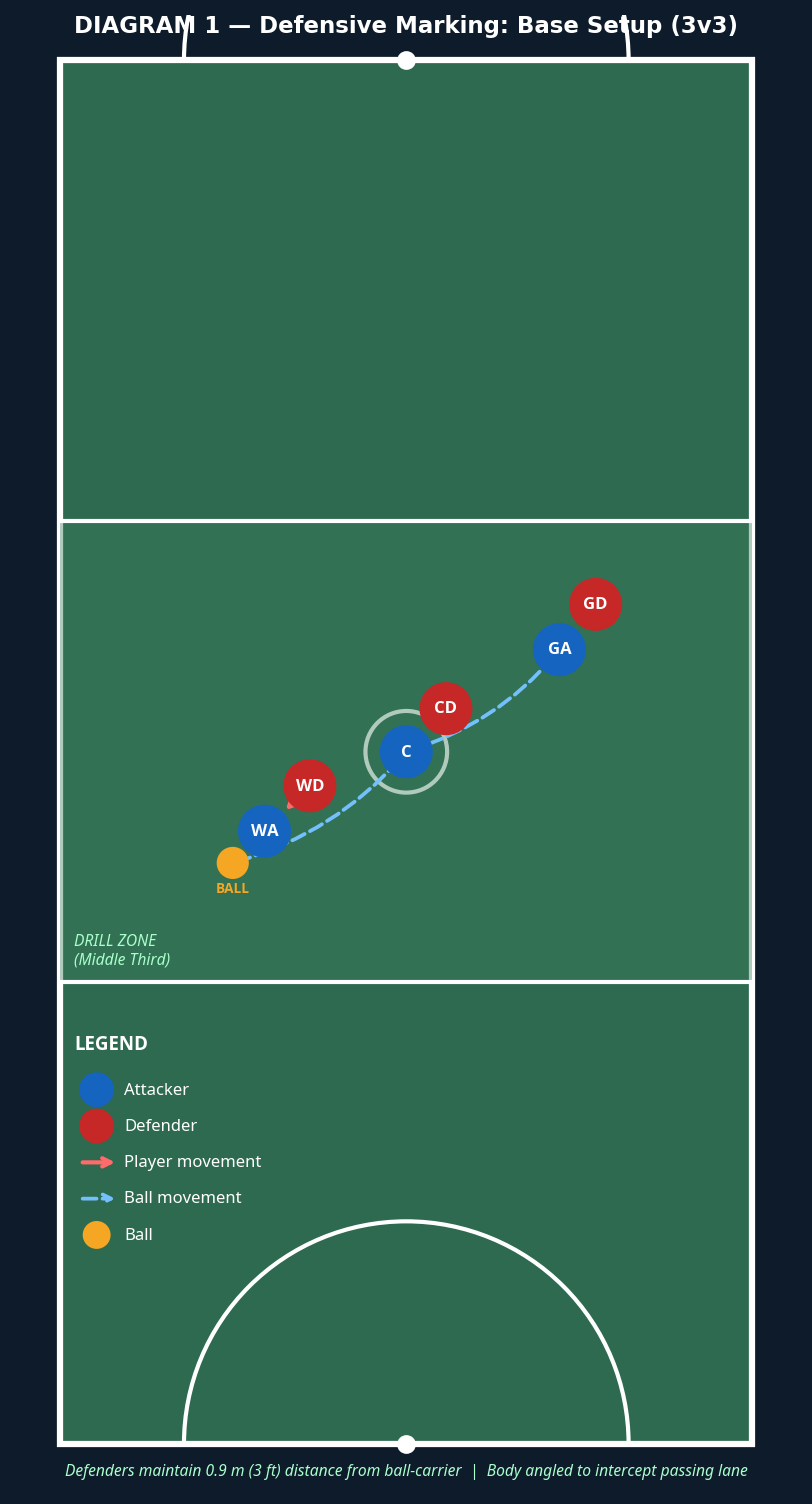
- Initial Positioning: Set up the attackers in a staggered formation in the middle third. Defenders start in a tight one-on-one marking position.

3. Step-by-Step Instructions
- Starting the Drill: The coach initiates the drill by blowing the whistle and feeding the ball to the Wing Attack (WA) stationed near the transverse line in the middle third.
- Applying the Base Pressure: As soon as WA receives the ball, the Wing Defence (WD) must immediately set their 0.9m distance, get their arms up, and angle their body to force the WA towards the sideline.
- Attacker Movement: The Centre (C) and Goal Attack (GA) must make dynamic, sharp drives to offer passing options.
- Defensive Tracking: The CD and GD must track their respective attackers closely, denying easy front space and attempting to stay on the ball-side shoulder.
- The Pass: The WA attempts a pass to either C or GA.
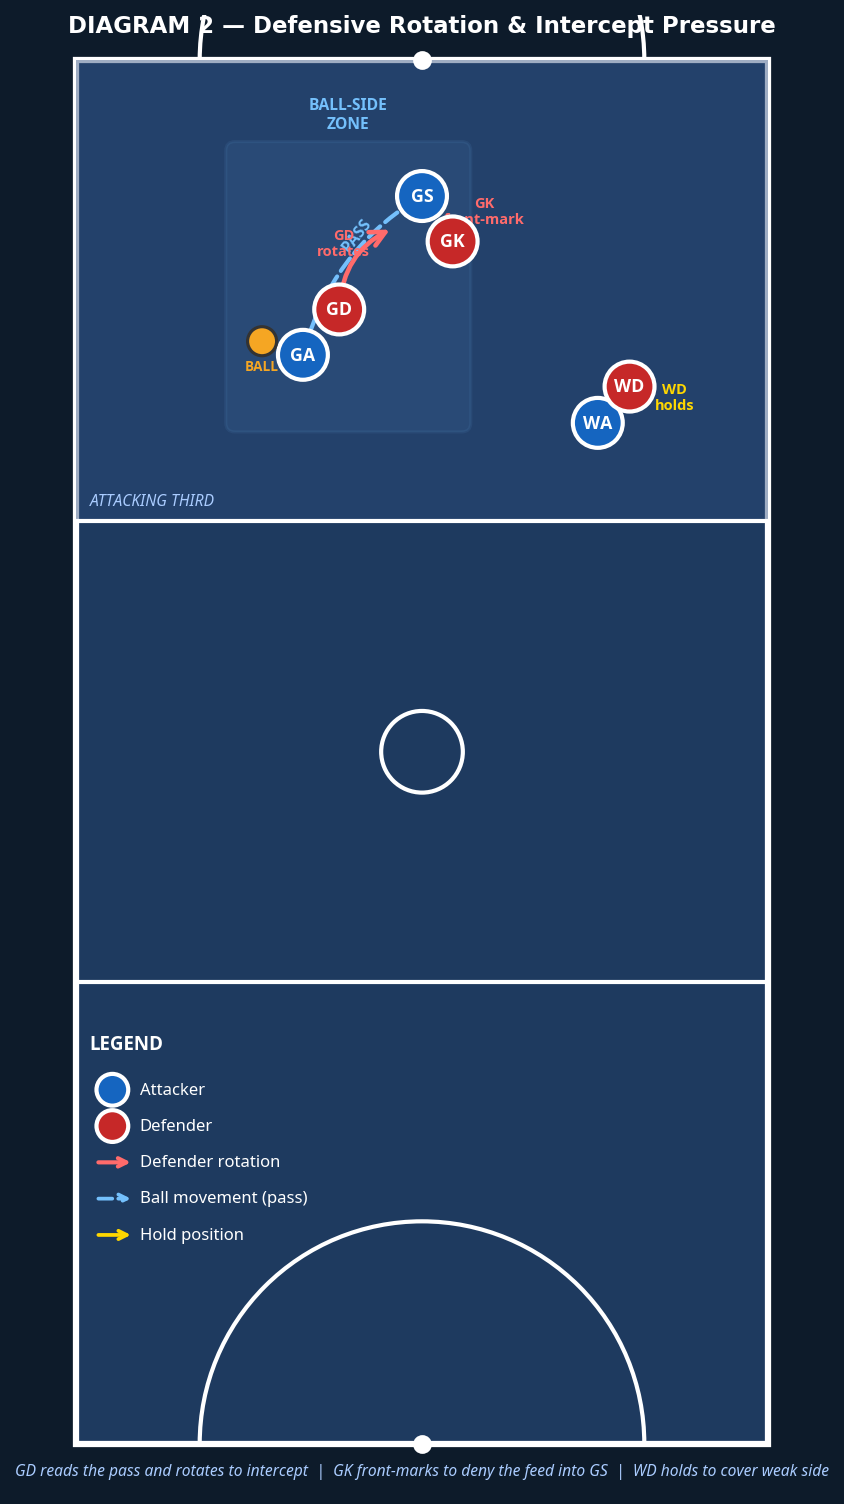
- The Rotation & Intercept: As the pass is released, the defenders must read the flight of the ball. The GD (or CD) attempts to rotate off their player to intercept the pass.
- Transition to Attacking Third: If the attackers successfully complete the pass, they must immediately look to feed the Goal Shooter (GS) in the goal circle.
- Circle Defence: The Goal Keeper (GK) must establish a strong front-marking position on the GS to deny the feed, while the GD drops back to provide help defence.
4. Key Coaching Points
- Distance and Timing: Ensure defenders establish their 0.9m distance before raising their arms to avoid contact penalties.
- Body Angling: Defenders should angle their bodies at 45 degrees to the ball-carrier to dictate the direction of the pass and maintain vision of both the ball and their direct opponent.
- Footwork: Emphasize fast, small, adjusting steps (fast feet) rather than lunging, allowing defenders to react quickly to the attacker's fakes.
- Communication: Defenders must constantly talk to each other, calling out screens, switches, and help defence requirements (e.g., "I've got ball!", "Drop back!").
- Vision: Defenders must maintain peripheral vision, seeing the ball and the player simultaneously (the 'V' vision).
5. Common Mistakes
- Breaking the 0.9m Rule: Defenders getting too eager and stepping inside the 3ft distance, resulting in an obstruction penalty.
- Flat-Footed Defending: Defenders standing flat-footed, making them slow to react to the attacker's drive or the release of the pass.
- Ball Watching: Defenders turning their heads completely to watch the ball, losing sight of their direct opponent who can then easily cut behind them.
- Poor Arm Position: Raising arms too early or straight up, which doesn't block the passing lane effectively. Arms should follow the angle of the intended pass.
6. Variations & Progressions
- Progression 1 (Overload): Add an extra attacker (e.g., 4 Attackers vs 3 Defenders) to force the defenders to communicate better, switch assignments rapidly, and prioritize the most dangerous passing threats.
- Progression 2 (Time Limit): Give the attackers a strict 3-second limit to release the ball. This forces quicker decision-making from the attackers and rewards intense, immediate defensive pressure.
- Variation 1 (Confined Space): Restrict the drill to just half the width of the court. This reduces the space attackers have to operate, making it easier for defenders to practice trapping and double-teaming on the sidelines.
7. Age Adaptations
- Under 10s / Under 12s: Focus purely on the basic mechanics of establishing the 0.9m distance and getting arms up without jumping. Reduce the intensity of the attackers' drives.
- Under 14s / Under 16s: Introduce the concept of body angling and forcing the attacker to a specific side. Begin practicing basic defensive switches and interceptions.
- Open / Seniors: Run the drill at full match intensity. Demand complex defensive rotations, double-teaming on the circle edge, and high-level communication.