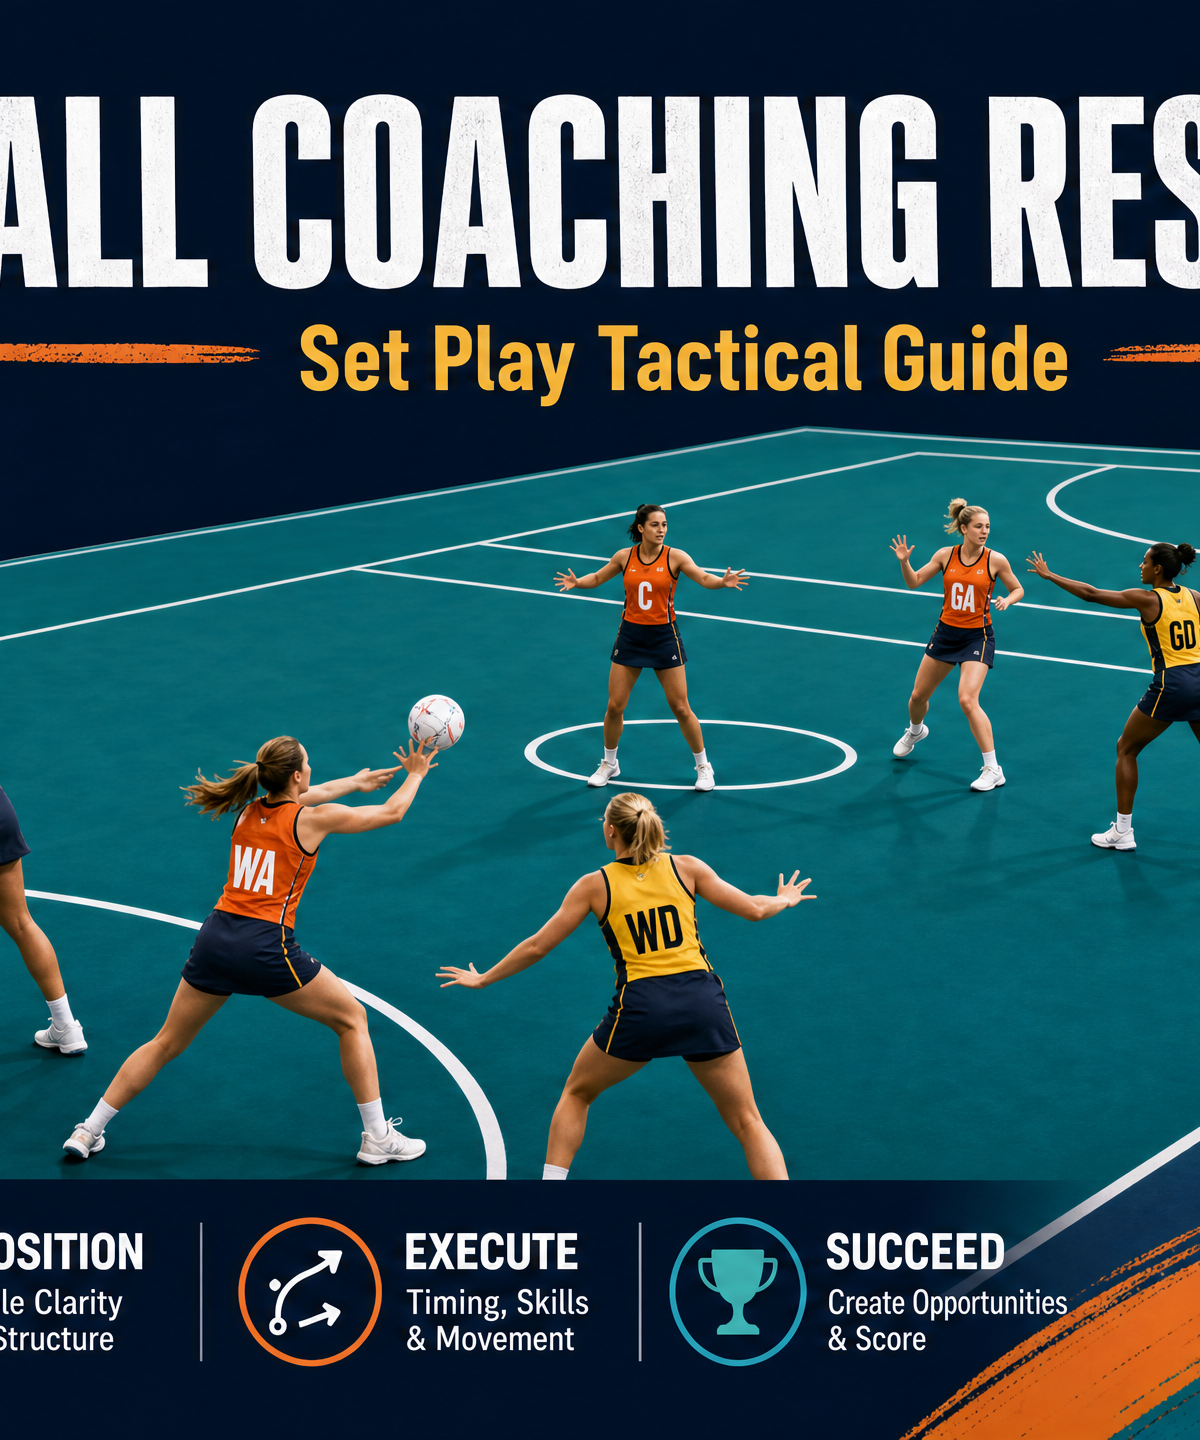
Penalty Pass Advantage Play: Goal Circle Edge Execution
Master the penalty pass advantage play to exploit defensive positioning and create high-percentage scoring opportunities from the goal circle edge.
Equipment Needed
1. Overview
The Penalty Pass Advantage Play is a highly effective offensive set piece designed to capitalise on a penalty awarded near the attacking goal circle edge. When a defender is penalised for contact or obstruction, they are forced to stand out of play (0.9m away), creating a temporary numerical advantage for the attacking team. This play leverages that advantage by using coordinated screens and sharp lead runs to isolate a shooter close to the post for a high-percentage shot.
Use this play when you have a strong holding Goal Shooter (GS) and a dynamic Goal Attack (GA) who can execute precise feeds under pressure. It is particularly effective against a tight, physical defensive unit that struggles to communicate through screens.
2. Setup
- Equipment Needed: 1 netball, full court markings, standard positional bibs.
- Court Setup: Attacking third, specifically focusing on the area immediately outside the goal circle.
- Player Positions:
- GA (Goal Attack): Positioned at the penalty spot to take the pass.
- GS (Goal Shooter): Starts deep inside the goal circle.
- WA (Wing Attack): Positioned wide on the transverse line or deep in the pocket.
- C (Centre): Holding the edge of the centre third for balance and reset options.
3. Step-by-Step Instructions
Phase 1: The Initial Setup
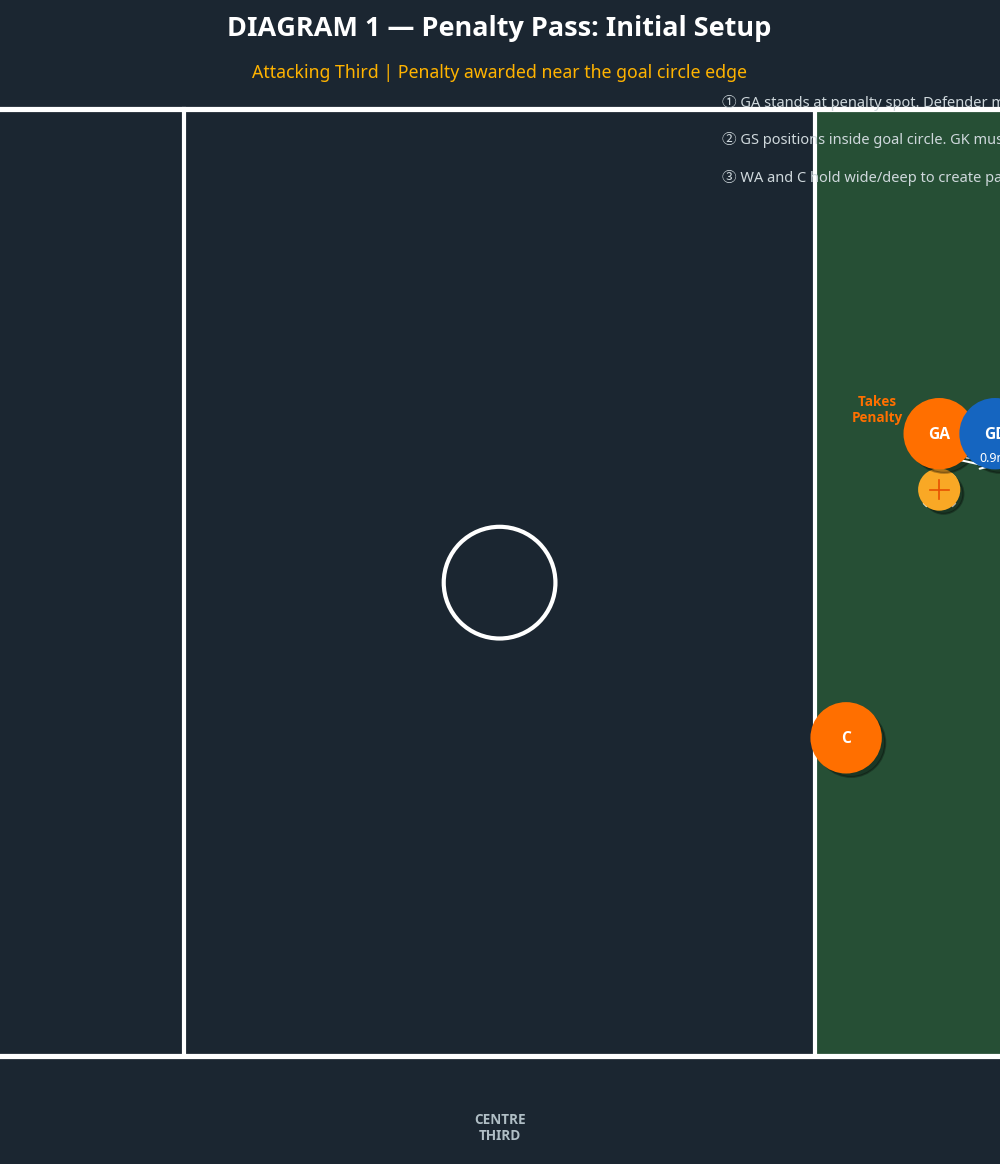
- Establish the Penalty: The GA sets up at the exact spot the penalty was awarded. The penalised defender (GD) must stand beside and away (0.9m) until the ball is released.
- Set the Base: The GS positions themselves deep in the goal circle, engaging the GK to draw them away from the top of the circle.
- Create Width: The WA and C hold wide and deep positions. Their role is to draw the WD and opposing C away from the primary passing channel.
Phase 2: Movement Pattern (Screens & Leads)
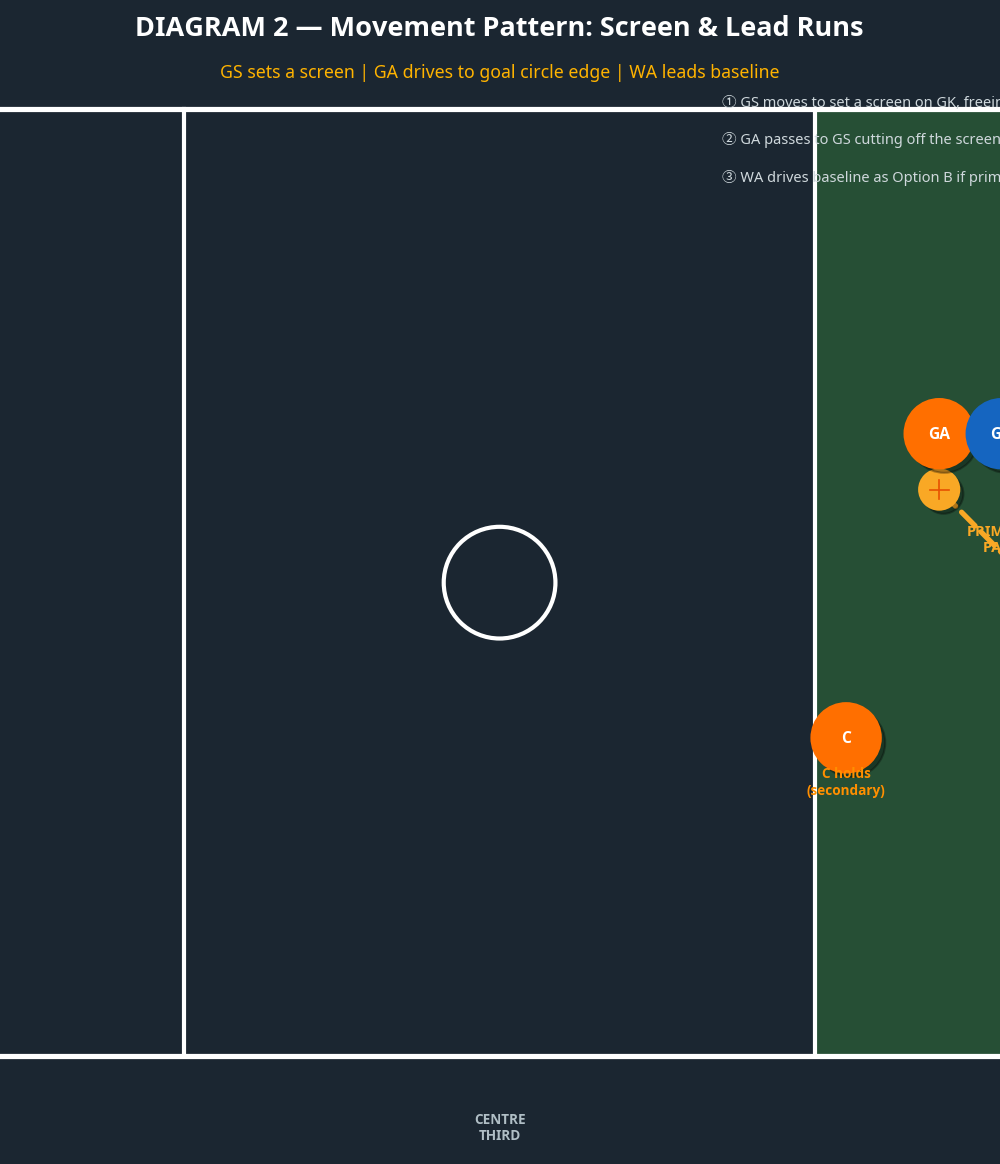
- The Screen: On the umpire's whistle, the GS drives out to set a strong, legal screen on the GK, effectively sealing them on the back shoulder and freeing up the top of the goal circle.
- The Primary Option: The GA immediately looks to pass to the GS, who rolls off the screen and cuts into the newly created space at the top of the circle.
- The Secondary Option (Baseline Lead): If the GK manages to fight over the screen, the WA executes a sharp baseline drive (Option B) to receive a pocket pass from the GA.
Phase 3: Final Execution & Shot
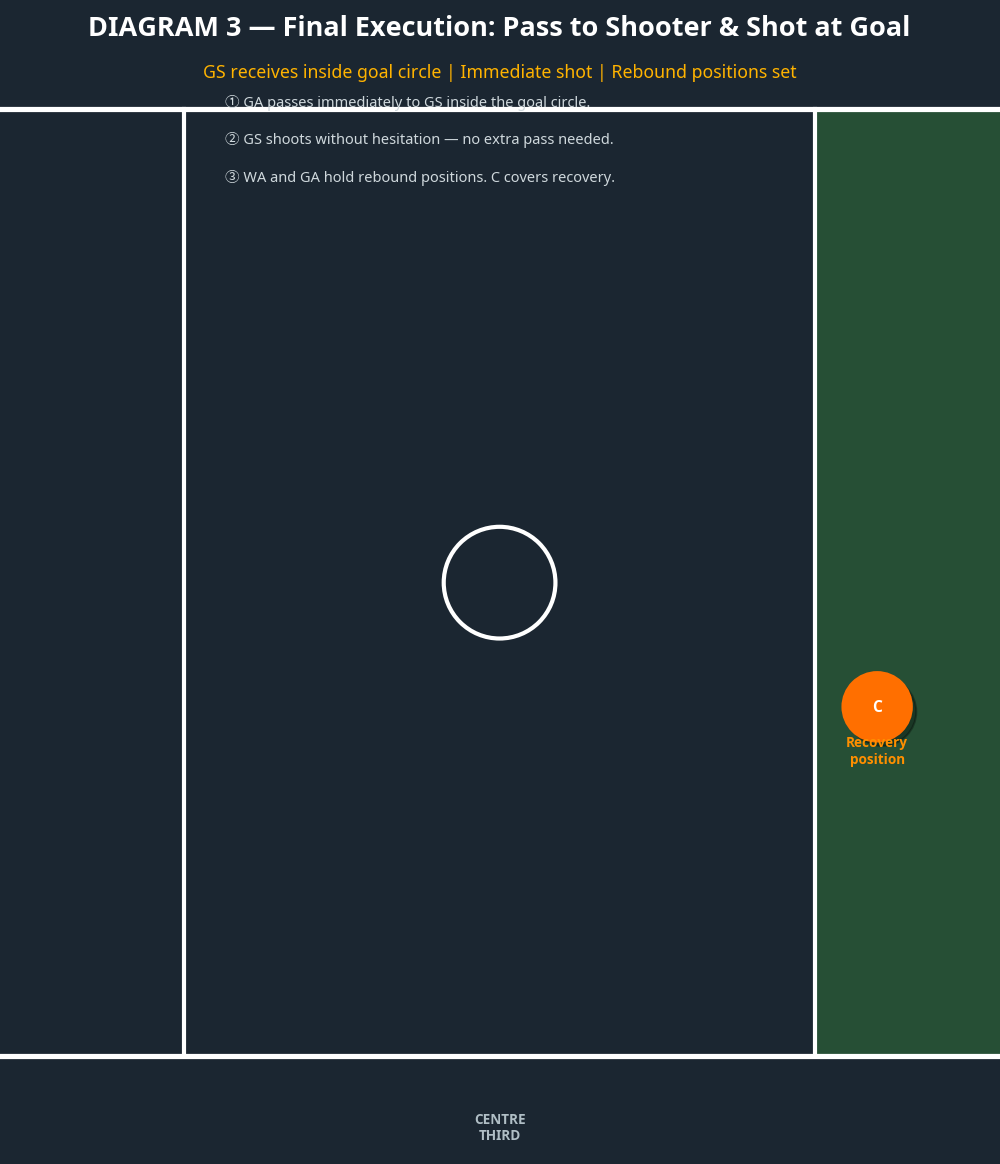
- The Feed: The GA delivers a flat, hard pass to the GS as they hit the top of the circle.
- The Shot: Upon receiving the ball, the GS immediately turns and takes the shot. Hesitation allows the defense to recover.
- Rebound Positioning: As the shot goes up, the GA and WA crash the circle edge for rebound positioning, while the C holds the transverse line to cover any potential defensive clearance.
4. Key Coaching Points
- Timing is Everything: The GS must time their screen exactly with the umpire's whistle. Moving too early results in a free pass against; moving too late allows the GK to dictate the space.
- Strong, Legal Screens: The GS must establish their feet and hold their ground. A moving screen will be penalised for contact.
- Immediate Vision: The GA must have their eyes up and scanning the circle before the whistle blows. The pass must be delivered the moment the GS creates separation.
- Rebound Readiness: Offensive rebounding is crucial. Attackers must anticipate the shot and establish inside positioning on their defenders immediately after the ball is released.
5. Common Mistakes
- Hesitation on the Pass: The GA holding the ball too long allows the penalised defender to re-enter play and the GK to recover.
- Weak Screening: The GS failing to make solid, legal contact on the screen, allowing the GK to slip through and contest the pass.
- Crowding the Space: The WA or C driving into the primary passing channel, bringing their defenders with them and clogging the top of the circle.
6. Variations & Progressions
- The Fake Screen & Roll: The GS fakes the screen on the GK and immediately rolls baseline for a lob pass over the top.
- The GA Drive: Instead of passing to the GS, the GA uses the GS's screen to drive into the circle themselves, receiving a quick one-two pass from the WA.
- Adding Defensive Pressure (Progression): Introduce a 'live' defense in practice where the penalised defender is allowed to recover aggressively, forcing the attackers to execute under game-like pressure.
7. Age Adaptations
- Under 10s/12s: Focus purely on the timing of the pass and the GS driving to the ball. Remove the complex screening element to avoid contact penalties.
- Under 14s/16s: Introduce the concept of holding space and basic screening. Emphasise the importance of the WA and C staying wide to create isolation.
- Open/Advanced: Execute the full play with variations. Focus on split-second decision-making and exploiting minor defensive misalignments.