Master the Wide Overlap Play from Lineout
A complete coaching guide to executing a devastating wide overlap play from a lineout, designed to stretch the defence and create scoring opportunities in the wide channels.

Equipment Needed
1. Overview
The Wide Overlap Play from a lineout is a fundamental attacking strategy in Rugby Union designed to rapidly move the ball away from the set-piece and into the wide channels, exploiting space before the opposition defence has time to realign. This set play is most effective when you have identified a numerical advantage out wide (an overlap) or are facing a team that tends to defend narrowly around the ruck and maul. The primary objective is to create a 2v1 or 3v2 situation for your winger and fullback, leading to a clean line break and a potential try-scoring opportunity. Its success relies on precise execution, clear communication, and perfect timing from the entire backline.
2. Setup

To run this play effectively in a training session, ensure the setup is clear and organized. This allows players to understand their roles and the spatial awareness required for the play to succeed.
- Equipment Needed: A single rugby ball, a set of cones to mark player starting positions, and a full-sized rugby pitch (100m x 70m).
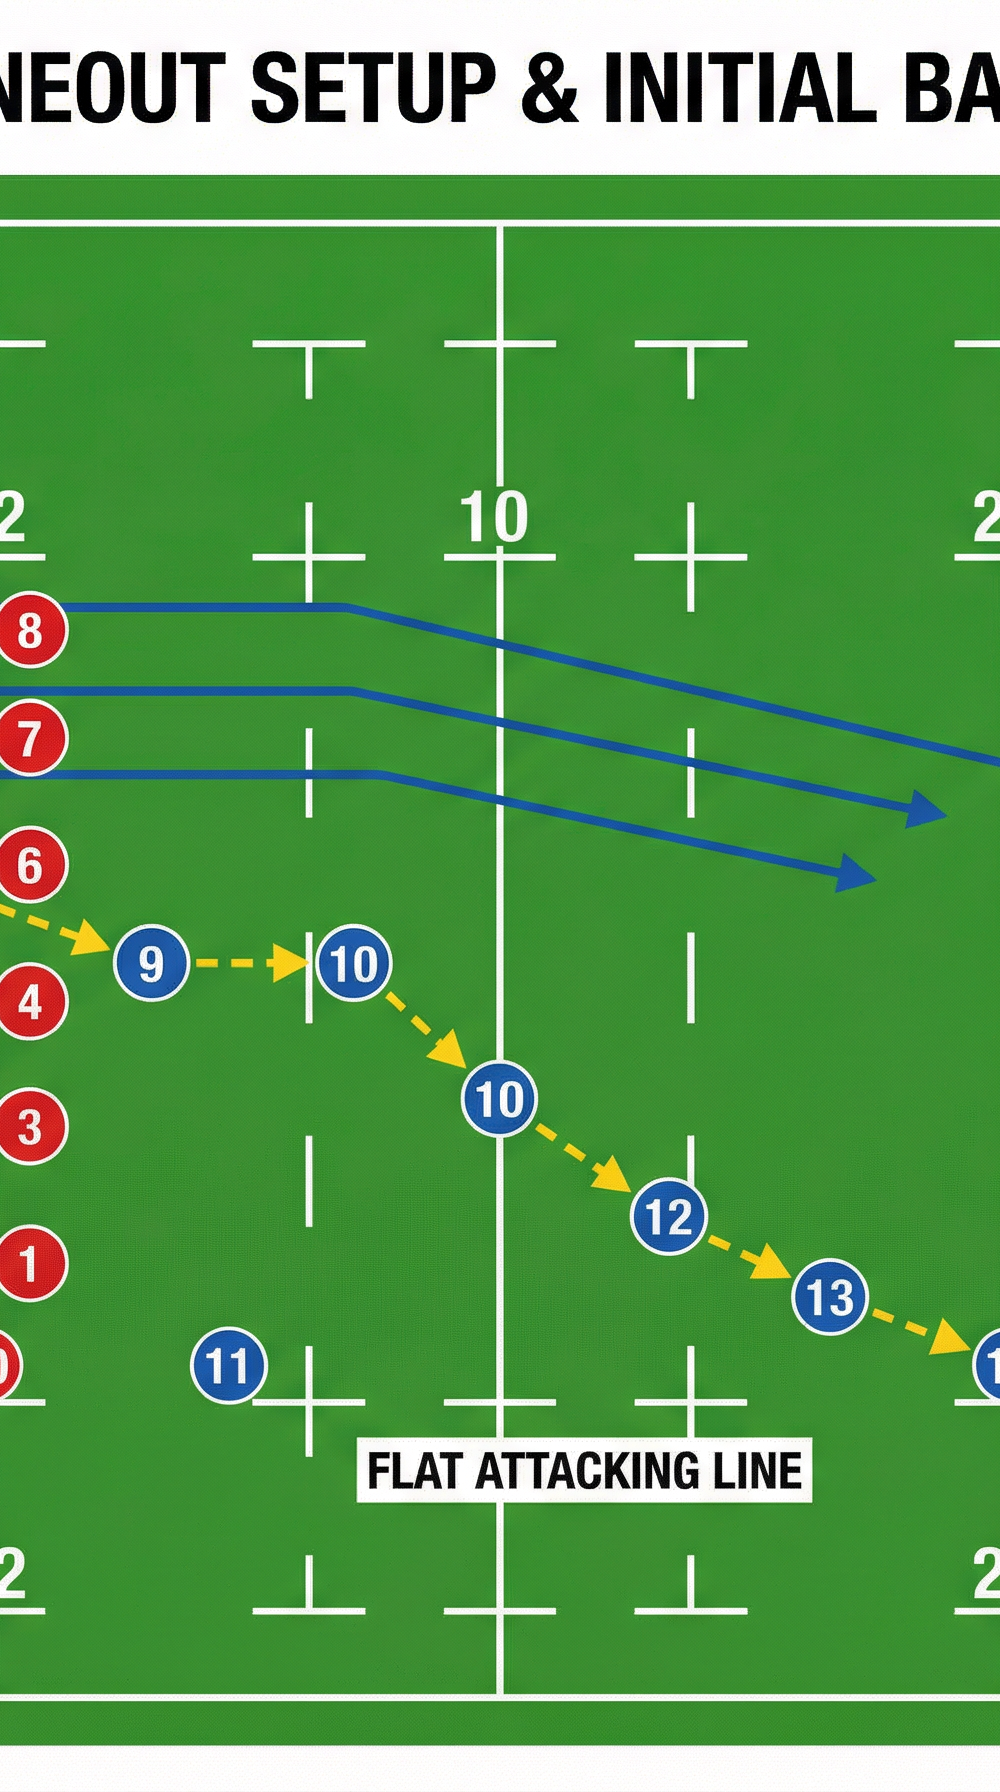
- Pitch Setup: The play begins with an attacking lineout on or around the opposition's 22-metre line, ideally positioned on the 15-metre line from the touch. This provides ample space to attack on the open side of the field.
- Player Positions:
- Forwards (1-8): A standard 5-man lineout unit — Hooker (2), Locks (4, 5), Flankers (6, 7). The Hooker throws, and the pod of forwards executes a clean, quick delivery to the Scrum-half.
- Scrum-half (9): Positioned at the receiver spot, ready for a quick pass from the lineout jumper.
- Fly-half (10): Aligned deep enough to take the pass from the 9 and have time to assess the defensive line.
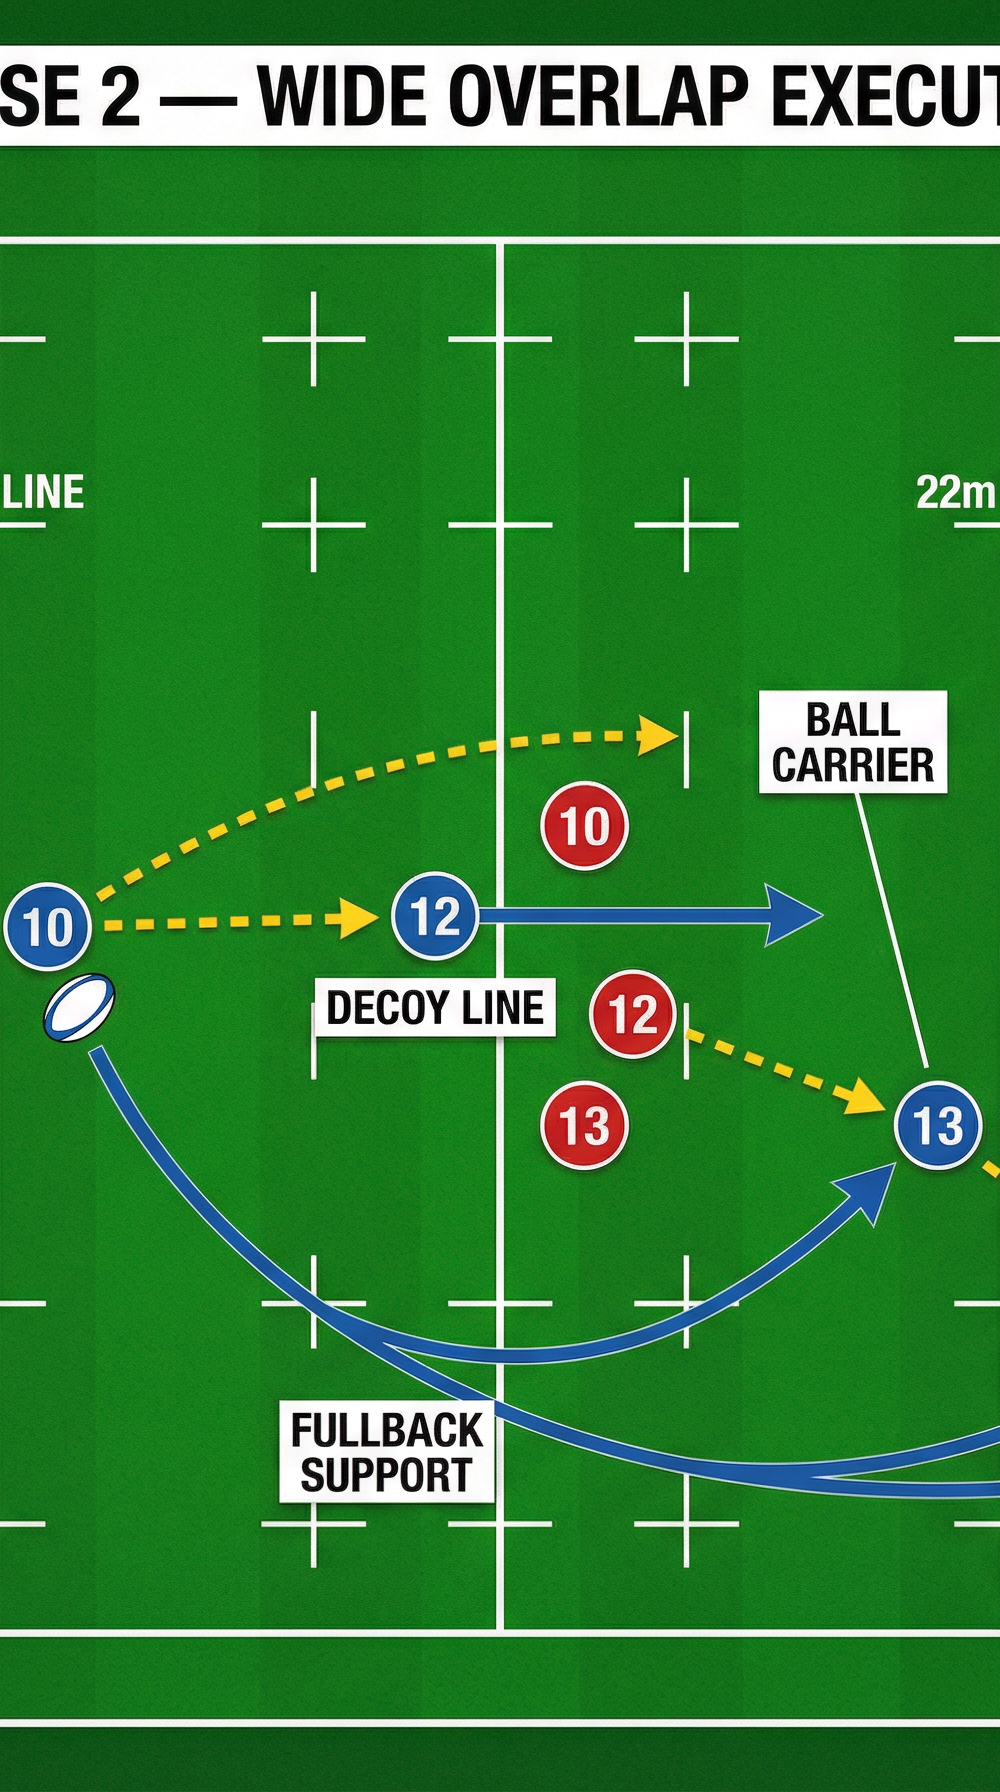
- Inside Centre (12): Positioned outside the 10, ready to run a hard, straight 'decoy' line to fix the inside defenders.
- Outside Centre (13): The key distributor in the wide channel, positioned to receive a pass from the 10.
- Wingers (11 & 14): Holding their width on the touchline to stretch the defence. The winger on the play side (14) is the primary target for the final pass.
- Fullback (15): Enters the line from depth, timing their run to create the crucial extra number in the attacking line.
3. Step-by-Step Instructions

Execution is a matter of timing and precision. Each step must flow seamlessly into the next. Coaches should walk through this sequence slowly at first, then increase the speed as players become more comfortable.

- The Lineout Win: The Hooker (2) executes a quick, flat throw to a designated jumper (e.g., Lock 4), who secures the ball and delivers it swiftly off the top to the Scrum-half (9) waiting at the back.
- Scrum-half to Fly-half: The 9 passes a long, fast ball to the Fly-half (10), who is moving forward onto the ball. The quality of this pass is critical to give the 10 time and space.
- The Decoy Runner: As the ball travels to the 10, the Inside Centre (12) runs a hard, straight line at the gap between the opposition's 10 and 12. This run must be convincing to draw the defenders' eyes and create space on the outside.
- The Key Pass: The Fly-half (10) takes the ball to the line, engaging their direct opponent. Just before contact, they throw a wide 'miss-pass' behind the decoy-running 12 to the Outside Centre (13).

- Creating the Overlap: The Outside Centre (13) catches the ball at pace. At the same time, the Fullback (15) accelerates into the line from depth, creating a 3-on-2 situation against the defending winger and fullback.
- Exploiting the Space: The 13 draws the final defender and makes the final pass to the Winger (14), who should now be in open space. The Winger accelerates down the touchline to score.
4. Key Coaching Points
- Speed of Ball from Lineout: The ball must be won and delivered to the fly-half as quickly as possible. A slow lineout allows the defence to drift and shut down the space.
- Depth of the Backline: The backline must align with sufficient depth to allow for long passes and for players to run onto the ball at pace. Flat alignment will kill the play before it starts.
- The Decoy Line is Crucial: The Inside Centre's (12) run must be a genuine threat. They should run as if they are getting the ball, with hands up, to hold the inside defenders and prevent them from drifting.
- Fullback's Timing: The Fullback (15) must time their injection into the backline perfectly. Too early and they will be flat; too late and the opportunity will be lost. They should accelerate as the 10 receives the ball.
- Pass Quality: All passes must be crisp, accurate, and thrown in front of the receiver to allow them to run onto the ball at full speed. The miss-pass from 10 to 13 is the most critical.
5. Common Mistakes

- Telegraphing the Play: Players looking out wide too early, giving the defence a clear signal of intent. Players must look straight ahead until the pass is made.
- Fly-half Passing Too Early: The 10 must engage the defensive line (take the ball forward) to commit their opposite number before passing. A premature pass allows the defender to drift and cover the outside.
- Poor Decoy Line: The Inside Centre (12) runs a lazy or unconvincing line, which allows the defence to easily drift and cover the outside threat without committing to the tackle.
- Fullback Over-running the Play: The 15 gets ahead of the ball, creating a forward pass situation or obstructing the Outside Centre (13) from making a clean catch.
6. Variations & Progressions

- Variation — The Cut-Out Pass to Fullback: Instead of the 10 passing to the 13, they can throw a longer cut-out pass directly to the Fullback (15) who has come into the line early. This is effective if the opposition 13 is shooting out of the line to intercept.
- Progression — Adding a Switch/Inside Pass: If the defence starts to drift effectively, the Winger (14) can look for an inside pass back to a supporting player (such as the 13 or 15 looping around) after breaking the initial line.
- Progression — Play from a Scrum: The same principles can be applied from a scrum set-piece, requiring the Number 8 to control the ball at the base and the backline to adjust their alignment accordingly.
7. Age Adaptations
- Under 12/14: Simplify the play. Use a 2v1 or 3v2 drill in isolation first. Remove the miss-pass and have the ball go through the hands (10 to 12 to 13). Focus on the principles of drawing a defender and passing into space.
- Under 16: Introduce the miss-pass from the Fly-half (10). Focus heavily on the timing of the decoy run from the Inside Centre (12) and the timing of the Fullback (15) entering the line. The lineout can be uncontested to ensure a clean platform.
- Open Age/Senior Rugby: At this level, all elements should be executed at high pace. Introduce defensive pressure that actively tries to disrupt the play. Run the play against different defensive systems (e.g., rush defence, drift defence) to challenge players' decision-making under pressure.