Forward Pod Play with Late Offload Option
A session-ready forward-pod pattern that helps coaches create gainline momentum, challenge the guard-defender pair, and release a safe late offload into the next attacking wave.

Equipment Needed
Overview
This is a three-forward pod play with a late offload option designed for use from a settled ruck between the 22-metre lines. It gives the scrum-half a clear, repeatable picture: play flat to a square carrier when the defensive guards are soft, then keep the ball alive through the out-the-back pod runner if the tackle locks on. The intent is not to force an offload; it is to create a hard, legal gainline carry first and make the offload a reward for winning the contact picture.
Use the call when your attack needs a reliable middle-field phase, when the defence is narrowing around the ruck, or when you want to pull a second defender into contact before playing to your 10 or centres.
Coaching outcome: The carrier wins square contact; the second forward presents an early cleanout picture; the third forward stays connected in a legal offload lane; and 9 is already in position to play the next phase within three seconds.
Setup
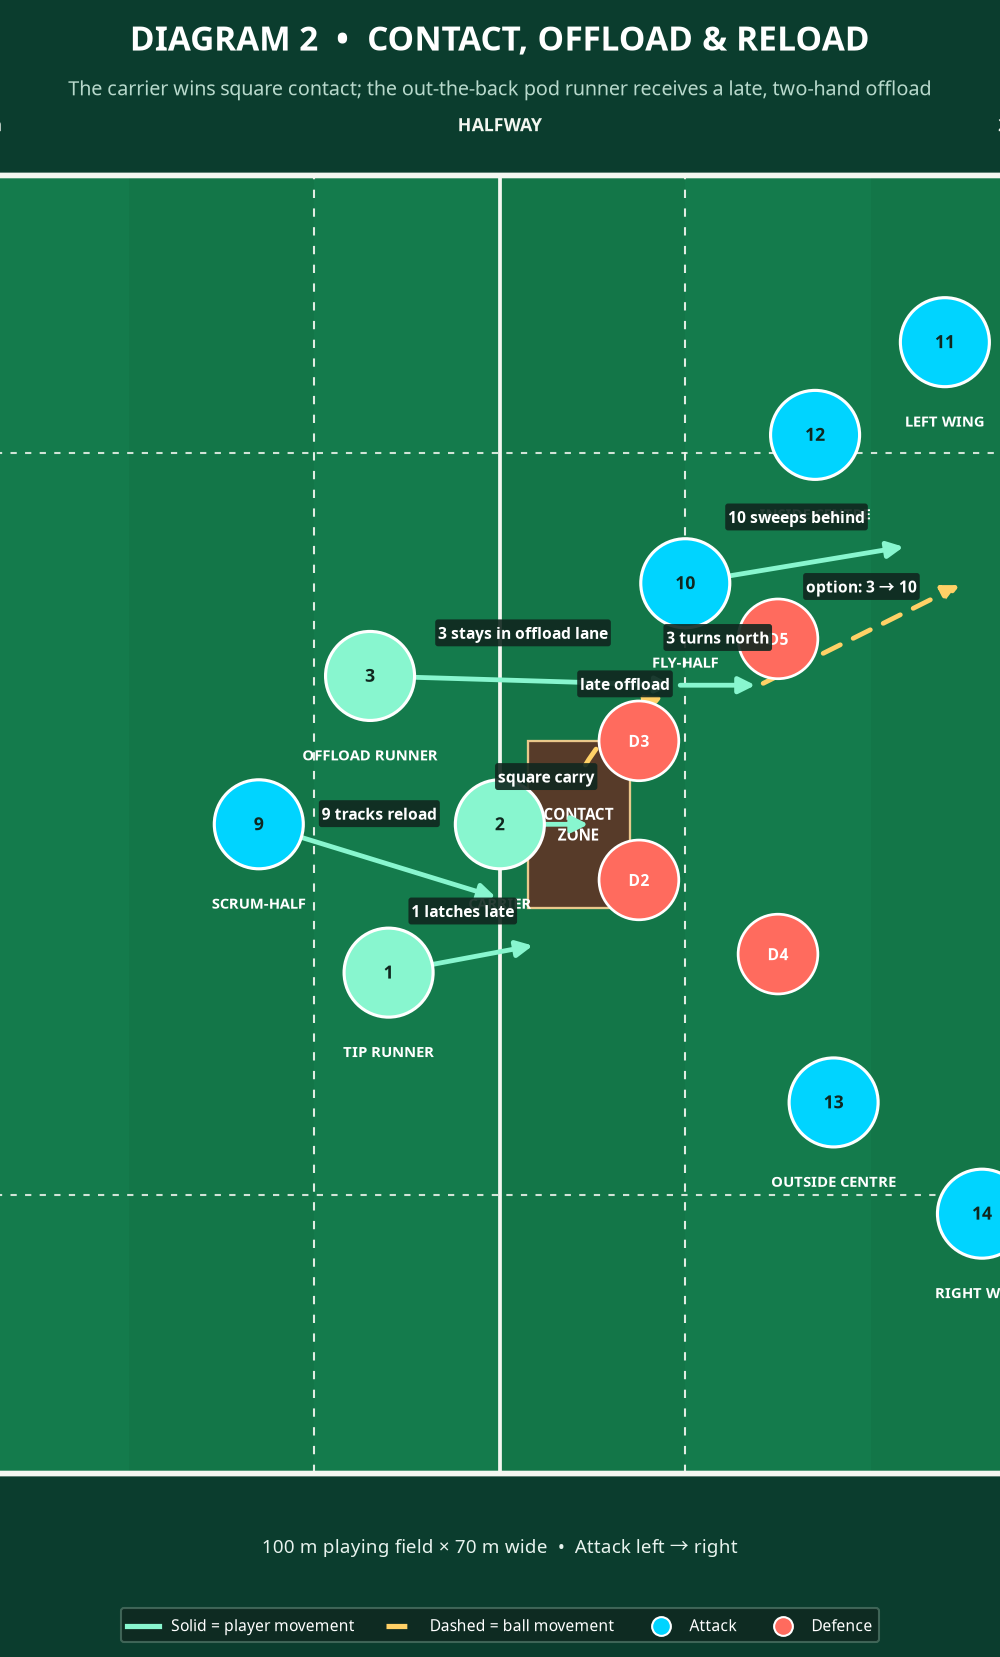
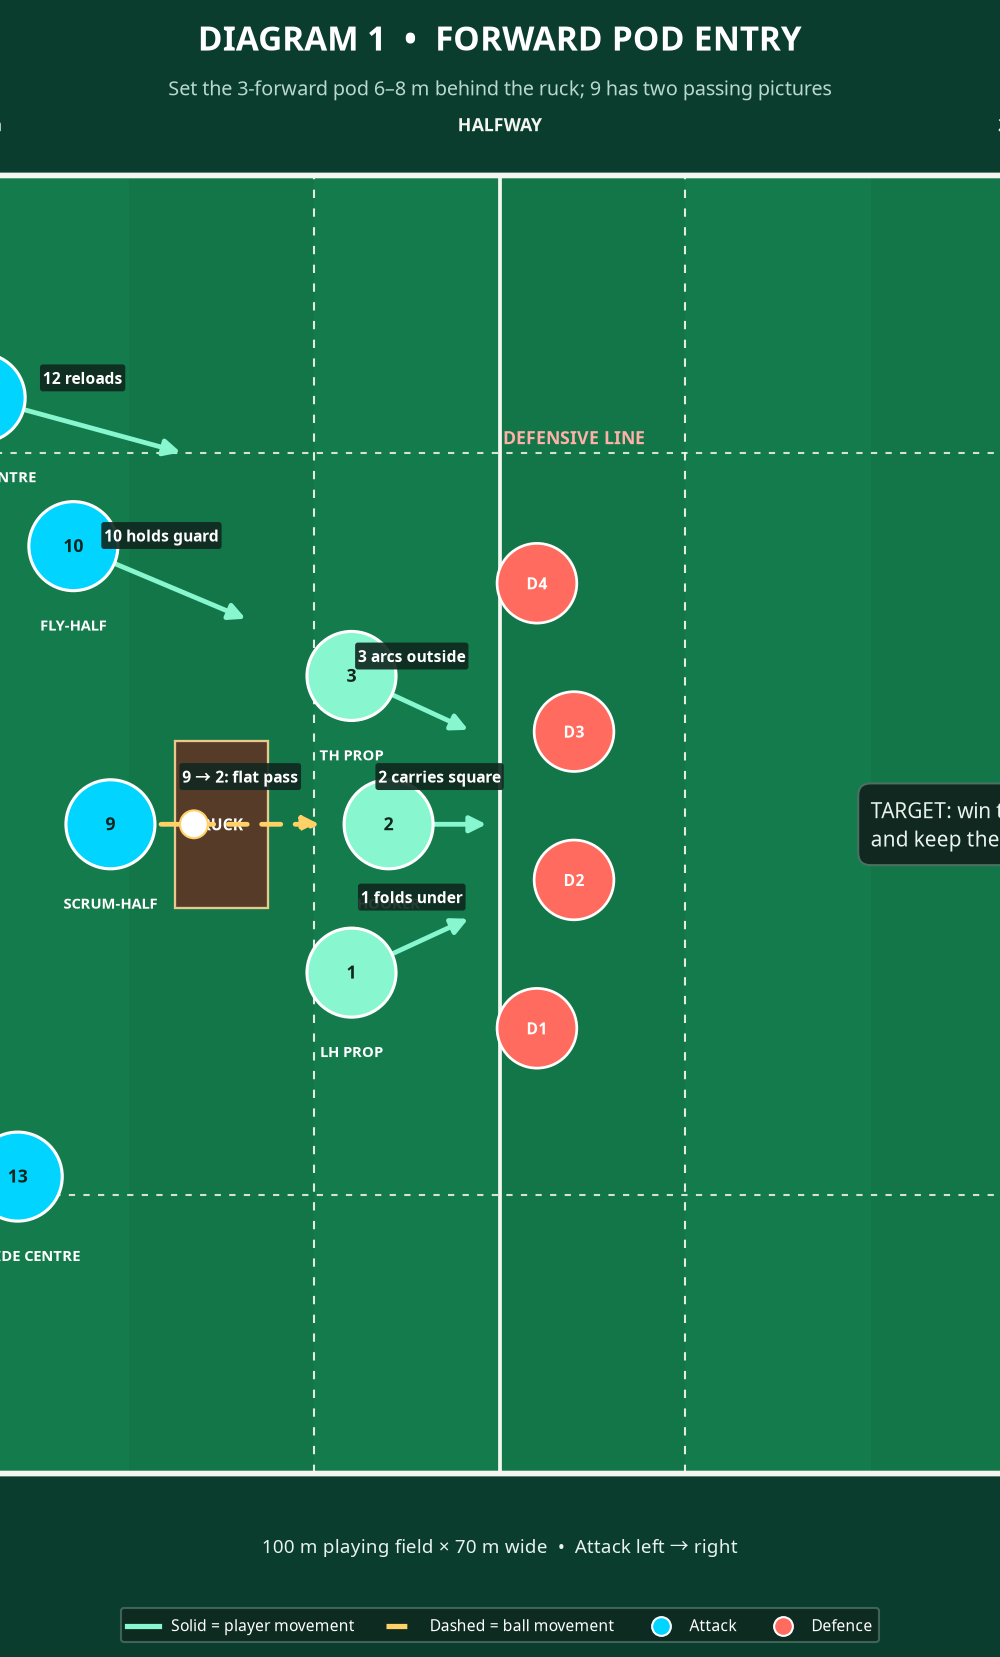
Place a ruck cone in the centre of a 25 m × 30 m working area. Mark a defensive line 7 m ahead of it with four defenders, then use cones to show a 5 m offside line behind the ruck. Start the three-forward pod 6–8 m behind the ruck and 6–8 m wide of it. Position the scrum-half, No. 9, on the open side, with No. 10 8–10 m wider and 2–3 m deeper than the pod. No. 12 should hold a second-wave line outside 10; No. 13 and the wings retain width rather than drifting in early.
| Role | Starting position | Non-negotiable job |
|---|---|---|
| 9 Scrum-half | 1 m behind and open-side of the ruck | Scan both guards, pass flat, then track inside the next ruck. |
| 1 Loosehead prop | Inside shoulder, 6–8 m back | Tip line and late latch; clear if the carrier is wrapped. |
| 2 Hooker | Middle of pod, 6–8 m back | Square primary carry with two hands on the ball. |
| 3 Tighthead prop | Outside shoulder, 6–8 m back | Stay behind the carrier's shoulder in the offload lane. |
| 10 Fly-half | 8–10 m outside and deeper | Sweep behind the pod to receive the second pass or organise the next phase. |
You need one ball, 14–18 cones, bibs for defenders, and four tackle shields for the contact build-up. Begin at walking pace with shields. Move to controlled live tackle only once players can identify the carry, latch, offload, and reload roles without being prompted.
Step-by-Step Instructions
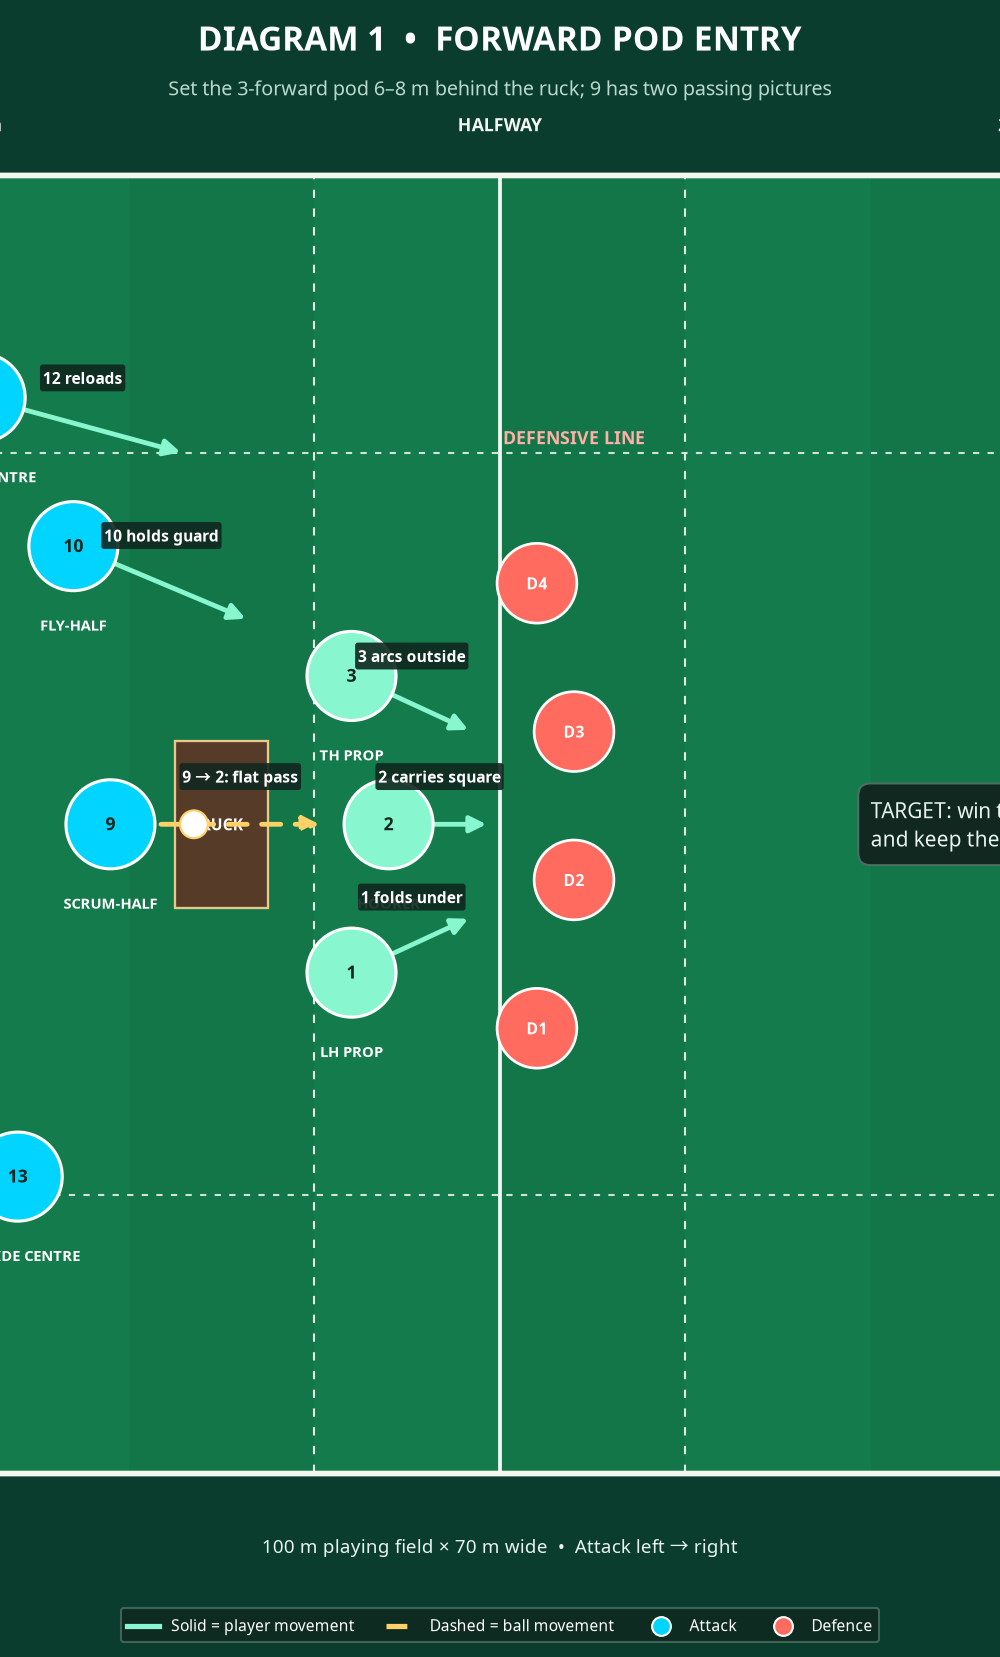

Call and scan. From the previous ruck, 9 calls “Pod right” or “Pod left” before the ball is available. He checks whether the first two defenders are tight, square, or drifting. The pod must set early; late arrivals produce a slow pass and remove the offload picture.
Build the three-forward shape. No. 2 is the central carrier. No. 1 sits on the inside hip, slightly in front at first, while No. 3 sets on the outside hip half a stride deeper. Keep 1–1.5 m between players: close enough to connect, wide enough to see the ball and avoid obstruction.
Deliver a flat pass. 9 passes firmly to 2 at chest height, aiming for the ball to arrive as 2 crosses the gainline. The pass should travel about 6–8 m. 9 does not admire the carry; he folds behind the inside shoulder and tracks the likely ruck.
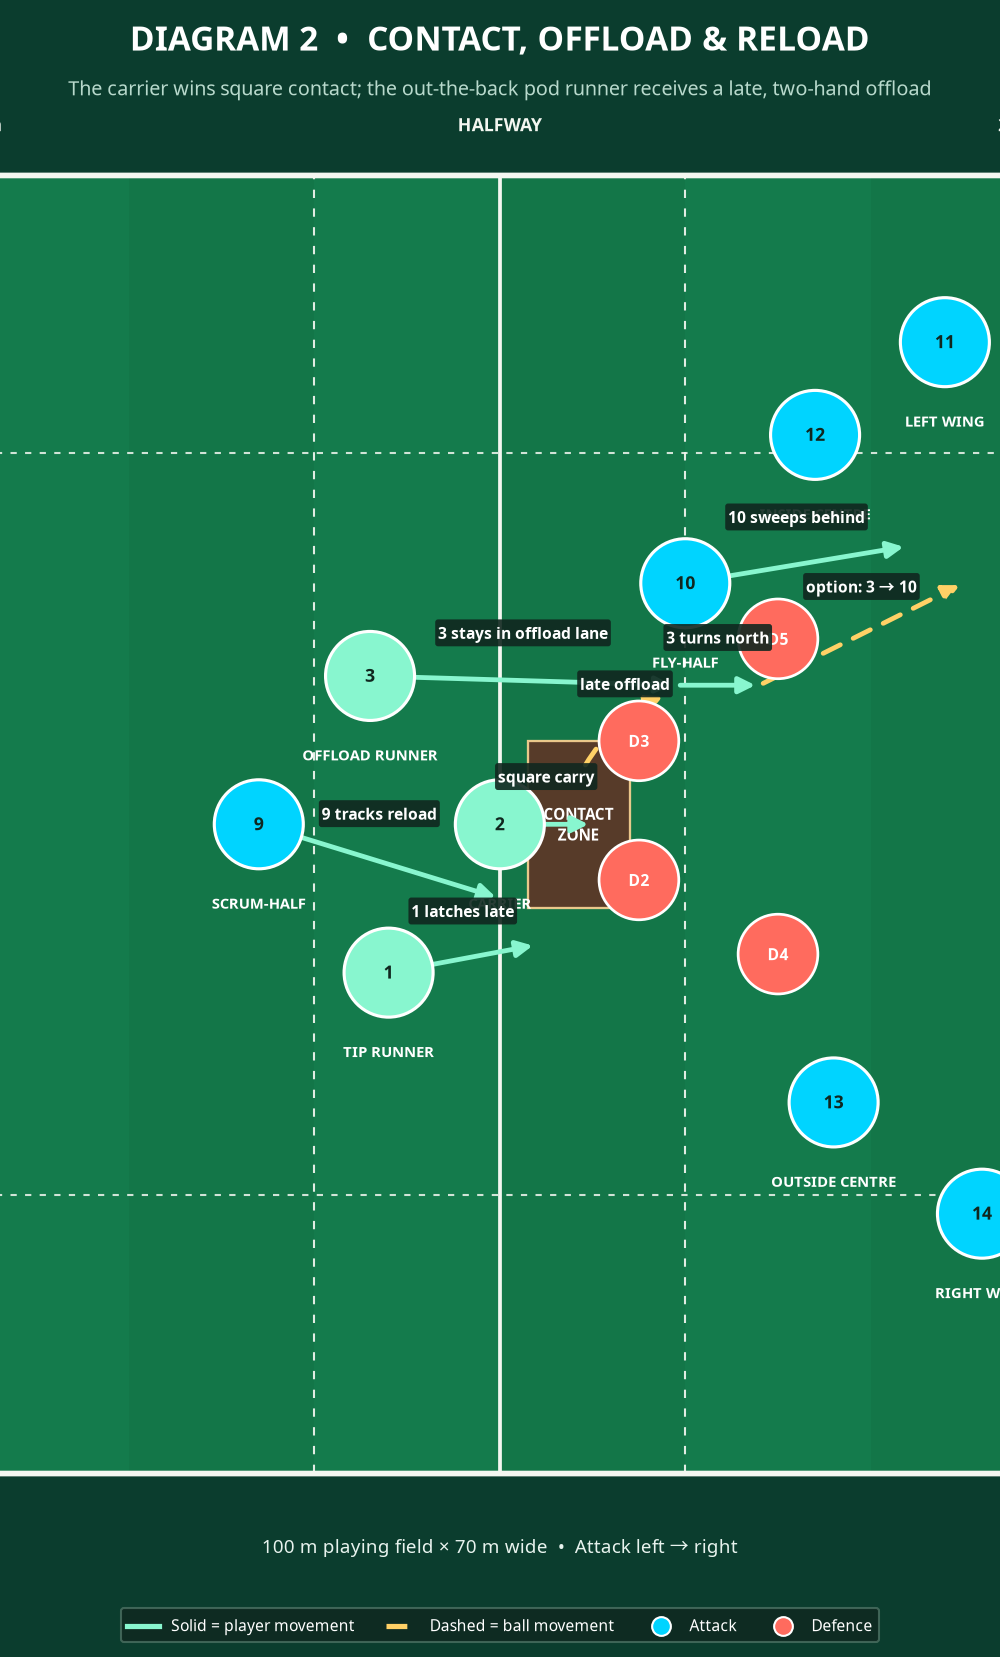
Win the collision square. No. 2 carries with a strong, level body line, eyes through the space between the two nearest defenders, and two hands on the ball until the final step. He attacks the defender's inside shoulder, using footwork only to improve the collision rather than to run sideways. No. 1 turns from a credible tip runner into the first latch or cleanout support.
Read, do not pre-plan, the offload. If 2 breaks the tackle or keeps both arms free, he may give a short, two-handed pass to 3. If 2's arms are trapped, he goes to ground long, presents the ball back, and 1 clears. The correct decision is the safe one; an offload under pressure is not a coaching win.
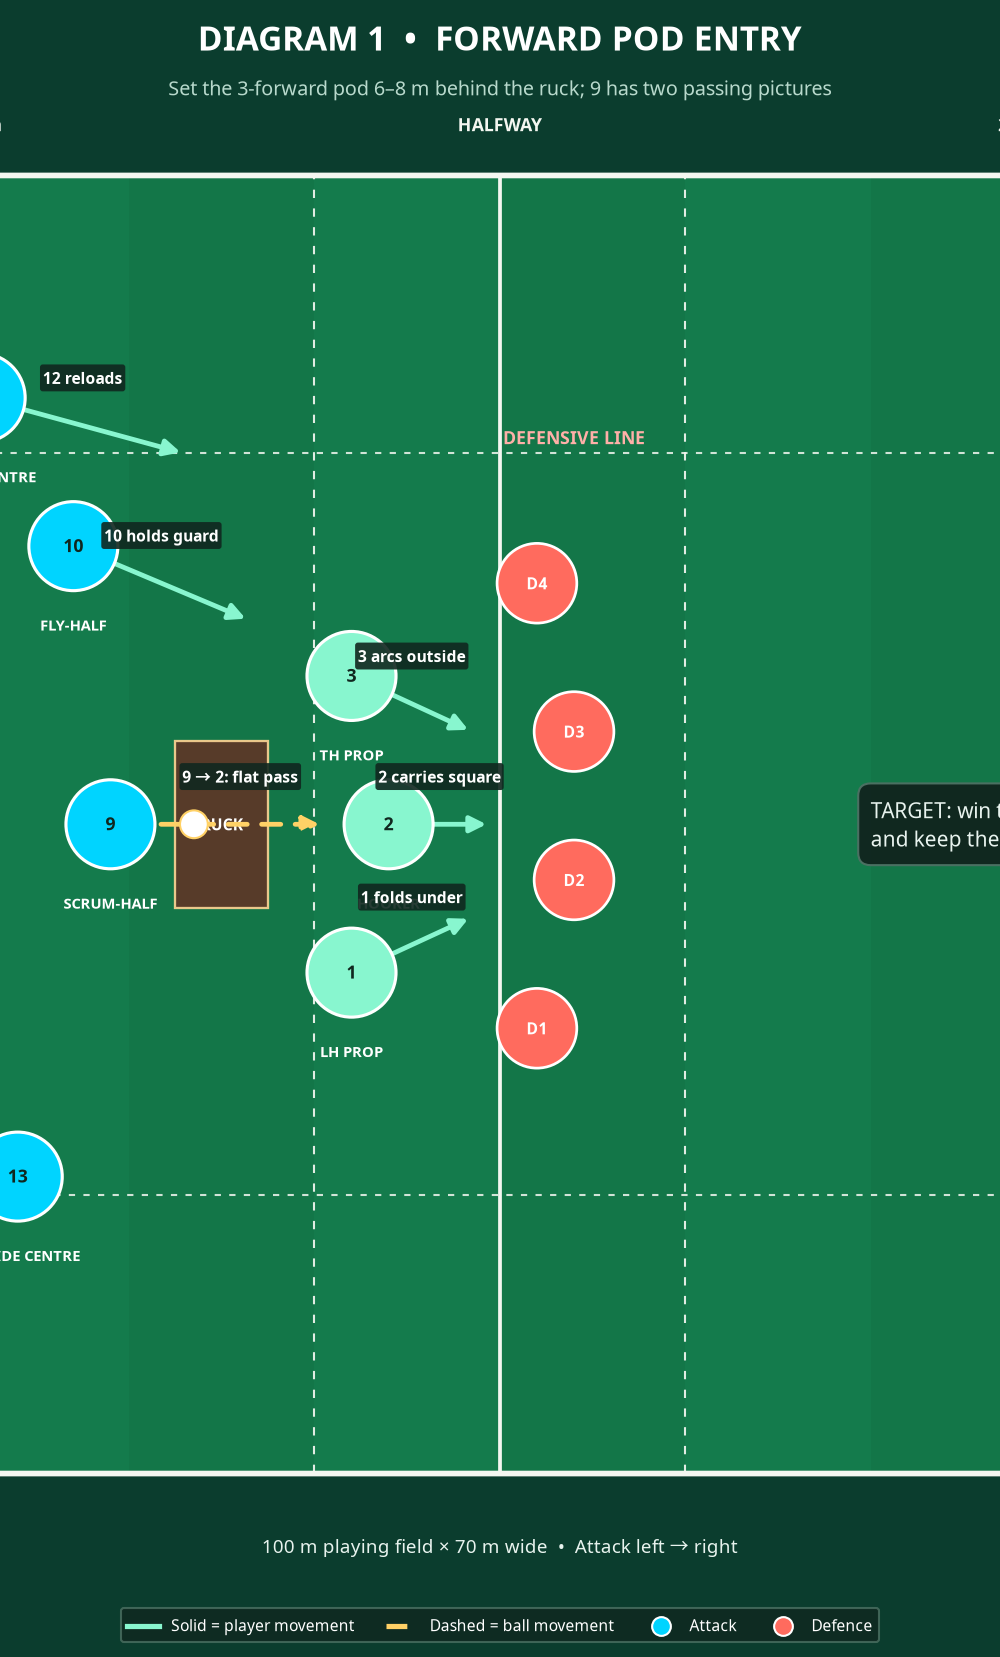
Receive and reload. No. 3 holds depth until the contact picture is clear, then runs north immediately after the ball. He catches with soft hands, scans 10 sweeping behind him, and either carries into the next seam or gives 10 a short pass. 12 reloads outside 10 to hold the next defender.
Finish the phase. Whether the offload lands or not, 9 calls the next picture within three seconds. If the ball is on the floor, 1 is the first cleaner, 9 sets the ruck, and 10 stays available on the open side. Keep the next phase simple: fast ball is the reward for accurate pod work.
Key Coaching Points
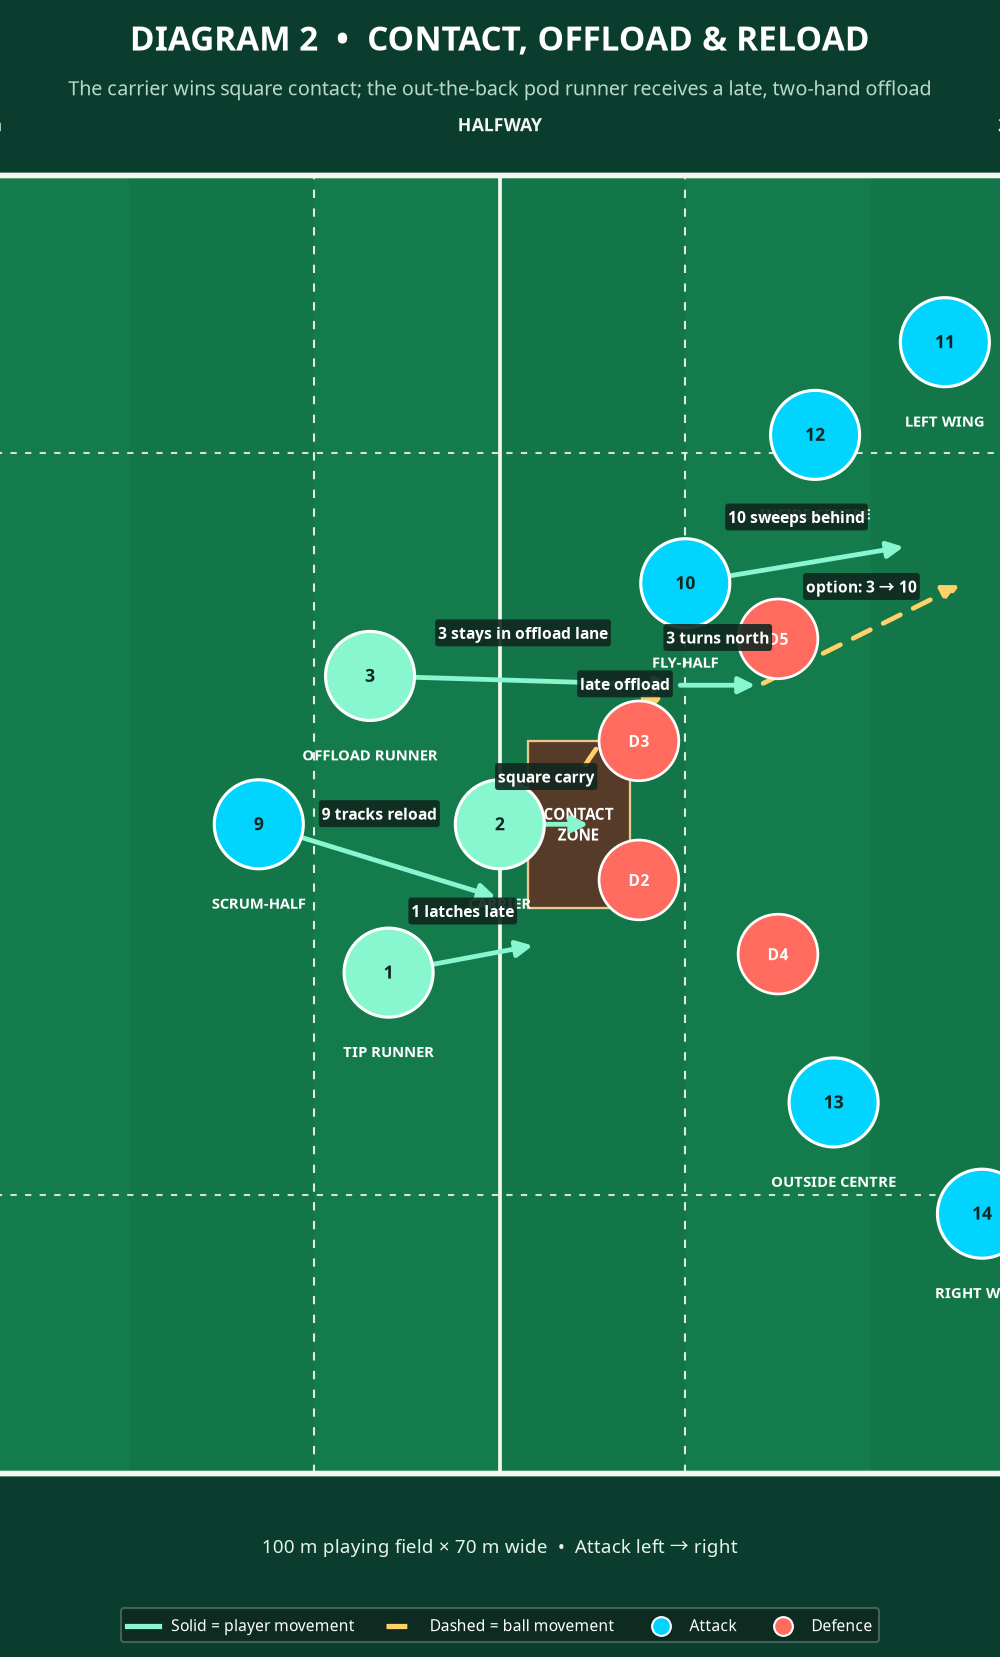
Set early, arrive with speed. The pod should be in position before 9 lifts the ball. Ask the forwards to communicate their number and role—“one tip,” “two carry,” “three out-back”—rather than simply crowding the breakdown.
Make the carrier's line square. The carrier's shoulders must point through the gainline, not towards the touchline. Square running makes both the tip and the outside offload believable and gives the carrier access to either defender's shoulder.
Coach connection, not congestion. Keep a 1–1.5 m relationship between the three forwards. If they are too tight, defenders can tackle two attackers at once; if they are too wide, the latch and offload support arrive late.
Protect the ball before chasing the offload. The ball carrier carries in two hands and only frees the pass once he has won contact and can see a teammate. Reinforce the phrase, “Secure first, release second.”
Demand a real reload from 9 and 10. 9 must finish near the ball, and 10 must be alive behind 3 rather than watching the collision. These two actions turn one useful carry into a multi-phase attacking threat.
Common Mistakes
| Error | What the coach will see | Correction |
|---|---|---|
| Pod arrives late | 9 waits, then throws a high or drifting pass. | Freeze the drill; reset the pod 6–8 m back and demand it is set before the ruck ball is available. |
| Carrier drifts | 2 is tackled sideways and the offload lane disappears. | Use a gate 2 m beyond the gainline and insist that 2 runs through it with square shoulders. |
| Forced offload | 2 tries to pass with a defender wrapping both arms. | Award a point for a long, clean presentation; make the offload conditional on two free hands. |
| 3 overruns the carrier | The offload goes behind or into traffic. | Start 3 half a stride deeper, then cue “hold, see, accelerate.” |
| 9 watches contact | The next ruck has no service. | Put a cone behind the contact zone; 9 must touch it after every pass before returning to service. |
Variations & Progressions
For an easier entry-level version, use three shields and remove the offload. Score the phase when 2 wins the gainline and 1 presents a fast cleanout. This gives young or new players the body-shape habits before decision-making is added.
For the tip variation, 1 runs a hard unders line and 2 passes before contact if the first guard overcommits. No. 3 remains the out-the-back option, so the defensive picture still looks like the base pod.
For the advanced decision progression, place a live 6–7 defender line in front of the pod. Give 9 the choice to hit 2, tip 1, or play behind to 10. Score two points for a line break, one for gainline plus a clean ruck, and subtract one for a forced offload or slow ball.
Age Adaptations
For Under 8 and Under 10, run a non-contact handling pattern with three designated runners and a touch defender. Use “carry, support, pass” language, reduce the work area to 15 m × 20 m, and permit only standing passes—no contact offloads. At Under 12, introduce shield contact and the concept of a legal two-hand offload after the carrier has stopped his feet. Keep the pod to three players and use a 20 m × 25 m area.
At Under 14, add controlled live tackle, a clearout player, and a three-second ruck-ball target. Teach the safe decision to go to ground when the ball is trapped. At Under 16 and open age, run the full pattern with live guards, a connected defensive line, 9's pre-scan, and the 10 sweep.

