Lineout Steal on Opposition Throw: The Coordinated Jumper Intercept
Master the art of the coordinated lineout steal — a high-reward set-piece weapon that turns opposition possession into a counter-attacking platform.

Equipment Needed
Overview
The lineout steal on opposition throw is one of the most tactically rewarding set-piece plays available to a Rugby team. When executed correctly, it not only denies the opposition a clean platform but immediately hands your team possession in a zone where the opposition forwards are out of position, their backs are flat-footed, and your own backline is primed to attack.
This play is best deployed when your coaching staff has identified a predictable opposition throw — typically a team that telegraphs their target lineout jumper through early body language, consistent call signals, or a repetitive throw-length pattern. It is equally effective when the opposition is under pressure near their own 22-metre line, where a successful steal can generate a try-scoring opportunity from a position the opposition least expects.
The steal is not a gamble — it is a calculated, rehearsed interception built on intelligence gathering, timing, and coordinated lifting mechanics. Coaches should treat it as a structured set play with defined roles, not an opportunistic leap.
Setup
Equipment Required
- 1 Rugby ball (match standard)
- Cones (to mark the 5-metre and 15-metre channels on the training pitch)
- Tackle bags or shields (optional, for post-steal contact simulation)
- Coaching whiteboard or tablet (for pre-session briefing)
Pitch Setup
Conduct this drill on a full-width section of the pitch (70 metres wide) near a touchline, replicating match conditions. Mark the 5-metre channel (between the touchline and the first dashed line) and the 15-metre channel clearly with cones if pitch markings are faint. The lineout forms perpendicular to the touchline, with players standing at least 0.5 metres apart in the lineout corridor as per Law 18.
Player Positions
This play requires a minimum of 8 players — the full forward pack — plus the scrum-half (No. 9) and ideally the fly-half (No. 10) to run post-steal options. The roles are as follows:
| Position | Number | Role in Play |
|---|---|---|
| Hooker | 2 | Stands outside touchline; does NOT throw (opposition throws) |
| Loosehead Prop | 1 | Binds at front of lineout; provides stability |
| Lock (Jumper) | 4 | Primary steal jumper — positioned at lineout slot 2 or 3 |
| Lock (Front Lifter) | 6 | Front lifter for No. 4 |
| No. 8 (Rear Lifter) | 8 | Rear lifter for No. 4 |
| Flanker | 7 | Positioned at back of lineout; provides width and peel option |
| Flanker | 6 | Positioned at front; disrupts opposition front jumper |
| Scrum-Half | 9 | 5 metres behind lineout; receives tap-back or stolen ball |
| Fly-Half | 10 | 15 metres from touchline; primary first receiver post-steal |

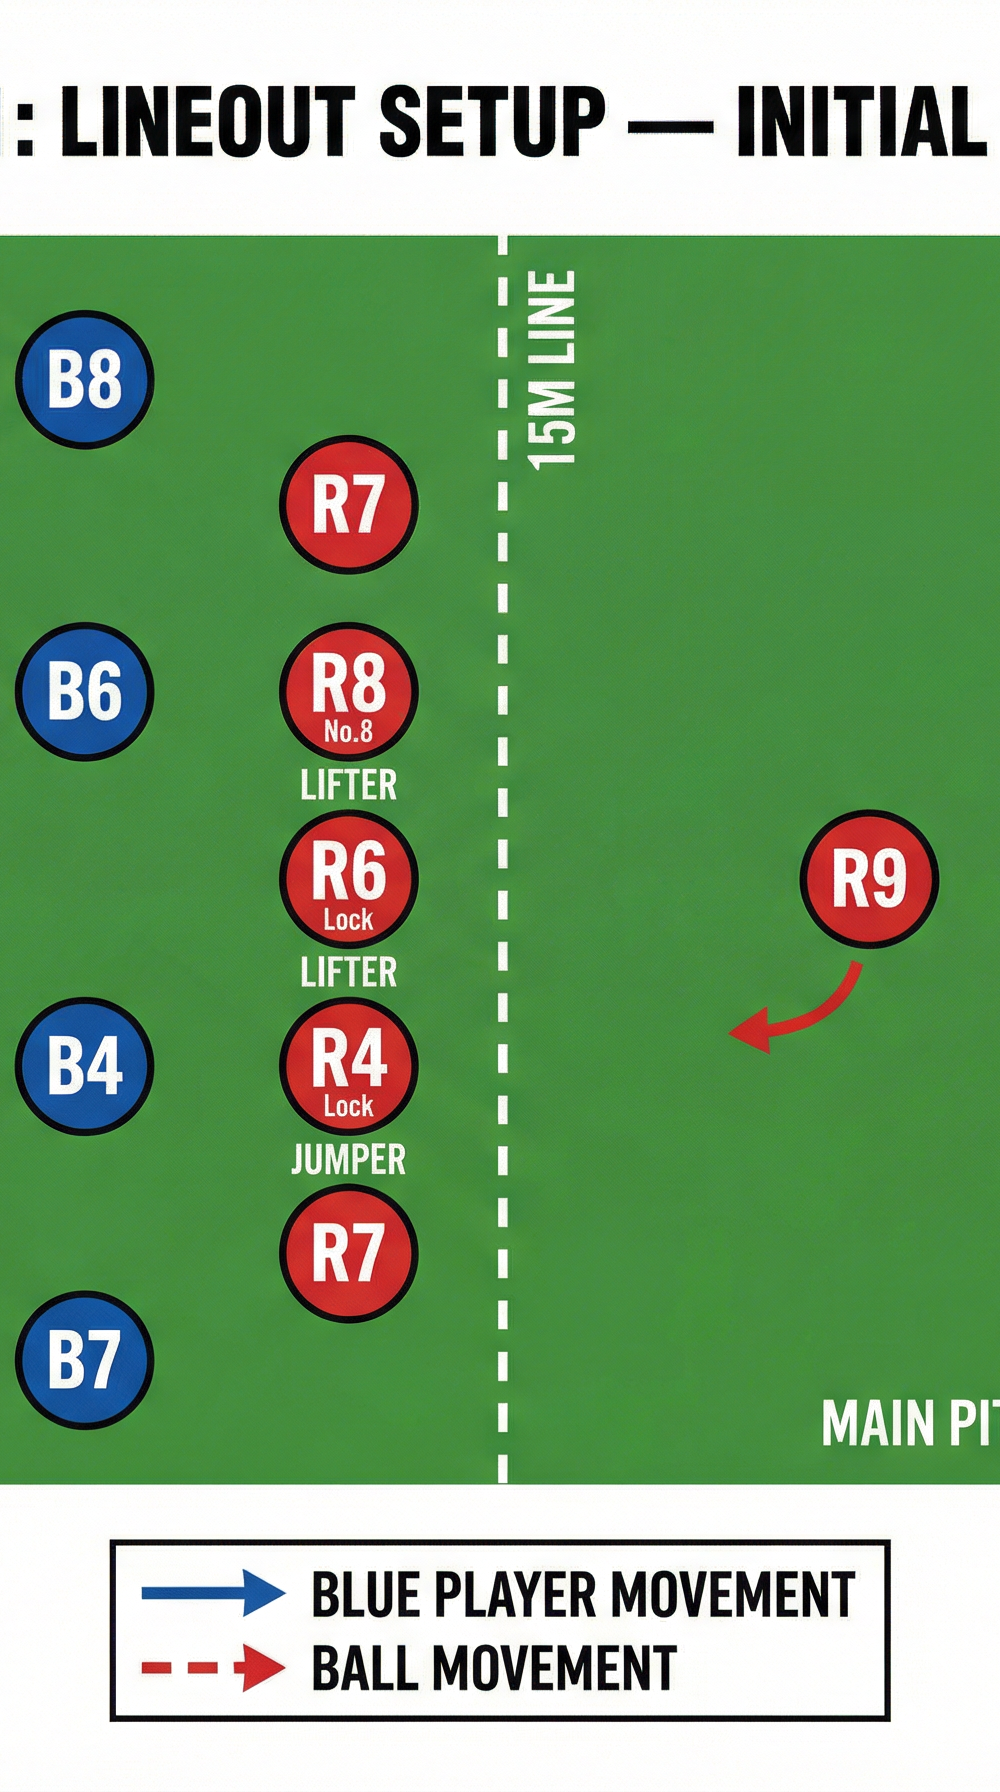
Diagram 1 shows the initial lineout alignment. Red (your team) positions the jumper (R4) at the predicted opposition throw target zone, flanked by front and rear lifters.
Step-by-Step Instructions
Step 1 — Pre-Match Intelligence (Coach's Responsibility)
Before the match, review opposition lineout footage. Identify their most common throw target (typically their primary lock at position 2 or 3), their hooker's body angle at throw, and any verbal or physical call signals. Brief your lineout captain (usually No. 4 or No. 6) on the target zone.
Step 2 — Call the Play
The lineout captain calls the steal play in the huddle before walking to the lineout. Use a pre-agreed code word (e.g., "HAWK" or "RED ZONE"). This alerts the jumper, both lifters, and the scrum-half. All other forwards maintain normal lineout body language to avoid telegraphing the intent.
Step 3 — Walk to the Lineout Deliberately
Your team approaches the lineout calmly. The jumper (No. 4) positions themselves one slot closer to the opposition's target jumper than they would in a standard defensive lineout. This is the critical positioning adjustment — the jumper must be within 0.5 metres of the predicted ball-flight zone without encroaching on the opposition's space before the throw.
Step 4 — Lifters Set Early
The front lifter (No. 6) and rear lifter (No. 8) bind onto the jumper's shorts and thighs before the throw is made. Both lifters adopt a low, loaded stance — knees bent, weight on the balls of their feet — ready to drive upward explosively. The lift must be initiated on the hooker's throwing action, not after the ball is released.
Step 5 — Read the Throw
The jumper watches the opposition hooker's eyes and throwing arm. A short throw (positions 1–2) will have a flatter trajectory; a long throw (positions 4–5) will have a higher arc. The jumper communicates the read with a subtle pre-agreed signal (e.g., a tap on the front lifter's shoulder for "go now").
Step 6 — Execute the Lift and Steal
On the hooker's throwing action, the lifters drive the jumper upward explosively. The jumper extends both arms fully above their head, reaching across the lineout corridor into the ball's flight path. The objective is to intercept the ball at its apex, before it reaches the opposition jumper's hands.

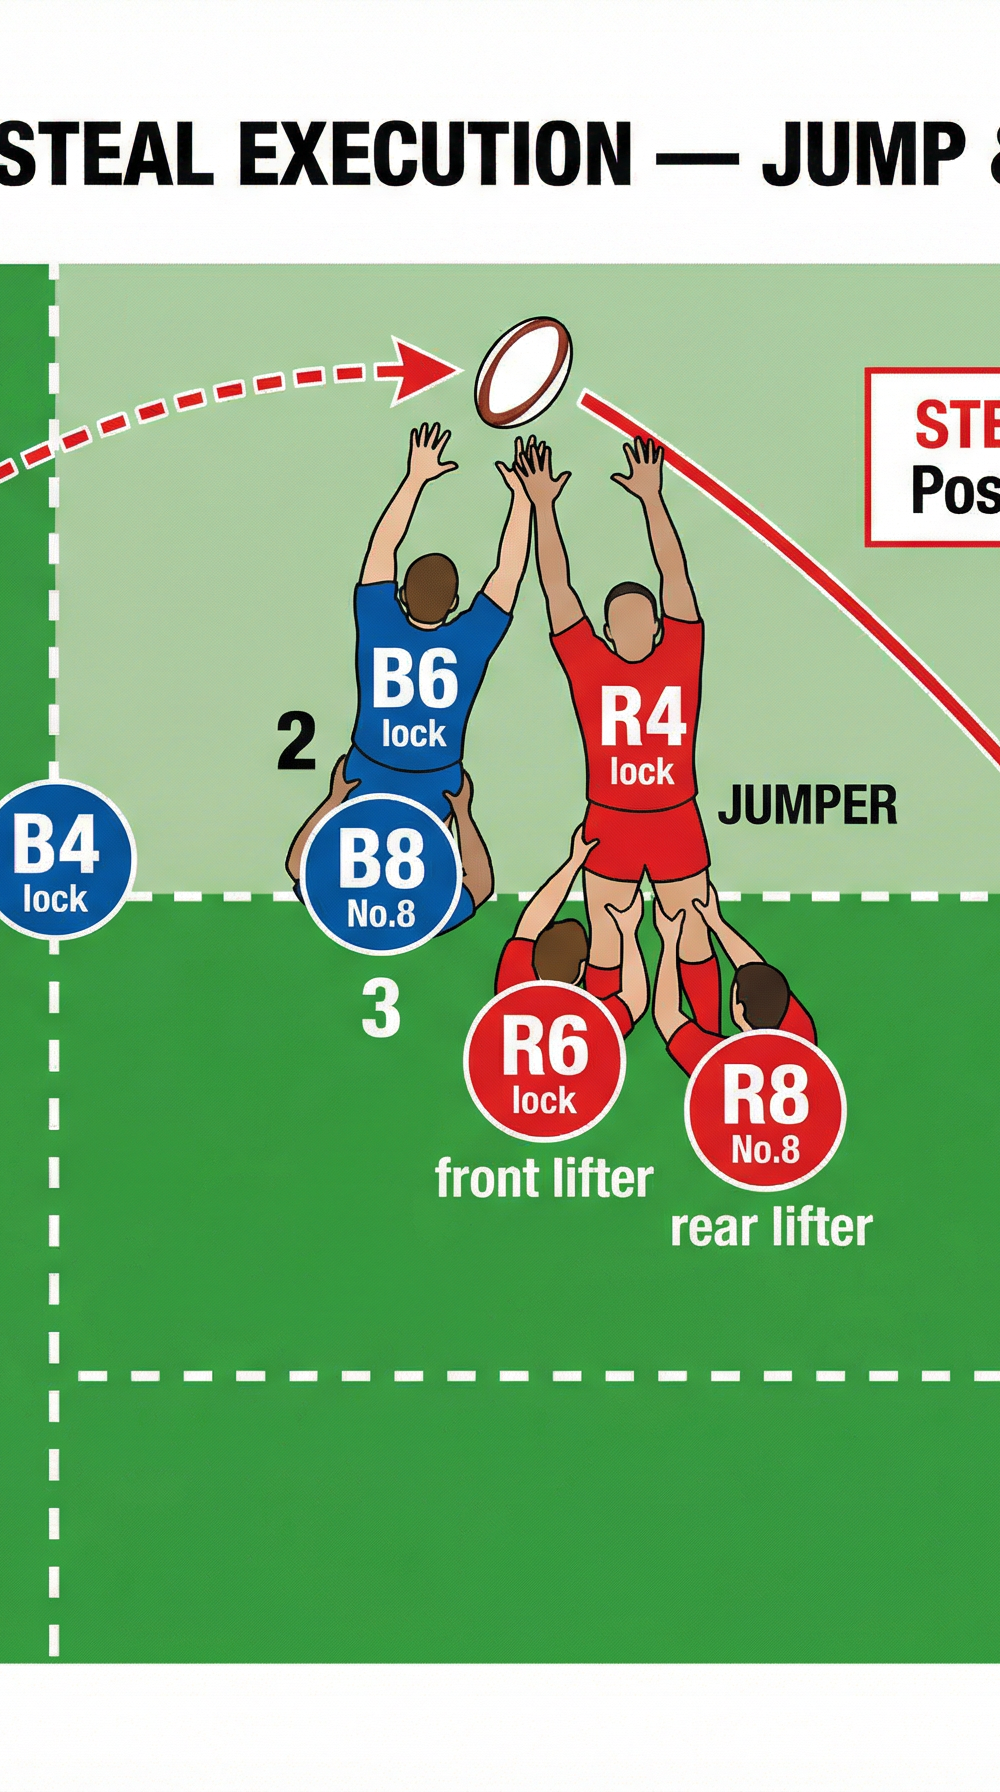
Diagram 2 illustrates the steal execution. R4 (your jumper) is lifted to intercept the ball in the steal zone between positions 2 and 3, while the opposition jumper (B6) is caught fractionally late.
Step 7 — Secure and Distribute
If the jumper catches cleanly, they are lowered immediately and the ball is passed directly to the scrum-half (No. 9). If the jumper cannot catch cleanly — due to height or timing — they tap the ball back toward their own scrum-half rather than attempting a contested catch. A tap-back is a successful steal. The scrum-half must be positioned 5 metres behind the lineout and moving forward to receive.
Step 8 — Execute the Counter-Attack
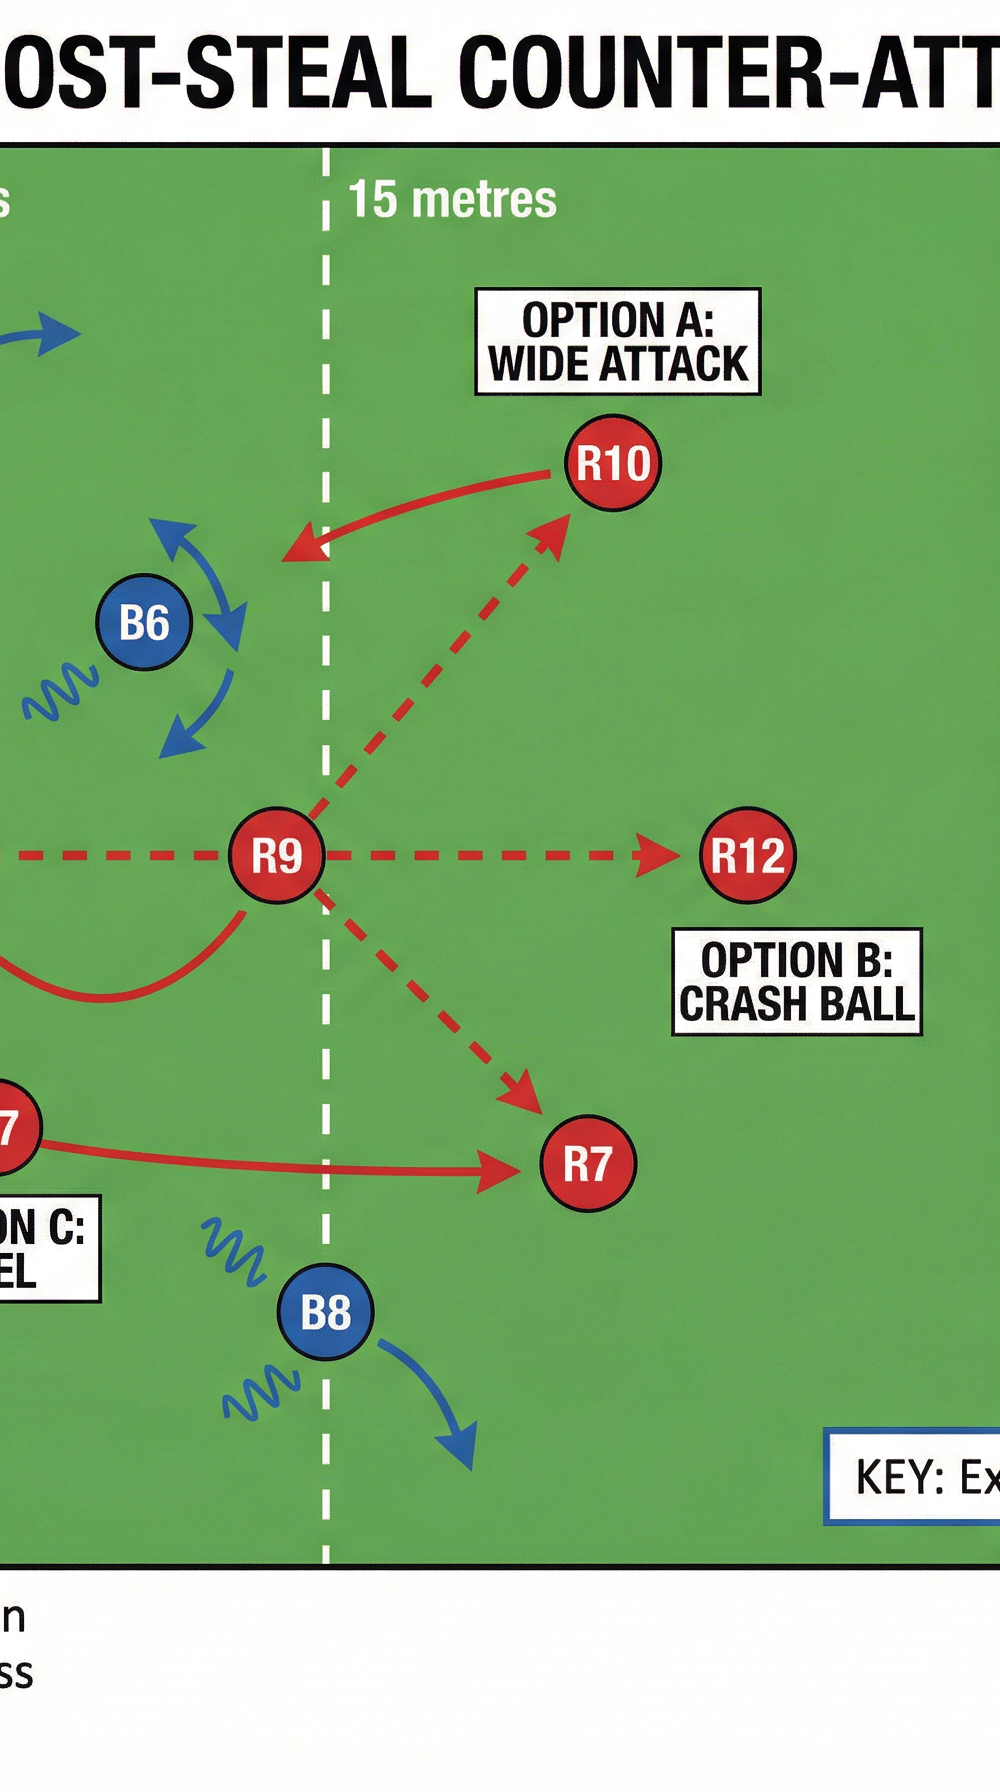
The moment possession is secured, the scrum-half makes an immediate decision based on the pre-called counter-attack option:
- Option A (Wide Attack): Pass to fly-half (No. 10) at 15 metres; exploit the opposition backline who are still aligned for defensive lineout positions.
- Option B (Crash Ball): Pass to inside centre (No. 12) who hits a hard line at pace through the disorganised opposition forwards.
- Option C (Peel): Flanker (No. 7) peels around the back of the lineout at pace to receive a short pass from the scrum-half.

Diagram 3 shows all three post-steal counter-attack options. The opposition forwards (blue) are caught out of position, creating space across the pitch.
Key Coaching Points

1. Positioning is Everything — Get the Slot Right
The jumper must be positioned at the correct lineout slot before the throw. Being even one slot out of position means the ball travels past them before they can intercept. Drill this positioning obsessively in training — walk the lineout, identify the slot, stand there with confidence.
2. The Lift Must Be Simultaneous and Explosive
Both lifters must drive upward at exactly the same moment. An asynchronous lift will cause the jumper to twist in the air, compromising their reach and balance. Use the cue: "Front lifter calls the lift." The front lifter watches the opposition hooker and calls "UP" as the throwing action begins.
3. Reach Across, Not Up
Coach the jumper to reach across the lineout corridor toward the ball's flight path, not simply straight up. The ball will be travelling laterally as well as vertically, and a purely vertical reach will miss it. The jumper's body should lean slightly toward the opposition at the apex of the lift.
4. Tap-Back is a Win — Never Force the Catch
If the jumper cannot secure a clean catch, a controlled tap-back to the scrum-half is the correct decision. Coaches must reinforce this: a tap-back that gives your team possession is a 100% successful steal. Forcing a contested catch risks a knock-on or a turnover.
5. Scrum-Half Must Be Moving Forward to Receive
A static scrum-half gives the opposition time to reorganise. The No. 9 must be moving toward the lineout at the moment the ball is tapped or passed down. Drill this footwork separately — the scrum-half starts 5 metres back and takes two accelerating steps forward as the lift goes up.
6. Counter-Attack Must Be Pre-Decided
The post-steal counter-attack option (A, B, or C) must be called before the lineout forms. Decision-making under pressure at the moment of steal is too slow. The scrum-half and fly-half must know exactly what they are doing before the opposition even throws the ball.
Common Mistakes

Mistake 1 — Jumping Too Early (Offside)
The most common error: the jumper or lifters initiate the lift before the opposition hooker releases the ball. This is an offside infringement under Law 18 and will result in a penalty against your team. Cure: drill the timing trigger — the lift begins on the throwing action, not the call. Use video review to show players the precise moment the throw is released.
Mistake 2 — Telegraphing the Steal Attempt
If your lifters bind onto the jumper too early, or if the jumper stares at the opposition hooker rather than maintaining neutral body language, experienced opposition coaches will spot the steal and change the throw target. Cure: maintain normal lineout body language until the very last moment. Lifters should bind at the same time they would in any normal lineout.
Mistake 3 — Poor Tap-Back Direction
A misdirected tap-back — especially one that goes forward or into touch — negates the steal entirely. Cure: the jumper must practise tapping the ball backward and infield (toward the 15-metre line) in every training repetition. Use a target cone 5 metres behind the lineout to give the jumper a visual reference.
Mistake 4 — Scrum-Half Ball-Watching
The scrum-half freezes watching the steal attempt instead of moving to receive. By the time they start moving, the opposition has reorganised. Cure: the scrum-half's job is to move forward regardless of whether the steal succeeds. If it fails, they defend. If it succeeds, they are already in position.
Mistake 5 — No Pre-Planned Counter-Attack
Teams steal the ball and then stand still, waiting for someone to make a decision. The opposition resets and the advantage is lost. Cure: every steal attempt in training must be followed by a full counter-attack sequence. Never drill the steal in isolation — always attach the post-steal play.
Variations & Progressions

Variation 1 — Double Jumper Steal (Advanced)
Deploy two potential steal jumpers at adjacent lineout slots. The opposition cannot predict which one will go up, forcing them to either change their throw or risk being stolen at either position. This requires two lift units (four lifters total) and is best used by experienced squads who have drilled the timing extensively.
Variation 2 — Decoy Steal with Defensive Pressure (Intermediate)
Send one jumper up as a decoy steal attempt while your remaining forwards aggressively contest the opposition's catch-and-drive. Even if the steal fails, the opposition's maul is disrupted and their primary ball carrier is under immediate pressure. This variation is lower risk and highly effective against teams that rely on a driving maul from lineout.
Progression 1 — Introduce Live Opposition
Begin the drill with a cooperative opposition (they throw to a pre-agreed target). Once your team has the timing and positioning correct, introduce a live opposition hooker who can vary the throw target. This forces your jumper to read the throw in real time rather than relying on prior knowledge.
Progression 2 — Full Match Simulation
Run the complete sequence — lineout steal, tap-back, scrum-half distribution, and full counter-attack — against a live defensive line. Time the sequence from steal to first tackle and set a target of under 4 seconds from steal to first contact. This replicates match pressure and trains the counter-attack at game speed.
Age Adaptations
Under 12 and Below — No Lifting
Lifting is not permitted in age-grade Rugby below Under 14 (World Rugby guidelines). For younger age groups, adapt the steal to a standing jump steal: the jumper simply times a standing jump to intercept a flat, low throw. Focus on reading the throw and jumping at the correct moment rather than the lift mechanics. The post-steal counter-attack principles remain identical.
Under 14 — Introduce Lifting with Safety Focus
At Under 14, lifting is introduced. Coaches must prioritise safe lifting technique above all else before introducing the steal play. Spend at least two full sessions on lift mechanics — grip positions, synchronised drive, controlled lowering — before adding the steal timing element. Use a lightweight ball or a tennis ball initially to allow the jumper to focus on body position without the pressure of catching.
Under 16 and Open Age — Full Play as Described
The full steal play as described above is appropriate for Under 16 and open age. At Under 16, simplify the post-steal options to one pre-called play (Option A or B only) to reduce cognitive load. At open age, all three counter-attack options should be available and the scrum-half should be empowered to make the live read based on defensive alignment.