The Defensive Deflector: Middle Lineout Steal & Counter-Attack
Master the art of disrupting opposition ball with this middle-jump lineout steal that instantly transitions into a devastating wide counter-attack.

Equipment Needed
1. Overview
The lineout is not just a method of restarting play; it is a critical battleground for possession and momentum. The 'Defensive Deflector' is an aggressive set play designed to steal the opposition's lineout throw by attacking the middle jumper. By reading the opposition hooker's cues and executing a rapid lift, your team can disrupt their primary possession platform. Crucially, this play does not just aim to spoil the ball—it is designed to secure the deflection and instantly launch a counter-attack against a disorganised defensive line. This is best used when defending between your own 22-metre and 10-metre lines, where a turnover can quickly be converted into a scoring opportunity.
2. Setup

Pitch Area: A standard 100m x 70m Rugby pitch. The drill is set up on the 5-metre line, simulating a real match scenario.
Equipment: 2-3 Rugby balls, bibs for two teams (e.g., Blue for defenders/stealers, Red for attackers/throwers), and a coaching whiteboard for pre-drill briefing.
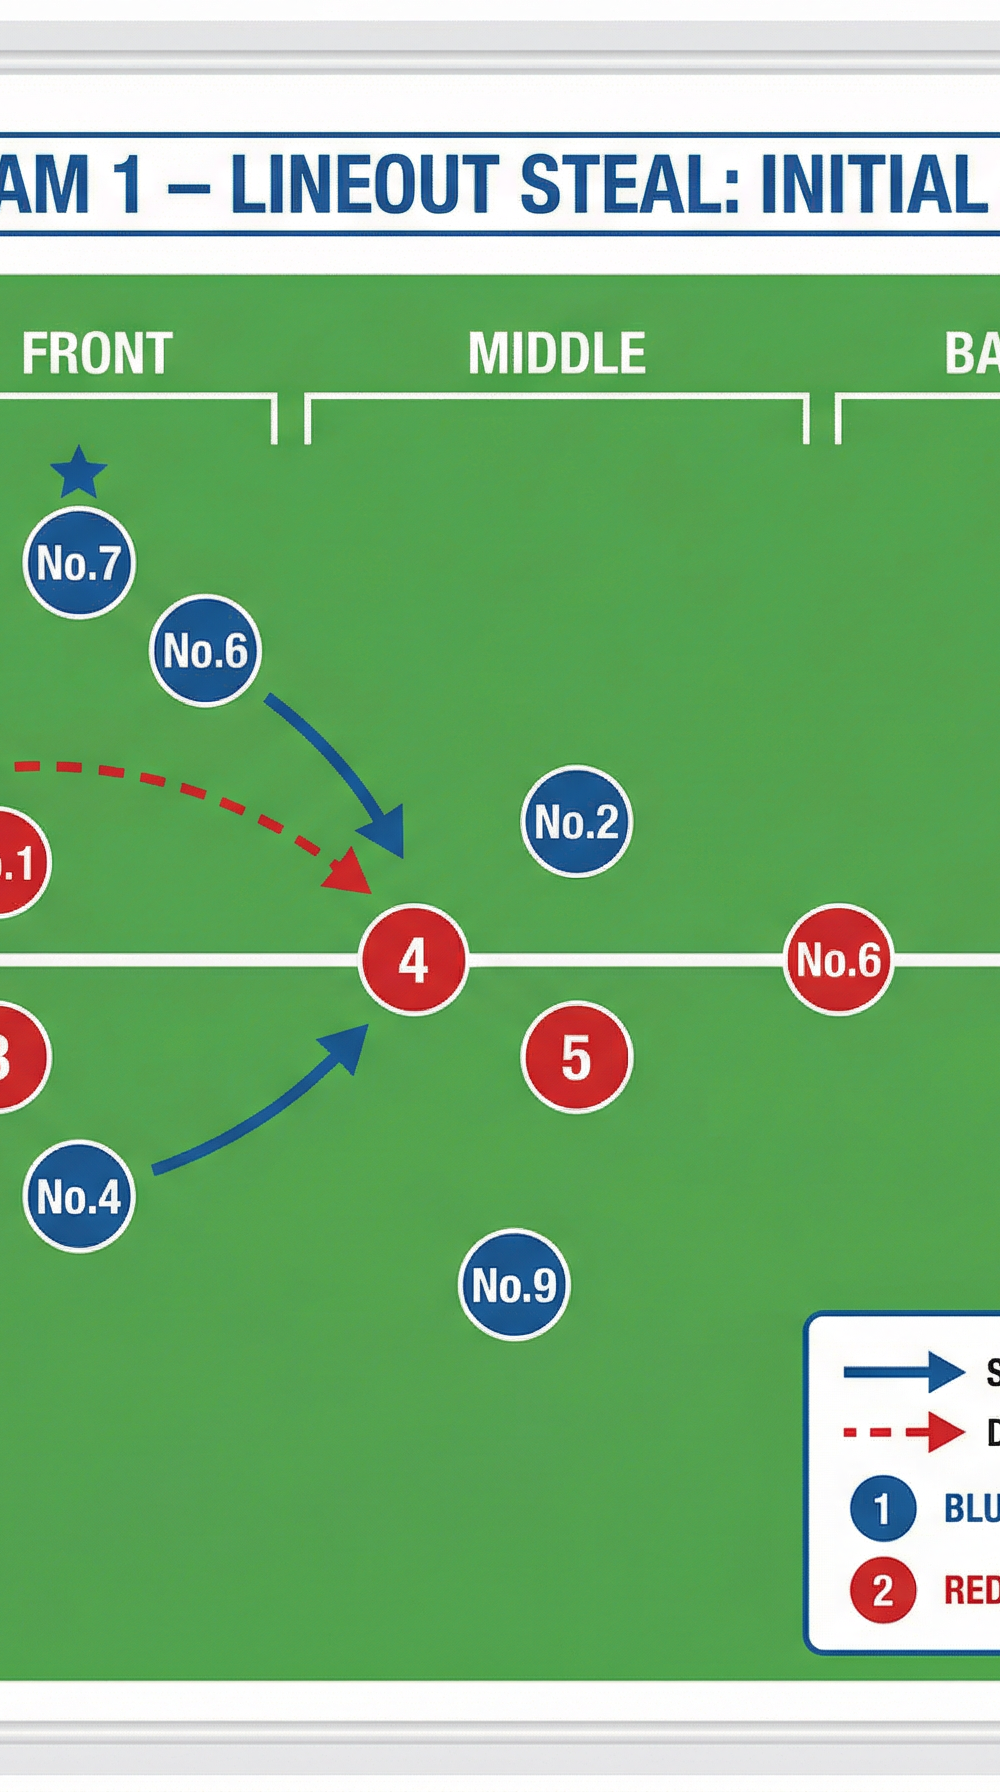
Player Positions (Defending Team):
- No.7 (Openside Flanker): Positioned at the front of the lineout to cover the short throw and act as a decoy.
- No.3 & No.5 (Lifters): Positioned in the middle zone, ready to execute a rapid lift.
- No.4 (Lock/Jumper): The designated steal jumper, positioned between the lifters.
- No.8 (Number Eight): Positioned at the back of the lineout, ready to receive the deflected ball.
- No.9 (Scrum-half): Sweeping 1-2 metres behind the lineout to secure loose ball and initiate the attack.
- Backline (10, 12, 13, 11, 15): Spread wide, ready to attack the space once possession is secured.

3. Step-by-Step Instructions

- The Setup and Read: The defending team aligns in a standard 7-man lineout formation. The defensive caller (usually the No.4 or No.5) reads the opposition's setup. The No.7 positions aggressively at the front to force the opposition to throw to the middle or back.
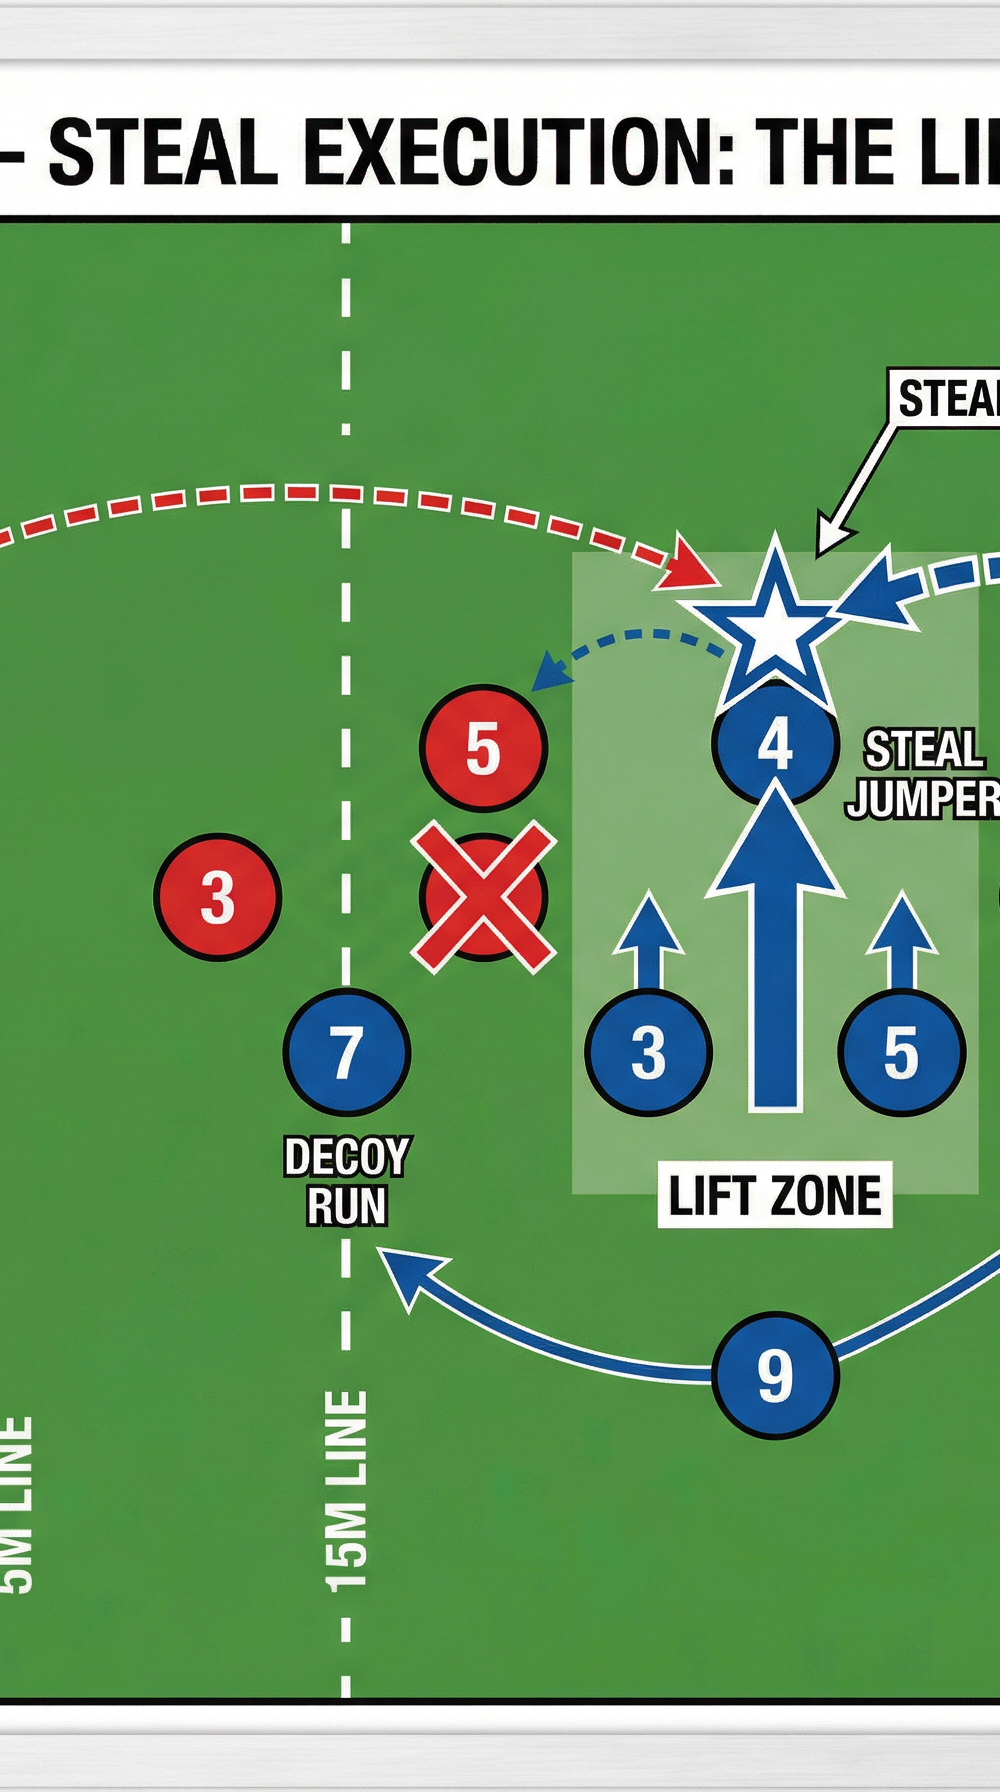
- The Trigger: As the opposition hooker begins their throwing motion, the defending lifters (No.3 and No.5) drop their weight slightly, preparing for an explosive lift.
- The Lift and Contest: The moment the ball leaves the hooker's hands, the lifters propel the No.4 high into the air. The timing must be impeccable—the goal is to reach maximum height just as the ball arrives in the middle zone.
- The Deflection: Instead of trying to cleanly catch the ball (which is difficult under pressure), the No.4 extends their inside arm and aggressively tips or deflects the ball backwards towards their own side of the lineout.

- Securing the Ball: The No.8, anticipating the deflection, steps back slightly to cleanly gather the tipped ball. Simultaneously, the No.9 sweeps around to support the No.8.
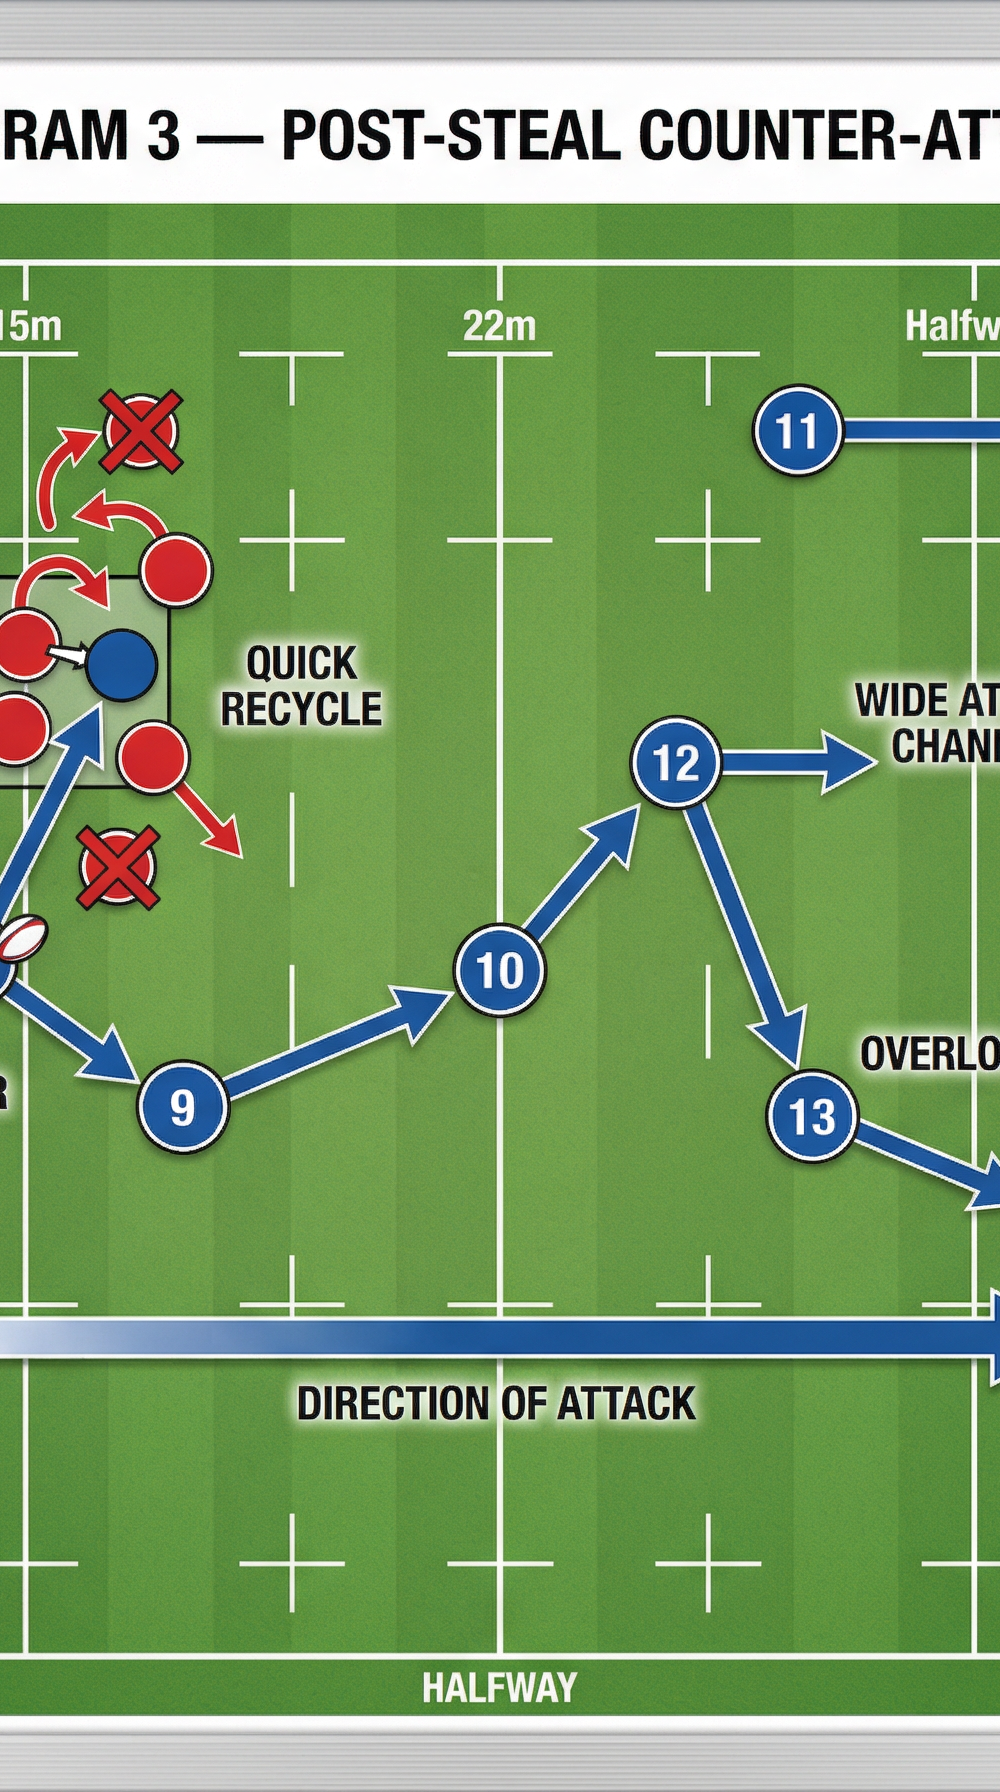
- The Counter-Attack Launch: The No.8 immediately transfers the ball to the No.9. The No.9 delivers a rapid, flat pass to the No.10 (Fly-half).
- Exploiting the Disorganisation: The opposition forwards are now trapped in the lineout, and their backline is retreating. The No.10 attacks the gainline, drawing the first defender before passing to the No.12. The backline executes a wide attack, exploiting the 3v2 overload on the outside edge.

4. Key Coaching Points

- Explosive Lifting: Lifters must use their legs, not just their arms, to drive the jumper up quickly. The lift must be a coordinated, simultaneous effort.
- Jumper's Body Position: The jumper must stay tight and strong in the air, keeping their eyes on the ball and extending their arm fully for the deflection.
- Anticipation at the Back: The No.8 must read the flight of the ball and the jumper's hand position to anticipate where the deflection will land. They cannot be flat-footed.
- Instant Transition: The transition from defense to attack must be seamless. The No.9 and No.10 must communicate early and execute their passes with speed and precision.
5. Common Mistakes
- Lifting Too Early or Too Late: Timing is everything. Lifting too early allows the opposition to adjust; lifting too late results in a missed contest.
- Trying to Catch Instead of Tip: In a contested situation, trying to cleanly catch the ball often leads to knock-ons. Tipping the ball backward is a higher-percentage play.
- Static Backline: The backline must be moving onto the ball as the No.9 passes. If they are static, the opposition defense has time to realign and shut down the counter-attack.
6. Variations & Progressions
- Progression 1: Live Opposition: Introduce a fully contested lineout with the attacking team actively trying to win their own ball and disrupt the steal.
- Variation 1: Front Steal: If the opposition adapts by throwing to the front, shift the lifting pod forward and use the No.7 as the jumper, with the No.4 dropping back to secure the deflection.
- Variation 2: The Maul Option: If the No.4 manages to cleanly catch the ball instead of tipping it, the defending forwards can immediately transition into an attacking maul, driving the opposition back.
7. Age Adaptations
- Under 14s: Focus heavily on safe lifting techniques. The lift should be controlled, and the jumper must be brought down safely. Emphasise the timing of the jump over maximum height.
- Under 16s: Introduce the concept of reading the opposition's cues and making defensive calls. Increase the speed of the transition from the steal to the counter-attack.
- Open/Senior: Execute the play at full match intensity. Focus on the intricacies of the backline counter-attack, ensuring precise lines of running and decision-making under pressure.