Penalty-to-Corner 5m Lineout: Front-Drive Attack
Teach a decisive penalty-to-touch lineout that turns a five-metre attacking platform into a compact front-drive maul, with a 9–10 exit when the defence overcommits.

Equipment Needed
Penalty-to-Corner 5m Lineout: Front-Drive Attack
Overview
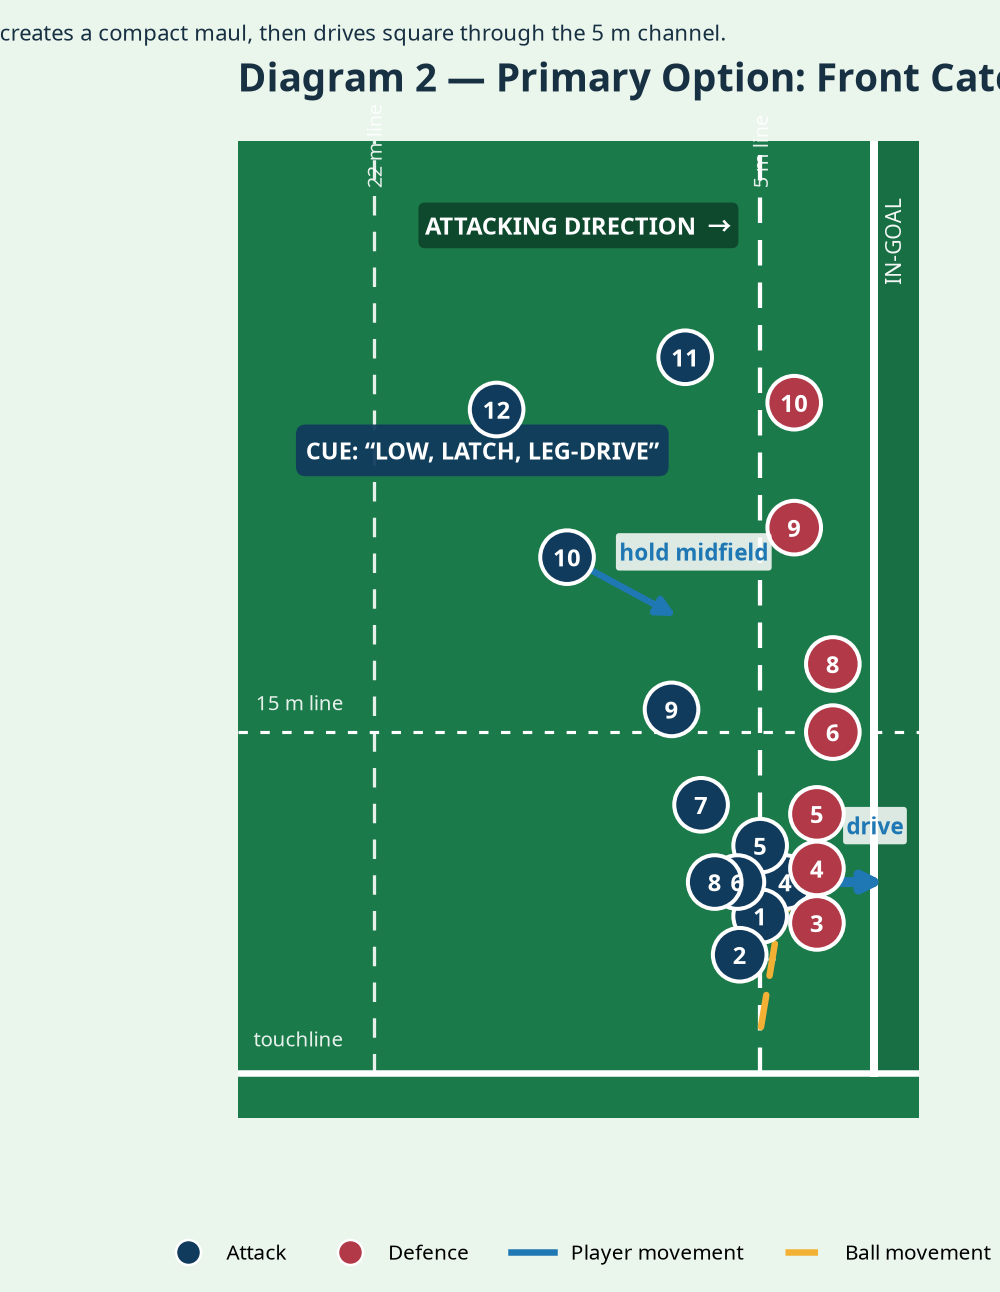
This is a five-metre penalty-corner attack for the moment your side has kicked a penalty to touch near the opposition try line. Its primary picture is a quick front catch by 4, a compact legal maul and a square drive through the five-metre channel. Its second picture is a 9–10 exit when defenders overcommit to the drive. It is a coach-friendly call because every player knows the first action, and 9 owns the decision after the catch.
Use it when the opposition’s near-side forwards are slow to organise, when your front-lift pod has a height advantage, or after you have made defenders respect a tight carry. On a maximum rugby field, set the practice area as a 24 m x 20 m box: touchline to 15 m line and five metres from the try line back into the field. A lineout cannot be formed nearer than five metres from the try line; the lines form between the five- and 15-metre lines from touch. 1 3
| Outcome | Trigger | Non-negotiable |
|---|---|---|
| Drive and score | Clean front ball; defenders narrow | Catch, land and bind before the drive |
| Exit to 9–10 | Defence overloads the maul edge | Ball is available at the hindmost foot |
| Recycle | Drive stalls before the goal line | 9 calls “use” early and retains connection |
Setup
Kick the penalty to touch, set the lineout at the five-metre line and make the initial language simple: “Corner” identifies the penalty-to-touch decision, “Front Drive” is the primary call, and “Hold–Exit” releases the 9–10 variation. From a penalty kick to touch, the kicking side throws into the resulting lineout. 1
| Element | Exact setup and responsibility |
|---|---|
| Markings | Cones mark touch, the five-metre line, 15-metre line and try line. Place the lineout on the five-metre line from goal. |
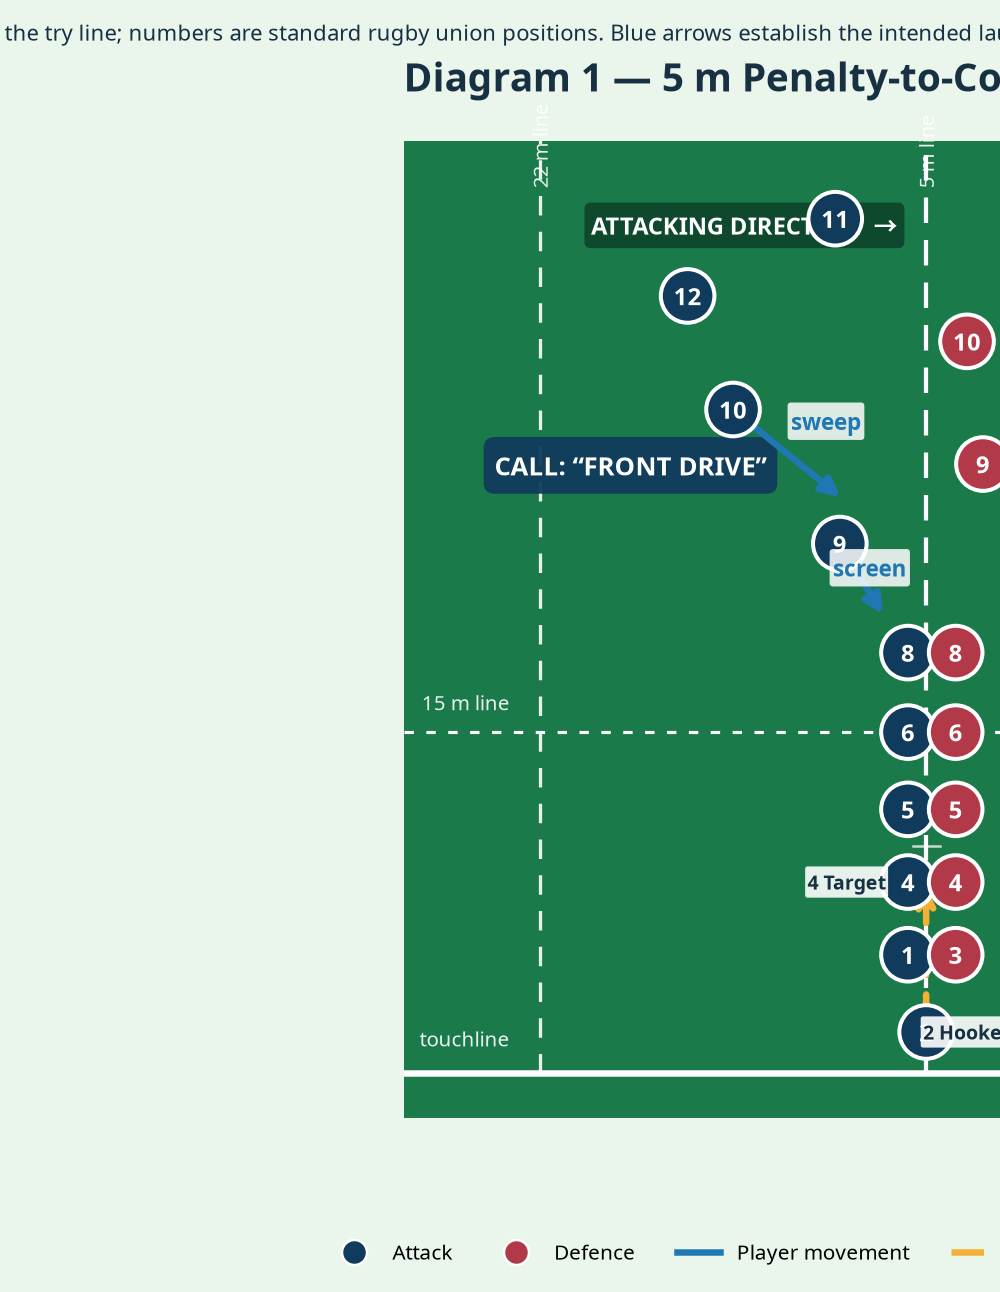
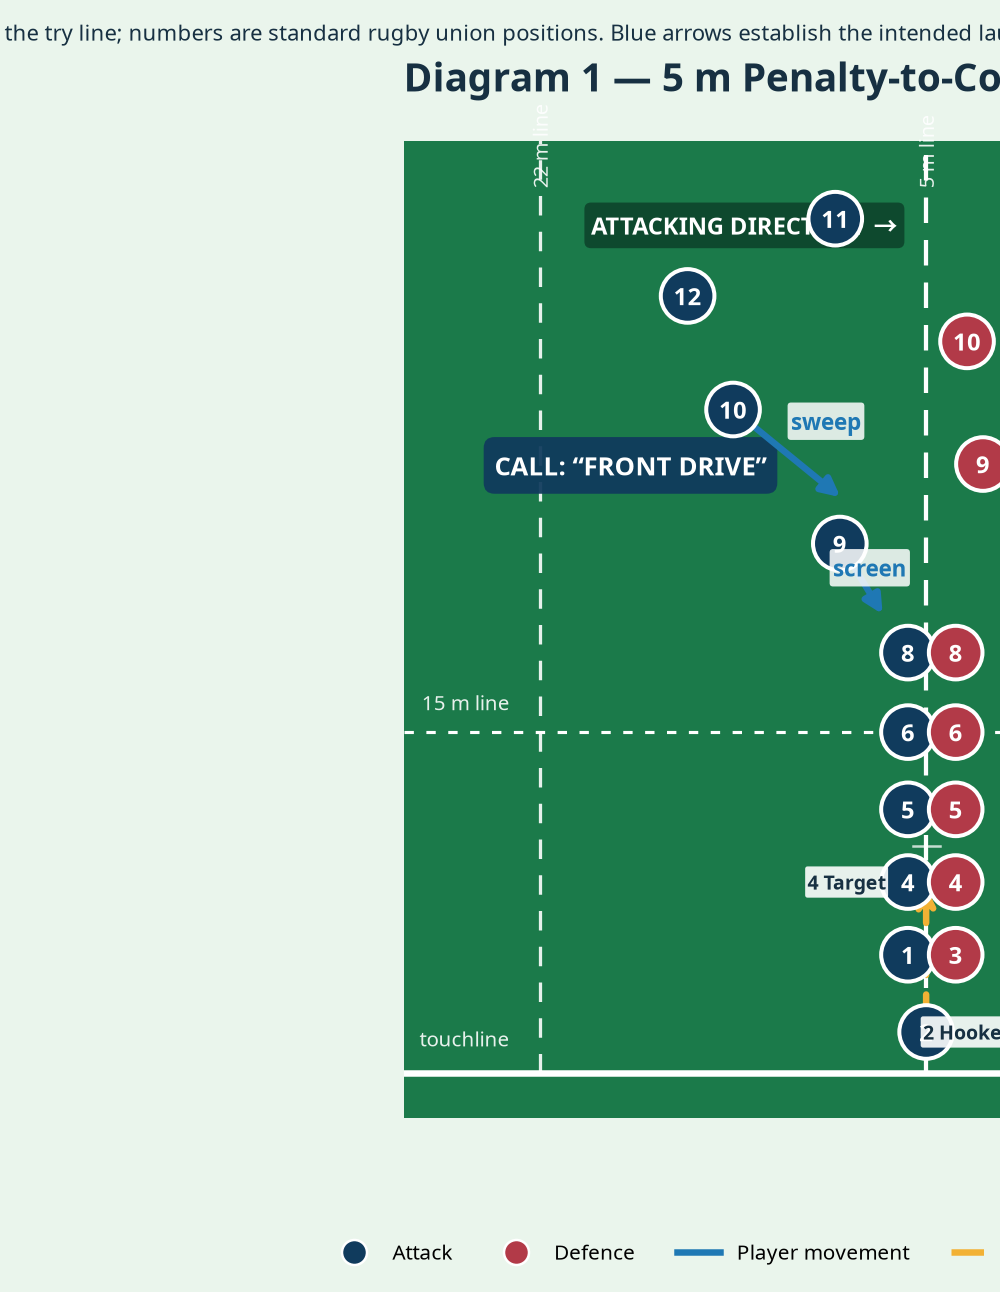
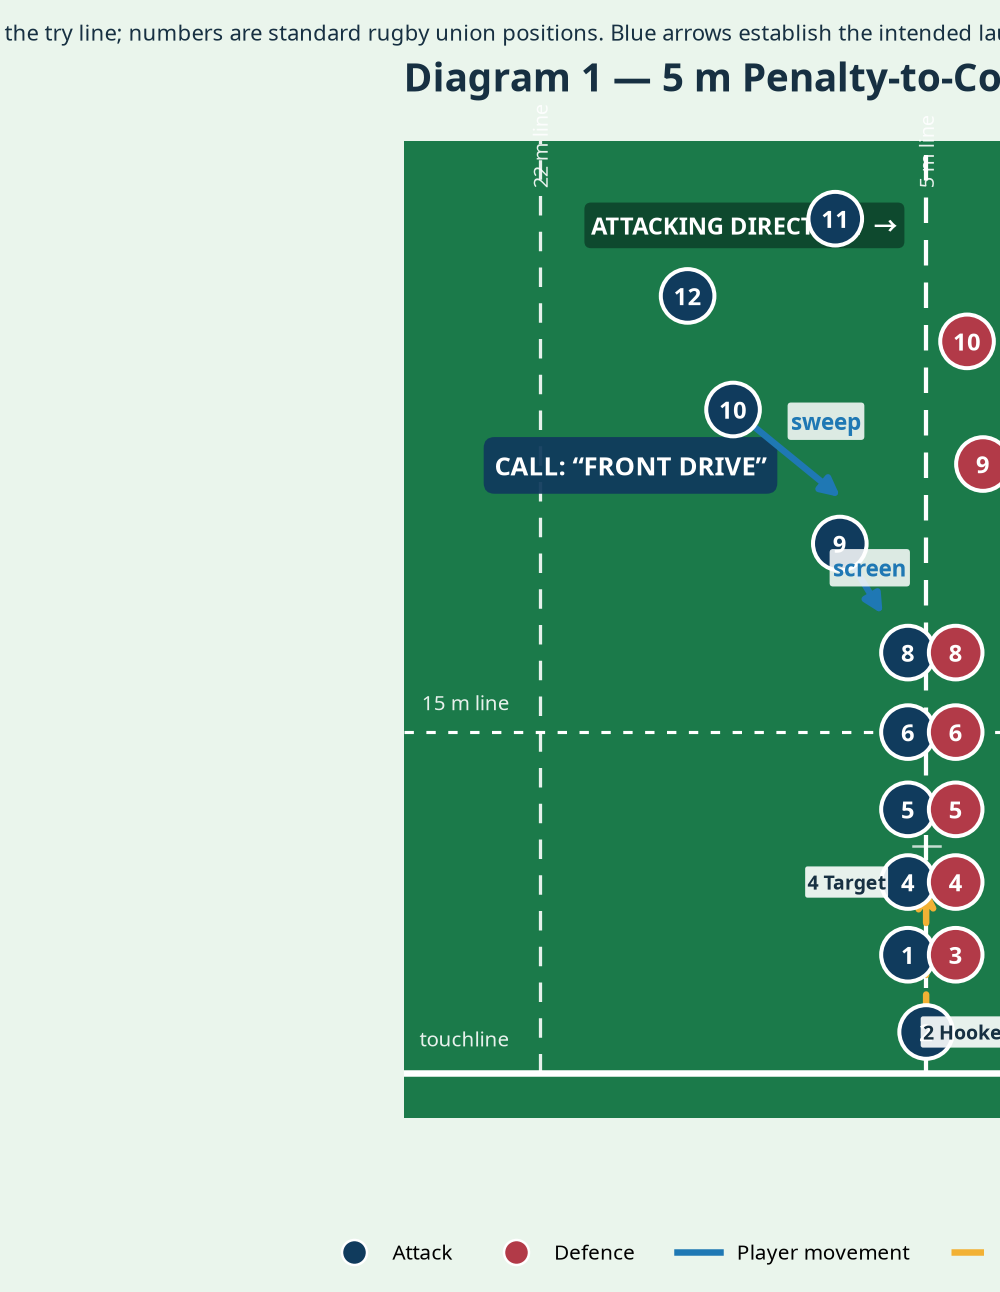
| Front pod | 4 is front target, lifted by 1 and 5. 6 is first binder; 8 is tail worker. |
| Backline | 9 starts 3–4 m behind the tail. 10 sweeps 6–8 m behind 9. 12 is the hard decoy; 13 and 11 retain width. |
| Defence | Match lineout numbers. Place 9 at guard; link 10 and 12 beyond the 15-metre line. |
| Equipment | One match ball, 16–20 cones, two shields, bibs and a whistle. Run each live rep to eight seconds. |

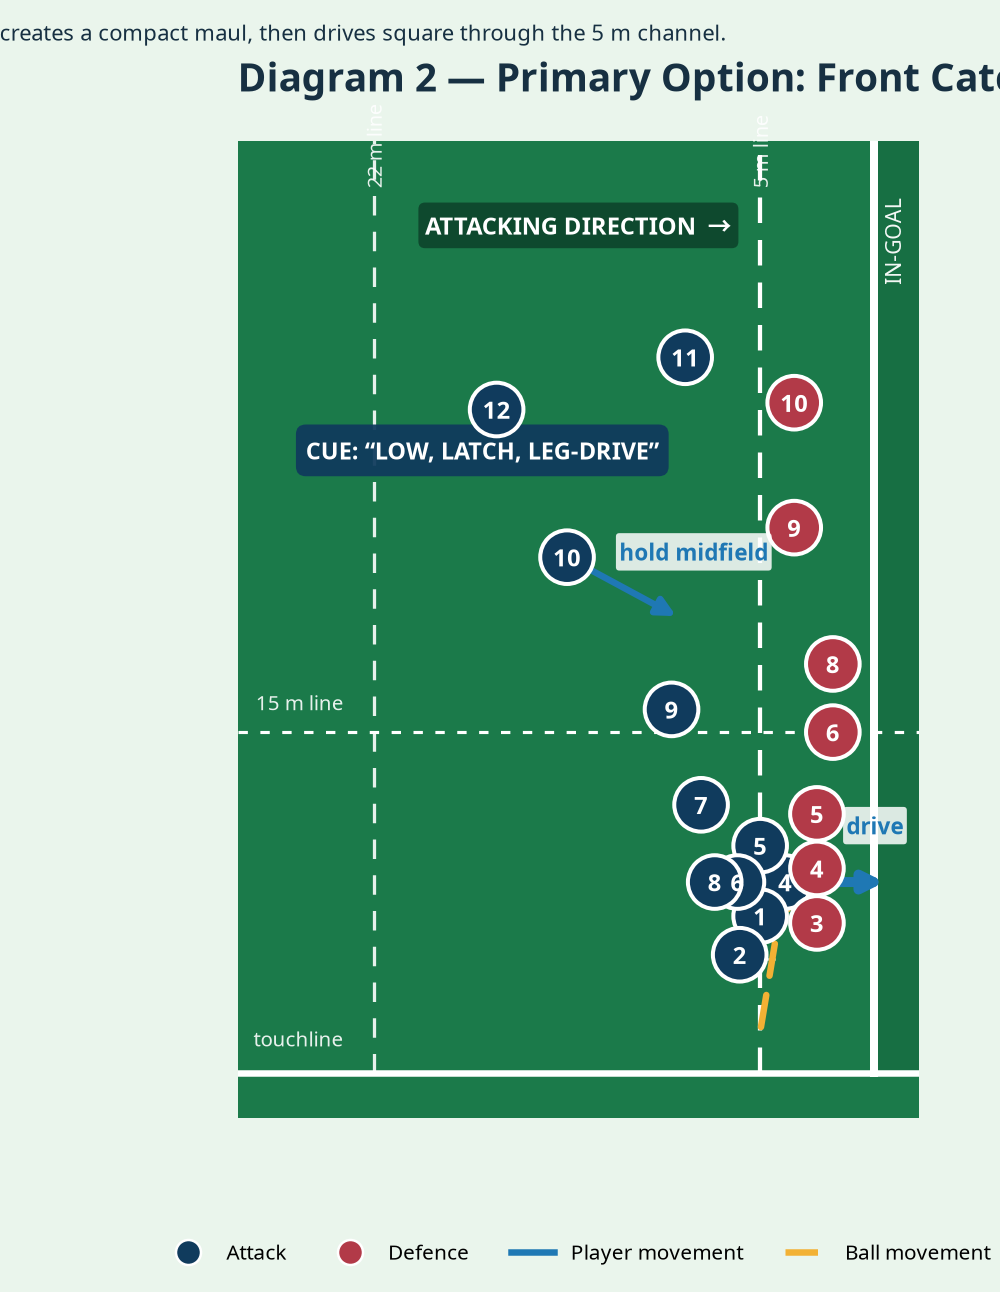
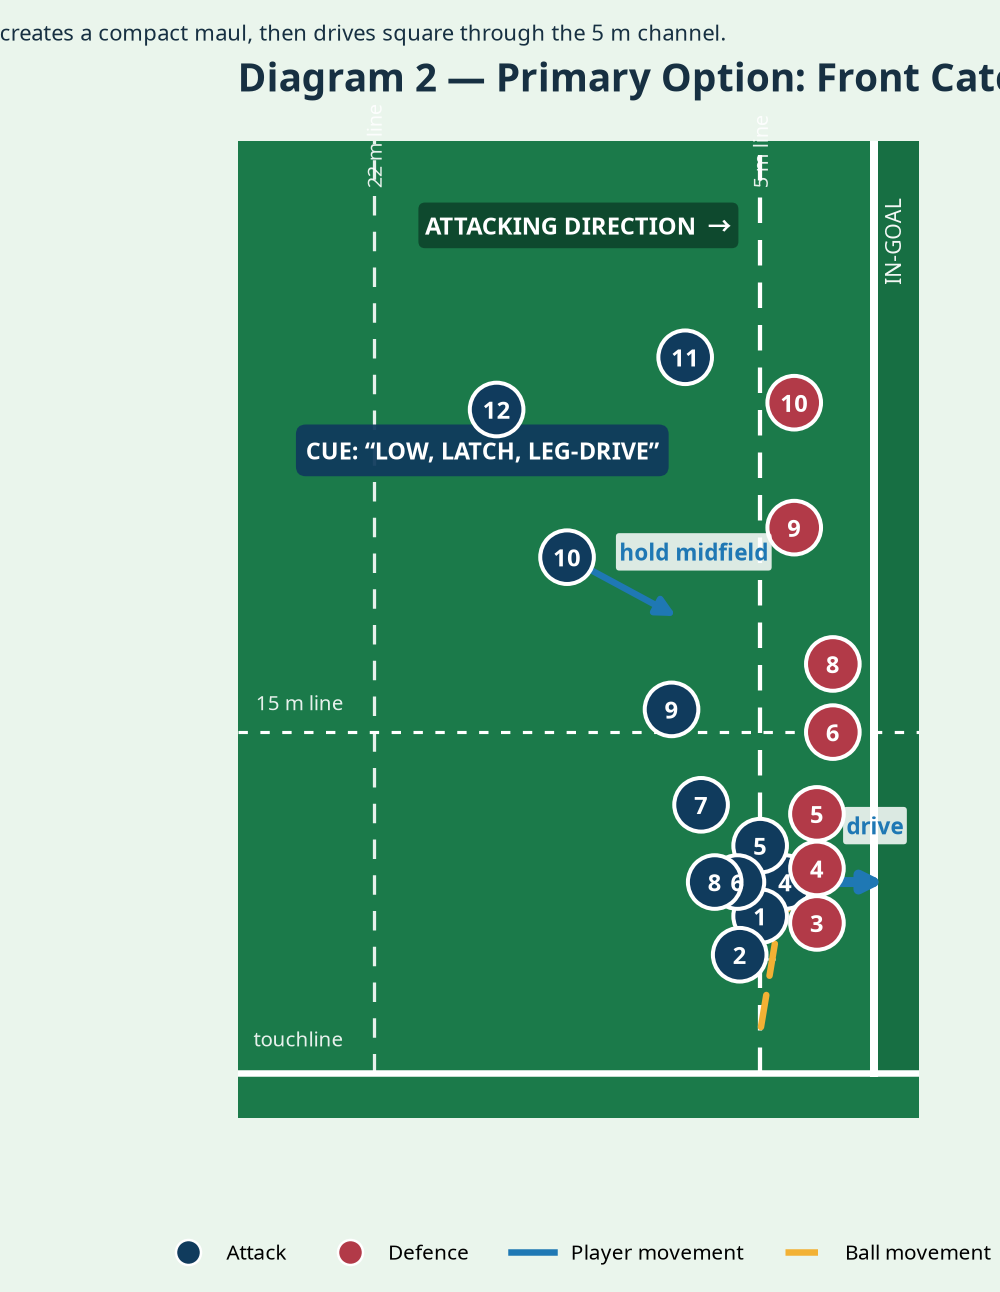
Diagram 1. Blue arrows show player movement; yellow dashed arrows show ball travel. Numbered circles use standard rugby positions. Keep 9, 10 and 12 visible so the maul is never the only threat.
Step-by-Step Instructions
Create the corner. The nominated kicker takes the penalty to touch between five and ten metres from the goal line. 2 collects the ball, lifters find the front slot and 9 gives the first call. The defending team must retreat 10 m from the penalty mark before joining play, but the attack should organise faster rather than wait for that advantage. 2
Set the legal picture. 2 stands on the mark with both feet on or behind touch. The lines are each half a metre from the mark and operate between the five- and 15-metre lines. The throw is straight and must reach the five-metre line before hitting the ground. 1 Put cones on those lines in practice; do not normalise an illegal shape.
Win the front lift. On “Front Drive”, 4 stays still until 2 commits. When the ball leaves 2’s hands, 1 and 5 lift through their legs and present 4’s hips and hands to the ball. 4 catches high, then lands under control within about 1.5 seconds. Pre-grip is permitted, but lifting cannot begin before release. 1
Build the maul first. Once 4 is down, 1 and 5 bind tightly; 6 binds immediately behind the catcher and 8 fills the tail. 2 joins after the throw. The first objective is a low, forward-facing unit with the ball transferred behind the front shield. Coach the rhythm aloud: “catch—land—bind.”
Drive square. When the ball is protected at the hindmost available point, 6 calls “go”. The unit drives at the try line, not the touchline: hips square, short steps, eyes up and every player pushing through the teammate in front. Demand two coordinated steps in the first two seconds. If the unit splits, 9 must use the ball rather than force a sideways maul.
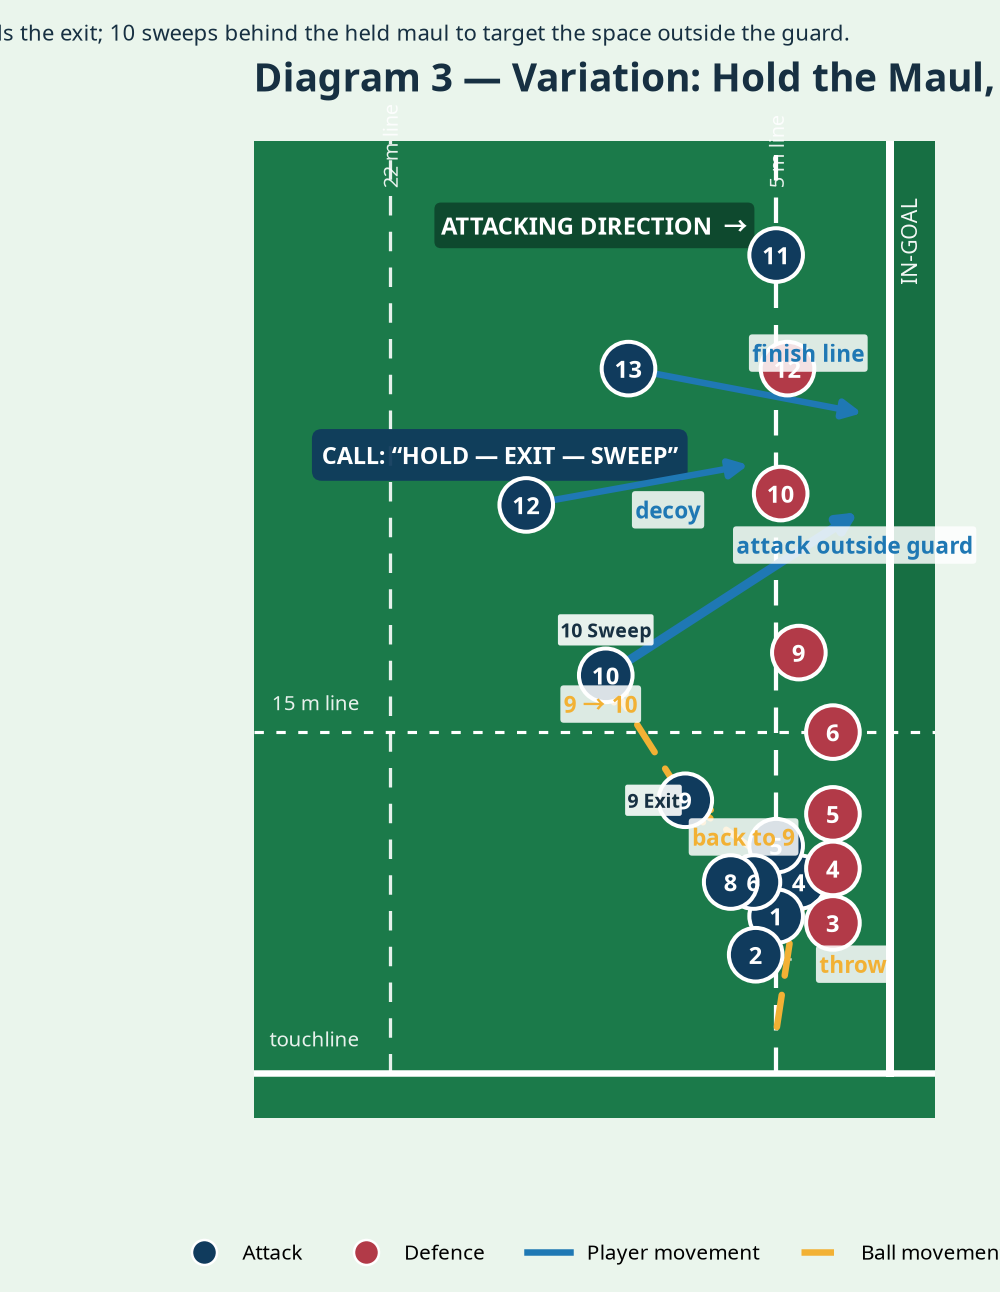
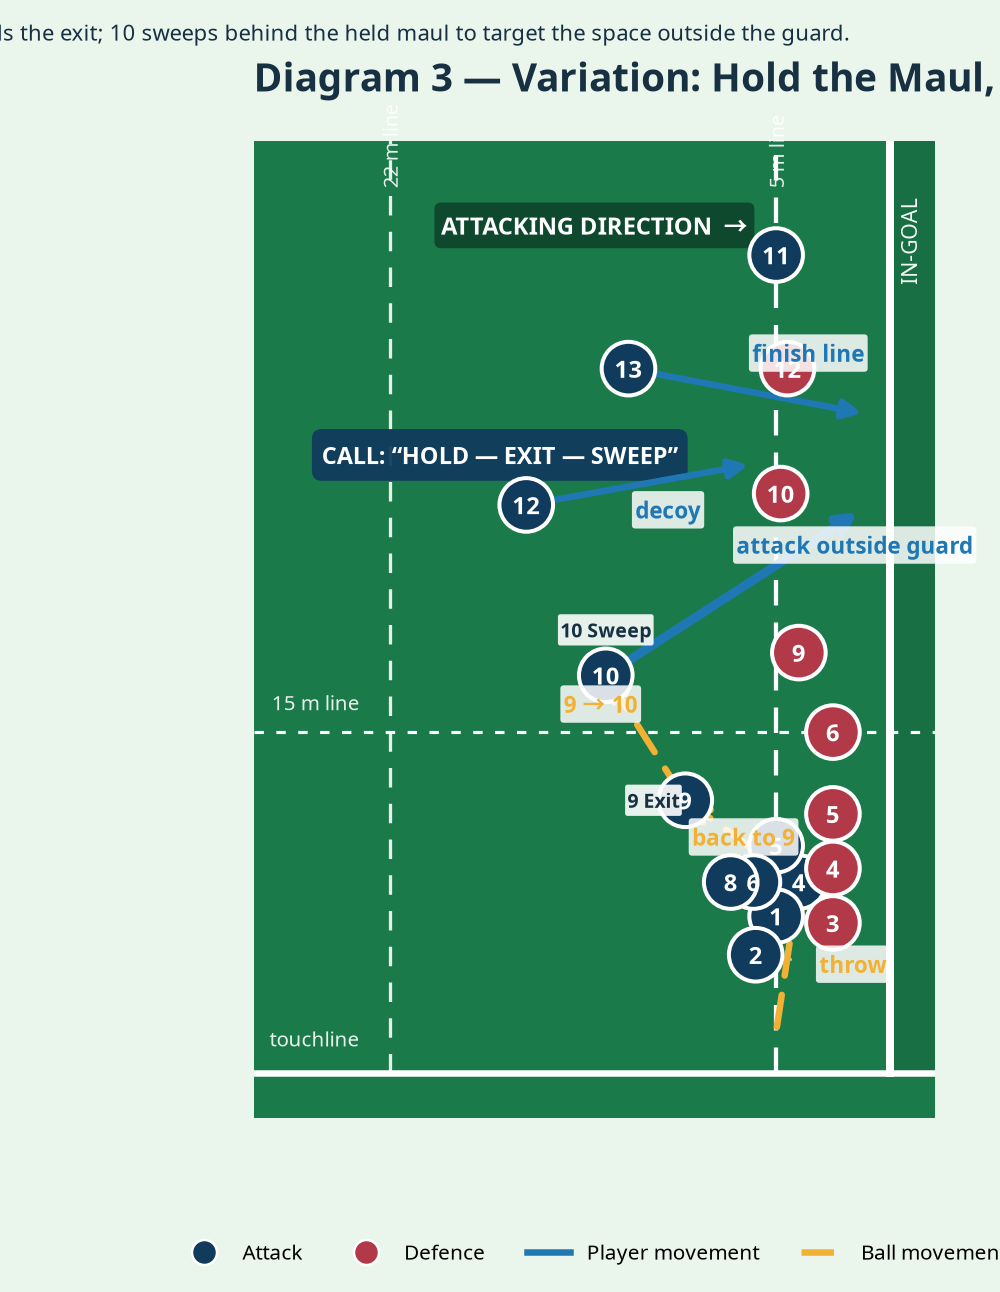
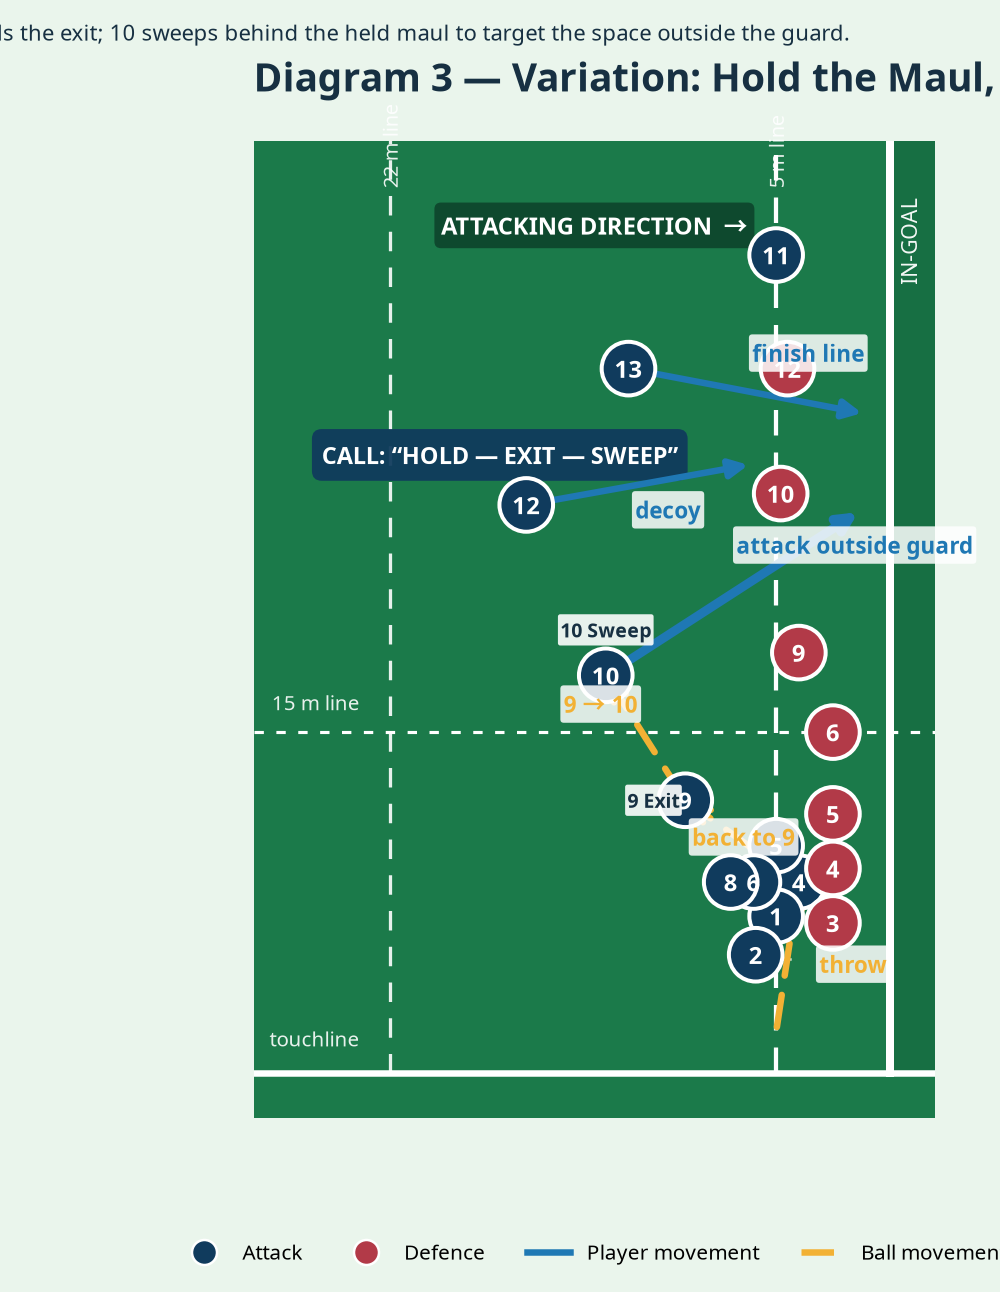
Hold the release. 9 scans the guard and first defender outside the maul. 10 holds a flat sweep, 12 runs a hard inside decoy and 13/11 stay on finishing width. Their task is to occupy defenders, not drift toward the maul.
Exit early if needed. If three or more defenders load the maul edge, 9 calls “Exit” after the second step. The ball is played from the hindmost foot to 9, then to 10 behind 12’s line. 10 carries at the soft guard or plays 13 out the back. From 9’s call, target an exit in under 1.5 seconds.
Finish and reset. Near the line, the carrier gets long only when supported; otherwise, recycle on the same side. Stop after a score, a clean recycle or a defensive win. Before the next rep ask: “Did we win the catch, the shape or the decision?”
Key Coaching Points
- Throw quality decides the call. Train 2 to hit 4’s outside hand under fatigue.
- Lift late and land safely. The lift starts after release and 1/5 control the descent.
- Make the maul narrow. Close the space around 4’s hips before moving.
- Drive through the goal line. Use a cone line perpendicular to the try line; correct shoulders that point at touch.
- Give 9 authority. 9 alone calls drive, use or exit once the ball is live.
- Keep the backline credible. 10’s depth and 12’s decoy prevent a free defensive fold.
Common Mistakes
| Mistake | What you see | Immediate correction |
|---|---|---|
| Early lift or crooked throw | Referee intervention; 4 reaches before release | Reset 2’s feet and rehearse “release–lift–catch”. |
| Catcher turns toward touch | Maul wheels out of the five-metre channel | Set 4’s near foot toward the try line; demand a square landing. |
| Loose first bind | Ball is exposed or the maul fragments | Give 1 and 5 a hip-to-rib bind target before driving. |
| 9 waits too long | Ball is trapped as defenders fold | Apply the two-step “use” trigger. |
| Backs spectate | Defence can empty into the maul | Score the 9–10 exit separately; reward 12 for fixing a defender. |
Variations & Progressions
| Variation or progression | How to run it | Purpose |
|---|---|---|
| Hold–Exit | Hold the maul for two steps, then 9 feeds 10 behind 12’s decoy. | Punish an overloaded maul defence. |
| Front pop | 4 lands and immediately pops to 9; 10 hits a short unders line. | Retain the front-lift picture without a full maul. |
| Live defence | Move from passive contest to active jump, then a live fold or legal maul defence. | Force drive, exit or recycle decisions under pressure. |
Age Adaptations
Follow local age-grade law first; lifting, contesting and mauling differ by competition. For Under 8/Under 10, remove lifting and contested mauls: use 4 as a grounded receiver, a two-player shield carry and a pass to 10. For Under 12, use controlled, coach-managed lifts only where permitted, limit the drive to two steps and stop the rep before a collapse. For Under 14, introduce a live jumper and the 9–10 exit, but make the defensive objective containment. For Under 16 and open age, run the full decision game: live contest, legal maul defence, an eight-second finish and a scoreboard that rewards the right option rather than only the try.
Finish with six competitive reps from each touchline. Award two points for a legal clean catch, three for a maul crossing the gain cone square and five for a try. That scoring keeps attention on the process that creates the score.
References