Mastering the Slip Cordon: Field Setup and Catching Fundamentals
A comprehensive guide for coaches on organizing the slip cordon, mastering catching fundamentals, and running effective progression drills.
Equipment Needed
1. Overview
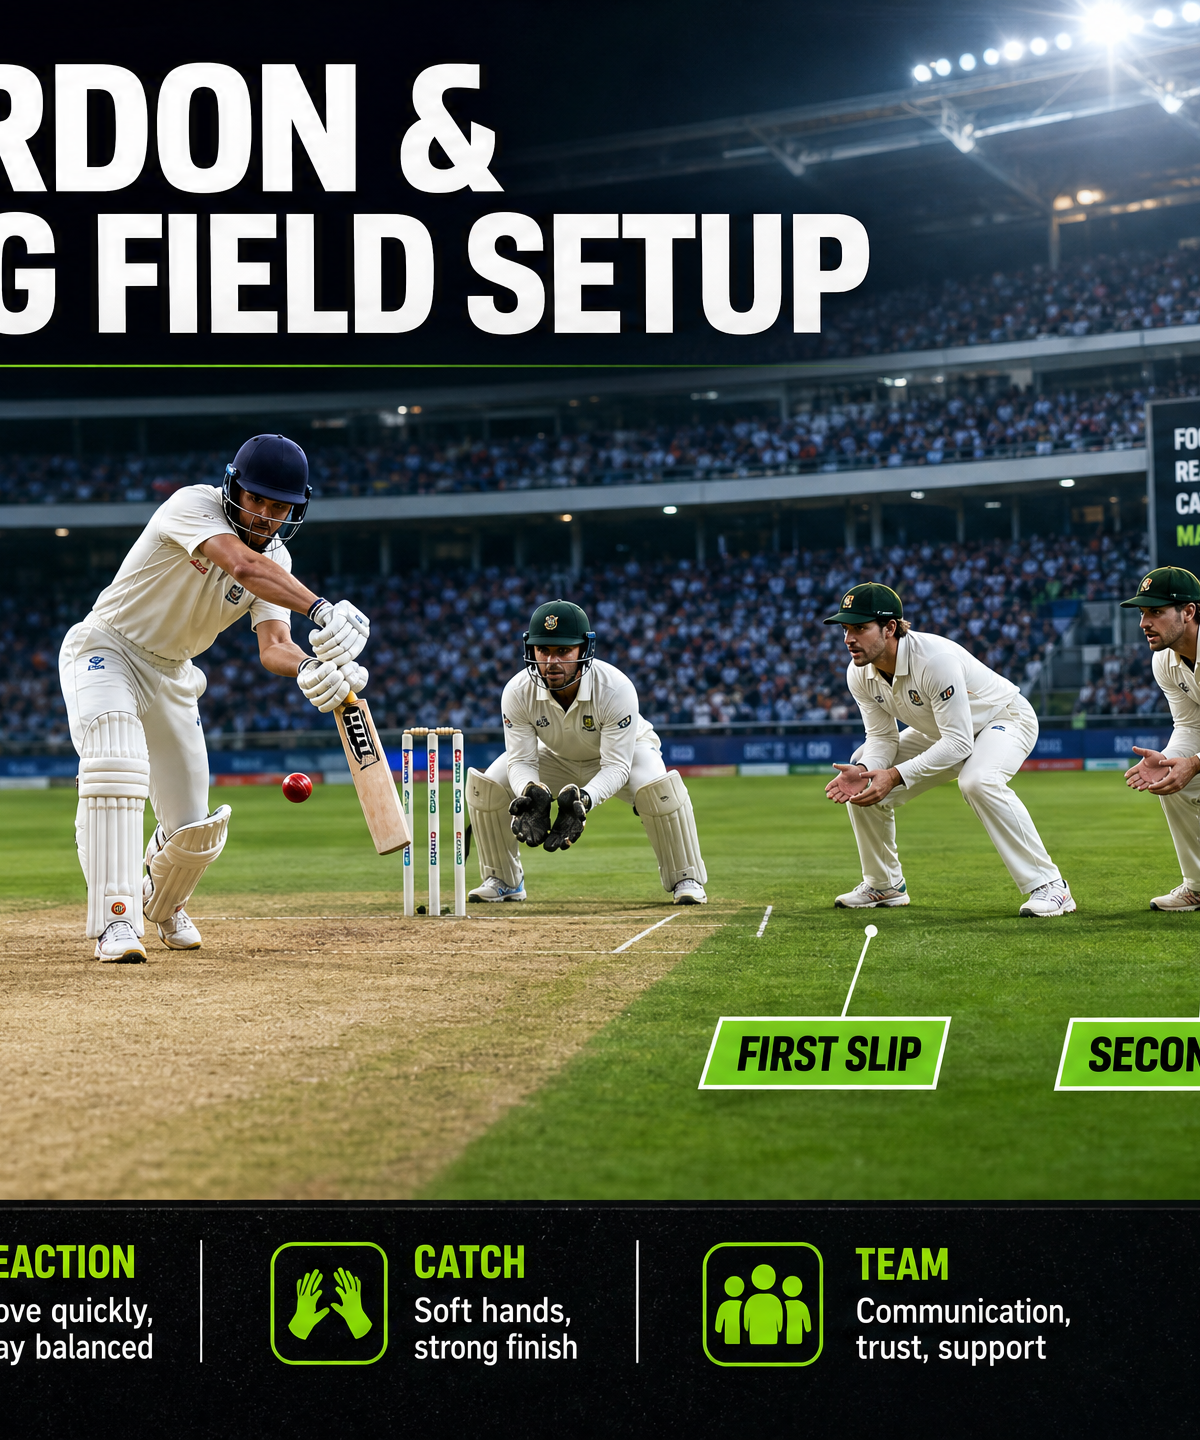
The slip cordon is arguably the most critical catching area in cricket, especially in the longer formats of the game. A well-organized slip cordon applies immense pressure on the batsman and capitalizes on the slightest errors in technique. This set play resource provides coaches with the blueprint for setting up the slip cordon, defining individual catching zones, and running progressive drills to sharpen reflexes and catching technique. It is designed to transform a group of individual fielders into a cohesive, communicative catching unit.
2. Setup
Equipment Needed
- Cricket balls (minimum 6, mix of new and slightly worn)
- Slip cradle or Katchet board (optional but recommended)
- Field markers or flat cones (for marking start positions)
- Cricket bat (for the coach/feeder)
Pitch and Field Setup
To execute this effectively, you need a clear understanding of the spatial relationship between the wicket-keeper and the slip fielders.

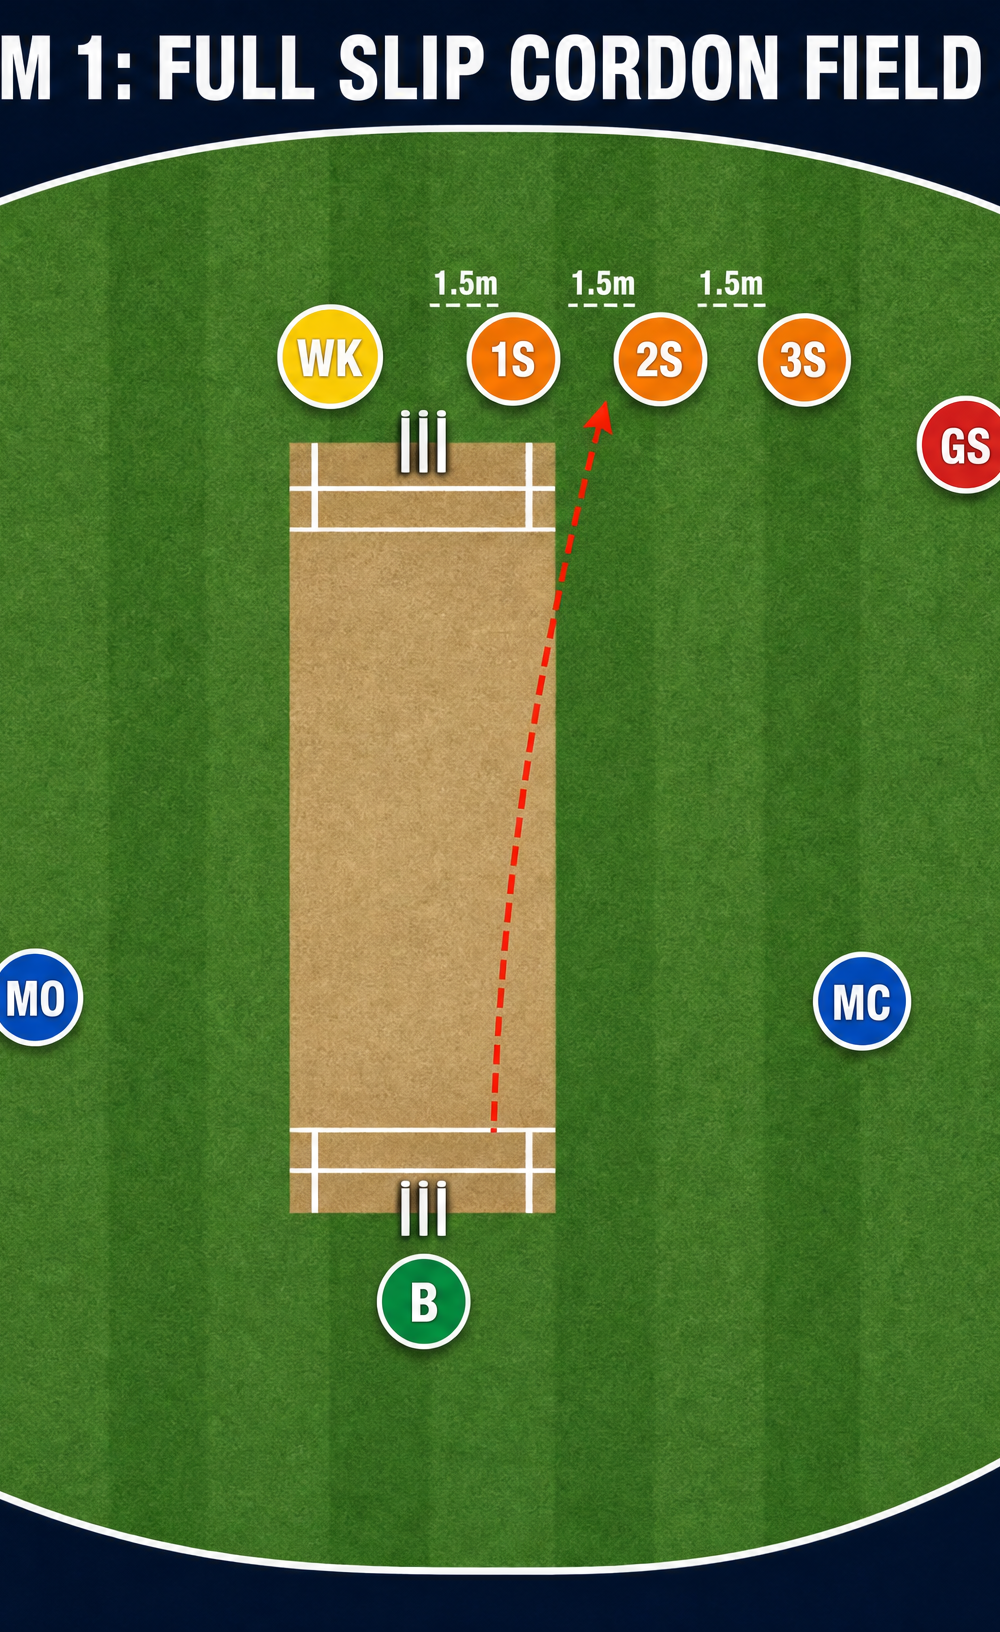
As shown in Diagram 1, the standard setup requires precise spacing:
- Wicket-Keeper (WK): Positioned directly behind the stumps, depth dictated by the bowler's pace.
- First Slip (1S): Positioned approximately 1.5 metres to the right of the wicket-keeper (for a right-handed batsman).
- Second Slip (2S): Positioned 1.5 metres to the right of first slip.
- Third Slip (3S): Positioned 1.5 metres to the right of second slip.
- Gully (GU): Positioned wider and slightly squarer, typically at a 45-degree angle from the stumps.
Coach's Note: The depth of the slips must stagger slightly. First slip stands slightly deeper than the wicket-keeper, second slip slightly deeper than first, creating a diagonal line. This prevents fielders from colliding when diving for the same ball.
3. Step-by-Step Instructions

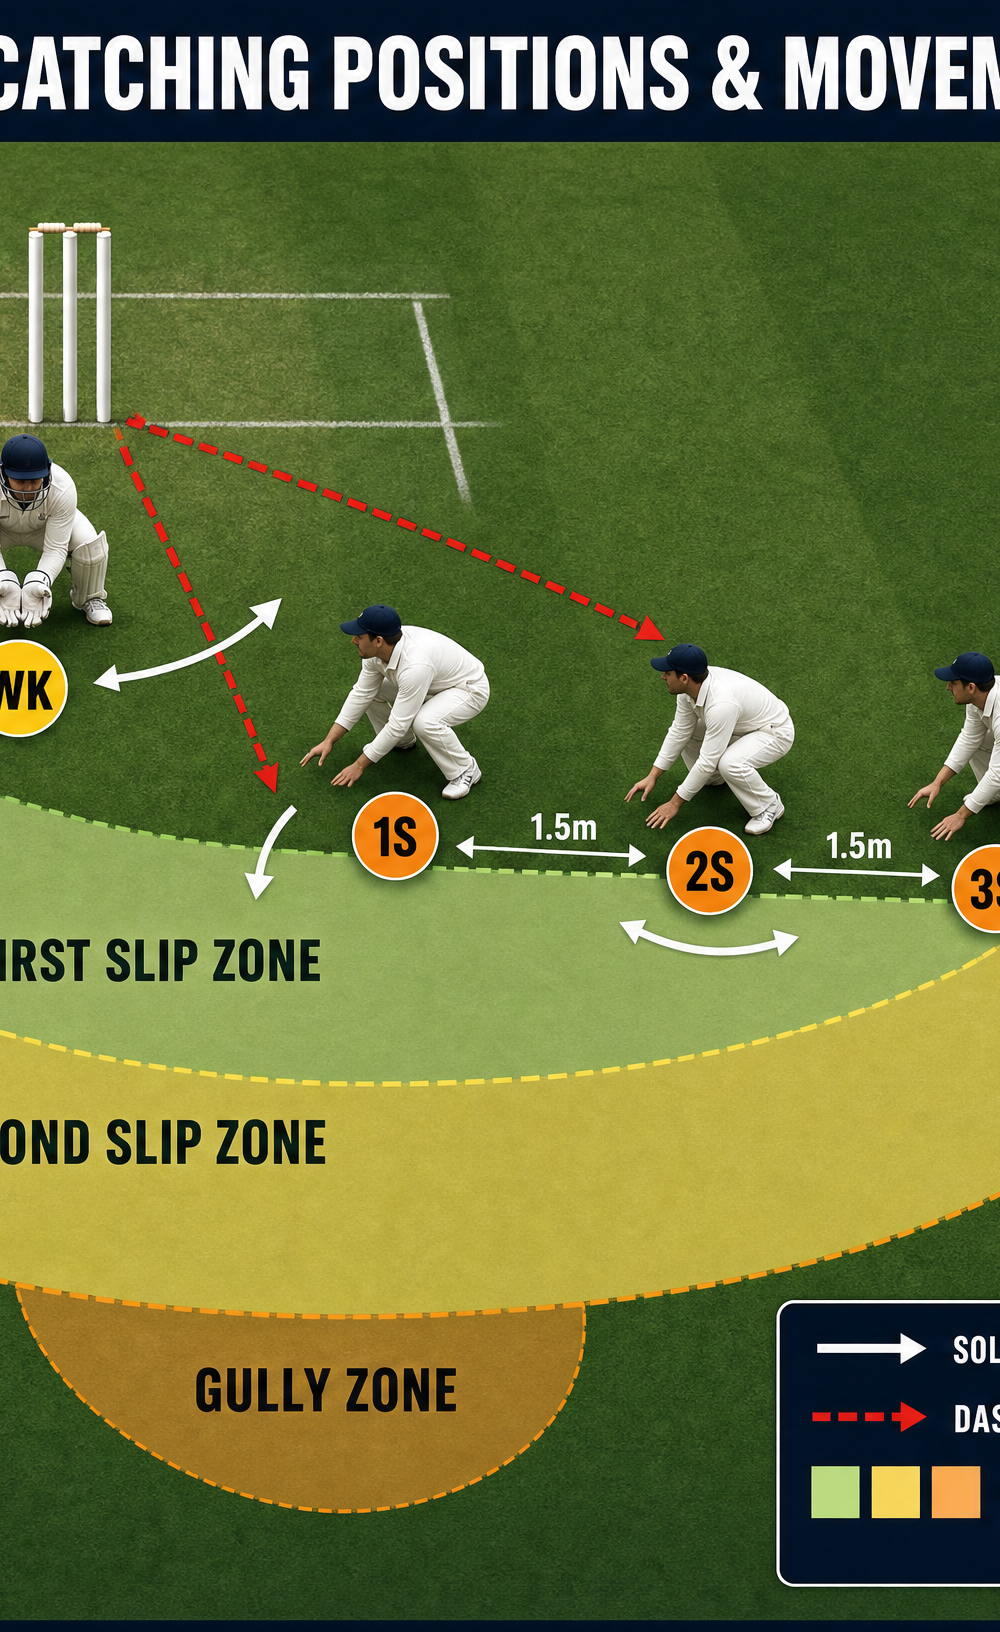
Establishing Catching Zones
Before running drills, players must understand their designated catching zones to avoid hesitation or collisions.
- Define the WK Zone: The wicket-keeper takes everything that comes straight or slightly to their right (for a right-handed batsman).
- Define the 1S Zone: First slip takes edges that go to their right, and any edge to their left that the WK does not call for.
- Define the 2S and 3S Zones: Each subsequent slip fielder is responsible for the ball coming directly to them or to their right.
- Establish the Golden Rule: The fielder moving to their right (for right-handed fielders) generally has the right of way, as it is easier to catch on the natural side.
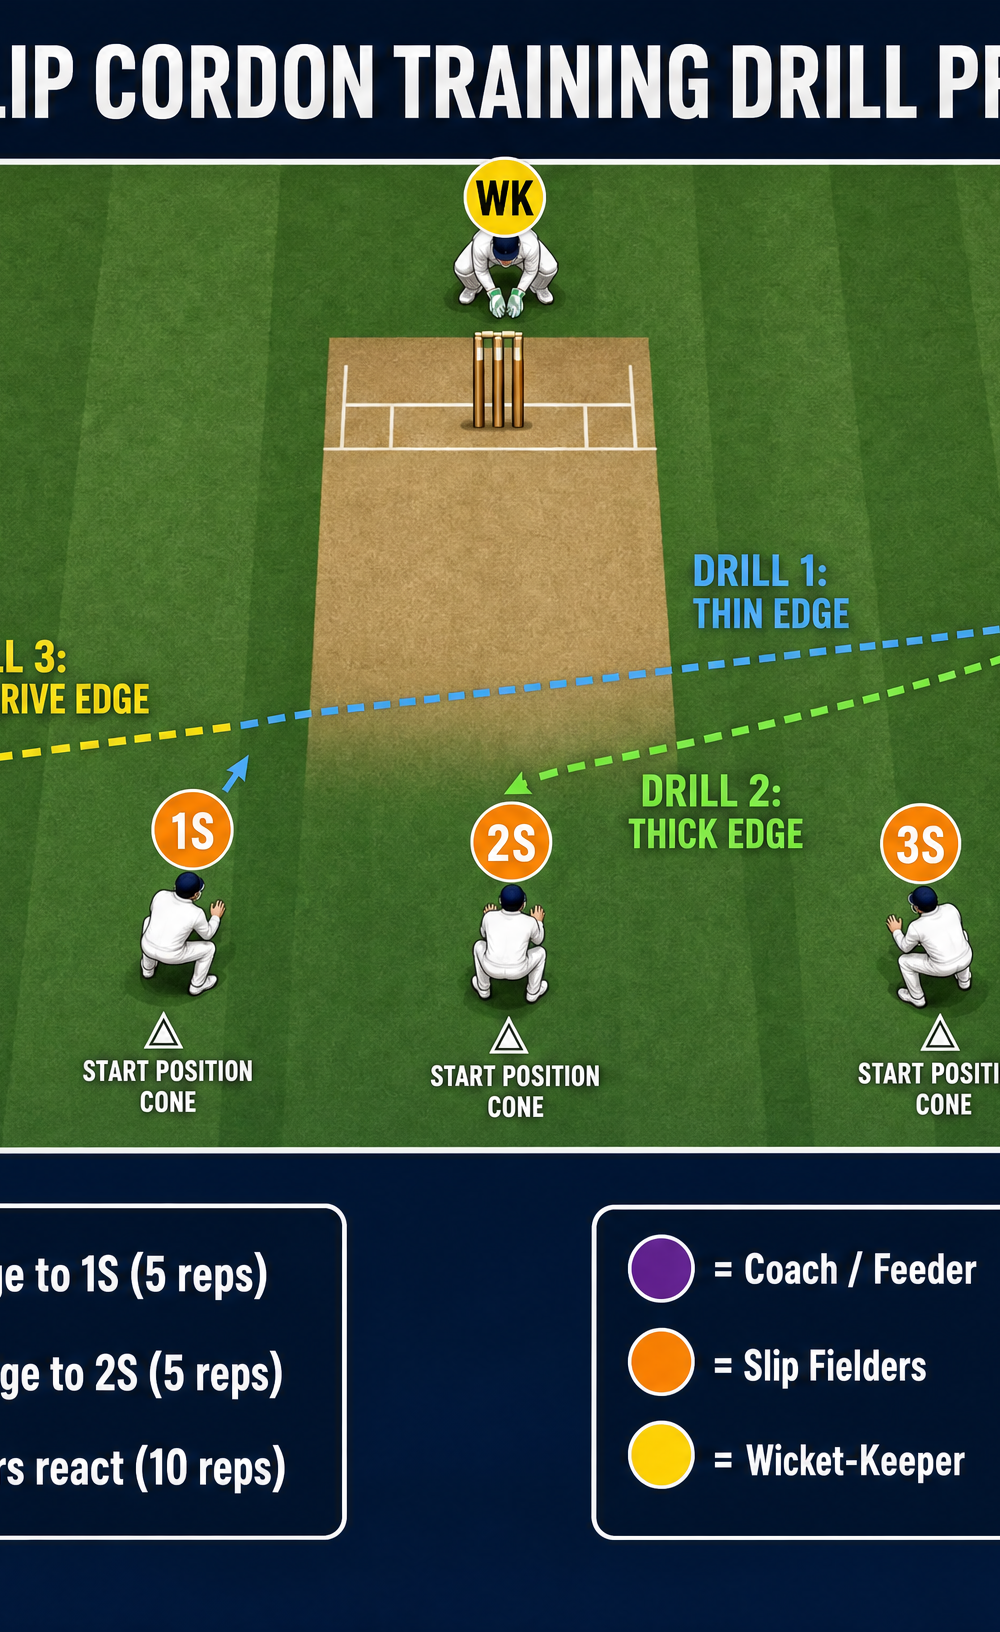
Running the Progression Drill
- Position the Fielders: Set up the WK, 1S, 2S, 3S, and Gully. Place a start cone 2 metres in front of each slip fielder to ensure they maintain the correct depth and don't creep forward.
- Coach Position: The coach stands on the off-side of the pitch, approximately 10-15 metres away, with a bat and a bucket of balls.
- Drill 1 (Thin Edge): The coach hits controlled, thin edges directed specifically toward the WK and 1S zone. Perform 5-10 repetitions.
- Drill 2 (Thick Edge): The coach hits thicker edges directed toward 2S and 3S. Emphasize lateral movement and diving. Perform 5-10 repetitions.
- Drill 3 (Square Drive Edge): The coach hits harder, squarer edges directed toward the Gully region. Perform 5-10 repetitions.
- Random Feed: The coach mixes up the feeds randomly to all positions, forcing the fielders to react naturally, communicate (calling "Mine!" or "Yours!"), and execute the catch.
4. Key Coaching Points

- Athletic Posture: Fielders must maintain a low, athletic base with weight on the balls of their feet, knees bent, and hands relaxed but ready.
- Watch the Ball, Not the Bat: Focus intensely on the ball as it leaves the bowler's hand, tracking it onto the bat and then off the edge.
- Soft Hands: When catching, fielders should "give" with the ball, drawing their hands back slightly upon impact to absorb the pace.
- Communication: Loud, clear calls are non-negotiable. If two fielders are going for the same ball, the one with the better angle must call it early.
- Stay Down: A common error is popping up before the ball reaches the edge. Fielders must stay low until they see the trajectory of the edge.
5. Common Mistakes

- Creeping Forward: Fielders unconsciously taking a step forward as the bowler runs in, ruining their reaction time.
- Hard Hands: Snatching at the ball instead of letting it come into the hands, leading to dropped catches.
- Standing Too Close Together: Insufficient spacing (less than 1.5m) leading to collisions and hesitation.
- Rising Too Early: Standing up before the ball reaches the batsman, making low catches impossible.
6. Variations & Progressions

- One-Handed Catches: Force fielders to practice diving and catching with their non-dominant hand.
- Deflection Board: Use a Katchet board or slip cradle to create unpredictable, realistic deflections instead of hitting off the bat.
- Blind Start: Fielders start facing away from the coach and turn around only when the coach yells "Go!", significantly reducing reaction time.
7. Age Adaptations

- Under 10 / Under 12: Use softer cricket balls (Incrediballs) to build confidence. Focus purely on the basic ready position and catching with two hands. Reduce the distance between the coach and the fielders.
- Under 14 / Under 16: Introduce the hard ball. Focus heavily on the staggered depth positioning and clear communication. Introduce diving techniques on soft ground or crash mats.
- Open / Senior: Full pace feeds. Implement the deflection board for unpredictable bounce. Emphasize taking catches low to the ground and one-handed reflex catches.