1-3-1 Zone Offense: Baseline Runner and High-Post Flash
Install a decisive 1-3-1 zone offense that creates a nail catch, frees the baseline runner, and teaches your players to finish high-low or punish the weak-side shift.

Equipment Needed
1-3-1 Zone Offense: Baseline Runner and High-Post Flash
Overview
This five-player 1-3-1 zone offense creates a high-post catch, forces the low defender to cover two threats, and produces a rim finish, short-corner look, or inside-out three. Use it against 2-3, 3-2, and match-up zones. Every cut must make a defender turn, slide, or choose between the ball and the baseline runner.
Run it after a dead ball or whenever the group needs clear spacing. “Flash” sends 4 to the nail, “Runner” sends 5 along the baseline, and “Skip” triggers the weak-side reversal. The diagrams use a 28 m x 15 m FIBA court. 1
Setup
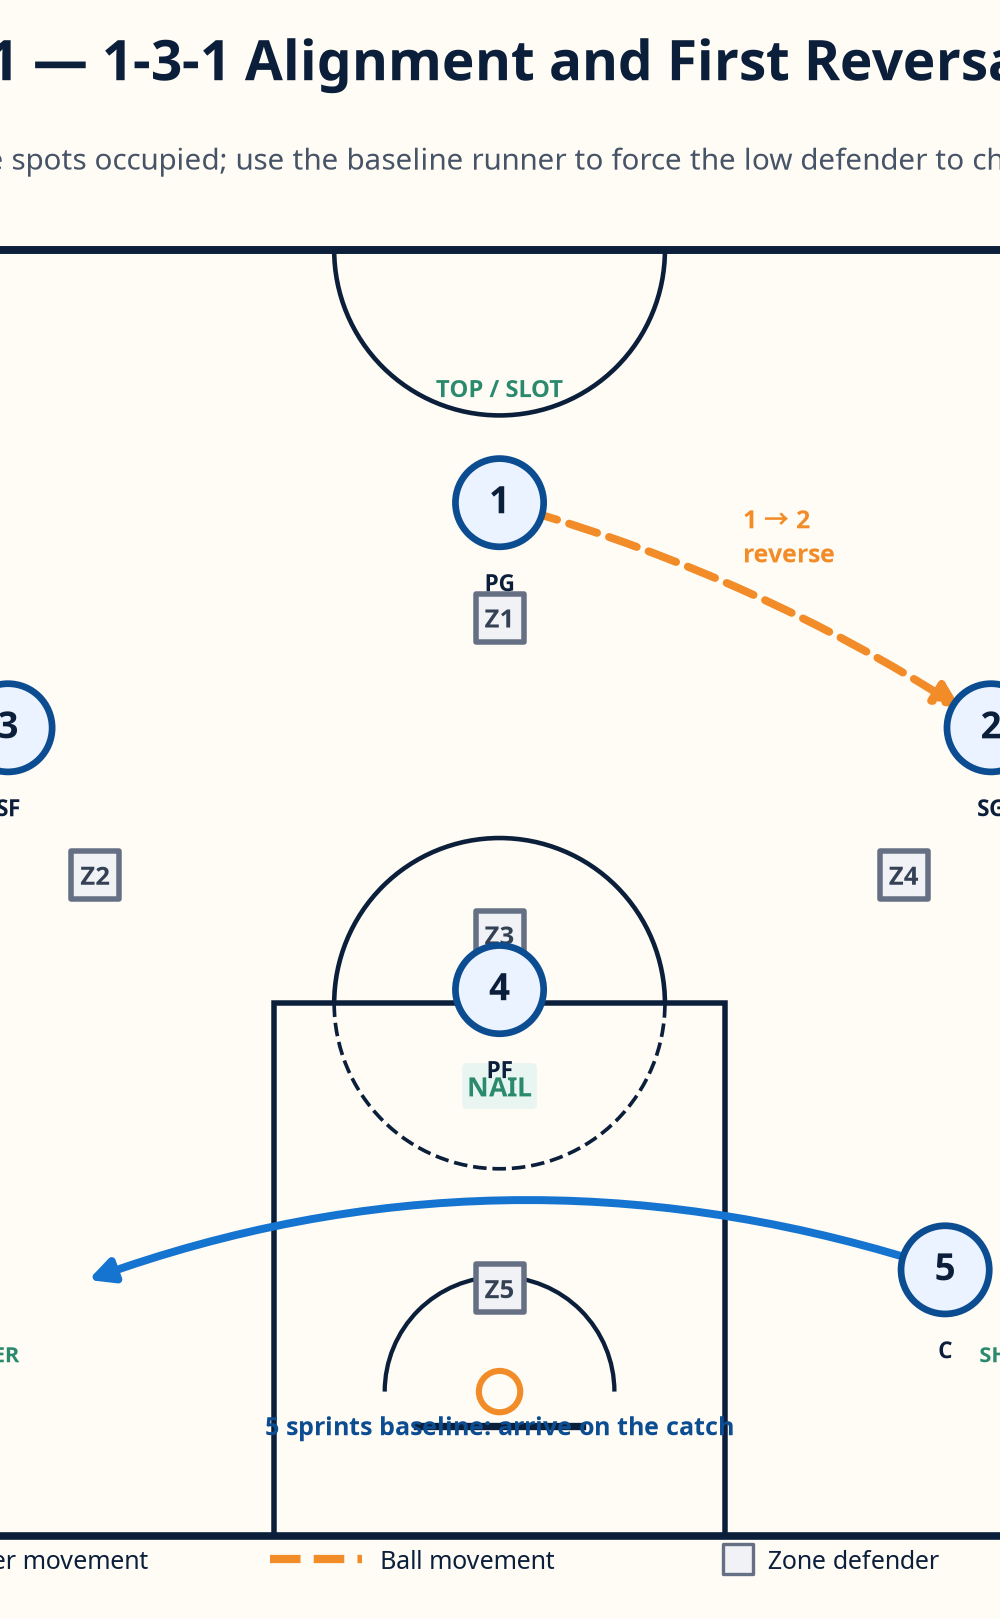
Place ten flat discs at the top, two wings, nail, and short corner. Use one ball to install and a second ball with the next unit. On a FIBA half-court, 1 starts 1 m above the arc; 2 and 3 are 5–6 m from the basket on each wing; 4 starts at the free-throw line area; and 5 starts in the weak-side short corner, 1–1.5 m above the baseline and 1 m inside the sideline.
| Spot | Player | Start position | Non-negotiable job |
|---|---|---|---|
| Top | 1 — Point Guard | Middle, one step above the arc | Deliver a crisp reversal and relocate as the safety valve. |
| Ball-side wing | 2 — Shooting Guard | Wing, outside the arc | Catch in triple threat and feed the nail on time. |
| Weak-side wing | 3 — Small Forward | Opposite wing, outside the arc | Hold width, then drift only when the ball enters the high post. |
| High post | 4 — Power Forward | Free-throw-line area | Flash to the nail, pivot on two feet, and read low first. |
| Baseline runner | 5 — Center | Weak-side short corner | Sprint baseline behind the zone and seal the low defender. |

Step-by-Step Instructions
Call the action and establish shape. Call “Flash” and give players five seconds to fill all five spots. 1 sees both wings, 4 shows hands at the nail, and 5 starts low enough to threaten the baseline. Keep 2 and 3 wide.
Reverse top to wing as 5 runs. 1 fires a chest-high pass to 2 on the right wing. As it leaves 1’s hands, 5 sprints to the ball-side short corner. The rule is arrive as 2 catches. This drags the lowest defender laterally and opens the rim line.
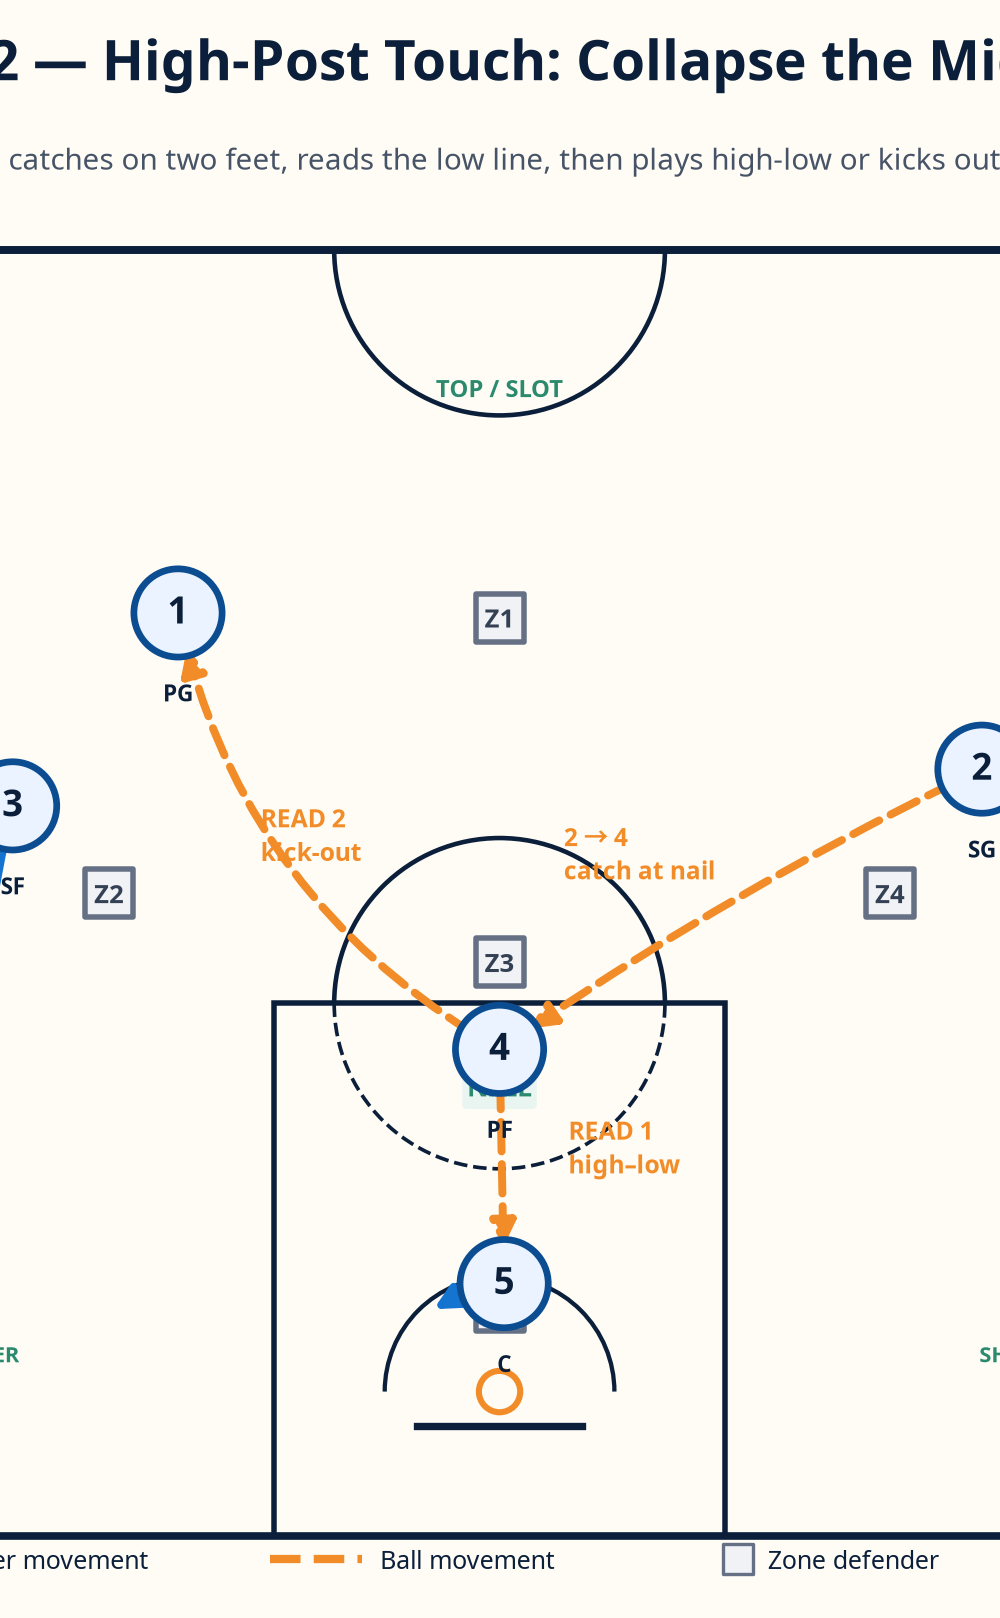
Flash the nail; do not post up early. On 2’s catch, 4 V-cuts into the nail and catches on two feet around the free-throw line, ideally 4.5–5.0 m from the baseline. 4 must see the rim, 5, and both wings; do not dribble away the advantage.
Make the high-low read first. If Z5 steps up to take away 4’s shot, 5 seals Z5 on the high side and presents both hands. 4 delivers a short bounce pass or a two-hand chest pass into the lane; 5 catches under control and finishes through the front of the rim. If a defender fronts 5, teach 4 to look at the weak-side wing for one count and use a quick lob only when there is clear space above the help. Never throw a soft pass into traffic because the play “says” high-low.
Use the kick-out when the low line collapses. If the bottom defender stays with 5 and a wing defender sinks, 4 pivots to the open perimeter player. 1 drifts to the slot; 3 slides down 1–2 m without crowding the lane. The sequence is catch, chin, read low for one beat, then kick out. The receiver shoots, attacks the close-out for two dribbles, or reverses immediately.
Finish the skip behind the shift. If 2 is denied the nail or the zone overloads the ball side, 2 skips the ball to 3. The skip must travel over the top of the zone, not through the elbows. As it is in flight, 5 crosses to the new ball-side short corner and 4 re-flashes to the nail. The first weak-side catch is a decision, not a pause: shoot, feed 5, or hit 4. If no advantage appears by the second reversal, reset through 1 and run it again with more pace.
Key Coaching Points
| Coaching point | What to demand on the floor |
|---|---|
| Occupy five windows | Keep a top, two wide wings, nail, and short corner occupied. The zone becomes smaller when two attackers share a window. |
| Pass before the zone loads | Aim for a 0.5–1.0 second decision on each perimeter catch. Quick reversals make defenders close out on the move. |
| Catch at the nail on balance | 4 lands on two feet, chins the ball, and pivots rather than dribbling into the crowded paint. |
| Baseline run is a sprint | 5 moves at game speed and finishes on balance; jogging lets the low defender guard both the runner and the rim. |
| See the next pass | 2 and 4 catch in triple threat with eyes up. Teach the pass to the open space, not the teammate’s current defender. |
| Shot selection wins the set | Take the rim finish, an uncontested inside-out three, or a paint touch. Do not settle for a guarded first-pass three. |
Common Mistakes and Corrections
The usual error is 4 standing at the free-throw line with a defender attached. Correct it with a V-cut and the cue “show, snap, hands.” A late runner is next: start 5 one step lower and move on the passer’s release. Install a one-second wing decision rule—shoot, nail, skip, or attack. If guards crowd the high post, mark 1’s relocation spot 4–5 m from the nail.
Variations and Progressions
For the first progression, remove defenders and run the five-player sequence on air until the ball reaches the rim or an uncontested perimeter catch in six seconds. Next, play 5-on-5 against a stationary 2-3 zone; allow the defense to move only after the second pass. This lets players recognize the weak-side shift without turning the drill into chaos.
For a harder progression, play live 5-on-5 and award the offense two points for a paint catch, three points for a high-low finish, and one point for an inside-out three. The defense earns a point for a deflection or a possession that ends without a nail touch. This scoring keeps the objective honest: the play is about forcing the center of the zone, not merely moving the ball around it.
A useful variation is “Runner Screen.” After the 1-to-2 pass, 5 crosses the baseline and uses 4 as a brief screen at the far low block before arriving in the short corner. Use it only with older, disciplined groups; teach 4 to be stationary and legal, then immediately re-flash to the nail. A second variation is “Empty Corner.” Have 3 lift from the weak-side wing to the slot before the skip, leaving the short corner entirely for 5. This is effective when the opponent’s low defender overhelps on the high post.
Age Adaptations
For Under-10, use 4-on-4, a shortened half-court, colored spots, and a simple “pass then cut baseline” rule. For Under-12/Under-14, use all five spots with guided defense; demand two-foot catches and no more than two dribbles after a paint touch.
For Under-16 and open-age teams, name the defender who tags 5, dictate the first reversal, and add a 10-second possession clock. Players must choose high-low or skip without waiting for a call.
Practice Plan: 20 Minutes
Install alignment for four minutes, rehearse the first pass, run, and flash for four, then spend six on high-low and kick-out reads with a coach as Z5. Finish with six minutes of scored live play. Stop only for spacing or timing errors.

