

Basketball
Defensive Closeout and Recovery: Nail-to-Wing Skip-Pass Drill
Teach defenders to close out under control from help position, recover through the paint on a skip pass, and finish each possession with a disciplined contest.
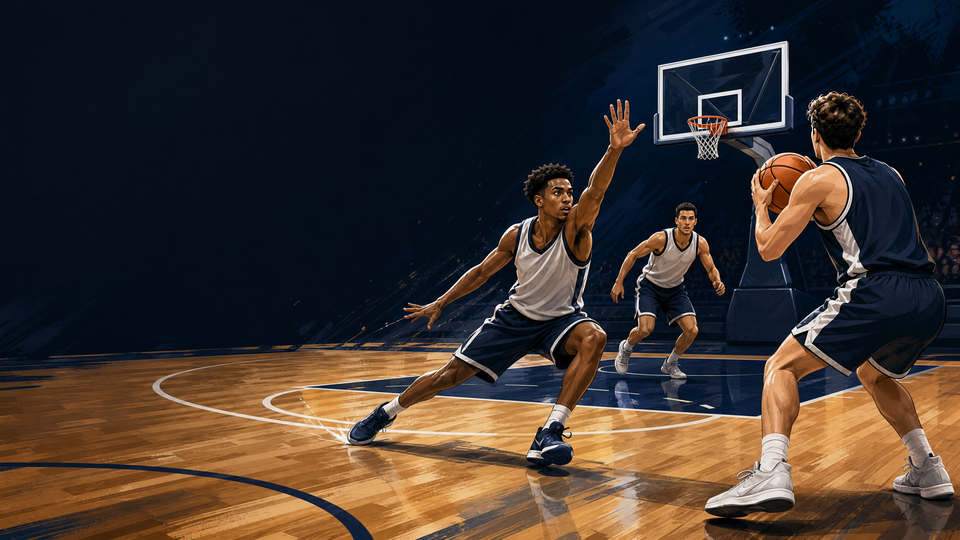
What you need
3 basketballs, 4 flat cones, 2 pinnies, whistle, stopwatch, whiteboard or score board
Overview
This high-repetition half-court drill teaches the essential sequence: start in help, sprint on the pass, arrive under control, then recover when the ball moves again. X1 must read the ball, protect the paint first, take away the immediate shot without surrendering the straight-line drive, and re-establish a contest after the skip pass. Use it as a teaching block before shell defense or as a short competitive segment.
Use it when film shows late wing closeouts, fly-bys, or weak-side defenders outside the paint on a skip pass. The diagrams use a FIBA half court; a regulation FIBA playing court measures 28 m x 15 m.1
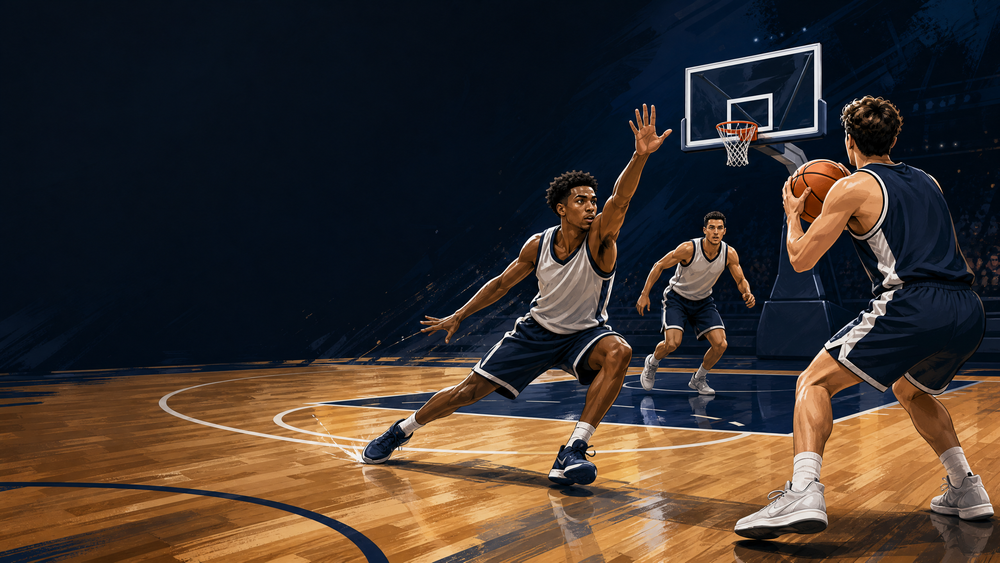
Setup
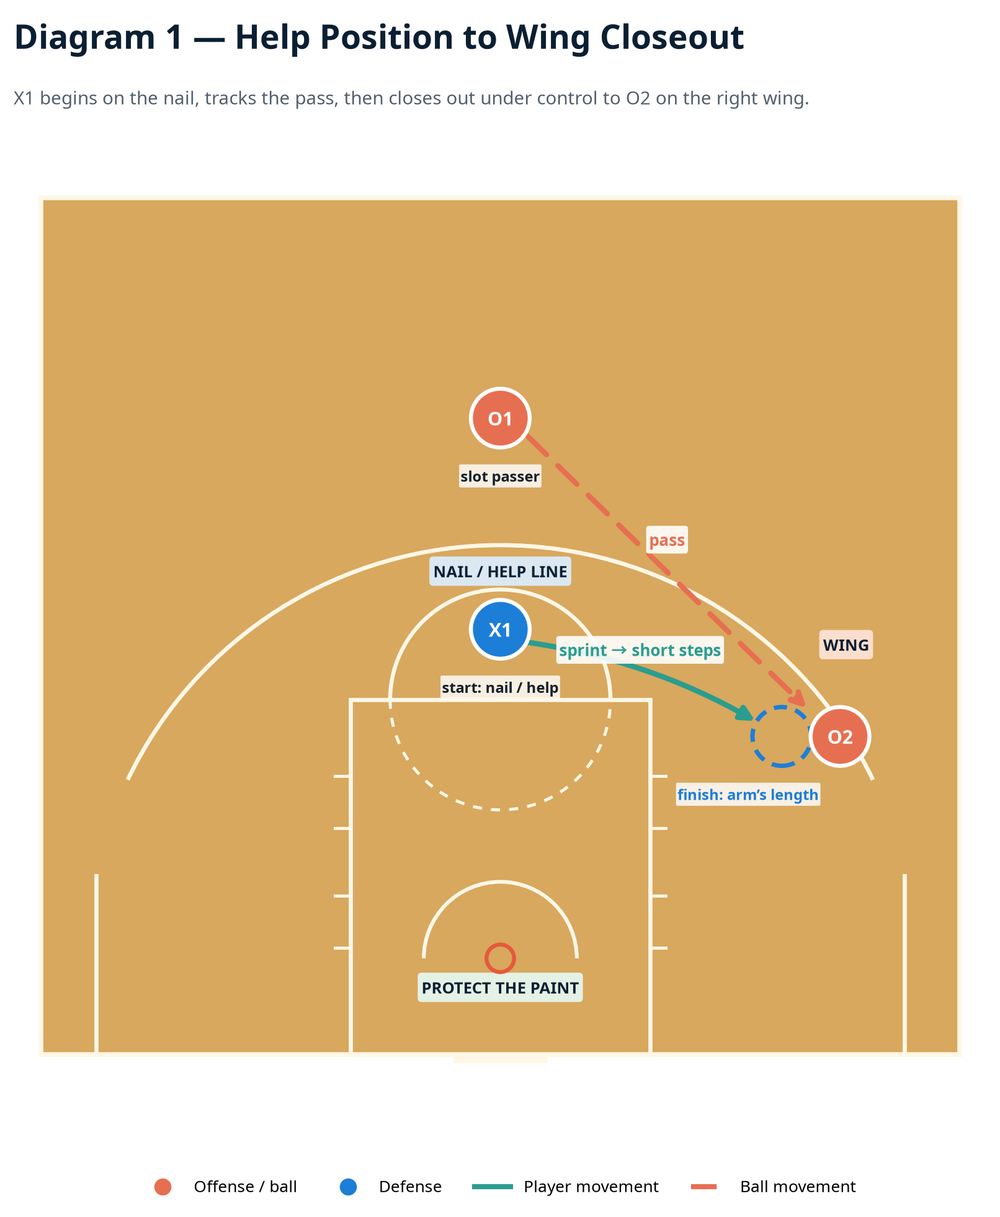
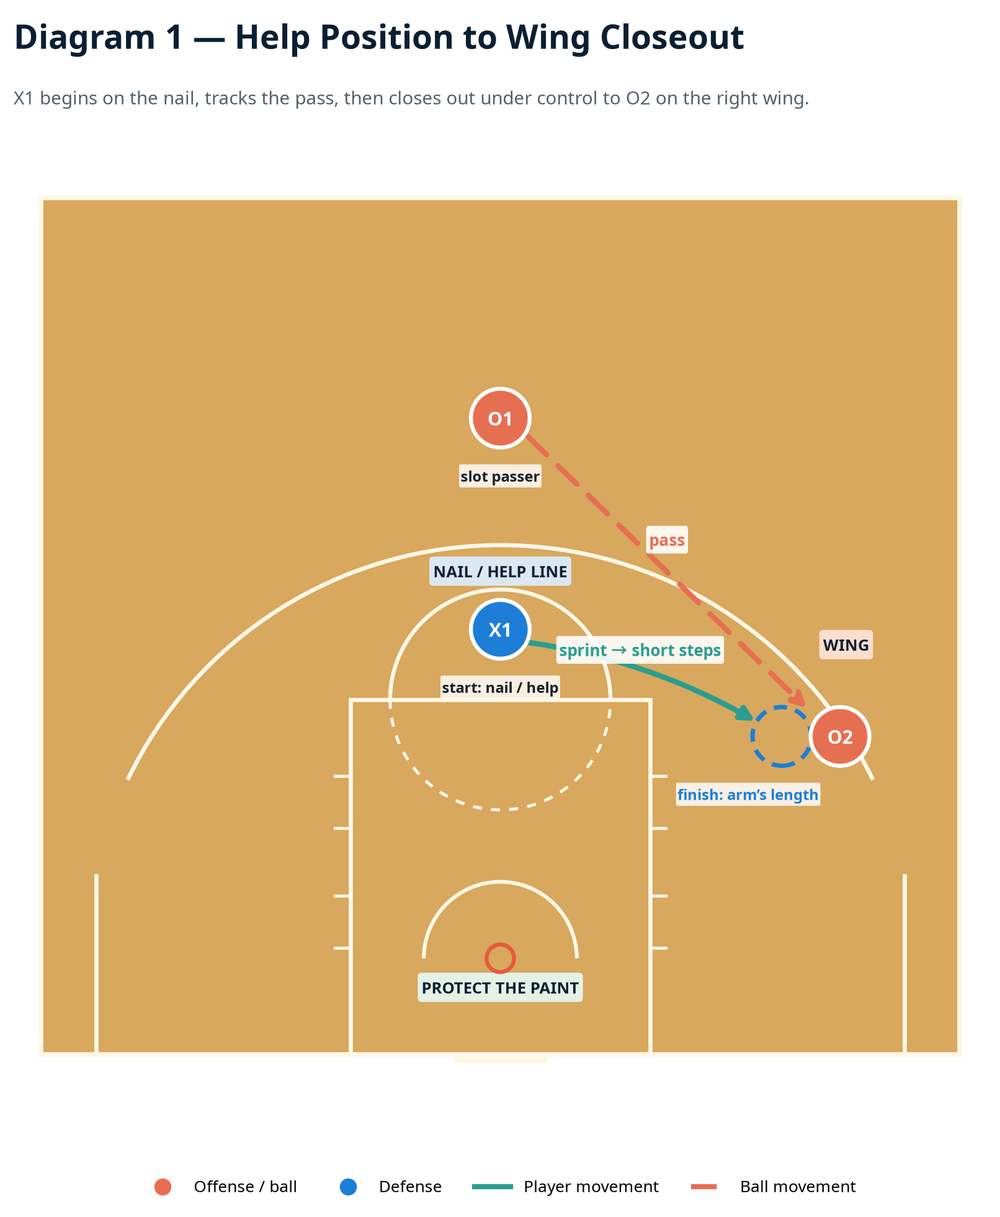
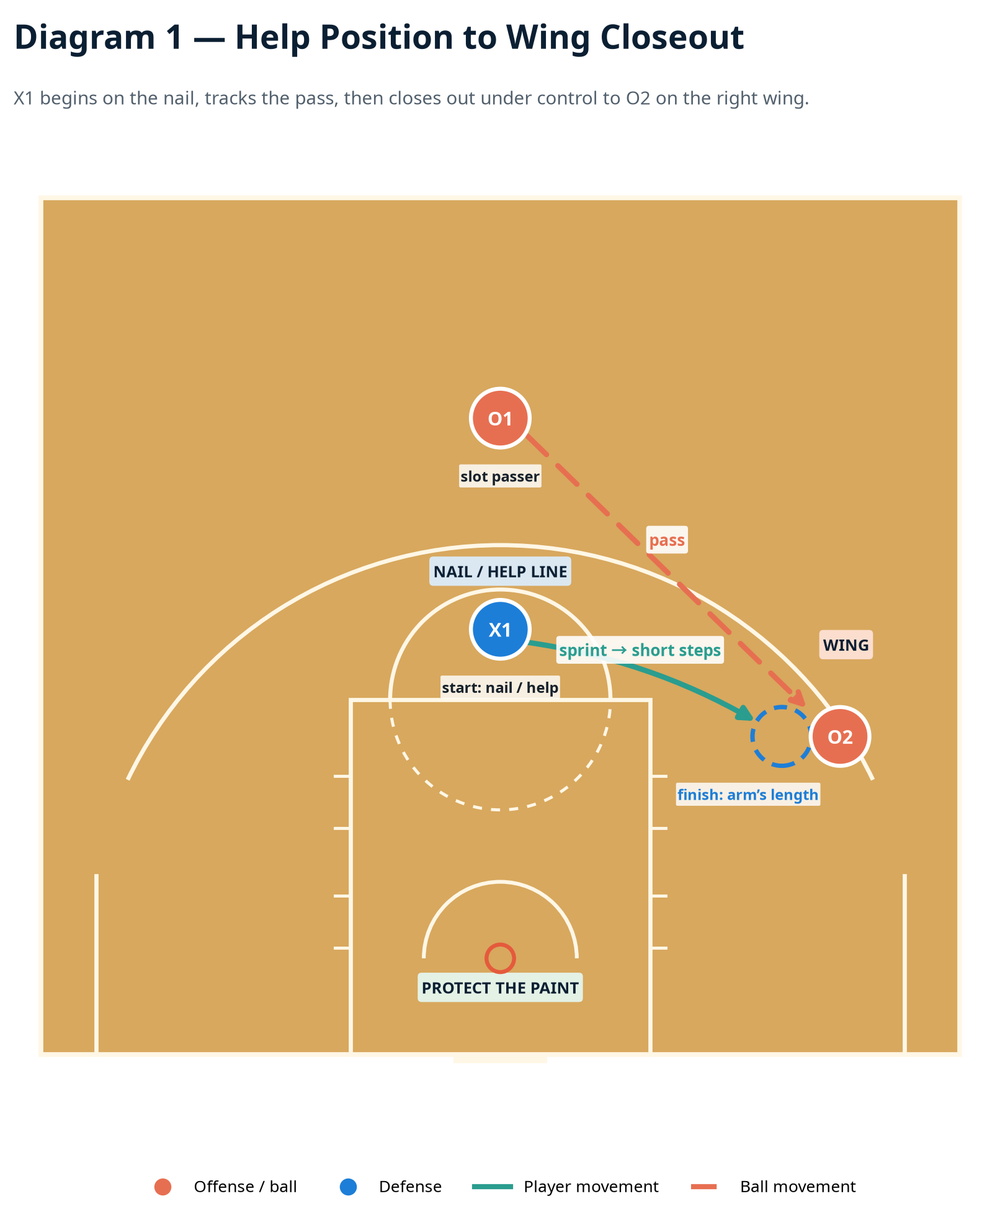
Use one FIBA half court. Place O1 (1, point guard) 1 m above the arc at the slot, O2 (2, shooting guard) 0.6–1 m outside the right-wing arc, and O3 (3, small forward) in the opposite wing window. Start X1 on the nail, inside the arc, with chest facing O1. The nail is the defender’s help reference.
| Item | Coaching standard |
|---|---|
| Players | 6 minimum: three active players plus three ready to rotate; 8–10 allows continuous work |
| Equipment | 3 balls, 4 flat cones, 2 pinnies, whistle, stopwatch, and a score board or whiteboard |
| Distances | X1 begins about 3.5–4 m from the nail-to-wing closeout target; the recovery route is approximately 8–10 m depending on the wing depth |
| Work block | 4 rounds of 45 seconds work and 30 seconds coaching/reset; change defensive group each round |
| Court reference | Use the half court only. Keep both wings outside the arc and keep the paint clear for the recovery touch. |
Mark a small flat-cone gate 1.2 m inside each wing catch point if you need a visual reminder that X1 must stop at arm’s length rather than run through the shooter. Start with one ball at O1. In the first teaching block, O2 and O3 are stationary catch-and-hold targets. Once the footwork is reliable, they become live in the last two dribbles.
Step-by-Step Instructions
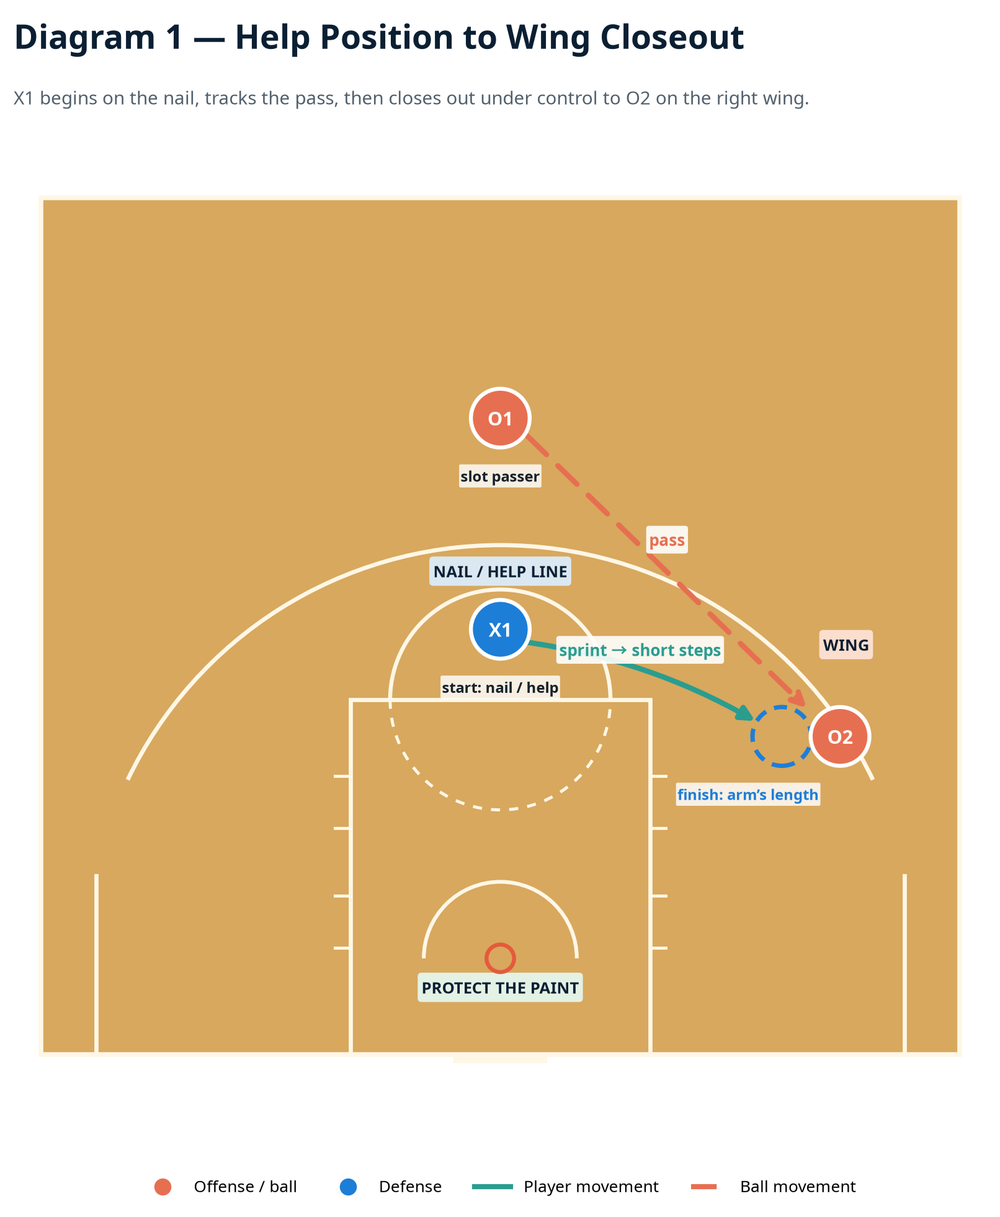
Set the defensive picture. X1 starts in a loaded stance on the nail: knees bent, hips down, hands visible, and eyes split between O1 and the rim. O1 holds the ball at the slot. O2 calls “wing” with target hands. Before the first rep, insist that X1 can see ball and basket; do not allow a flat-footed spectator position.
Trigger the first closeout. On the coach’s “pass” cue, O1 throws to O2. X1 reacts on the ball’s flight, takes the first two strides at full speed, and begins to decelerate about 1.2 m from O2.
Arrive under control. X1 finishes one arm’s length from O2 with the near hand high to the shooting pocket, the far hand lower and active, chest square enough to absorb a drive, and weight on the balls of the feet. Coach the defender to close the inside shoulder first and angle the attacker toward the planned help side. O2 catches, shows a realistic shot fake, and holds for one full second. If X1 leaves the floor or crosses the feet, stop the rep and replay it immediately.
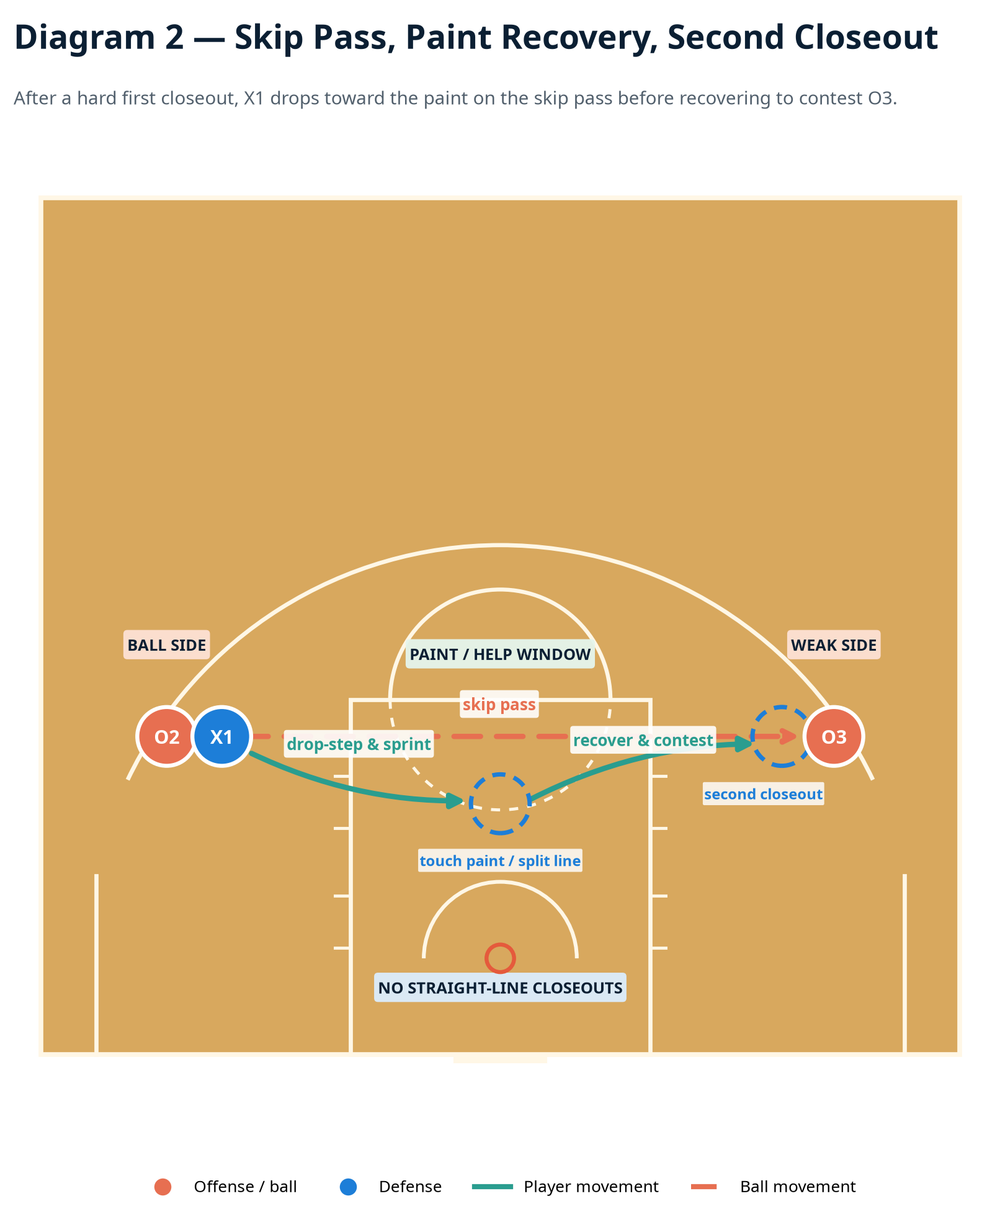
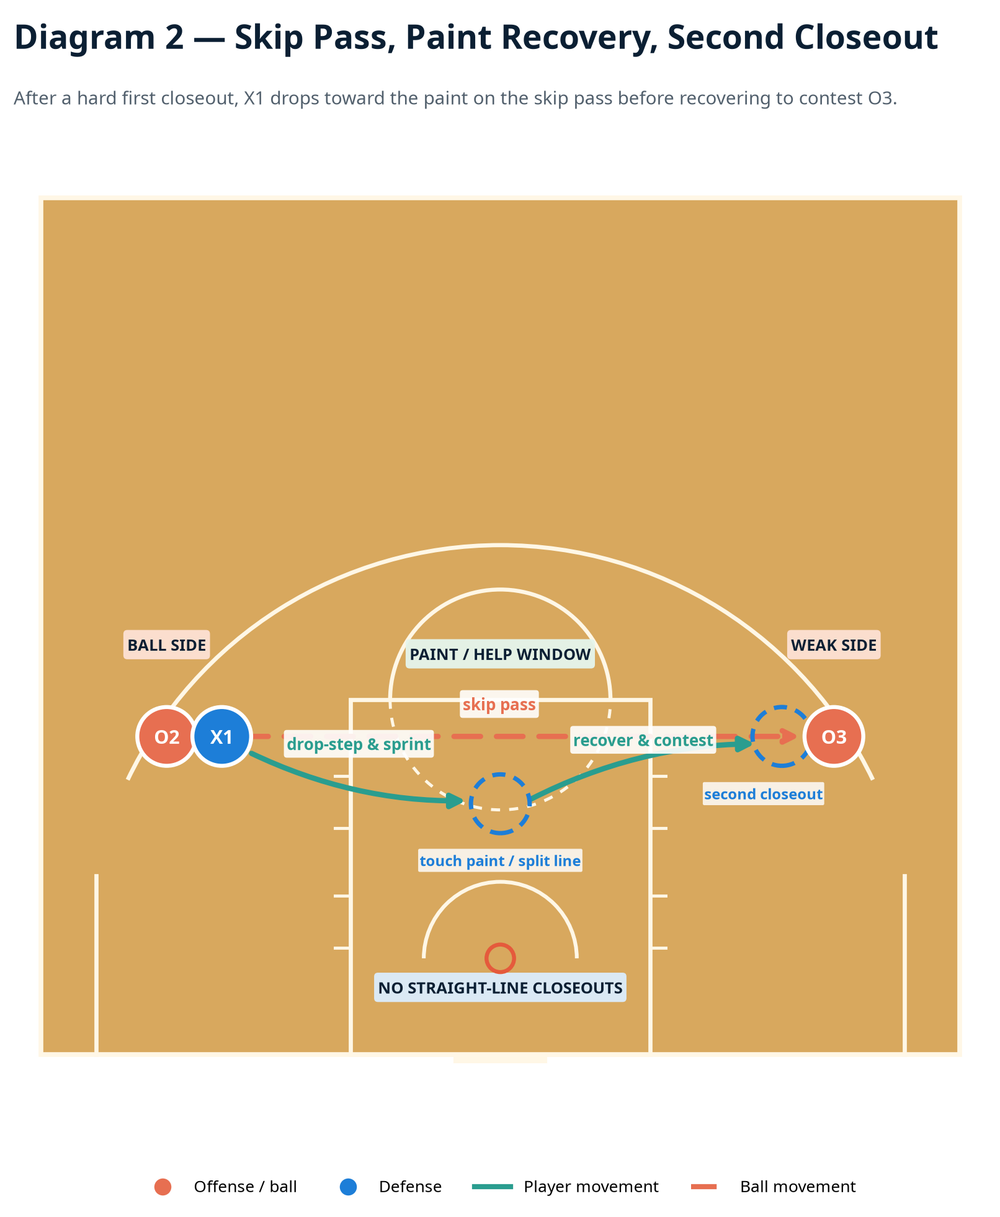
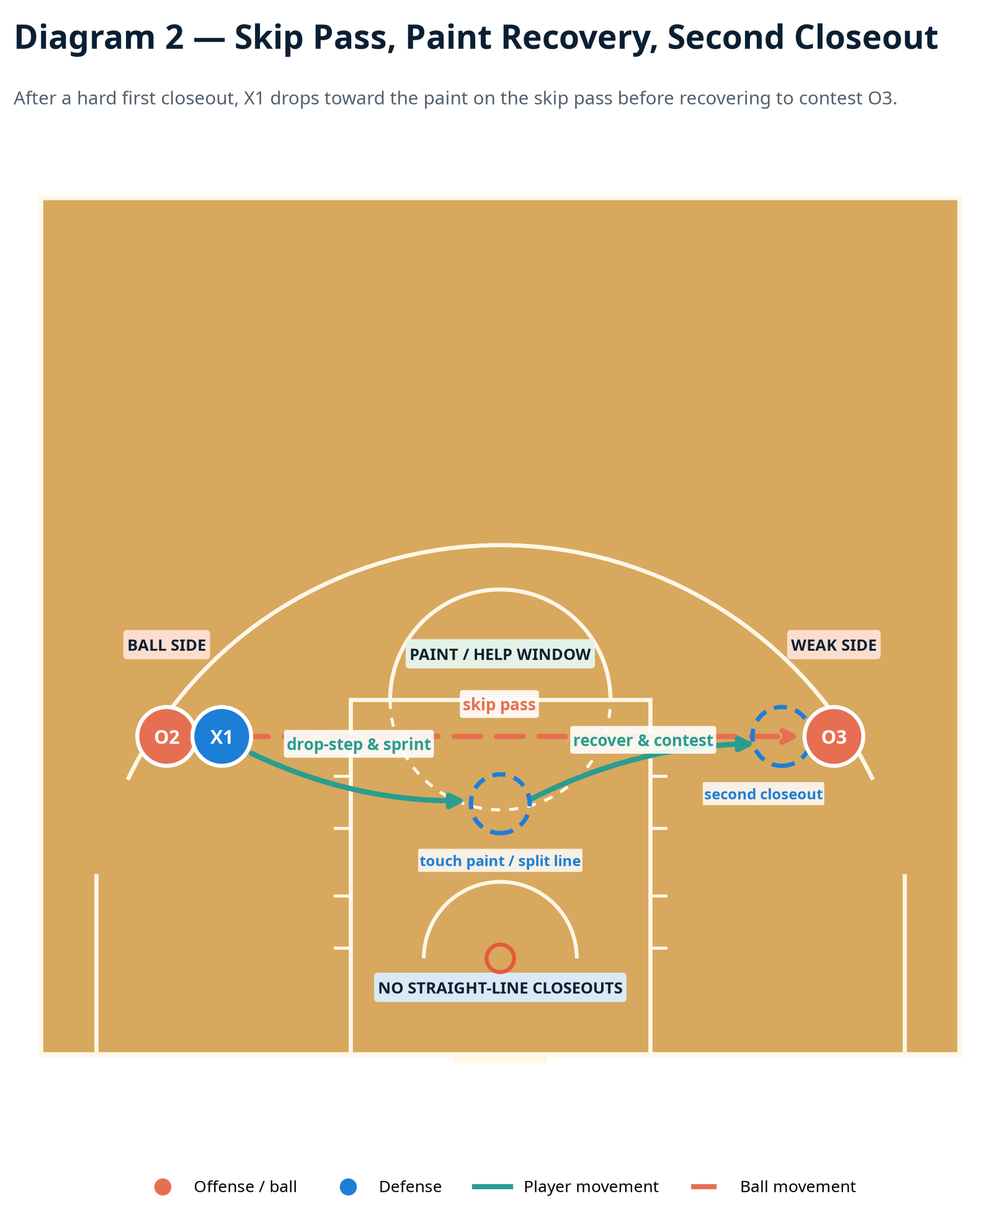
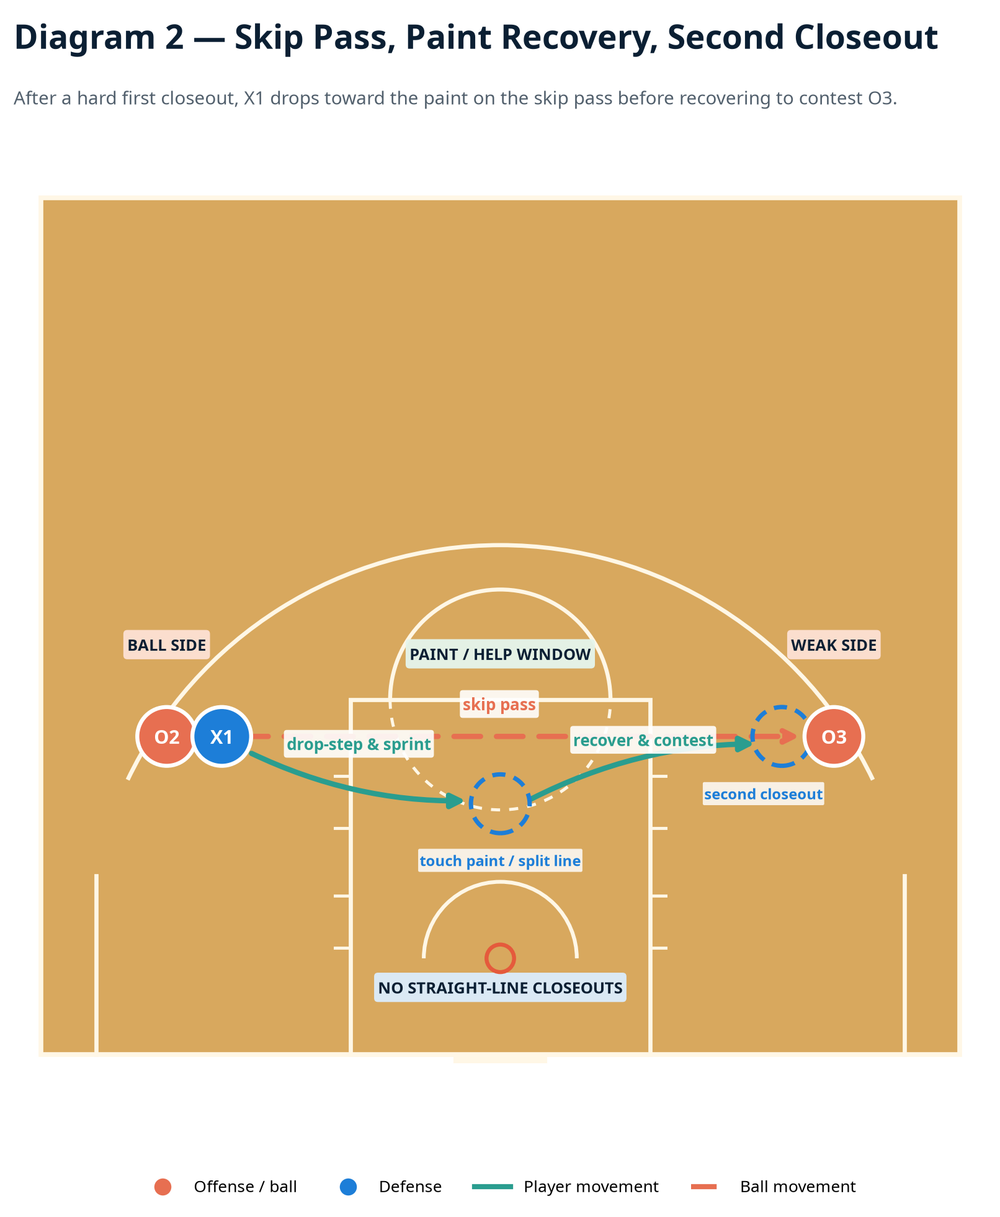
Force the recovery decision. On the whistle, O2 throws a skip pass to O3 on the opposite wing. X1 uses a drop step—opening the foot nearest the basket—then sprints through the paint/help window instead of chasing in a straight line behind the ball. X1 must visibly touch the split-line/paint cone with a foot or hand before leaving for O3. This builds the habit of protecting the rim while the ball travels.
Execute the second closeout. As O3 receives the pass, X1 drives out of the paint and again breaks down 1.2 m from the catch. The second contest must be balanced: high hand to remove the shot, hips low enough to contain the first dribble, and no lunging past the outside shoulder. O3 holds the ball for a count of “one” in the teaching phase.
Finish live and score it. In the competitive phase, O3 may shoot immediately or use a maximum of two dribbles to attack. X1 earns 1 point for a clean contest or forced miss, 2 points for a stop plus defensive rebound, and loses 1 point for a blow-by, foul, or uncontested catch-and-shoot. Play to 5 points, then rotate. O1 moves to O2’s line, O2 moves to O3’s line, O3 becomes the next X1, and X1 joins the O1 line.
Key Coaching Points
- Move on the flight of the ball. The pass is X1’s trigger. A defender who waits for the catch will be late, regardless of speed.
- Sprint long; chop short. Demand urgency over the first two strides, then short, noisy feet in the final 1.2 m. The closeout is won by deceleration, not by a dramatic leap.
- Take away the shooter’s middle. Align the body so the offensive player is steered to the planned sideline or baseline help, not directly into the middle of the floor.
- Show a high hand without losing the hips. The contesting arm affects vision and release; the hips and chest protect against the drive. Do not coach a one-handed fly-by.
- Recover through the paint. On the skip, X1 must first regain a rim-protecting position, then close out to O3. This is the tactical value of the drill.
- Finish the possession. A good closeout ends only after the shot is contested, the drive is contained, and the rebound is secured. Add the rebound whenever the group is ready.
Common Mistakes
| Error | What it usually means | Immediate correction |
|---|---|---|
| X1 arrives too hot and flies past O2 | The defender never decelerated | Move the cone gate 0.3 m closer and require three short steps before the contest. |
| X1 jumps at every fake | The defender is watching the ball, not the shooter’s hips | Cue: “High hand, low hips, no air.” Make O2 use two deliberate fakes. |
| X1 trails the skip pass outside the paint | The defender is chasing the ball rather than protecting the basket | Require a paint-cone touch and freeze the rep if the route misses the help window. |
| X1 opens with the wrong foot on recovery | The defender cannot turn efficiently toward the basket | Walk through the drop step: nearest-to-basket foot opens first, then sprint. |
| Closeout finishes too far away | The defender is protecting against a drive but conceding the shot | Use the arm’s-length gate and award an offensive point for an uncontested shot. |
Variations & Progressions
Start with a guided three-player version: O2 and O3 catch, shot fake, and hold; X1 rehearses the routes without a live drive. This version is best for installing stance, footwork, and the paint-recovery rule.
Progress to a two-dribble decision version. O2 may rip baseline after the first closeout, and O3 may shoot or attack with two dribbles after the skip. Add a coach or helper at the rim as the designated help defender so X1 has a real direction to force.
Finish with a four-out shell transfer. Add O4 in the left corner and require O3 to make one extra pass before the possession becomes live. X1 must communicate “ball,” “help,” and “close,” while a second defender tags the paint. This makes the drill a bridge to your team’s shell-defense terminology.
Age Adaptations
| Age group | Adjustment | Coach’s emphasis |
|---|---|---|
| Under 8–Under 10 | Use two players, one pass, and a 2.5–3 m closeout. Remove the skip pass and do not score live drives. | Athletic stance, hands up, stop under control, and safe spacing. |
| Under 12–Under 14 | Use the full two-pass pattern but allow O2 and O3 to hold after the catch for one second. Set the paint-touch cone closer to the nail. | See ball and basket, sprint on the pass, short steps before contact distance. |
| Under 16 and open age | Make O2/O3 live, add the two-dribble limit, and score rebounds, fouls, and communication. Run it from both wings. | Close the right angle, recover through the paint, contest without fouling, and finish the stop. |
Coach’s Session Note
Keep work bouts short enough that closeout technique stays sharp. If defenders stand tall, reach, or lose balance, reduce live reps and return to a one-pass rehearsal. The transfer test is simple: can players close out a wing without surrendering the middle and still be first back into the paint on the next pass?
