Horns Flare: Create a Top-Slot Three-Pointer
Teach a precise Horns elbow-entry and flare-screen sequence that creates a clean top-slot three, with built-in counters for closeouts and switches.
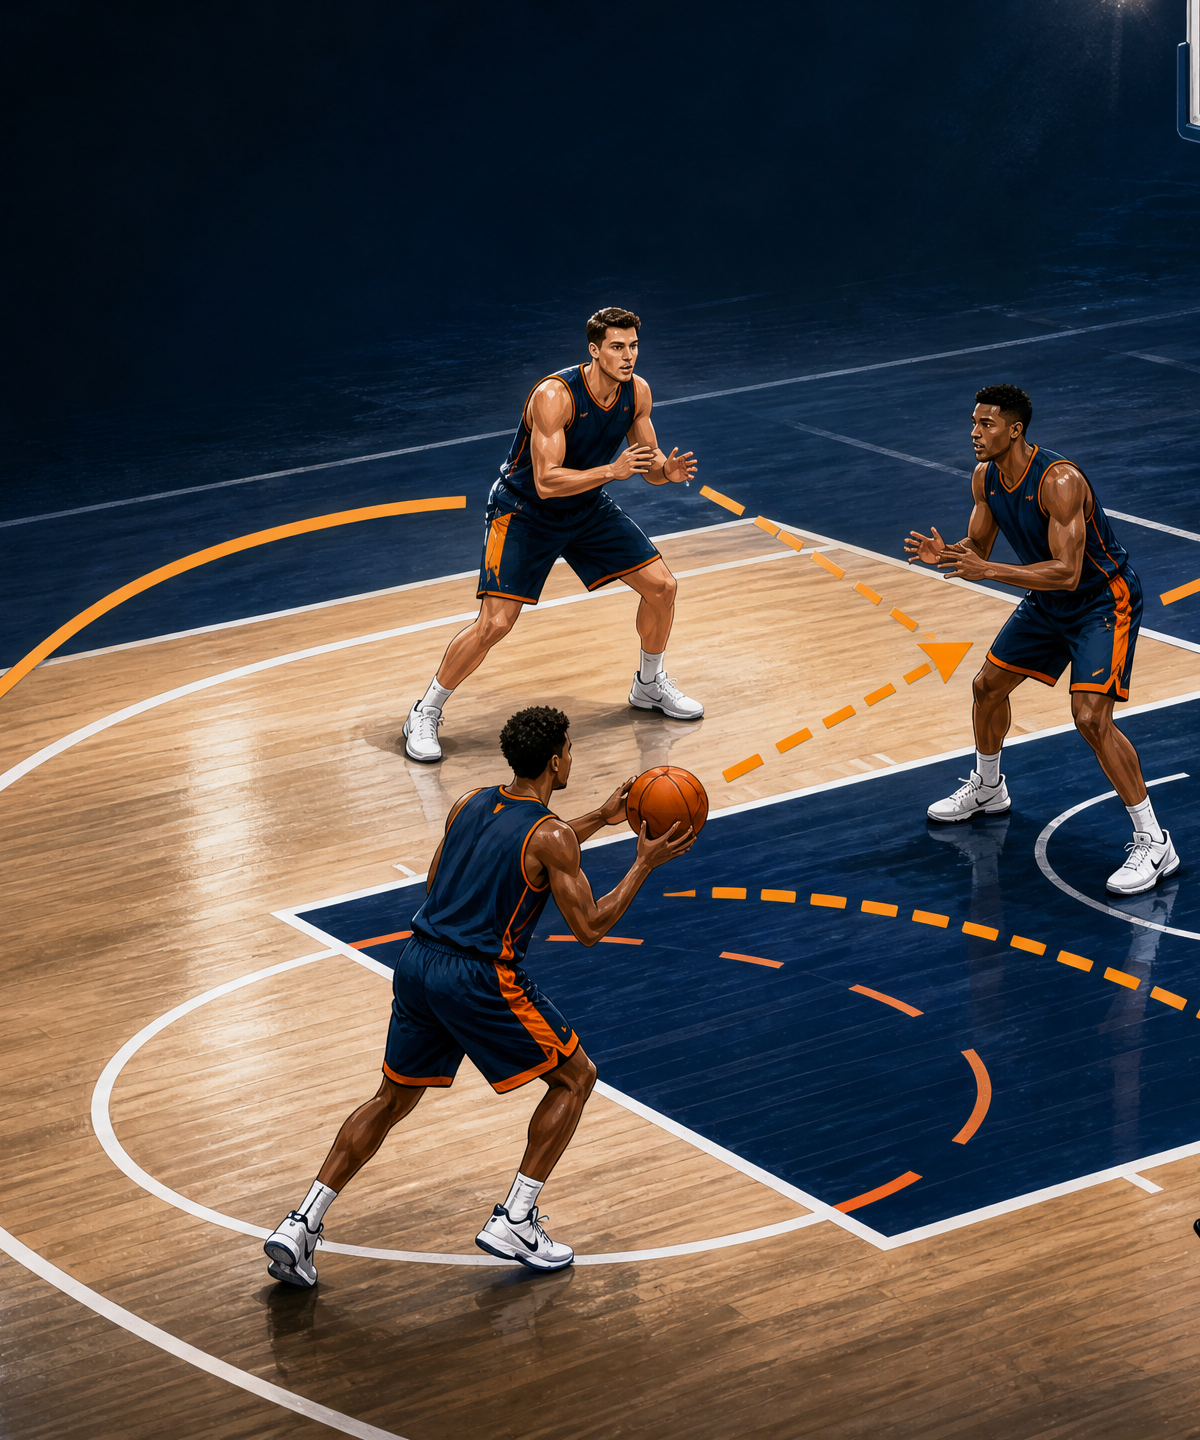
Equipment Needed
Overview
This Horns Flare is a quick-hitting half-court action designed to free your best catch-and-shoot perimeter player for a clean three at the top-right slot. It begins from the familiar Horns picture—1 at the top, 4 and 5 at the elbows, and 2/3 in opposite corners—then turns the defence with an elbow entry, a clear, and a flare screen. Use it after a timeout or against nail-help teams.
The set is not a hope-for-a-shot play. It creates a defined decision: shoot the skip pass if 2 is free; drive the hard closeout if X2 flies out; or flow into a high-low or side pick-and-roll if the defence switches. Use the 28 m x 15 m FIBA floor, elbows around 5.8 m from the baseline, and corners outside the three-point line.1
Coach’s definition: The flare must be a screen-to-space, not a screen-to-stand. The shooter leaves the screen looking over the outside shoulder, arrives shot-ready, and makes a decision before the defence can reload.
Setup
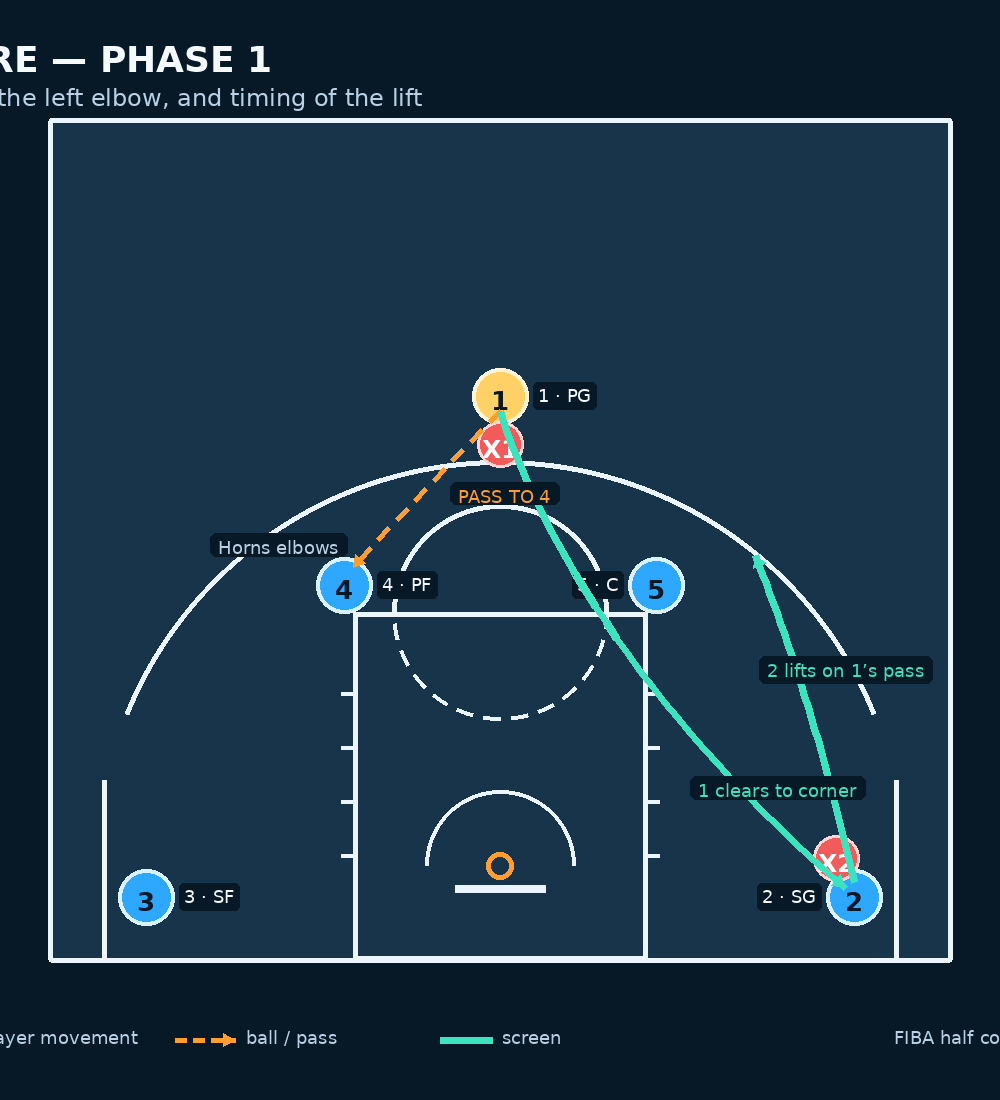
Use one ball, five offensive players, and defenders once the movement is learned. Place 1 (point guard) 0.5–1 m above the arc. Put 4 (power forward) on the left elbow and 5 (centre) on the right elbow, outside the lane line. Start 2 (shooting guard) in the right corner and 3 (small forward) in the left, toes just outside the corner three area. Coach from the left sideline, level with the free-throw line extended.
| Role | Starting location | Non-negotiable job |
|---|---|---|
| 1 — PG | Middle, above the arc | Deliver the entry and clear hard to the right corner. |
| 4 — PF | Left elbow | Catch with a jump stop, see the floor, throw the skip on time. |
| 5 — C | Right elbow | Flip into a legal flare screen, then seal or rebound. |
| 2 — SG | Right corner | Lift on the entry, brush 5, catch with feet prepared. |
| 3 — SF | Left corner | Hold weak-side width, be the emergency outlet and balance defender. |
Step-by-Step Instructions
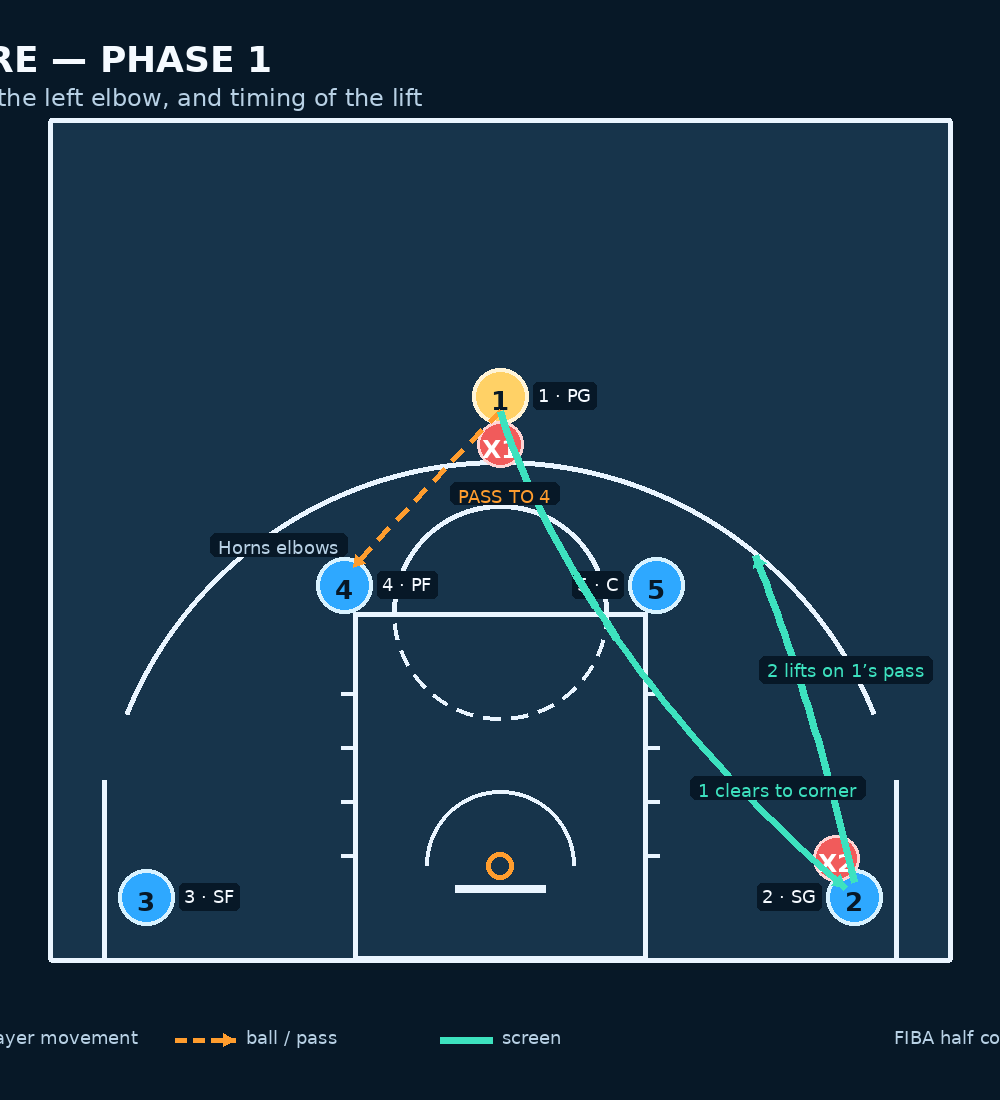
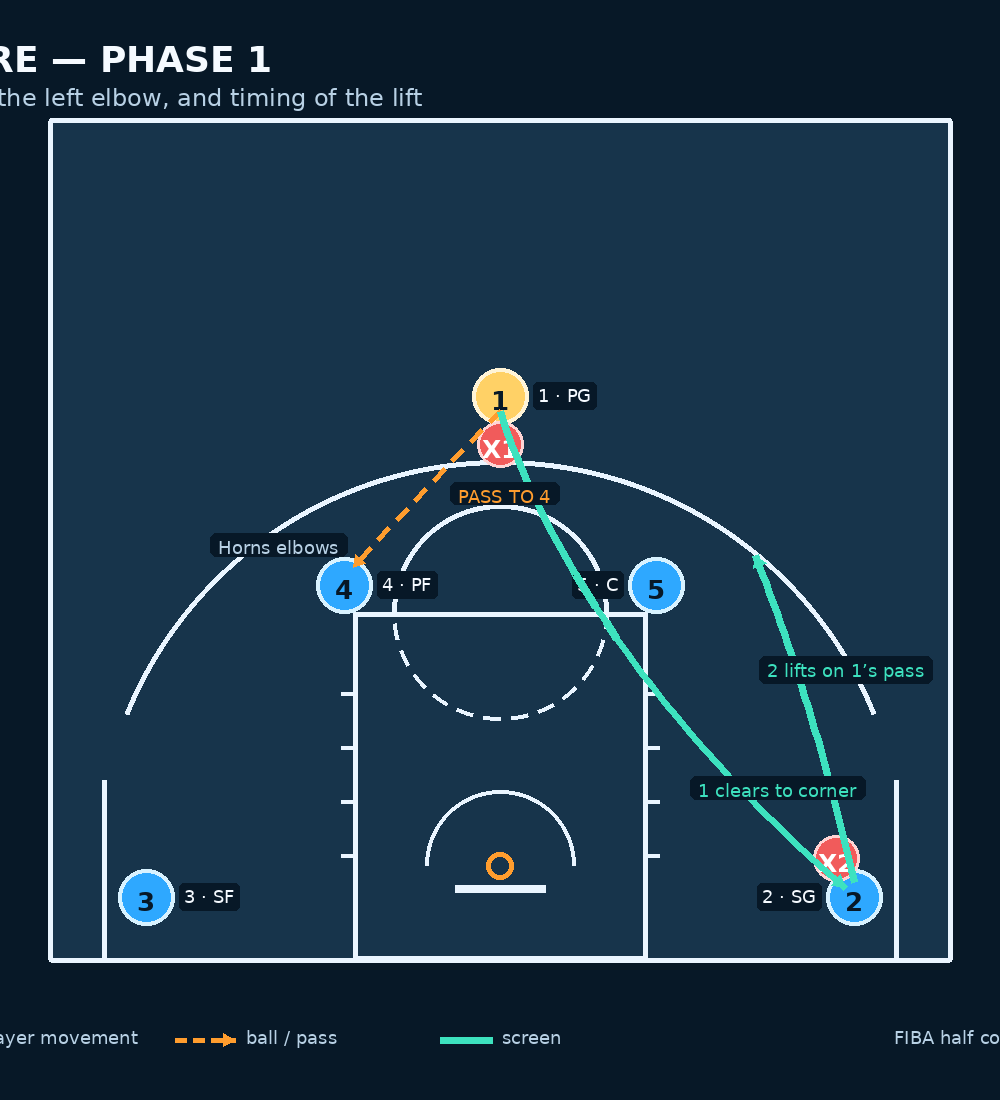
Call and align. Call “Horns Flare.” Players sprint to their landmarks; do not let the alignment become a casual walk-in. 1 gives 4 a hand target and passes from the centre lane line to 4’s outside hand at the left elbow. The pass should arrive with enough pace that 4 can catch on a two-foot jump stop.
Clear and lift together. On the flight of 1’s pass, 1 sprints through to the right corner and turns to face the ball. At that same instant, 2 lifts from the right corner toward the right slot, initially moving straight up the sideline. This simultaneous action pulls X1 away from the top and prevents X2 from simply sitting on the flare route. 3 stays deep in the left corner; one metre of extra width is better than drifting toward the lane.
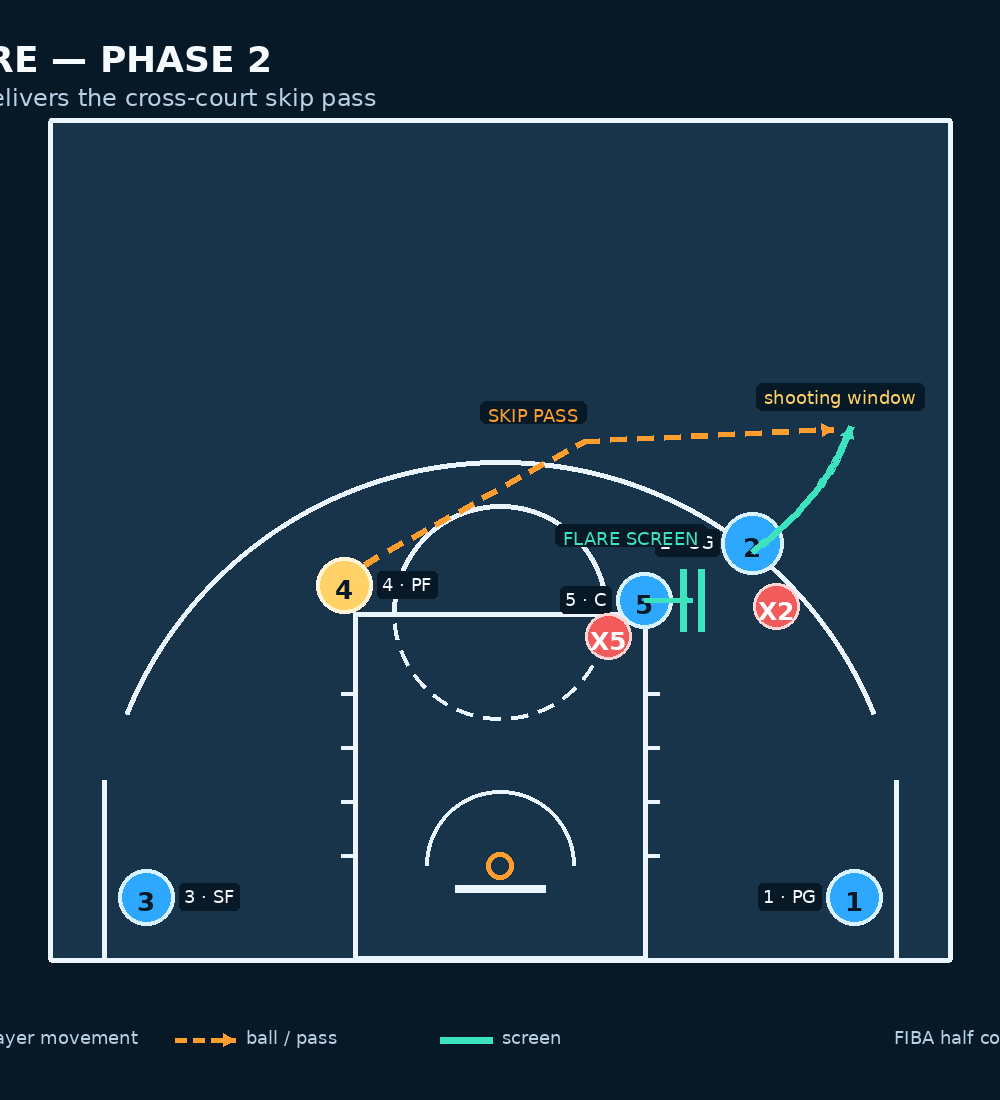
Set the flare. As 2 reaches the right slot, 5 steps up and turns to present a shoulder-width, stationary flare screen on X2’s path. Teach 5 to arrive early, be still before contact, and show chest to the sideline—not the back. 2 sets up the defender with two steps toward the lane, then changes speed and runs shoulder-to-shoulder over 5’s outside hip. 4 must keep the ball high, chin it, and read the defender rather than predetermine the pass.
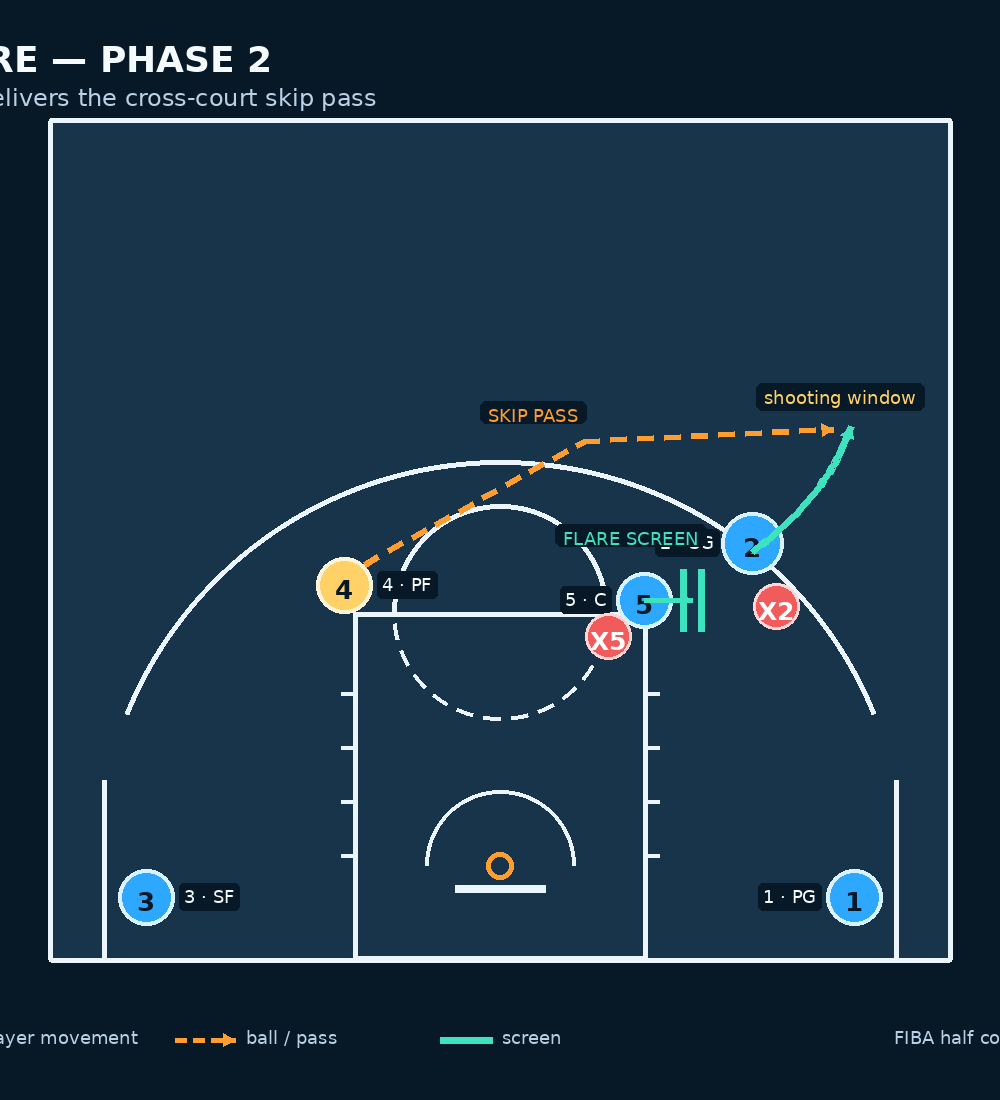
Throw the skip to shooting space. When 2 clears 5’s screen, 4 fires a two-hand or one-hand skip pass to the top-right slot, approximately 0.5–1 m behind the three-point line. The pass travels ahead of 2’s chest, never behind the cutter. 2 catches with knees loaded, inside foot slightly forward, and eyes on the rim. The target window is short: ideally, the ball arrives as 2’s second foot finds the floor.
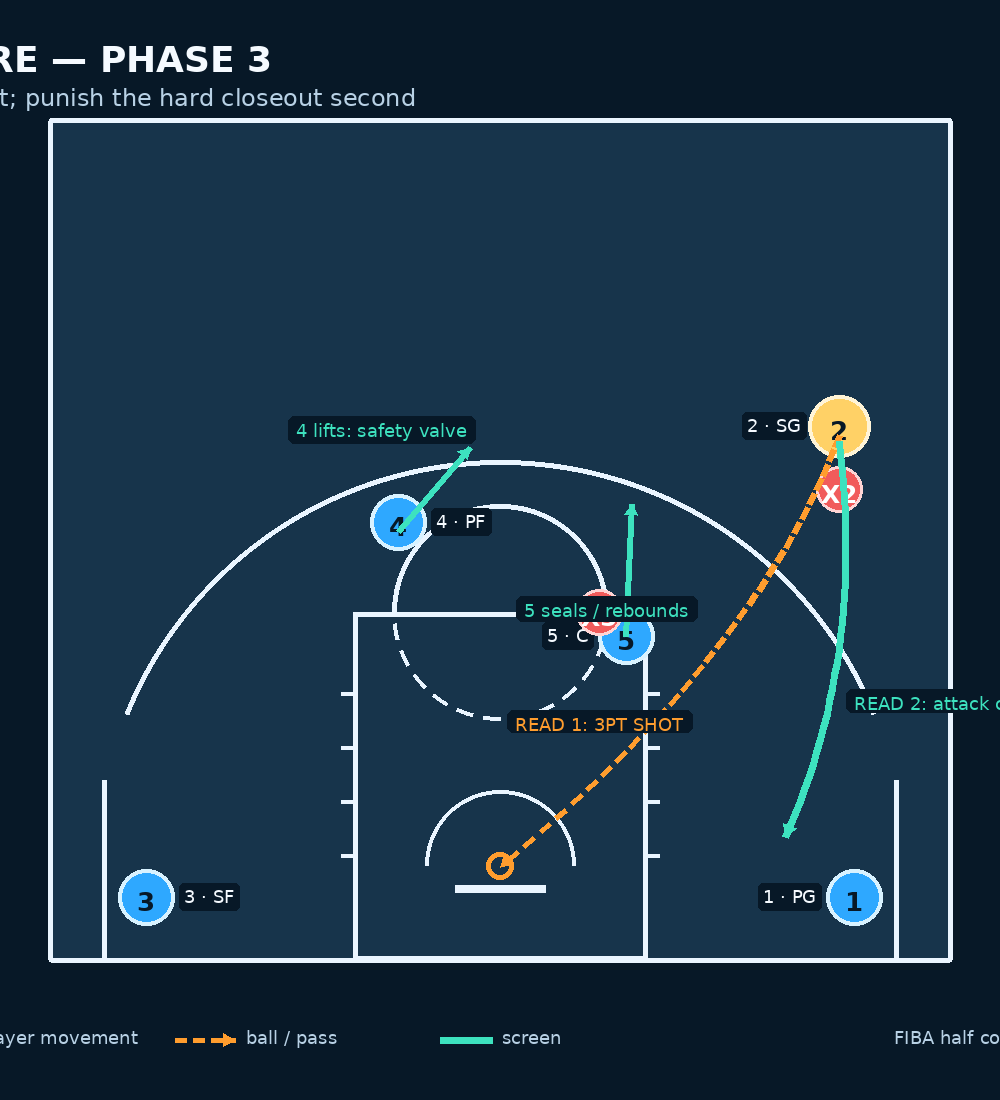
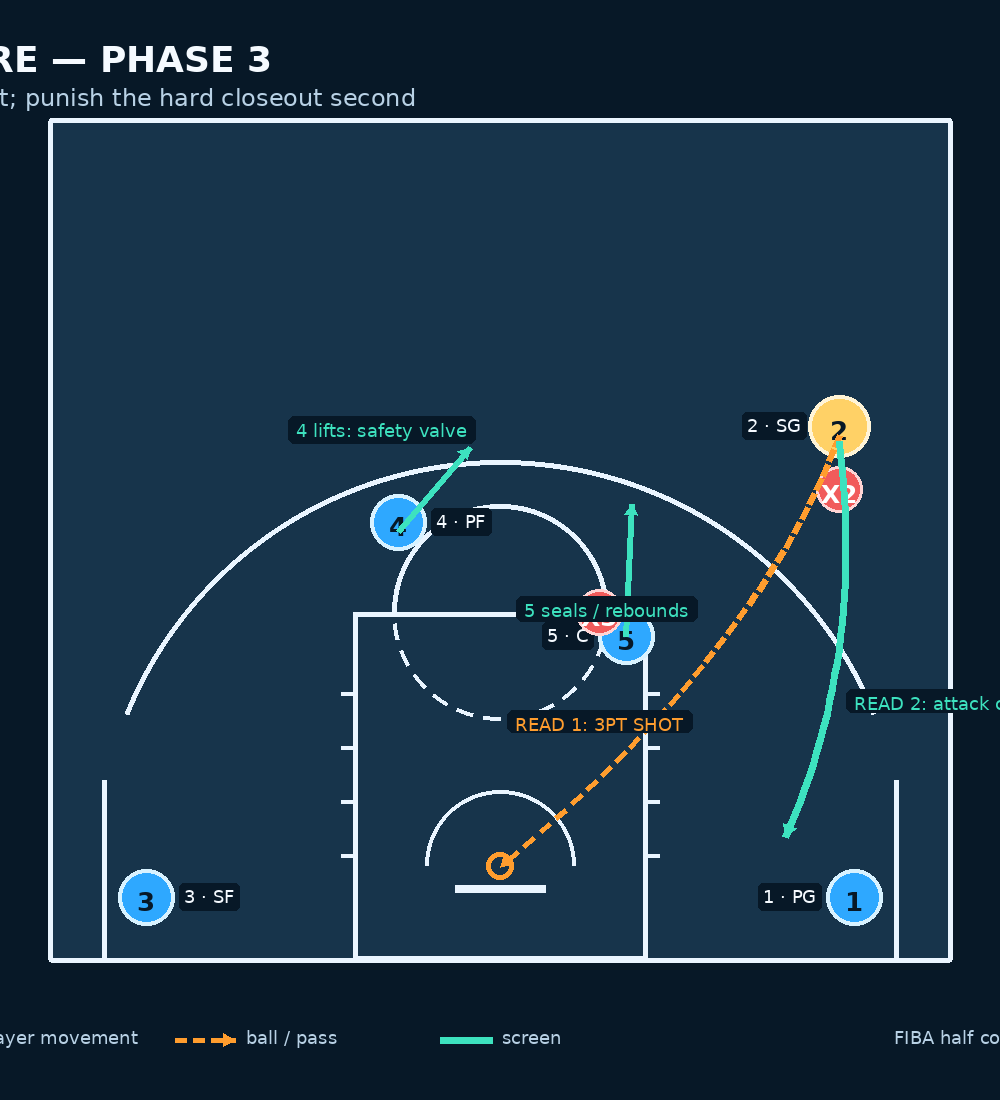
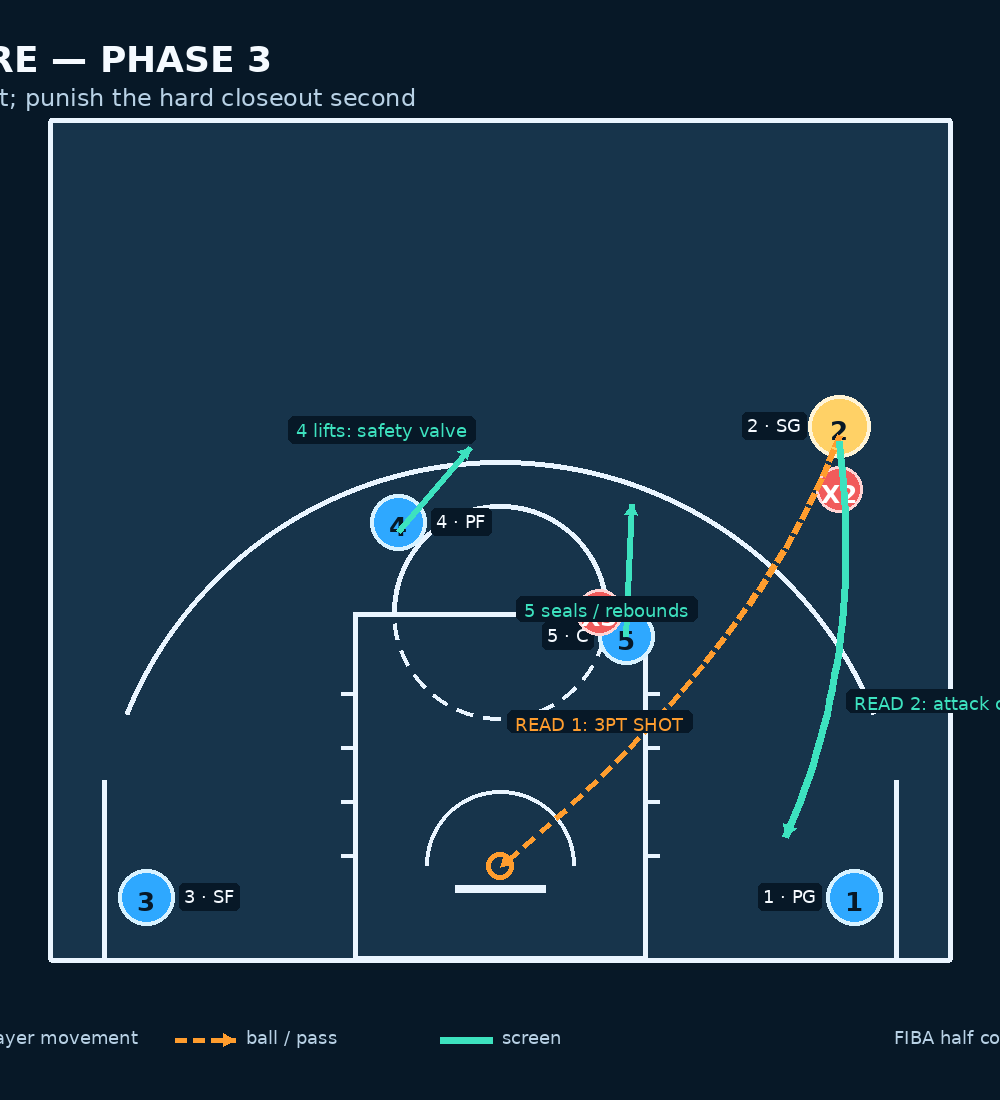
Finish the primary read. If X2 is screened, late, or under the flare, 2 rises immediately for the three. Require 5 to pivot from the screen into a seal on X5 and then pursue the offensive glass. 4 lifts slightly toward the top as a safety valve, 3 remains spaced for a long rebound or reversal, and 1 holds the right corner until the shot is released. This balance gives the shooting team a clean floor behind the ball and two rebounders around the paint.
Punish pressure without losing structure. If X2 runs 2 off the line, 2 attacks the closeout downhill toward the right slot or middle, keeping the dribble away from the sideline. 5 re-screens only if needed; otherwise, 5 rolls or seals the switching defender. 4 lifts behind the ball for the return pass. If X5 jumps out to deny the flare, 4 can hit 5 slipping to the rim before the switch is set.
Key Coaching Points
- Make the entry a trigger, not a pause. The clear and lift begin as the ball leaves 1’s hands. A late lift lets X2 chase in a straight line and eliminates the flare advantage.
- Screen angle decides the shot quality. 5 should screen the defender’s route to the slot, not the shooter’s destination. Place the screen roughly a forearm’s distance outside the right elbow; too low produces a mid-range catch, while too high exposes the pass.
- Demand legal screen discipline. 5 must be stopped, balanced, and vertical before X2 arrives. Coaches should blow the whistle for moving screens in teaching reps; it protects the set when pressure rises.
- Teach 2 to arrive on balance. The shooter needs a change of pace before the screen, a tight shoulder brush, and a compact catch. No extra dip, no side fade, and no dribble unless the closeout creates it.
- Coach 4 as the quarterback. 4 reads in this order: open flare three, hard-closeout drive, 5 slip, then reversal to 3. The best pass is early and on the shooter’s line.
- Build shot accountability. On the release, 5 attacks the front of the rim, 4 follows the shot from the elbow, and 3 protects the weak-side long rebound. 1 and 2 communicate transition balance.
Common Mistakes
| Mistake | What it looks like | Immediate correction |
|---|---|---|
| Slow corner lift | 2 arrives as 5 is already screening. | Start 2’s lift on the entry pass; use a verbal “ball in air” cue. |
| Screen is too low or moving | The catch is inside the arc or an offensive foul is called. | Re-mark 5’s spot just above the elbow and insist on a jump stop. |
| Skip pass thrown behind 2 | The shooter drifts sideways, allowing X2 to recover. | 4 passes to space in front of the flare, at chest height. |
| 1 lingers at the top | X1 clogs the skip-pass lane. | Make 1 sprint through the right slot to the corner every rep. |
| Weak-side drift | 3’s defender can help into the lane. | Put a cone in the left corner and require 3 to keep two feet outside it. |
Variations & Progressions
Variation 1 — Slip versus switching. Call “Flare Slip.” As 2 starts the lift, 5 shows the screen but immediately opens to the rim. If the defence switches early, 4 feeds 5 for a lay-up or high-low touch. Keep 2 lifting to hold X2 wide.
Variation 2 — Reject into dribble handoff. If teams shoot the gap and deny the flare, 2 rejects 5’s screen, plants toward the sideline, and receives a dribble handoff from 4. 5 then follows into a ball screen for 2. This is the natural second action, not a new set.
Progression — Add live decision rules. Begin 5-on-0 until spacing is automatic. Move to guided 5-on-5 with X2 chasing over, under, or switching on the coach’s call. Finish live: the offence has 8 seconds to score, but only earns a point for a three, a paint touch after a closeout, or a 5 slip. That scoring system rewards the correct read rather than a memorised route.
Age Adaptations
For Under-10, remove the skip pass. Use the same spacing with 4 passing to 2 at the right wing after 5’s stationary screen; use tape spots and prioritise safe stops. For Under-12, retain the flare but shorten the catch distance and allow 4 one settling dribble. For Under-14, use the full sequence with live X2 and clear screening rules. For Under-16 and open teams, add switch/slip, handoff rejection, and game-clock constraints. At every age, retain wide corners, timed lift, a legal screen, prepared catch, and two rebounders.

