Blindside Strike: 8-9-6 Scrum Attack
Exploit the narrow channel with this aggressive blindside scrum play, utilizing your No.8, Scrum-half, and Blindside Flanker to overload the defense and create line breaks.

Equipment Needed
1. Overview
The Blindside Strike (8-9-6) is a highly effective set-piece attack launched from a scrum positioned toward the middle or openside of the pitch. By attacking the narrow 'blindside' channel, you force the defending scrum-half and back row to make split-second decisions under extreme pressure.
This play is designed to isolate the defending blindside flanker and winger. It utilizes a strong pick-and-go threat from the Number 8 to draw defenders, followed by a rapid pass from the Scrum-half (9) to the Blindside Flanker (6) running a hard, aggressive line into the space created.
When to use it:
- When the opposition scrum-half is defending on the openside or is slow to track around the base.
- When the opposition blindside winger is defending too deep or too wide.
- Inside the attacking 22m area to punch over the gain line.
2. Setup
Equipment Needed:
- Full contact gear (mouthguards, headgear if preferred)
- 1 Rugby ball
- Cones to mark the scrum mark and the blindside zone
Pitch Setup:
- Set the scrum mark approximately 15-20 meters from the touchline, creating a defined blindside channel.
- Ensure there is at least 30 meters of attacking depth to run the play at full speed.
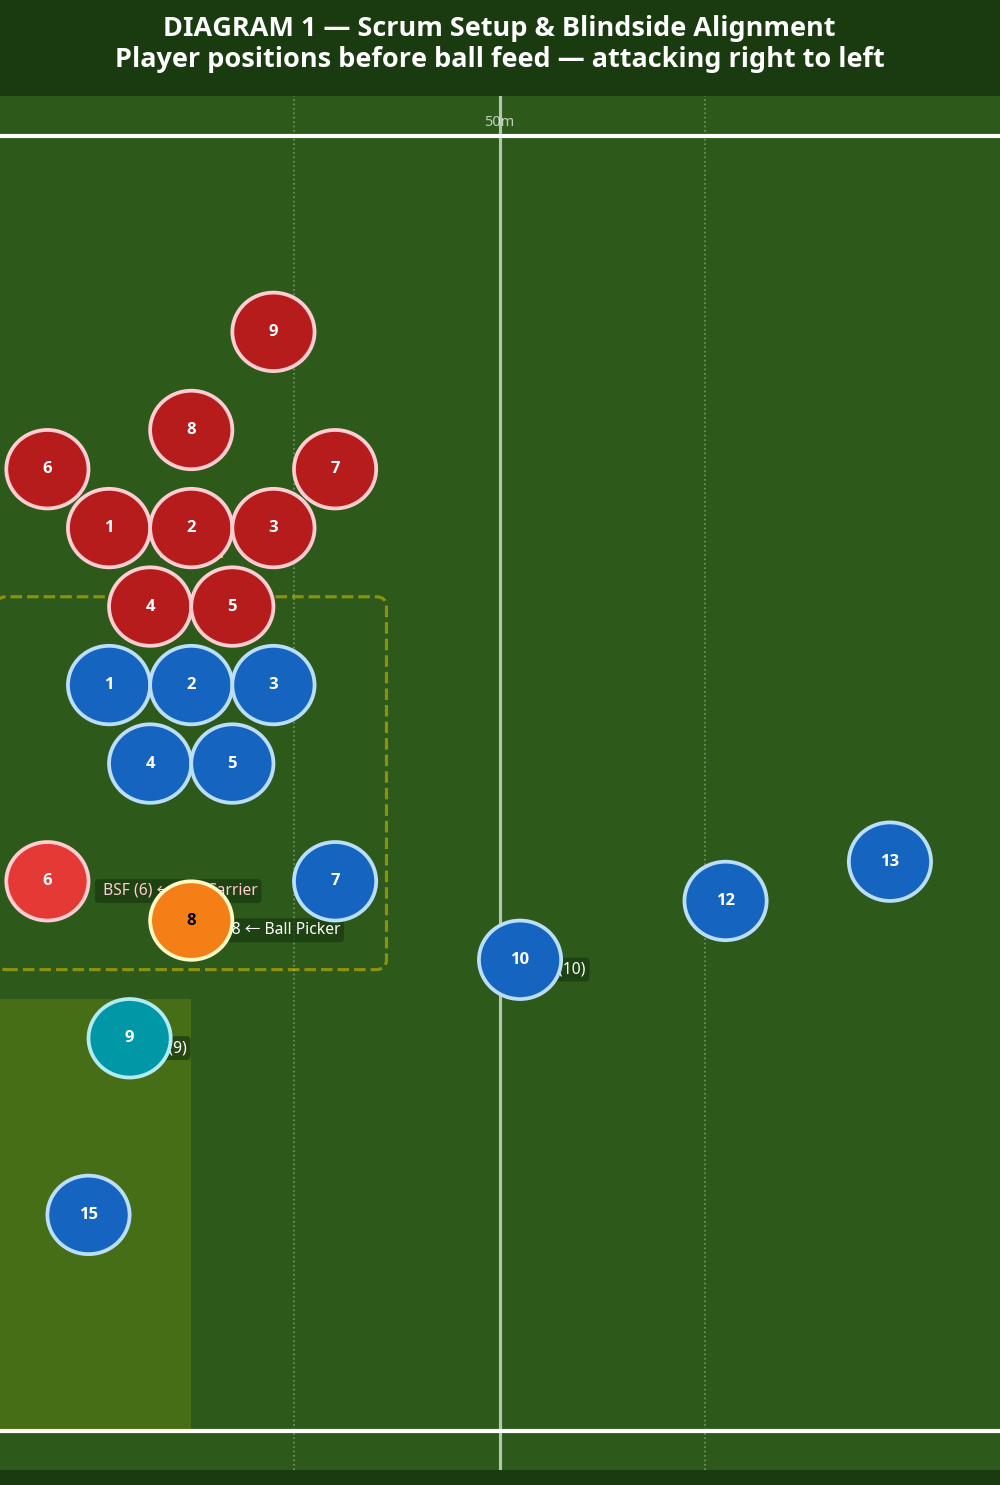
Player Positions:
- Forwards (1-8): Standard scrum formation. The Blindside Flanker (6) must be prepared to detach rapidly.
- Scrum-half (9): Positioned at the base of the scrum, ready to clear the ball.
- Openside Backs (10, 12, 13): Hold their width and depth on the openside to freeze the defense and act as decoys.
- Blindside Winger (11) & Fullback (15): Positioned to support the blindside strike.
3. Step-by-Step Instructions
- The Engagement & Feed: The scrum engages and the Scrum-half feeds the ball. The pack must provide a stable platform and channel the ball cleanly to the Number 8's feet.
- The Pick-up: The Number 8 unbinds and picks the ball up, taking one strong, explosive step directly toward the opposition scrum-half or blindside flanker to commit them.
- The Delivery: The Scrum-half (9) tracks the Number 8. As the defense commits to the Number 8, the 8 delivers a short, soft pop pass or the 9 clears it immediately to the Blindside Flanker (6).
- The Strike Line: The Blindside Flanker (6) detaches from the scrum exactly as the ball reaches the Number 8. They run a hard, aggressive, slightly outward-angled line to receive the pass at pace, aiming for the seam between the defending scrum and the winger.
- Support Runners:
- The Fullback (15) tracks behind the 6, offering an inside offload option.
- The Blindside Winger (11) holds their width, offering an outside pass option if the defending winger bites in on the 6.

4. Key Coaching Points
- Scrum Stability First: The play will fail if the scrum is moving backward. The tight five must lock out and provide a clean channel.
- Timing of the Detach: The Blindside Flanker (6) must not detach early (which is a penalty). They must time their release exactly as the ball is secured at the back of the scrum.
- Commit the Defense: The Number 8 must look like a genuine carrying threat. Their initial step must be aggressive to draw the defending 9 and 6.
- Depth and Pace: The 6 must come from depth and hit the ball at full pace. Catching the ball while standing still makes them an easy target.
5. Common Mistakes
- Early Detachment: The 6 breaks their bind before the ball is out, resulting in a penalty.
- Drifting Sideways: The 6 runs laterally across the pitch rather than attacking the gain line vertically, allowing the defense to slide and cover.
- Poor Communication: The 8 and 9 miscommunicate the pickup, leading to a fumble at the base of the scrum.
- Lack of Decoys: The openside backs (10, 12, 13) stand flat-footed, allowing the defense to read the play early and fold across to the blindside.
6. Variations & Progressions
- Progression 1: The 8-9-11 Wrap: If the defending winger reads the 6, the 6 acts as a decoy and the 9 throws a longer cutout pass directly to the Blindside Winger (11) hugging the touchline.
- Progression 2: The Inside Switch: The 6 receives the ball but immediately plays a short inside pop pass to the Fullback (15) cutting against the grain.
- Variation: The 8 Pick-and-Go: If the defense over-commits to the blindside runners, the Number 8 fakes the pass and carries hard around the base themselves.
7. Age Adaptations
- Under 10s / Under 12s: Focus heavily on the basic 8-9 connection and the 8 picking up safely. Introduce the 6 running a simple line without complex decoys.
- Under 14s: Introduce the timing of the 6's detachment and emphasize hitting the line at pace.
- Under 16s / Open: Implement the full play with all decoy runners and support options (15 and 11). Focus on the decision-making of the 8 and 9 based on how the defense reacts.