Cricket
Foundation First: Batting Stance and Footwork Drop-Feed Drill
A progressive, coach-led drop-feed practice that builds a stable batting base, decisive front- and back-foot movement, and repeatable contact under the eyes.
What you need
Bat, Helmet, Batting pads, Batting gloves, 8-12 practice balls, Stumps, 6 cones, Measuring tape
1. Overview
A batter cannot play straight, leave well, or access scoring areas consistently until their base is reliable. This Batting Stance and Footwork Drop-Feed Drill isolates posture at set-up, a compact trigger, a purposeful first step, and a balanced finish. Controlled feeds remove the fear and timing pressure of live bowling, so you can coach one movement pattern at a time before returning the player to a realistic release.
Use the drill at the start of a batting session, during a technical reset after repeated mis-hits, or as a station in a net circuit. It is particularly useful for players who fall across the crease, reach with the hands, or commit the front foot too early. The objective is not to create a rigid batting style; it is to give each player a repeatable, balanced base from which to make better decisions.
2. Setup
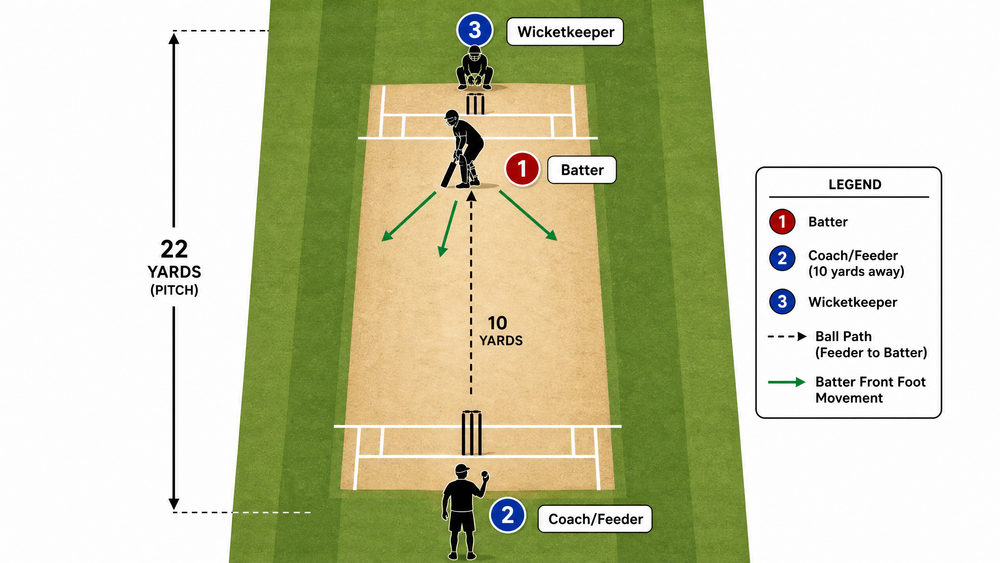
Run the activity on a marked practice strip or on the square of an oval ground. For adult cricket, the pitch is 22 yards (20.12 m) long and 10 ft (3.05 m) wide; junior pitch lengths may be varied by the local governing body.[1] Place stumps at the striker's end and, where possible, a second set at the bowler's end. Mark a straight V between mid-off and mid-on with two cones 10 m in front of the striker. This gives players a safe, purposeful target rather than inviting a loose swing toward the whole oval.
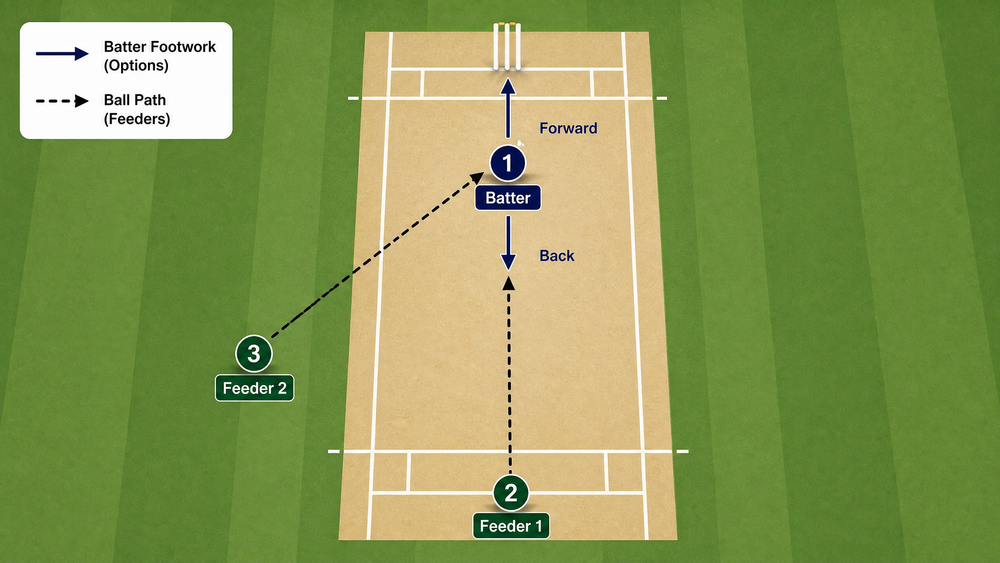
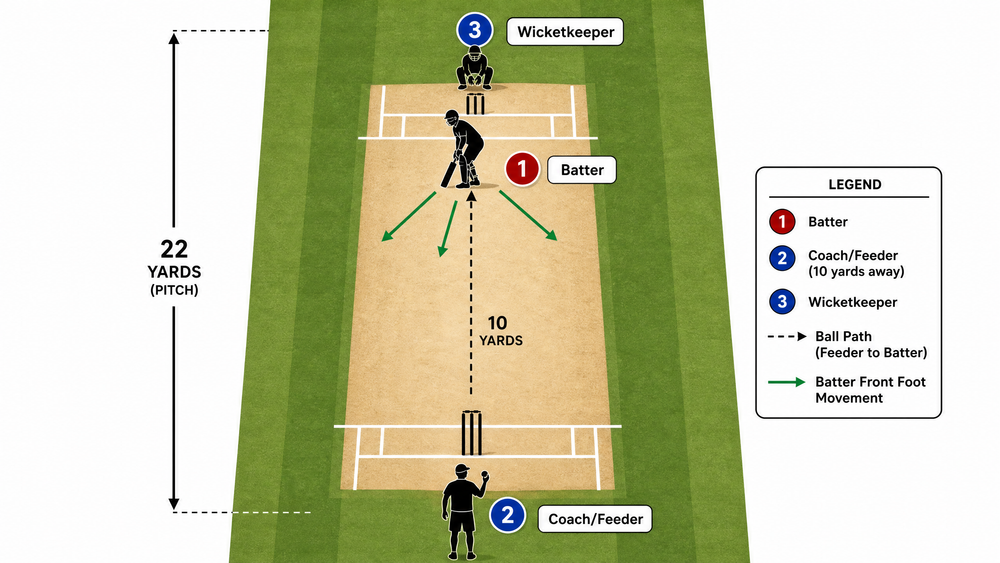
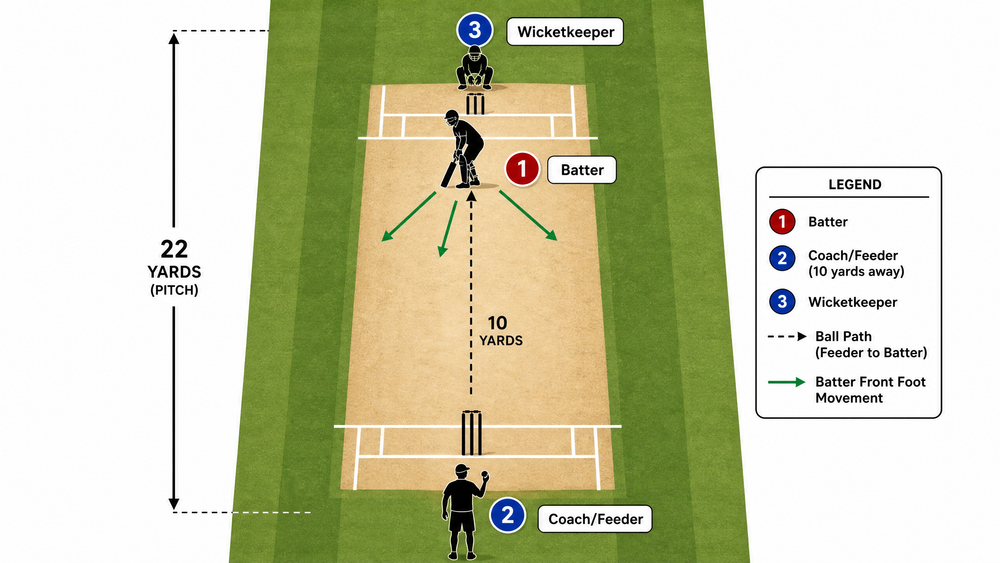
Set Player 1 — Striker/Batter at the popping crease in protection appropriate to the ball. Set Player 2 — Coach/Feeder 10 yards (9.1 m) down the pitch, in a 3 m x 3 m feeder box. Set Player 3 — Wicketkeeper/Collector 3-5 m behind the striker's stumps, outside the striking arc. On a busy ground, mark a 10 m retrieval corridor beyond the target cones and keep waiting players on the leg-side boundary of the practice area.
| Item | Quantity | Coaching use |
|---|---|---|
| Bat, helmet, pads and gloves | 1 set per striker | Match protection to ball type; hard-ball work requires a helmet. |
| Practice balls | 8-12 | Start with tennis balls; use incrediballs or regulation balls as skill improves. |
| Stumps and cones | 1 set plus 6 cones | Defines the striker's crease, feeder box and straight V. |
| Timing | 18 minutes | Three-minute demonstration, then three four-minute rotations with reset feedback. |
Position map
In Diagram 1, 1 is the striker, 2 is the coach/feeder, and 3 is the wicketkeeper/collector. The solid arrows show the front-foot stride options; the dashed arrow shows the ball path. The feeder uses underarm feeds or a controlled bounce, never a pace that forces the batter to abandon the technical focus.
3. Step-by-Step Instructions
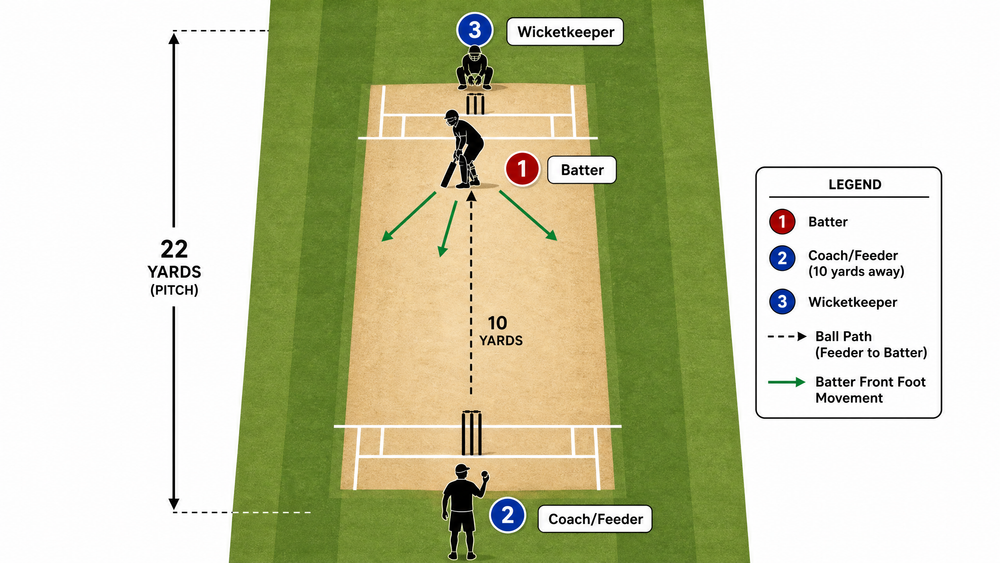
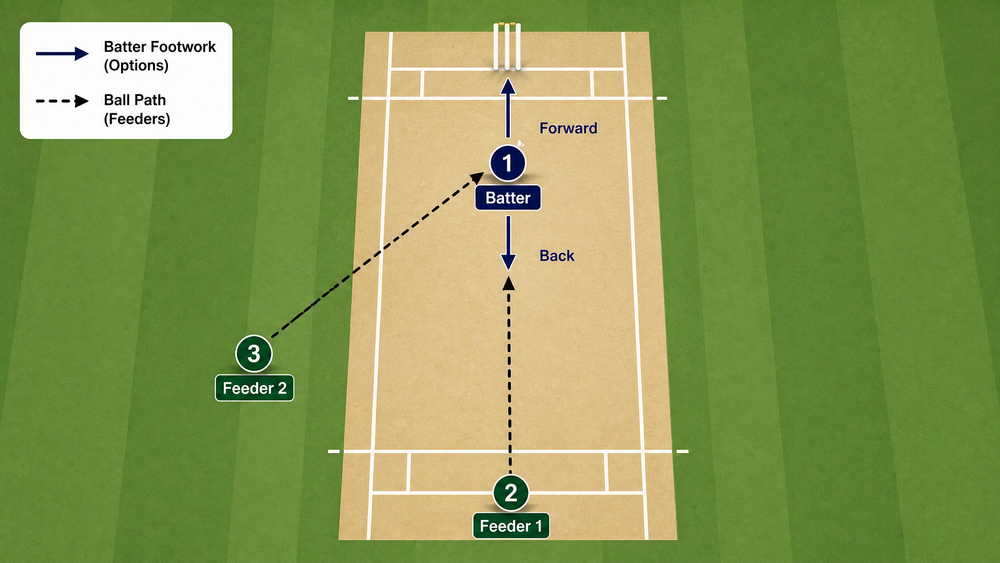
Demonstrate the picture. Show an athletic stance: feet roughly shoulder-width apart, knees soft, head level, hands relaxed, and bat resting behind the back foot. Reverse the picture for a left-hander.
Give one cue. Ask Player 1 to choose a personal cue before each ball: “still head,” “small trigger,” or “head to the ball.” Keep one cue for a whole block so feedback stays precise.
Feed the front-foot zone. Player 2 provides six gentle underarm feeds, dropping or bouncing the ball to arrive as a half-volley around middle-and-off. It should arrive 0.5-1.0 m in front of the popping crease.
Trigger after release. On release, the batter makes a compact transfer—usually a small press back-and-across or forward press—then remains balanced. The feet must not leave together and the front foot must not be planted before the feed is visible.
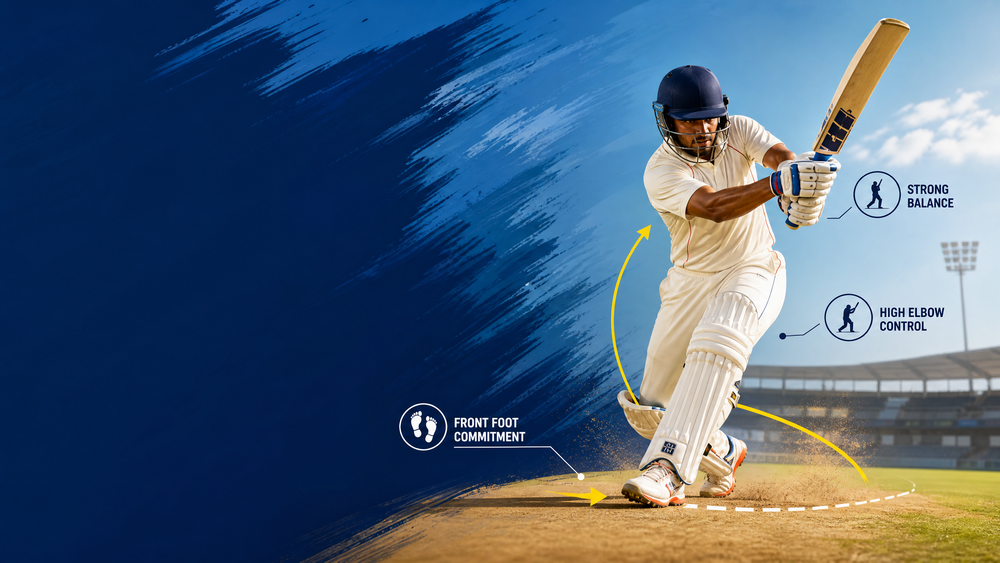
Stride to the line. The front foot moves toward the ball rather than across it. For a straight-drive line, place the front toe roughly toward mid-off/extra cover; maintain enough flex in the front knee for the head to travel above it.
Play under the eyes. The hands bring the bat down straight with the leading elbow high enough to keep the blade on line. Contact occurs beneath the eyes, with weight finishing over the front leg and the ball directed through the cone V.
Hold, assess, reset. Require a two-second hold after each contact. Check whether the batter could remain in the shot without falling sideways. Give one concise correction, then reset the stance. Rotate after six balls: striker to collector, collector to feeder, feeder to striker.
Add the back-foot response. In the final block, call “front” or “back” just before release. For “back,” feed a ball that bounces 1.5-2.0 m from the striker. The batter transfers back-and-across, keeps their head inside the line, and defends or punches into the V.
4. Key Coaching Points
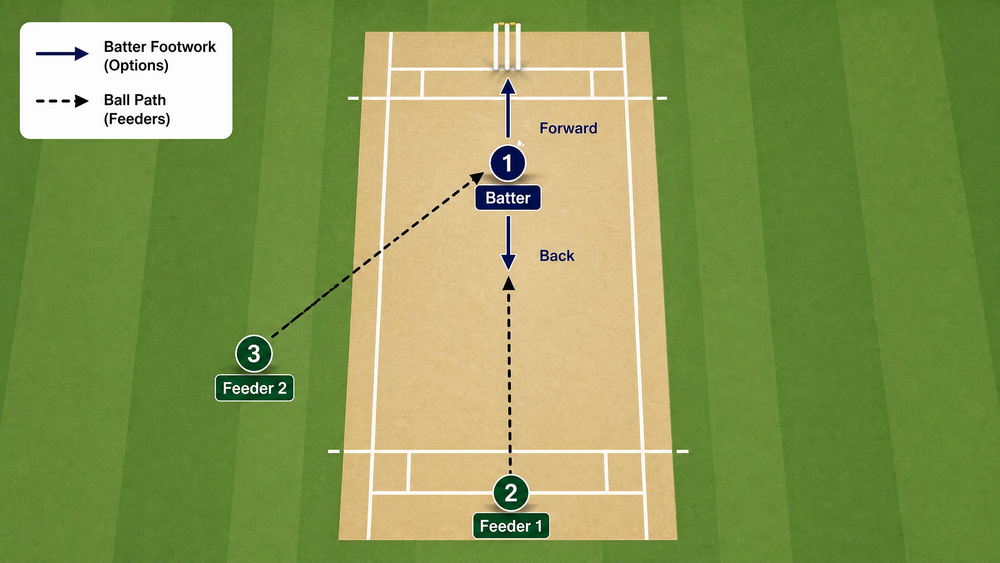
- Build a mobile stance. The player needs soft knees, level eyes, and enough space between the feet for a first step either way.
- Move head and shoulder first. The head and front shoulder initiate the movement; the foot supports that body position. This prevents a reach-and-lunge.
- Stride along the ball's line. A foot landing beside the ball keeps hip and bat path open; an across-the-line step narrows the swing arc.
- Finish over the ball. For a front-foot shot, the nose should be broadly above the front knee, with the back heel naturally light.
- Use the full face. Encourage soft hands and grounded contact in the first block. A hard swing can disguise poor feet.
- Coach the reset. Improvement comes when every repetition begins from a deliberate, consistent stance.
5. Common Mistakes
| Error to spot | Likely cause | Practical correction |
|---|---|---|
| Front foot plants before release | Batter is guessing or rushing. | Pause the feeder's hand at set-up; trigger only after release. |
| Batter falls to off side | Head has moved away from the line. | Place a cone outside the front knee and ask the player to bring the nose toward it at contact. |
| Hands reach while feet stay still | Batter is trying to hit from the crease. | Reduce feed distance and require one visible first step before every front-foot contact. |
| Front knee locks or collapses | Poor athletic base or over-stride. | Shorten the stride by one shoe length and rehearse a soft front knee without a ball. |
| Bat swings across the line | Elbow drops and body opens early. | Score only grounded contacts through the straight V. |
6. Variations & Progressions
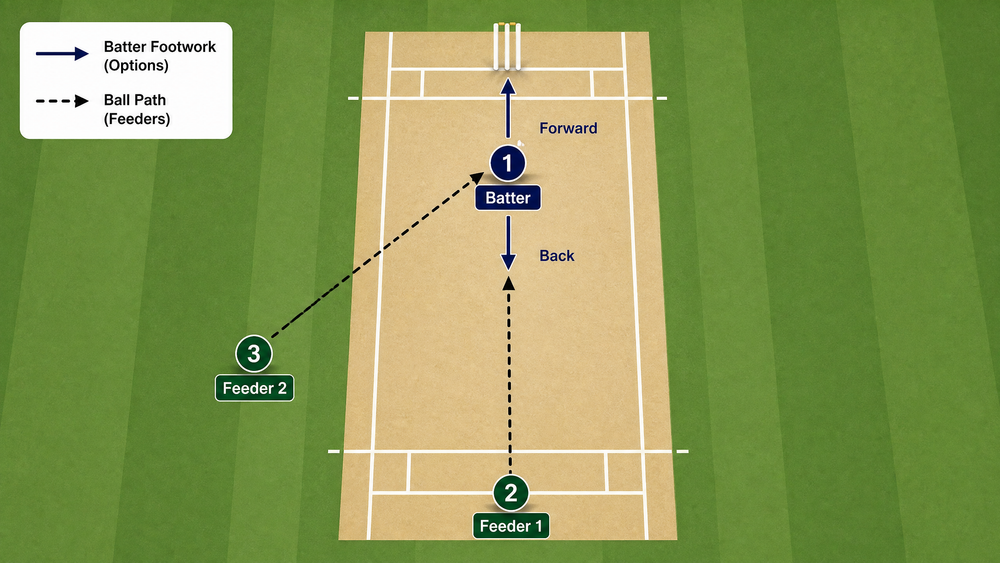
1. Make it easier — cone-gated shadow-to-feed. Begin without a ball. Set two flat cones one bat-width apart on the intended front-foot line. The batter shadows six strides through the gate, then receives six tennis-ball feeds. This gives younger players direction before they are asked to strike.
2. Make it harder — two-feeder recognition. Add a second feeder on the off-side. Player 2 supplies straight/full feeds; Player 3 feeds an off-side half-volley from 8-10 m away. The batter reads which feeder releases, selects the correct foot angle, and holds balance. Keep feeds at 70% intensity until the player completes eight grounded contacts from 12.
3. Make it game-real — live overarm challenge. Move the feeder to 14-16 yards and use gentle overarm throws. Award one point for a grounded ball through the correct target zone, one bonus point for holding balance for two seconds, and remove a point for premeditated foot movement. Finish with a six-ball over varying full, good-length and short feeds.
7. Age Adaptations
For Under 8s, use a plastic bat and tennis ball over a shortened 10-14 yard strip. Coach only stance, level eyes, and a positive step; celebrate contact rather than diagnosing elbow height. For Under 10s, retain tennis or soft-core balls and add the cone gate, aiming for four grounded contacts from six.
For Under 12s and Under 14s, use incrediballs or soft-core cricket balls on a suitable junior pitch. Introduce the “front or back” call and expect independent resets. For Under 16s and Open players, use regulation balls with full protection, a 22-yard pitch where appropriate, and the two-feeder or live-overarm progression. Demand a clear decision, balanced finish, and named scoring target on every ball.
Coach's close-out
Bring the group together for 60 seconds. Ask each batter to name the cue that made their best contact repeatable, then ask the feeder what they observed about head position and first-step timing. This brief reflection turns a mechanical drill into a player-owned habit and gives you a clear focus for the next net block.
References